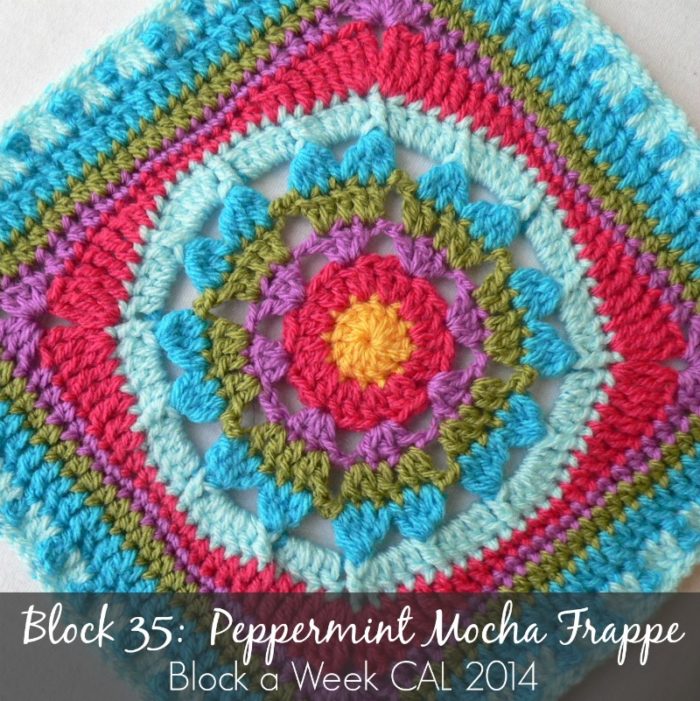
Block 35 of the Block a Week CAL (hosted by Kimberly Slifer) is SmoothFox’s Peppermint Mocha Frappe Square. SmoothFox is Donna Mason-Svara, in case you didn’t know :)
If you are using the same hook and yarn for all your squares, they will not all come out the same size. I have now added a post outlining the extra rounds I added to each square to get them to the size of Block 1, which was the biggest. You can find that here.
Peppermint Mocha Frappe Crochet Square
{Pattern © 2013 Donna Mason-Svara. Version 05/21/2013. Photo tutorial done with kind permission}
Pattern
Available as a Free Ravelry Download.
Suggested Materials
- 5.5 mm Clover Amour Crochet Hook (US I/9 UK 5)
- Worsted weight yarn
Size
- Using the hook and yarn specified, your square should be a nice even 12″ when you are done.
- Using a 4 mm crochet hook (US G/6 UK 8) and double knit yarn, as I have done, your finished square will be about 8.5″ big.
Video Tutorial
This week we get a bonus video tut of the whole square! You can find Donna’s brilliant video tutorial HERE.
My Yarn and Colour Choices
I am using Stylecraft Special DK.
- Saffron (Round 1)
- Pomegranate (Rounds 2 and 7)
- Magenta (Rounds 3 and 8)
- Meadow (Rounds 4 and 9)
- Turquoise (Rounds 5 and 10)
- Sherbet (Rounds 6, 11, and Optional 12)
Notes
- US Crochet Terminology used. (See this comparative chart if you need help transcribing from US to UK)
Special Stitches
- Ch-5 Picot – Ch 5, sl st in the top of the dc at the base of the ch-5
- Dc4tog – this pattern uses a modified dc4tog. You will be making 4 partial dc’s over 3 st’s before completing them all on the last yarn-over. This will be explained in detail when we get to it :)
- Fpdc – Front post dc
Peppermint Mocha Frappe Square Photo Tutorial
This photo-walkthrough is NOT the actual pattern and should not be used instead of the pattern, but rather in conjunction with it.
Thank you very much to Donna for giving us permission to do this photo-tutorial for her square. And a special thank you to Kimberly Slifer for letting me do these tutorials and for obtaining the necessary permission.
Round 1
You can start this round with a magic ring instead of the initial ch-4 ring.
Magic Ring Instructions for Round 1
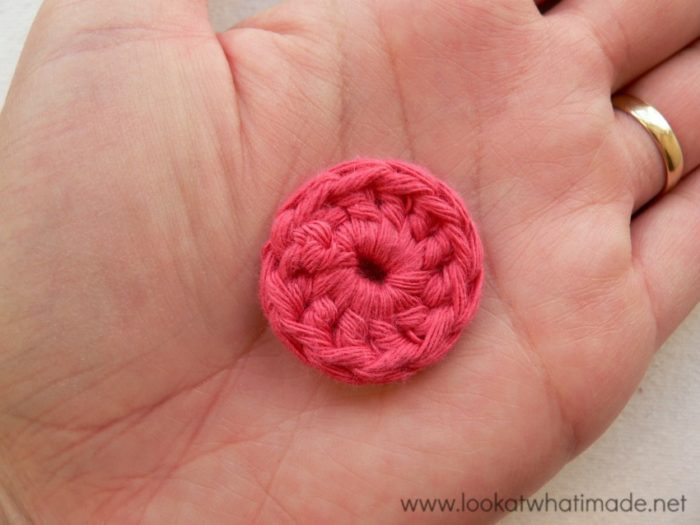
Into a magic ring: ch 3 (this counts as your first dc). Dc x 11 into the ring and pull the ring tight. Join to the top of the first dc with a sl st.
If you feel like practising the invisible join, feel free to use it instead of the sl st join. Make sure that you understand which stitch to join to if you do use it!
If you are not familiar with working into a magic ring, this video tutorial from Moogly is clear and easy to follow.
Please remember, when working into a magic ring you HAVE to work away your initial tail very well. If you just cut it, your whole square might unravel!
Stitch count: 12 dc’s
Round 2
- If you are using the same colour, ch 3 (this counts as your first dc). Dc in the same st.
- If you are using a new colour, join your yarn by making a standing double crochet in any st around. Dc in the same st.
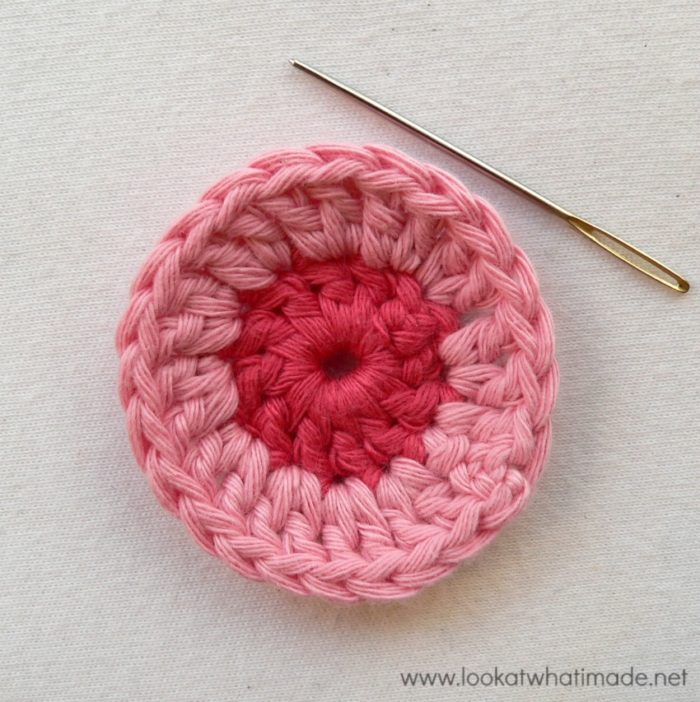
Make 2 dc’s in each of the remaining 11 st’s around. Join to the top of the beginning ch-3 (or the standing double crochet) with a sl st or use the invisible join.
Stitch count: 24 dc’s
Round 3
- If you are using the same colour, ch 3 (this counts as your first dc) and make 2 dc’s in the same st.
- If you are using a new colour, join your yarn by making a standing double crochet in any st around. Make 2 dc’s in the same st.
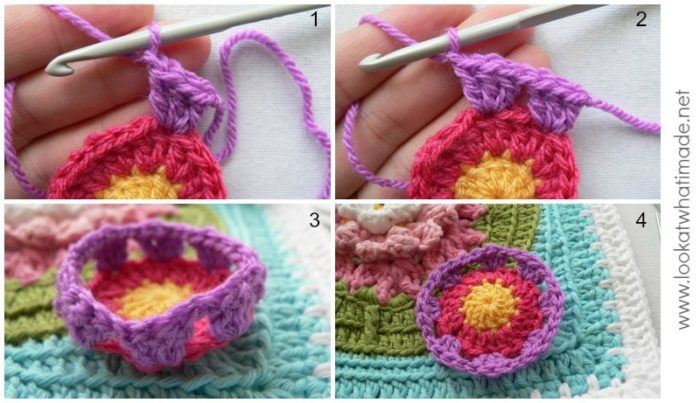
Ch 1 and skip 2 st’s (Photo 1). (Make 3 dc’s in the next st – see Photo 2. Ch 1 and skip 2 st’s) 7 times.
Join to the top of the beginning ch-3 (or the standing double crochet) with a sl st. At the end of this round your work will pull up into a bowl (Photo 3). Don’t worry about it. It will straighten out in the next round.
Stitch count: 24 dc’s and 8 ch-1 spaces
Round 4
- If you are using the same colour, ch 3 (this counts as your first dc) and dc in the same st.
- If you are using a new colour, join your yarn by making a standing double crochet in any st around. Make another dc in the same st.
Dc in the next st. Make 2 dc’s in the next st (Photo 1). Ch 2 (Photo 2) and skip the ch-1 space. (Make 2 dc’s in the next st, dc in the next st, make 2 dc’s in the next st. Ch 2 and skip the next ch-1 space) 7 times.
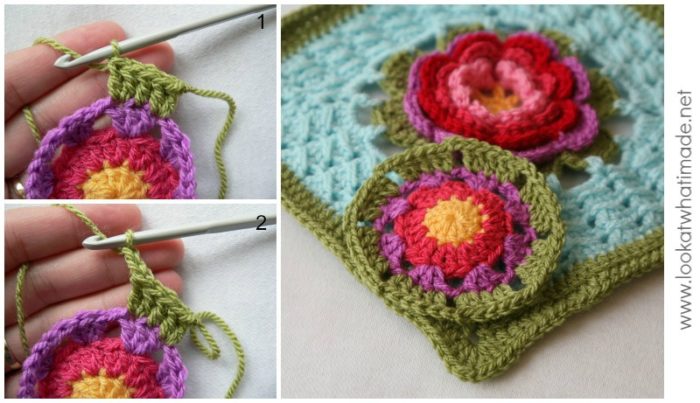
Join to the top of the beginning ch-3 (or the standing double crochet) with a sl st. The square in the background below is Katharine’s Rose (Week 28).
Stitch count: 40 dc’s and 8 ch-2 spaces
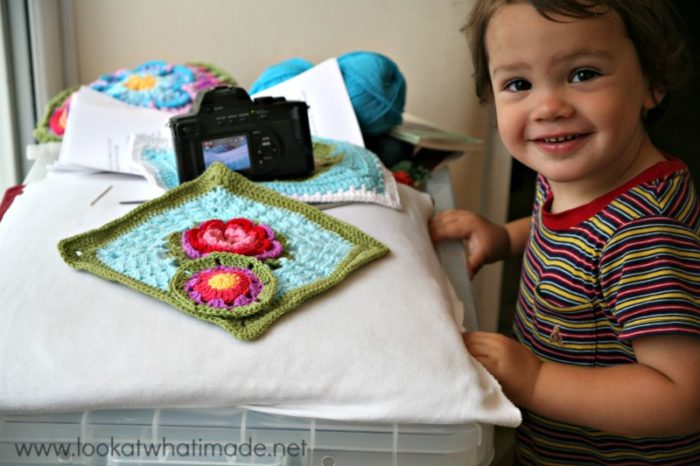
I just had to share these photos with you. This is cheeky preparing to “climb” up to my workspace to see what mom has got on her hook this time…

Triumphant! So, instead of telling him to get down immediately, because he really is getting too heavy for the boxes, I took a few photos.
This one was taken about 3 seconds before he pulled everything you can see (camera included) onto the ground. Luckily, I had the better camera in my hand, right? Don’t worry. Boy, camera, and crochet hook are all unscathed(ish)…
Round 5
Round 5 is a tricky one. Not to do, but to explain. At this point I strongly suggest that you watch the VIDEO TUTORIAL for this square.
At this point each “heart” should have 5 dc’s. You are going to make your first dc4tog over stitches 1, 2, and 3 of the heart. You are going to make your next dc4tog over stitches 3, 4, and 5 of the heart.
“Now hang on a mo! You said dc4tog, but you’ve only mentioned 3 stitches.” These dc4tog’s are special. So grab a cuppa and a quiet spot and let’s begin.
- If you are using the same colour, continue as below.
- If you are using a new colour, join your yarn to the first dc of any 5-dc group with a sl st.
First Heart
First Cluster (Dc4tog over 3 st’s)
Ch 2 (this counts as the first partial dc) – see Photo 1. Yarn over, insert your hook into the SAME st, yarn over and pull up a loop (3 loops on hook). Yarn over and pull through 2 loops (2 loops on hook) – see Photo 2. Yarn over, insert your hook into the NEXT st, yarn over and pull up a loop (4 loops on hook). Yarn over and pull through 2 loops (3 loops on hook) – see Photo 3. Yarn over, insert your hook into the NEXT st, yarn over and pull up a loop (5 loops on hook). Yarn over and pull through 2 loops (4 loops on hook) – see Photo 4. Yarn over and pull through all 4 loops on your hook. This is your first dc4tog over 3 st’s made.
Now ch 3 (Photo 5).
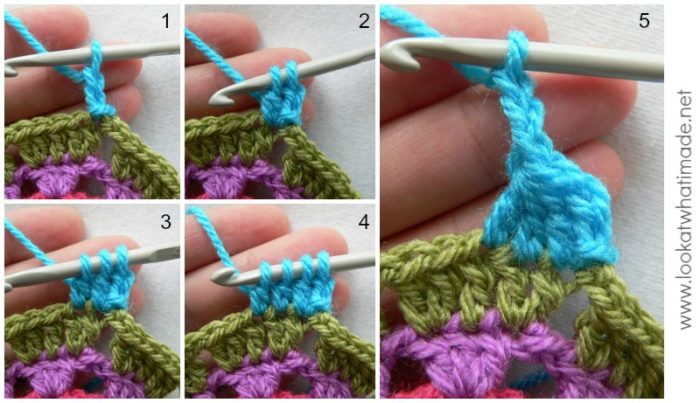
Second Cluster (Dc4tog over 3 st’s)
Yarn over and insert your hook into the SAME st as the last partial dc (so the third st of the 5-dc group). Yarn over and pull up a loop (3 loops on hook). Yarn over and pull through 2 loops (2 loops on hook) – see Photo 1. Yarn over, insert your hook into the NEXT st, yarn over and pull up a loop (4 loops on hook). Yarn over and pull through 2 loops (3 loops on hook) – see Photo 2. Yarn over, insert your hook into the NEXT st, yarn over and pull up a loop (5 loops on hook). Yarn over and pull through 2 loops (4 loops on hook) – see Photo 3. Yarn over, insert your hook into the SAME st (so the fifth st of the 5-dc group), yarn over and pull up a loop (6 loops on hook). Yarn over and pull through 2 loops (5 loops on hook) – see Photo 4. Yarn over and pull through all 5 loops on your hook. This is your second dc4tog over 3 st’s made.
You have now completed your first heart.
Ch 4 and skip the ch-2 space (Photo 5).
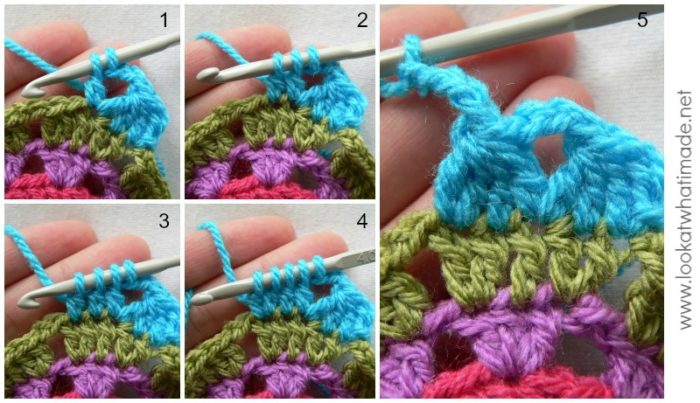
Subsequent Hearts
First Cluster (Dc4tog over 3 st’s)
Yarn over and insert your hook into the first st of the next 5-dc group. Yarn over and pull up a loop (3 loops on hook). Yarn over and pull through 2 loops (2 loops on hook) – see Photo 1. Yarn over, insert your hook into the SAME st (so the first st of the 5-dc group), yarn over and pull up a loop (4 loops on hook). Yarn over and pull through 2 loops (3 loops on hook) – see Photo 2. Yarn over, insert your hook into the NEXT st, yarn over and pull up a loop (5 loops on hook). Yarn over and pull through 2 loops (4 loops on hook) – see Photo 3. Yarn over, insert your hook into the NEXT st (so the third st of the 5-dc group), yarn over and pull up a loop (6 loops on hook). Yarn over and pull through 2 loops (5 loops on hook) – see Photo 4. Yarn over and pull through all 5 loops on your hook. This is your first dc4tog over 3 st’s for the next heart.
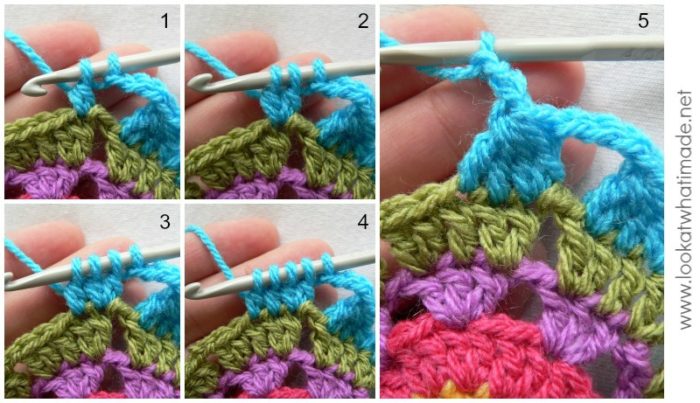
Ch 3 (Photo 5) and complete a Second Cluster as above. Ch 4. You have now completed 2 hearts.
(Dc4tog over the first 3 st’s of the next heart. Ch 3. Dc4tog over st’s 3, 4, and 5 of the same heart. Ch 4) 6 times. Join to the top of the beginning cluster with a sl st. Fasten off and work away your tails of yarn.
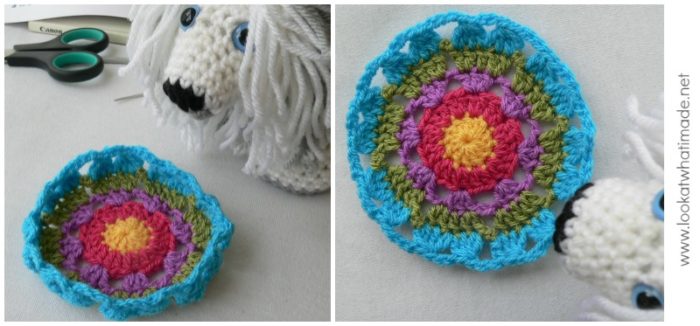
You should now have 8 hearts, each consisting of 2 clusters. At the end of this round your work will once again pull up into a bowl (Photo below left). You can either flatten this now, if it bugs you, or wait for it to correct itself in the next round. The lion watching over my work is from my new book, Amamani Puzzle Balls.
Stitch count: 16 clusters, 8 ch-3 spaces, and 8 ch-4 spaces {8 hearts}
Round 6
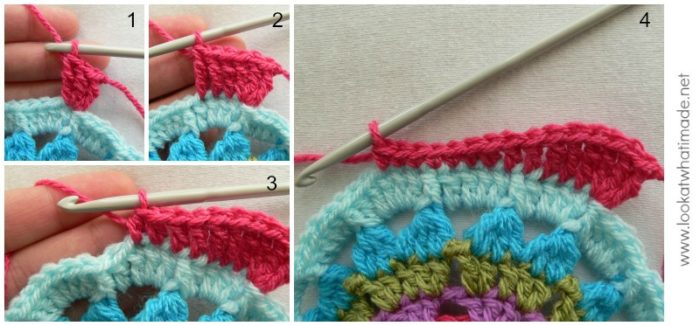
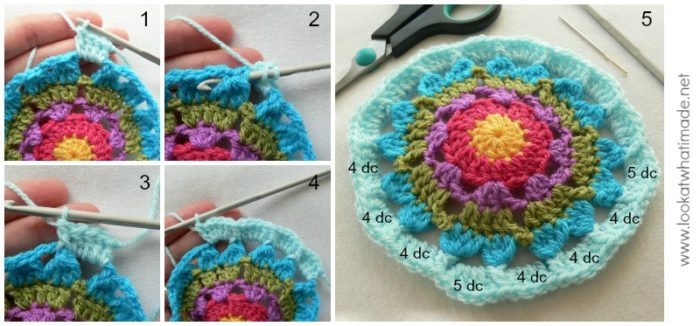
Join your new yarn by making a standing double crochet in the ch-4 space to the right of any heart around (to the left if you are left-handed). Make 3 dc’s in the same space (Photo 1). Fpdc around the next cluster (Photos 2 and 3).
Continue the round as written (in the pattern).
Photo 4 shows the first repeat completed. Pay particular attention to the fact that each fourth ch space will contain 5 dc’s, not 4 (Photo 5).
Stitch count: 68 dc’s and 16 fpdc’s
Round 7
You can start this round in any stitch around.
I started mine in the first dc of the second 4-dc group. The photos and instructions below reflect that choice. If you feel like you might struggle with this round, although it is quite straightforward, I suggest you start in the same stitch.
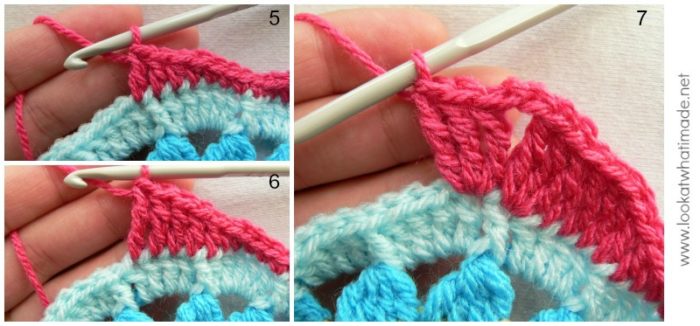
Start with a standing treble crochet (the same as a standing double crochet, but with one more yarn-over) in the first dc of the second 4-dc group from the previous round. Make 2 more tr’s in the same st (Photo 1). Tr in the next 3 st’s. The last tr will fall in the dc before the fpdc (Photo 2). Dc in the next 2 st’s and hdc in the next 2 st’s (Photo 3). Sc in the next 5 st’s. The last sc should fall in the third dc of the 5-dc group (Photo 4).
Hdc in the next 2 st’s and dc in the next 2 st’s. The last dc should fall in the first dc of the next 4-dc group (Photo 5). Tr in the next 3 st’s (Photo 6). Make 3 tr’s in the next st, which will be the fpdc. Ch 2 and make 3 tr’s in the next st (Photo 7).
Repeat around and join as instructed in the pattern. You will notice that, instead of “ch 2, join with sl st”, you are instructed to join with “ch 1 plus hdc in top of beg ch-3”. This counts as a ch-2 corner space. By joining to the top of the beginning ch-3 with a hdc instead of a sl st, you are placing your hook in the center of the “ch-2” corner space, making it easy to start the next round in the “ch-2” corner space.
Stitch count: 48 tr’s, 16 dc’s, 16 hdc’s, 20 sc’s, and 4 ch-2 corner spaces {12 tr’s, 4 dc’s, 4 hdc’s, and 5 sc’s per side}
Round 8
As written.
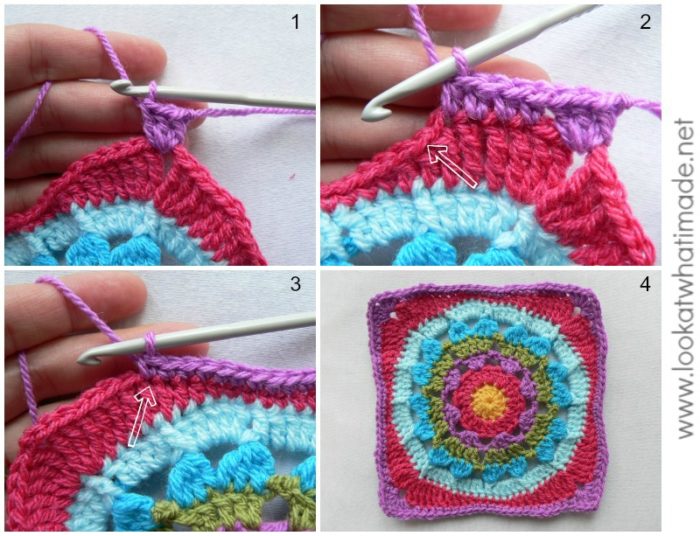
Remember, when skipping the first 2 tr’s, that the top of the first tr will be slightly hidden by the corners. Don’t accidentally skip 3 st’s. See this post if you need help identifying the “hidden” stitch.
The first sc of each side should fall in the first dc (from the previous round) of each side (indicated with an arrow in Photo 2). The last sc of each side should fall in the last dc (from the previous round) of each side (indicated with an arrow in Photo 3).
Stitch count:
- Total: 24 dc’s, 32 hdc’s, 52 sc’s, and 4 ch-2 corner spaces
- Per Side: 6 dc’s, 8 hdc’s, and 13 sc’s
Round 9
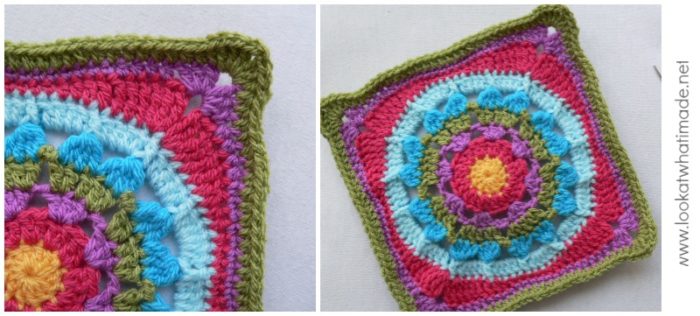
As written.
Remember the first hidden stitch.
Where the pattern tells you to hdc across, you should be making 27 hdc’s on each side.
Stitch count:
- Total: 24 dc’s, 108 hdc’s, and 4 ch-2 corner spaces
- Per Side: 6 dc’s and 27 hdc’s
Round 10
Join your new yarn by making a standing double crochet in any corner ch-2 space. (Dc, ch 2, 2 dc) in the same space.
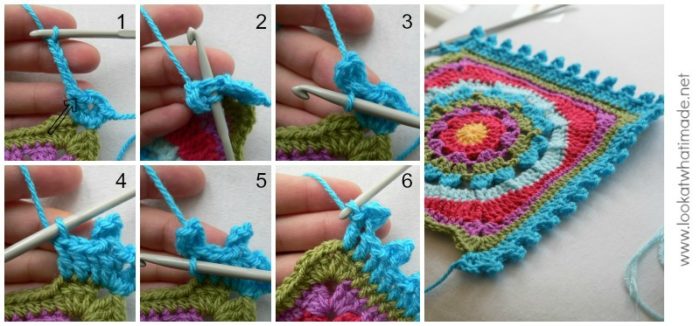
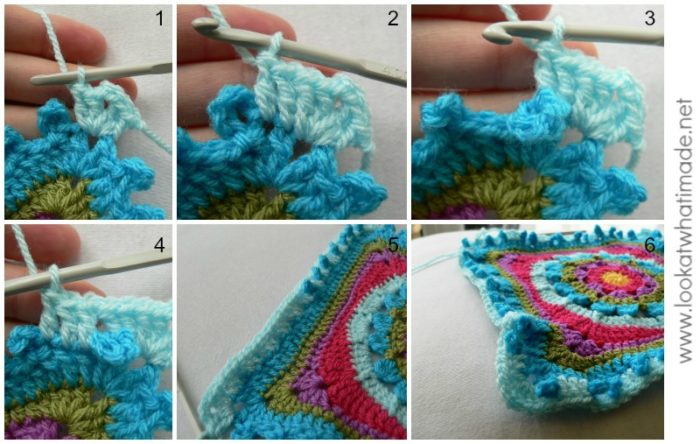
*Ch 5 and sl st into the top of the last dc made (indicated with an arrow in Photo 1 and illustrated in Photos 2 and 3). This is your first ch-5 picot made. [Dc in the next 3 st’s (Photo 4), make a ch-5 picot in the top of the last dc (Photo 5)] 11 times. The last dc and picot of the side should fall in the last st before the next ch-2 corner space (Photo 6). (2 dc, ch 2, 2 dc) in the corner ch-2 space.*
Repeat from * to * 3 more times, omitting the last corner on the last repeat. Join to the top of the standing double crochet with a sl st and fasten off.
Stitch count: 148 dc’s, 48 ch-5 picots, and 4 ch-2 corner spaces {37 dc’s and 12 ch-5 picots per side}
Round 11
As written.
Helpful to Know:
- There should be 2 dc’s between the corner and the first picot on each side (Photo 2).
- There should be 3 dc’s between each picot (Photo 4).
- There should be 2 dc’s between the last picot of a side and the next corner.
The pattern tells you to push the picots forward and out of the way when doing this round (Photo 3). I found it much easier to just crochet in front of the picots (Photo 5) and then push them forward once I’d finished the round.
WOBBLE ALERT: At the end of this round, your square will wobble. This is not because there are too many stitches in the actual last round, but rather because the picots displace the stitches of the last round and take up space, even though they are, for all intents and purposes, IN FRONT of the last round.
So what do I do?
Well, if you love the sticky-uppy picots (and I quite do), you do nothing. Your final stitch count is mathematically correct for the size of the square and the waviness will correct itself once you join the square to another square. It will not correct itself completely with blocking yet, but just trust me.
If you are not bothered about the sticky-uppyness, you can add a sl st border as I will explain below, catching the picots as you go.
Please Note: Kimberly got rid of the wobble by doing this round as an hdc round instead, skipping the first and last st’s of each side. I have no idea why this works. Probably because the hdc’s don’t allow the picots to take up space like the dc’s do. If you do decide to use hdc’s instead, you will HAVE to work behind the picots, because you won’t be able to pop them to the front of your square later on if you work in front of them.
Stitch count: 164 dc’s and 4 ch-2 corner spaces {41 dc’s per side}
Round 12: Optional Sl St Round
Sl st in the next st (the dc before the ch-2 corner space).
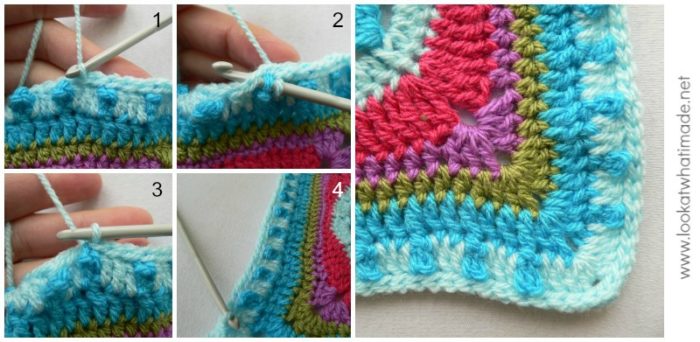
*Make 2 sl st’s in the corner space. These sl st’s won’t be attached to the 2 ch st’s of the corner space, because you are making them into “thin air”, but don’t worry about that. They won’t migrate. Sl st into the first 4 st’s after the corner. (Insert your hook into the loop at the top of the ch-5 picot – only one loop. Then insert your hook into the next dc, which will be the first dc after the picot, and make a sl st through both layers. Sl st in the next 2 dc’s) 12 times. Sl st in the last dc*
Repeat from * to * 3 more times, omitting the last sl st on the last repeat. Fasten off and work away your tails of yarn.
Photos 1 and 4 show the sl st’s “catching” the picots. Photo 2 illustrates the hook inserted into the loop at the top of the picot and through the next dc. Photo 3 illustrates the sl st completed through both layers.
Stitch count: 172 sl st’s
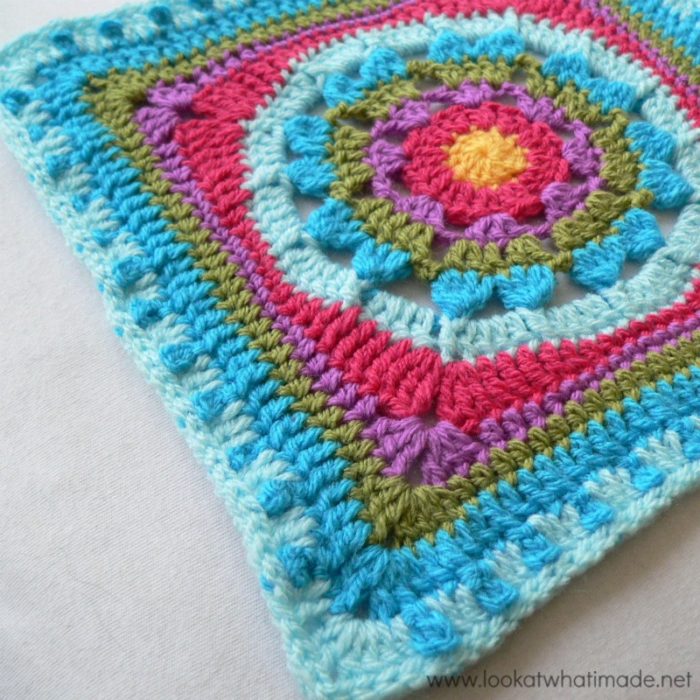
 Et Voila!
Join the Block a Week CAL
If you would like to be part of the Block a week CAL on Facebook, please join the Official CCC Social Group (you must be logged into Facebook to do so) so that you can access and utilize the support and encouragement of all the lovely ladies on there.
You can also join the Block a Week CAL Flickr Group so that you can inspire others and be inspired yourself.
For those of you who do not like Facebook, you can always follow along with me here. I will be posting the blocks every week.
Remember to subscribe to my Weekly Newsletter if you would like to be kept in the loop. You can also like my Facebook page or follow me on Bloglovin, Google+, Pinterest, Twitter, or Instagram.
More Blogs Following the CAL
- Lou Mander from Tea, Crochet and Me – using Stylecraft in White, Mocha and Raspberry
- Wendy from Little Wendy Crochet (Dutch photo tutorials)
Happy Hooking!




karen dean says
thanks ideas. I will try some squares and see how it goes. I am going to teach some ladies and girls in an orphanage in Haiti how to crochet so they can supplement the income for the orphans
Carrie says
Your son is the cutest thing ever!!! Glad to hear that he’s unscathedish ;)
Dedri Uys says
Hehe. He is a little monster!
Rhondda Mol says
Beautiful tutorial Dedri and I cannot help but grin at your cheeky monkey :) He is DARLING! xo R
Dedri Uys says
Thank you, Rhondda. If only they could stay that cute forever!