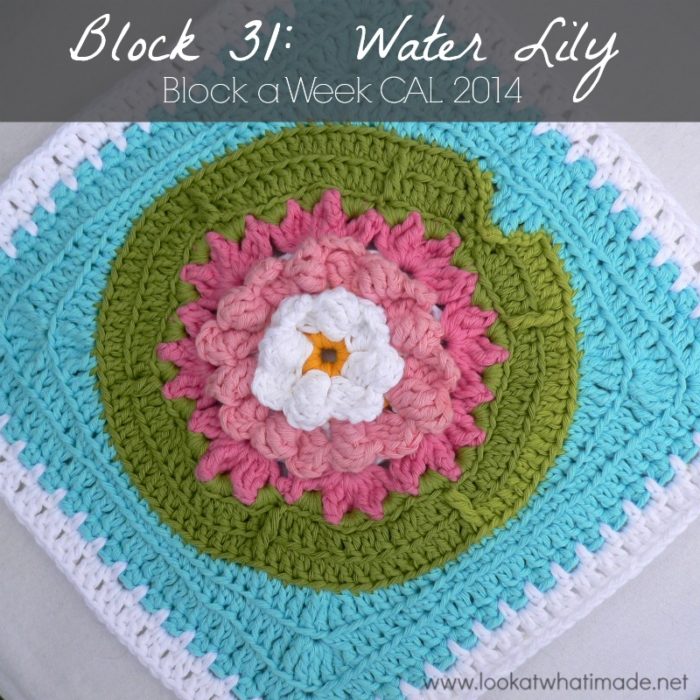
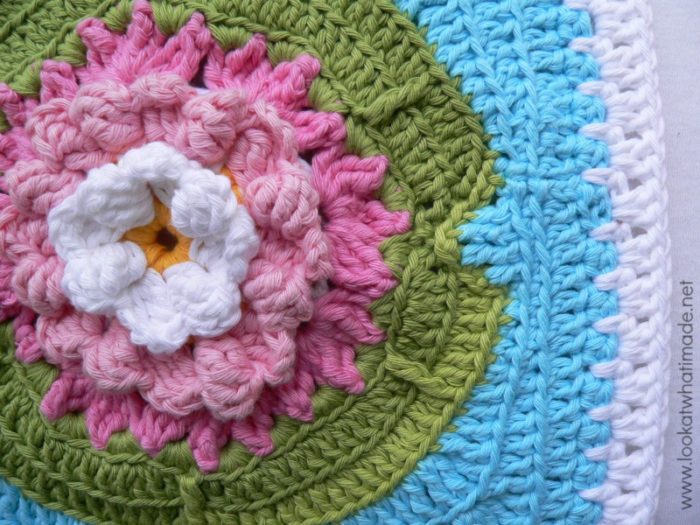
Block 31 of the Block a Week CAL (hosted by Kimberly Slifer) is Julie Yeager’s Water Lily Square. I love Julie’s work (I think I have said it a hundred times already) and this square is so playful and unlike any of the squares we have done yet. One of my favourite squares to date is Julie’s Firenze Square (which was week 26, if I am not mistaken).
Update: This pattern is no longer available for free. Julie is happy for the tutorial below to remain on my site, but it is not the complete pattern. You can buy the complete written pattern HERE.

I have now added a post outlining the extra rounds I added to each square to get them to the size of Block 1, which was the biggest. You can find that here.

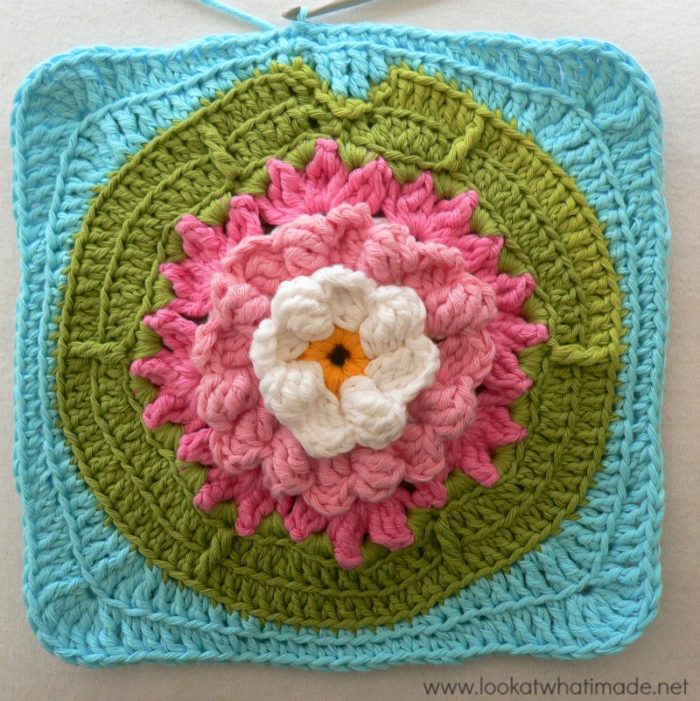
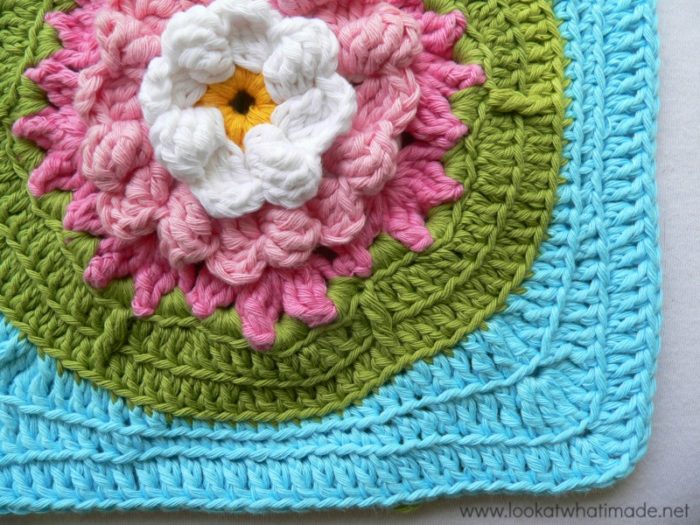
Water Lily Crochet Square
{Pattern © 2013 Julie Yeager. Photo tutorial done with kind permission}
Pattern
Available to BUY as a Ravelry Download (no longer free as of September 2014).
Suggested Materials
- 5.5 mm Clover Amour Crochet Hook (US I/9 UK 5) – please note, the pattern states 6/I, which is an error
- Worsted weight yarn
Size
- Using the hook and yarn specified, your square should be a nice even 12″ when you are done.
- Using a 4 mm crochet hook (US G/6 UK 8) and double knit yarn, as I have done, your finished square will be about 8″ big.
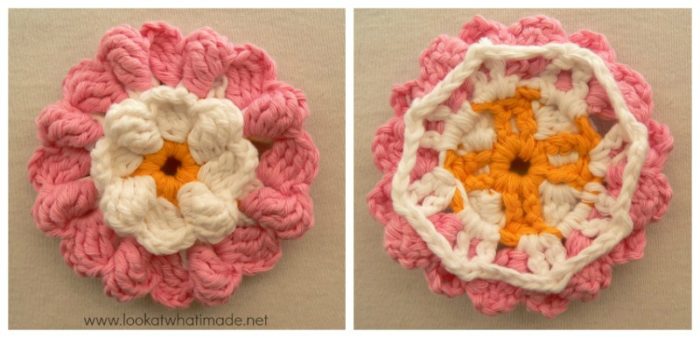
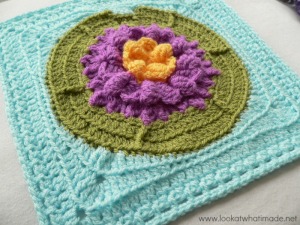 Colours
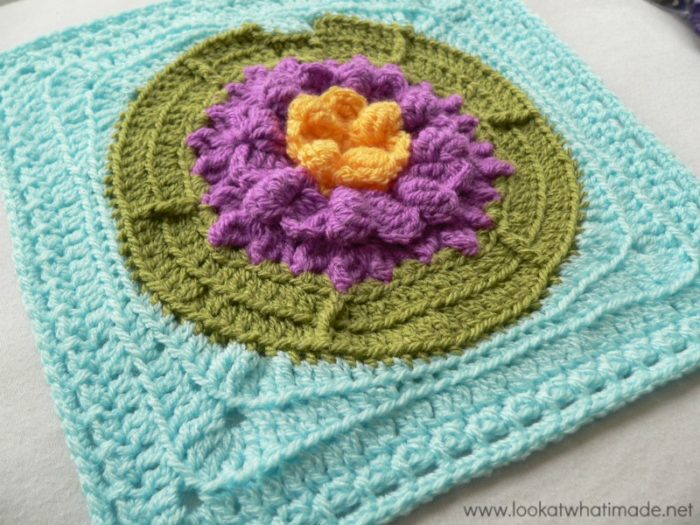
Although the tutorial below is done using DROPS Paris Cotton, I have used Stylecraft Special Dk for the square I will be using in my blanket.
- Saffron (Rounds 1 and 2)
- Magenta (Rounds 3 – 5)
- Meadow (Rounds 6-8)
- Sherbet (Rounds 9 – 13 and Optional 14)
Notes
- US Crochet Terminology used. (See this comparative chart if you need help transcribing from US to UK)
- If you feel like practising the invisible join, feel free to use it instead of the sl st join. Make sure that you understand which stitch to join to if you do use it!
- Julie suggests working into the ch st right after the cluster when working into the “top of the cluster”.
Special Stitches
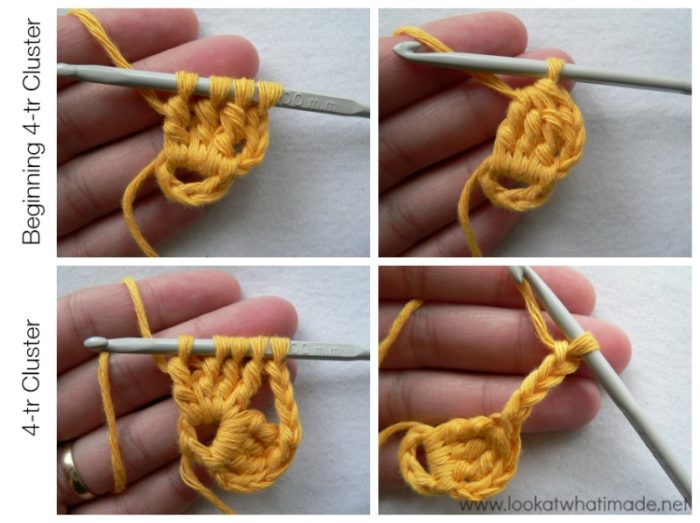
Beginning 4-tr Cluster
Ch 4 (as first tr). (Yarn over twice. Insert your hook into the same st and pull up a loop. Yarn over and pull through 2. Yarn over and pull through 2) three times. Yarn over and pull through all 4 loops on your hook.
You are partially completing each of the 3 tr’s and then completing them all on the last yarn-over.
4-tr Cluster
Yarn over twice. Insert your hook into the specified stitch and pull up a loop. Yarn over and pull through 2. Yarn over and pull through 2. (Yarn over twice. Insert your hook into the same stitch and pull up a loop. Yarn over and pull through 2. Yarn over and pull through 2) three times. Yarn over and pull through all 5 loops on your hook.
You are partially completing each of the 4 tr’s and then completing them all on the last yarn-over.
Water Lily Square Photo Tutorial
This photo walkthrough is NOT the actual pattern and should not be used instead of the pattern, but rather in conjunction with it.
Thank you very much to Julie Yeager for giving us permission to do this photo tutorial for her Water Lily Square. And a special thank you to Kimberly Slifer for letting me do these tutorials and for obtaining the necessary permission.
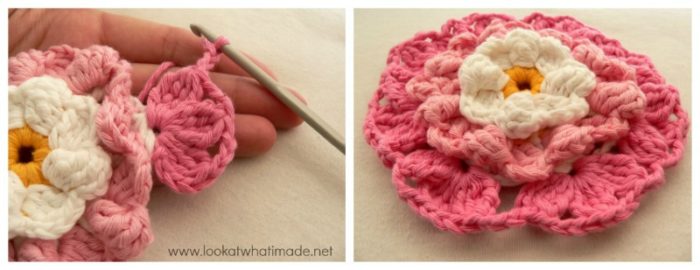
Round 1
You can start this round with a magic ring instead of the initial ch-5 ring, but I don’t advise it as your first round consists of cluster stitches and it becomes fiddly to make cluster stitches into a magic ring. Fiddly, but not impossible :)
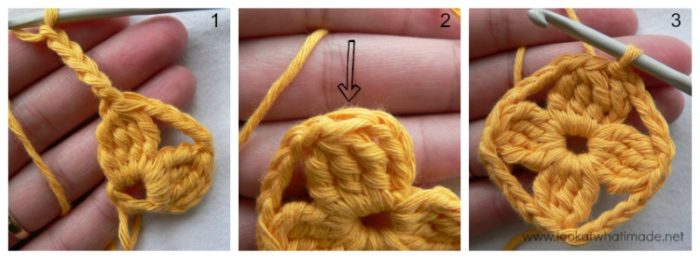
Ch 5 and join with a sl st to the first ch to form a ring.
Into the ring: make a beginning 4-tr cluster. Ch 5. (Make a 4-tr cluster, ch 5) three times. Join to the top of the beginning cluster (indicated with an arrow in Photo 2) with a sl st and fasten off your yarn.
Stitch count: 4 4-tr clusters and 4 ch-5 spaces.
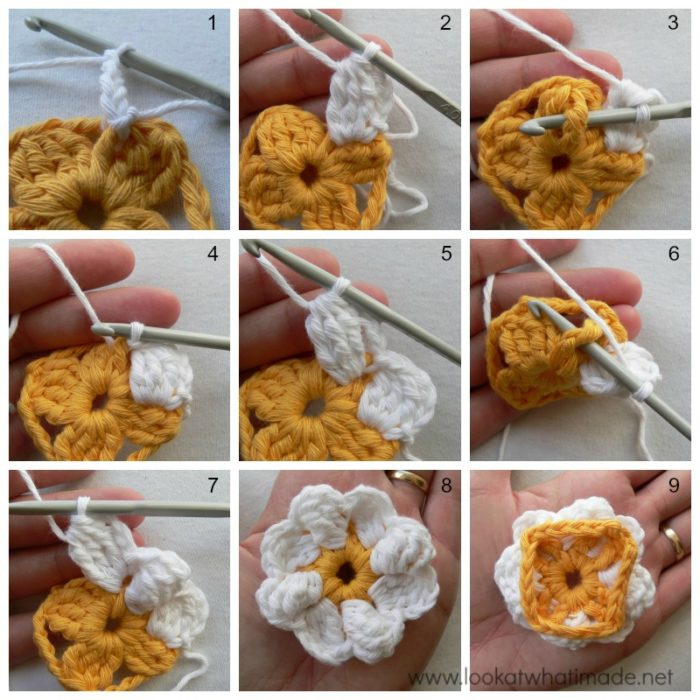
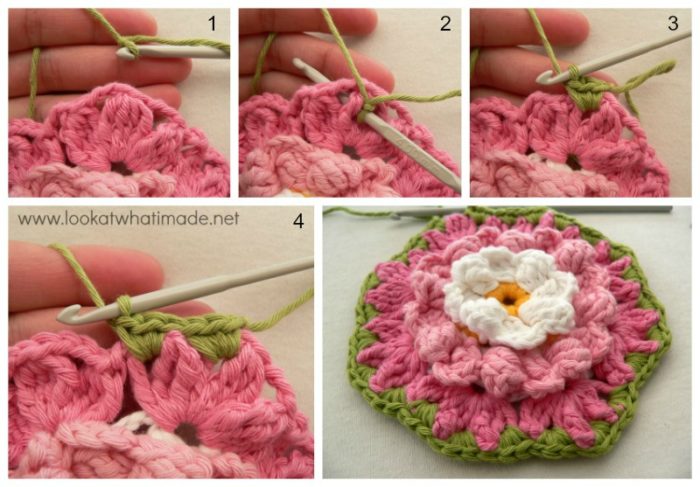
Round 2
Join your new colour by making a sl st around the post of the fourth tr of any 4-tr cluster. You are basically making a front post sl st.
*Make a beginning 4-tr cluster around this same (fourth) post (Photos 1 and 2). The stitches of the cluster will form a little line along the post of the stitch – see Photo 2. Sl st into the second tr of the next 4-tr cluster (Photos 3 and 4). Make a beginning 4-tr cluster around this same (second) post (Photo 5). Sl st around the post of the fourth tr of the same 4-tr cluster (Photo 6).* Repeat from * to * 3 more times, omitting the last sl st on the last repeat.
Join to the first stitch of the round with a sl st. I don’t really know which stitch Julie means, so I just made my sl st into the first ch st of the first 4-tr cluster of the round. Fasten off.
Stitch count: 8 4-tr clusters
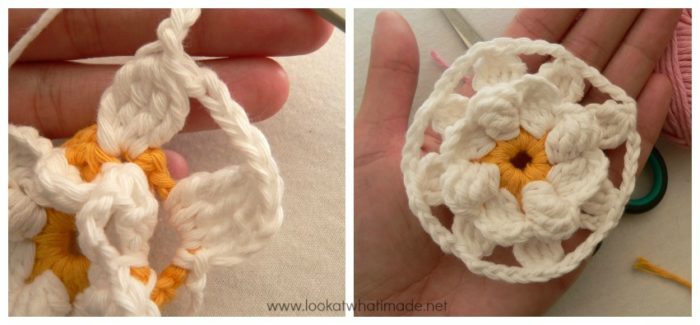
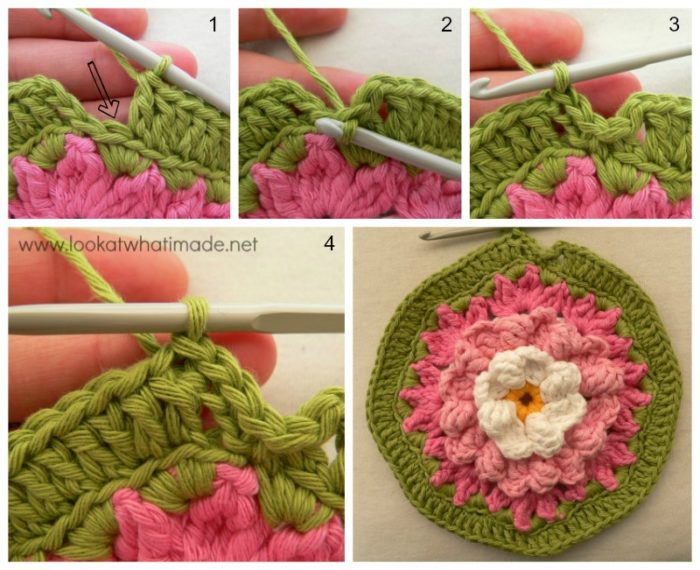
Round 3
In this round you will be working into the ch-5 spaces and cluster stitches from Round 1, which you will find behind the flower formed by Round 2 ( (Photo 9 above).
Join your yarn by making a sl st in any ch-5 space around. Into the same ch-5 space: make a beginning 4-tr cluster and then ch 5. *Make a 4-tr cluster in the top of the next cluster (see the photo on the left below). Ch 5. Make a 4-tr cluster in the next ch-5 space. Ch 5.* Repeat from * to * 2 more times. Make a 4-tr cluster in the top of the next cluster. Ch 5. Join to the top of the first cluster with a sl st. Fasten off.
Stitch count: 8 4-tr clusters and 8 ch-5 spaces
Round 4
This round is the same as Round 2, but with more repeats.
Stitch count: 16 4-tr clusters
Round 5
In this round you will be working into the top of the 4-tr clusters from Round 3. You will basically be making 3 4-tr clusters, separated by 3 ch st’s, in each 4-tr cluster from Round 3. It will be hard to fit all the stitches into that one stitch, but just keep pulling the clusters out of the way and you will manage.
Stitch count: 24 4-tr clusters and 24 ch-3 spaces
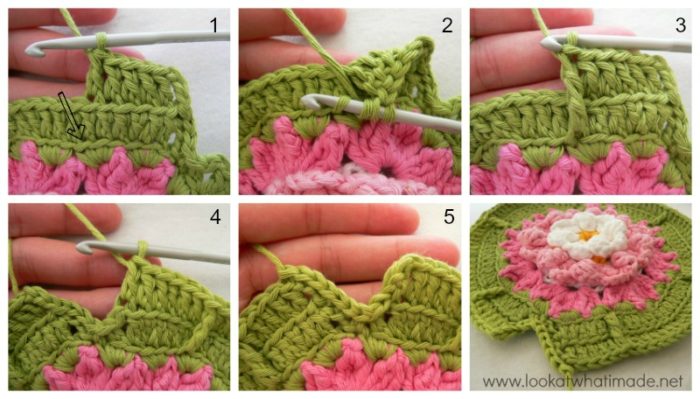
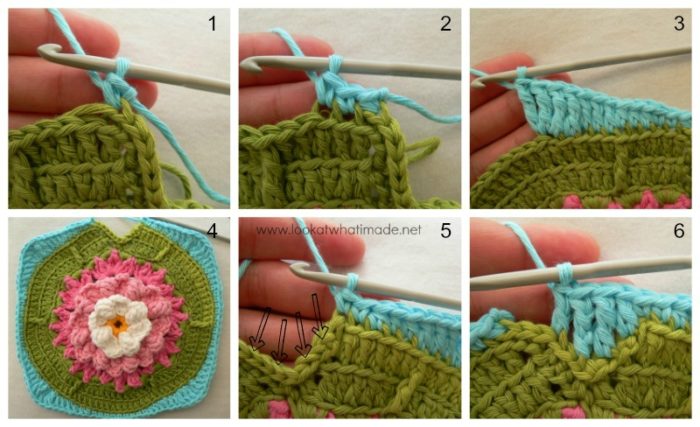
Round 6
Join your new yarn by making a standing single crochet around the post of the fourth tr of any cluster AND the ch-3 space right after the cluster.
To do that, insert your hook from front to back between the third and fourth tr of any cluster (with a sl st already on your hook) – see Photos 1 and 2. The head of your hook should be at the back of your work. Yarn over and pull up a loop. Yarn over (trapping the ch-3 under the yarn-over) and complete a sc. Make 2 more sc’s around the post of this stitch (remembering to trap the ch-3 as you work). Making the stitches in this way causes the clusters from the previous round to appear pointy (Photo 3).
Make 3 sc’s around the post of the fourth stitch of every cluster around (remembering to trap the ch-3 as you work) – see Photo 4.
Stitch count: 72 sc’s
Round 7
Work in the back loops only (unless specified). This round is easy and the only bit that might need explaining is the little gap at the end of the round.
When you have made all the dc’s for the round (as written), you should have one st left unworked (indicated with an arrow in Photo 1). You will now need to make 2 sl st’s into the side of the last dc. This will feel a little bit weird. Sl st in the front loop only of the next st from Round 6 (Photo 2). Sl st in each of the 3 ch’s of the beginning ch-3 (Photo 3). Sl st in the front loop only of the next dc (Photo 4).
Stitch count: 83 dc’s (including beginning ch-3, which counts as a stitch) and a gap.
Round 8
As written.
When instructed to make a tr in the front loop only of the stitch below in Round 6 (see Photos 1 – 3), remember that you should not skip the stitch behind the tr. This is effectively an increase.
When you get to the gap (Photo 4), make 2 sl st’s into the side of the last dc as before. Sl st in the front loop only of the next 6 sl st’s. make a sl st in each ch of the beginning ch-3 and then sl st into the next dc (Photo 5).
Stitch count: 87 dc’s, 6 tr, and a gap
Round 9
Join your yarn by making a standing single crochet in the back loop only of the last sl st (Photo 1). Skip the stitch that contains the sl st and continue on as written (Photos 2 – 4).
When you have made a sc in each of the last 2 st’s before the gap, skip the next sl st and make a dc in the blo of the next sl st. Skip the next sl st and tr in the blo of the next sl st. Skip 2 sl st’s and tr in the blo of the next sl st. Skip the next sl st and make a dc in the blo of the next sl st (indicated with arrows in Photo 5 and illustrated in Photo 6). Join to the first sc with a sl st.
Stitch count: 104 st’s {26 st’s per side}
Round 10
As written.
The 5 tr’s that form your corner should fall in the second tr of any 3-tr corner from the previous round.
Stitch count: 120 st’s {30 st’s per side}
Round 11
On the first side you will be making 12 dc’s between the beginning ch-3 and the first corner. On the next 3 sides you will make 29 dc’s between corners. On the last side you will make 16 dc’s before joining with a sl st.
Remember that your corners should fall in the third tr of each 5-tr corner from the previous round.
Stitch count: 132 st’s and 4 ch-1 corners {33 st’s per side}
Round 12
As written.
The way the pattern is written you end up skipping 2 st’s at the end of the round before joining with a sl st again. It might just be me, but I did it twice and I am confident that I followed it to the letter this time. It doesn’t matter, but if you’re bothered by things like this, you might want to start this round in the stitch BEFORE the sl st join to make it 100% symmetrical.
Remember that the first stitch after the corner (the first one you are meant to skip) will be slightly hidden by the corner stitches. Don’t accidentally skip 2 st’s here!
Stitch count: 76 hdc’s and 68 ch-1 spaces {16 hdc’s and 17 ch-1 spaces per side – not including the 3-hdc corners}

Round 13
As written.
Stitch count: 8 sc’s, 68 hdc’s, and 76 ch-1 spaces {2 sc’s, 17 hdc’s, and 18 ch-1 spaces per side (not including the corner ch-1 space)}
I have added an optional additional round to get this square the same size (and stitch count) as the others. You can find that here.
Join the Block a Week CAL
If you would like to be part of the Block a week CAL on Facebook, please join the Official CCC Social Group (you must be logged into Facebook to do so) so that you can access and utilize the support and encouragement of all the lovely ladies on there.
You can also join the Block a Week CAL Flickr Group so that you can inspire others and be inspired yourself.
For those of you who do not like Facebook, you can always follow along with me here. I will be posting the blocks every week.
Remember to subscribe to my Weekly Newsletter if you would like to be kept in the loop. You can also like my Facebook page or follow me on Bloglovin, Google+, Pinterest, Twitter, or Instagram.

More Blogs Following the CAL
- Lou Mander from Tea, Crochet and Me – using Stylecraft in White, Mocha and Raspberry
- Wendy from Little Wendy Crochet (Dutch photo tutorials)
Happy Hooking!


Virginia Burrow says
Dedri, you are a master!!! Amazing work and gorgeous tutorial as always, thank you!
Dedri Uys says
Thank you, Virginia :)