Block 21 of the Block a Week CAL (hosted by Kimberly Slifer) is April Moreland’s Winter Dream. This is the first time we are using one of April’s crochet squares, and I am so happy to be featuring one of hers. The pattern is well-written and straightforward, and the block is beautiful!
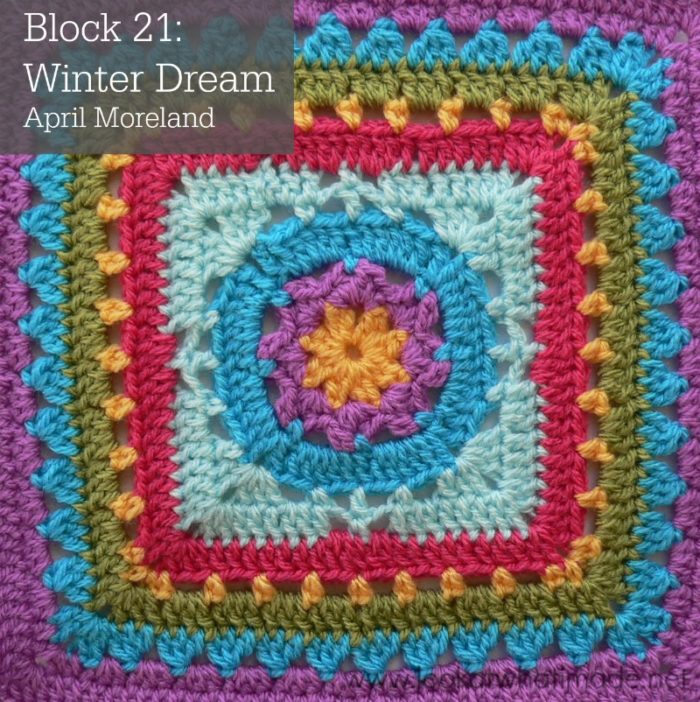

Winter Dream Square
{Pattern © 2013 April Moreland. Photo tutorial done with kind permission}
Pattern
- You can find the pattern here on April’s blog, The Left Side of Crochet
- Ravelry PDF Print-out
Suggested Materials
- 5.5 mm Clover Amour Crochet Hook (US I/9 UK 5)
- Worsted weight yarn
Size
- Using the hook and yarn specified, your square should be a nice even 12″ when you are done.
- Using a 4 mm crochet hook (US G/6 UK 8) and double knit yarn, as I have done, your finished square will be about 7.5″ big.
My Yarn and Colour Choices
I am using Stylecraft Special DK.
- Saffron (Rounds 1 and 8)
- Magenta (Rounds 2, 11, and Optional 12)
- Turquoise (Rounds 3, 4, and 10)
- Sherbet (Rounds 5 and 6)
- Pomegranate (Round 7)
- Meadow (Round 9)
Notes
- The initial ch st’s in each round are counted as a stitch, except for the initial ch st in Rounds 2, 3, and 8, which doesn’t count as a stitch.
- US Crochet Terminology used. (See this comparative chart if you need help transcribing from US to UK)
- Please Note: The yarn used in most of the tutorial photos is Drops Paris Cotton.
Corrections
Round 8 has 32 ch-3 spaces, not 24.
Special Stitches
Beginning Cluster and Cluster – see this Photo Tutorial
Useful Tutorials
Winter Dream Photo Tutorial
This photo-walkthrough is NOT the actual pattern and should not be used instead of the pattern, but rather in conjunction with it.
Thank you very much to April Moreland for giving us permission to do this photo-tutorial for her Winter Dream Square. And a special thank you to Kimberly Slifer for letting me do these tutorials and for obtaining the necessary permission.
Round 1
You can start this round with a magic ring instead of the initial ch-4.
Magic Ring Instructions for Round 1
Into a magic ring: ch 3 (this counts as your first dc). Dc and ch 1. *2 x dc, ch 1* x 7. Pull the ring tight. Join to the top of the initial ch-3 with a sl st. Don’t forget those ch-1’s (indicated with arrows below).
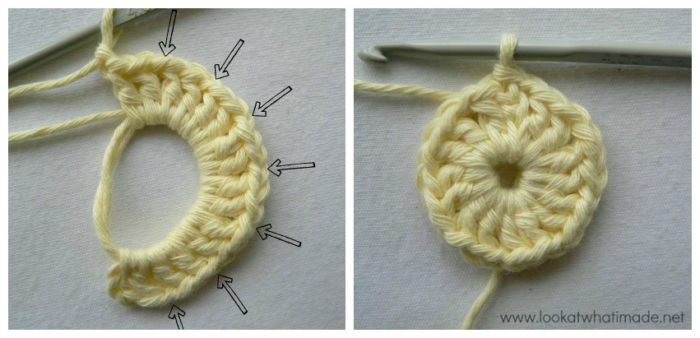
If you are not familiar with working into a magic ring,this video tutorial from The Crochet Crowd is very good. Please remember, when working into a magic ring you HAVE to work away your initial tail very well. If you just cut it, your whole square might unravel!
Stitch count: 16 dc’s, 8 ch-1 spaces
Round 2
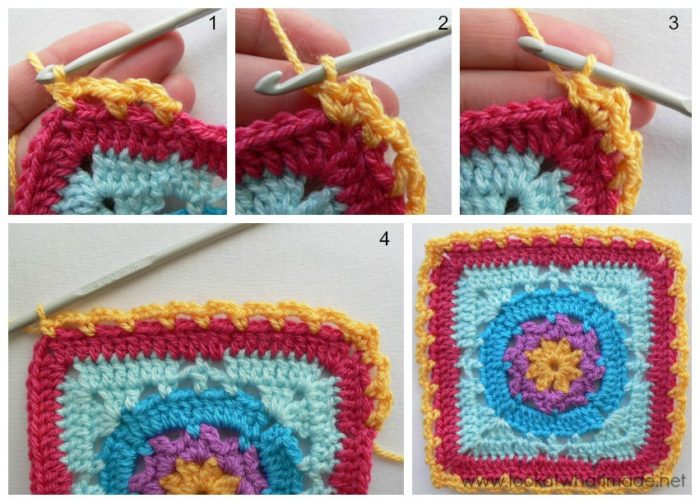
- If you are using the same colour, sl st into the next dc and into the ch-1 space. (Sc, dc, ch 1, dc, sc) in the same ch-1 space.
- If you are going to use a different colour, I suggest joining your yarn by making a standing sc in any ch-1 space around (Phot0 1). (Dc, ch 1, dc, sc) in the same ch-1 space (Photos 2 and 3).
(Sc, dc, ch 1, dc, sc) in each ch-1 space around (Photo 4). Join to the first sc with a sl st.
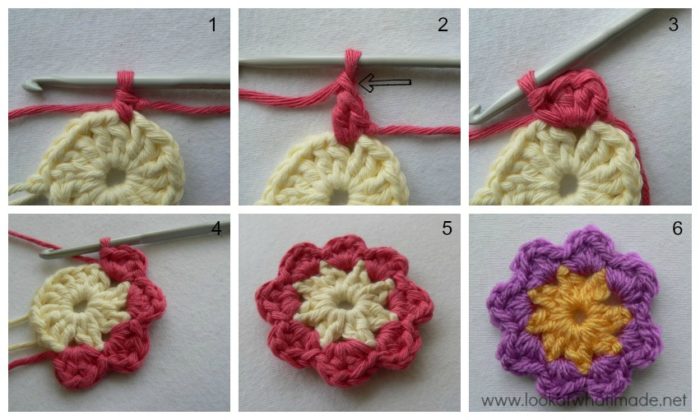 Stitch count: 8 petals {16 sc’s, 16 dc’s, and 8 ch-1 spaces}
Round 3
- If you are going to use the same colour, sl st into the next dc and into the ch-1 space. (Ch 1, sc) in the same space.
- If you are going to use a different colour, I suggest joining your new yarn by making a standing single crochet in any ch-1 space around (Photo 1).
Ch 3 (Photo 2). *Sc in the next ch-1 space, ch 3 (Photo 3)* x 7. Join to the top of the first sc with a sl st.
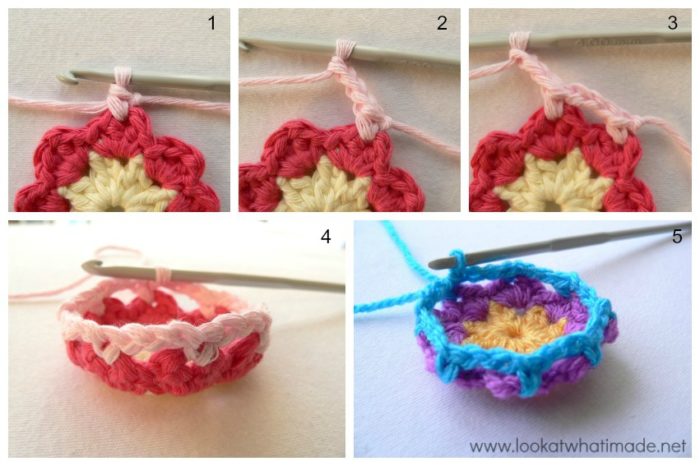 You will notice that this rounds pulls up into a bowl. This will correct itself in the next round.
Stitch count: 8 sc’s and 8 ch-3 spaces
Round 4
Ch 4 (this counts as your first dc and ch 1). Alternatively, start with a standing double crochet in the same st as the sl st join and then ch 1. Dc in the same stitch (Photo 1). Make 5 dc’s in the next ch-3 space (Photo 2) and dc in the next sc, which might be slightly hidden (indicated with an arrow in Photo 2 and illustrated in Photo 3). Make 5 dc’s in the next ch-3 space (Photo 4). (Dc, ch 1, dc) in the next sc (Photo 5).
Repeat around as instructed in the pattern, and join to the third ch of the beginning ch-4 (or the top of the standing double crochet) with a sl st.
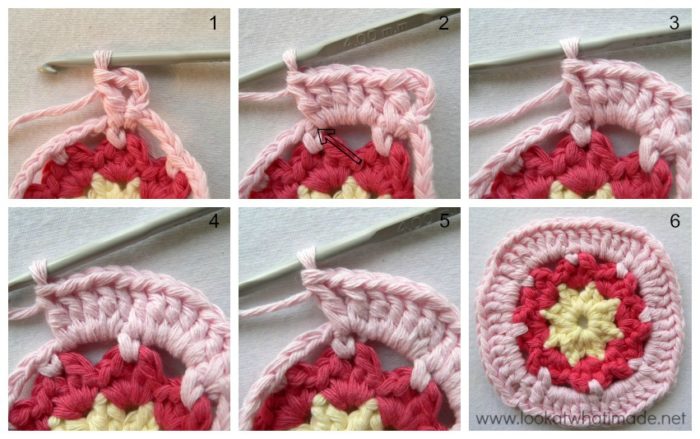 Stitch count: 52 dc‘s and 4 ch-1 spaces
Round 5
Ch 3 (this counts as your first dc). Alternatively, start with a standing double crochet in the same st as the sl st join (Photo 1).
*(2 x dc, ch 2, 2 x dc) in the next ch-1 space (Photo 2). Dc in the next stitch (Photo 3). Be mindful of the fact that the loops of the next st will be hidden under the corner stitches you just made. See this tutorial if you need help identifying the top of the first st to work into. Ch 2 and skip the next 2 st’s. Sc in the next st. Ch 2, skip the next 2 st’s and dc in the next st (Photo 4). Ch 2 and skip the next 2 st’s. Sc in the next st. Ch 2, skip the next 2 st’s and dc in the next st (Photo 5).*
Repeat around, omitting the last dc of the last repeat. Join to the top of the beginning ch-3 (or the standing double crochet) with a sl st.
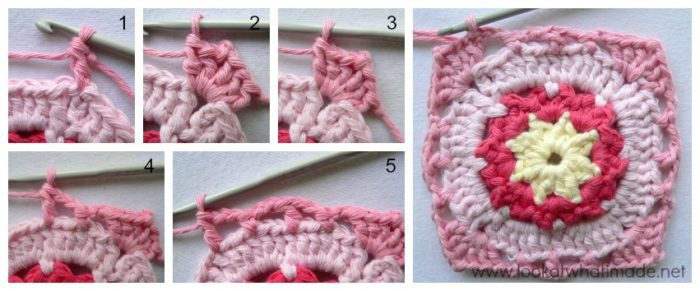 Stitch count: 28 dc’s, 8 sc’s, and 20 ch-2 spaces
Round 6
In this round, the stitches of the corner will again hide the loops of the first stitch after the corner. Make sure that you don’t accidentally skip the first st.
Ch 3 (this counts as your first dc). Alternatively, start with a standing double crochet in the same st as the sl st join.
Dc in each of the next 2 st’s. *(2 dc, ch 2, 2 dc) in the next ch-2 space. Dc in each of the next 3 sts (Photo 1). Make 2 dc’s in the next ch-2 space (Photo 2). Dc in the next sc. Ch 1 and sc in the next dc (Photo 3). Ch 1 and dc in next sc. Make 2 dc’s in the next ch-2 space (Photo 4). Dc in each of the next 3 st’s.*
Repeat around as instructed in the pattern, and join with a sl st to the top of the beginning ch-3 (or the standing double crochet).
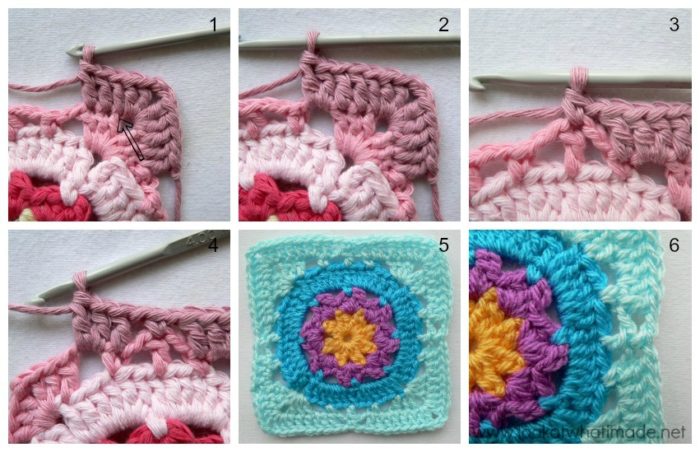 Stitch count: 64 dc’s, 4 sc’s, 4 ch-2 corner spaces, and 8 ch-1 spaces
Round 7
Round 7 is straightforward. You are making (2 x dc, ch 2, 2 x dc) into each corner ch-2 space. You are making a dc in each dc across, and 2 dc’s in each of the 2 ch-1 spaces per side.
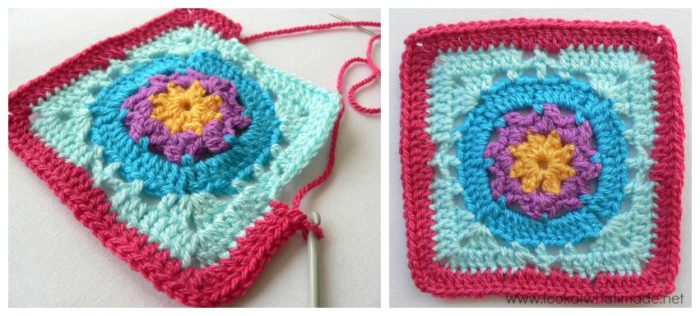 Stitch count: 100 dc’s, 8 ch-1 spaces, and 4 ch-2 corner spaces {25 dc’s per side}
Round 8
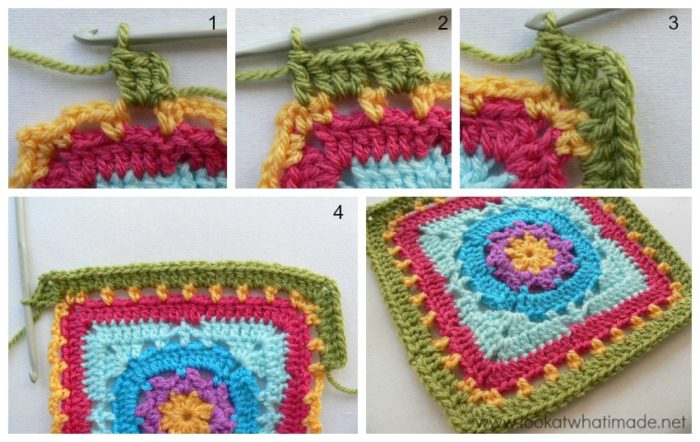
If you are going to change colour for this round, start with a standing single crochet in the same st as the sl st join. (Ch 3, skip the next 2 st’s, sc in the next st) twice (Photo 1). *(Sc, ch 2, sc) in the corner ch-2 space (Photo 2). Sc in the next st (Photo 3). (Ch 3, skip the next 2 st’s and sc in the next st) 8 times.*
Repeat around as instructed in the pattern and join to the first sc with a sl st.
 Stitch counts:
- Total: 44 sc’s, 32 ch-3 spaces, and 4 ch-2 corner spaces
- Per Side: 11 sc’s and 8 ch-3 spaces
Round 9
Another straightforward round. The only thing to look out for is the corners, where you should be skipping the first and last of the 4 sc’s in each corner. If you look at Photo 2, you will see that I have skipped the first of the 4 sc’s.
 Stitch count: 120 dc’s and 4 ch-2 corner spaces {30 dc’s per side, 26 dc’s between corners}
Round 10
In this round you will be using Clusters. They are the same as a dc3tog. If you need help with making the cluster stitches, have a look at this tutorial.
Each cluster in this round should fall over a 3-dc group from the previous round. Remember to only ch 1 before each corner, not 2 like you do between clusters.
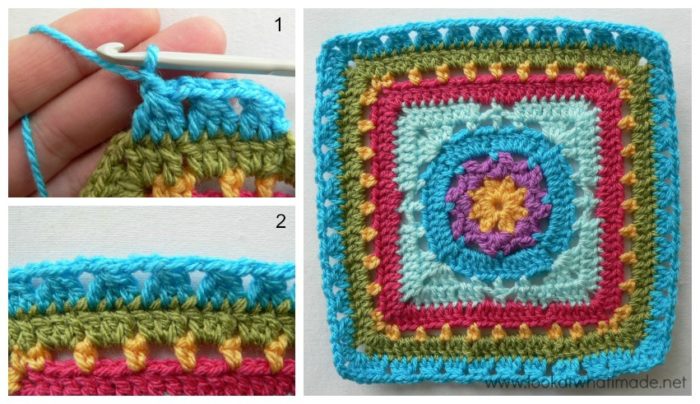 Stitch counts:
- Total: 40 clusters, 16 dc’s, and 4 ch-2 corner spaces
- Per Side: 10 clusters and 4 dc’s
Round 11
Round 11 is another straightforward hdc round. The only thing to look out for is the fact that you again skip the first and last of the 4 corner stitches. In Photo 2 you can see that I have skipped the first dc of the corner. The corners themselves are just (hdc, ch 2, hdc). Photo 4 shows the first stitch after the corner made into the “hidden” loops of the first dc after the corner.
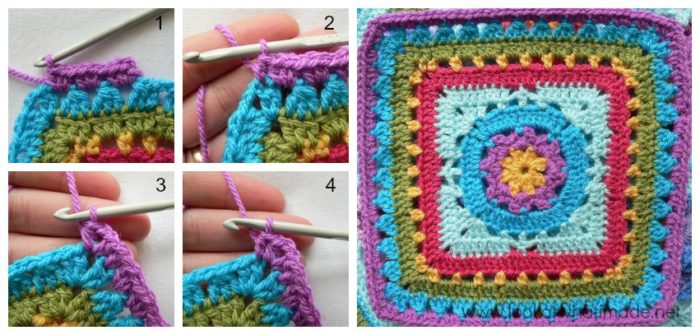 Stitch count: 148 hdc’s and 4 ch-2 corner spaces. {37 hdc’s per side, 33 hdc’s between corners}
I have added an Optional Additional Round 12 to get my square to the same size as the others squares to date. You can find the instructions for that HERE.
Remember to subscribe to my Weekly Newsletter if you would like to be kept in the loop. You can also like my Facebook page or follow me on Bloglovin, Google+, Pinterest, Twitter, or Instagram.

More Blogs Following the CAL
- San from Loopsan – using Stylecraft in sophisticated Parchment, Denim, Mocha and Meadow
- Lou Mander from Tea, Crochet and Me – using Stylecraft in White, Mocha and Raspberry
- Wendy from Little Wendy Crochet (Dutch photo tutorials)
Happy Hooking!


Debbie George says
Hi Dedri,
I love this pattern!
Can you please tell me the exact instructions in rounds 9 and 11?
I’m fairly new to this crocheting addiction and you have not specified the exact stitches for these rounds. This would be a big help as I am just learning to read patterns and have stalled at this point as I don’t want to make a mistake.
Many thanks,
Debbie
Dedri Uys says
Hi Debbie. This tutorial should not replace the pattern. It is only a helpful tool to assist you with following the pattern. At the start of each tutorial you will find a heading that says ‘Pattern’. Under that heading you will find a link to the complete written pattern. The written pattern has all the instructions and stitches written out per round.
I hope that helps,
Dedri
Debbie says
Thanks Dedri much appreciated!
Missed that bit somehow, but all good now.
Debbie
Sarah Sadler says
This is really causing me problems! Rows 6 and 7 have been done and then frogged 10 times today. Is the stitch count right on 7? Very confused with the 8 ch-1 spaces.
I shall overcome………:-)
Dedri Uys says
Sarah, if you send me a picture of your square at the end of Round 6, I can better assist you.
Can you find this bit in Round 6 of the tut: “Ch 1 and sc in the next dc (Photo 3). Ch 1 and dc in next sc. Make 2 dc’s in the next ch-2 space (Photo 4). Dc in each of the next 3 st’s.”
Do you see the ch 1 and sc, then ch 1 and dc? Those are your 2 ch-1 spaces per side. {So 8 in total}
On the next round you need to make 2 dc’s in each of those ch-1 spaces.
So Round 7 will read like follows (I am starting in a corner to make it easier to write the instructons): *(2 dc, ch 2, 2 dc) in the corner space. Dc in the next 8 dc’s. 2 x dc in the ch-1 space. Dc in the sc. 2 x dc in the ch-1 space. Dc in the next 8 dc’s* Repeat that for each side. That will give you 25 dc’s per side. Hope this helps!
Dane says
super ce granny jolies couleurs j’ adore le pas a pas est très explicite bravo je suis en pleins dans les grannys en ce moment pour réaliser une jupe et ensuite deux robes pour cette hiver
San says
Lovely as always! I really really need to get going on the CAL again! x
Dedri Uys says
You DO need to get going again…in a while x
Carrie says
Wow, I love the look of this one… like a square inside of a square
Dedri Uys says
It IS pretty, isn’t it :)
diana Anderson says
Dedri,
I wanted to say THANK-YOU! So much for doing these step by step tutorials, I can’t tell you how much they have helped me. I have never been good at figuring out a pattern, most of the time I would look at the photos and just wing it. Now I can read a pattern and follow it.
The joy that shines in your face is so lovely and your childern are beautiful. Thank you again for sharing your talent and life. May God bless you and yours abundantly.
diana
Dedri Uys says
Diana, thank you so much for your encouraging and very kind comment. I love nothing better than hearing that people are learning and not following. That is my aim!
I have been truly blessed with those boys of mine (although they drive me mental sometimes) and I thank God for them every day (even when they drive me mental). Blessings to you and yours too.
Dedri