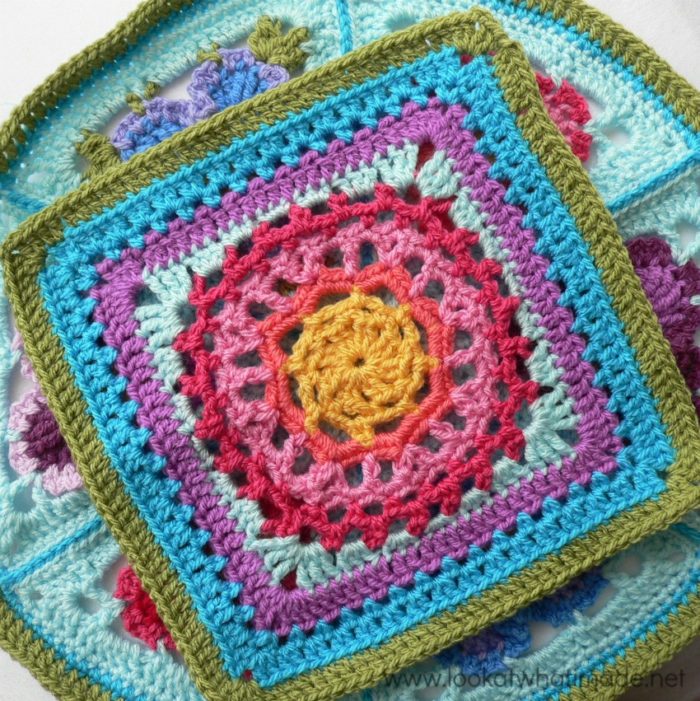
Block 20 of the Block a Week CAL (hosted by Kimberly Slifer) is Chris Simon’s Mandala Square. I love the simplicity and grace of this square. And I love the fact that it grew at the speed of light! This is the fourth of Chris’ patterns to be featured in the CAL. If you like her design style, be sure to have a look at her Butterfly Garden (Week 10), Kaleidoscope Blossom (Week 12), and Lace Petals (Week 16).
At the end of Round 8, you end up with the cutest little lacy mandala. I’m thinking it will make a great little rug if worked in really thick yarn or t-yarn.
Mandala Crochet Square
{Pattern © 2005 Chris Simon. Photo tutorial done with kind permission}
Pattern
- You can download the pattern here (Scribd). If you have any problems opening or saving the pattern, try this link instead.
- Add it to your Ravelry queue
Suggested Materials
- 5 mm Clover Amour Crochet Hook (US H/8 UK 6)
- Worsted weight yarn
Size
- Using the hook and yarn specified, your square should be a nice even 12″ when you are done.
- Using a 4 mm crochet hook (US G/6 UK 8) and double knit yarn, as I have done, your finished square will be about 8″ big.
My Yarn and Colour Choices
I am using Stylecraft Special DK.
- Saffron (Rounds 1-3 and Optional Round 14)
- Shrimp (Round 4)
- Fondant (Rounds 5 and 6)
- Pomegranate (Rounds 7 and 8)
- Sherbet (Round 9)
- Magenta (Round 10)
- Turquoise (Rounds 11 and 12)
- Meadow (Round 13)
Notes
- US Crochet Terminology used. (See this comparative chart if you need help transcribing from US to UK)
- Please Note: The yarn used in most of the tutorial photos is Drops Paris Cotton.
Mandala Square Photo Tutorial
This photo-walkthrough is NOT the actual pattern and should not be used instead of the pattern, but rather in conjunction with it.
Thank you very much to Chris Simon for giving us permission to do this photo-tutorial for her Mandala Square. And a special thank you to Kimberly Slifer for letting me do these tutorials and for obtaining the necessary permission.
Round 1
You can start this round with a magic ring instead of the initial ch-5.
Magic Ring Instructions for Round 1
Into a magic ring: ch 3 (this counts as your first dc) and dc. *Ch 2 (Photo 1), 2 x dc (Photo 2)* x 7. See Photo 3. Ch 2 and join to the top of the beginning ch-3 with a sl st.
If you are not familiar with working into a magic ring,this video tutorial from The Crochet Crowd is very good. Please remember, when working into a magic ring you HAVE to work away your initial tail very well. If you just cut it, your whole square might unravel!

Stitch count: 16 dc’s and 8 ch-2 spaces
Round 2
- If you are going to use the same colour yarn, sl st in the next st and in the ch-2 space. Ch 1 and sc in the same space.
- If you are going to use a new colour, make a standing sc in any ch-2 space around.
*Ch 3 (Photo 1), sc in the next ch-2 space (Photo 2)* x 7. Ch 1 (Photo 3) and join to the first sc with a hdc (Photo 4). This (ch 1, hdc) counts as a ch-3 space and effectively places you in the centre of that space.

Stitch count: 8 sc’s, and 8 ch-3 spaces (remembering that the final (ch 1, hdc) counts as a ch-3 space)
Round 3
This is a straightforward round. At the end of this round you should have a sc in each ch-3 space from the previous round, and 4 ch’s between each sc.
Photo 1 illustrates the initial (ch 1, sc) in the same space as the (ch 1, hdc) join from the previous round.
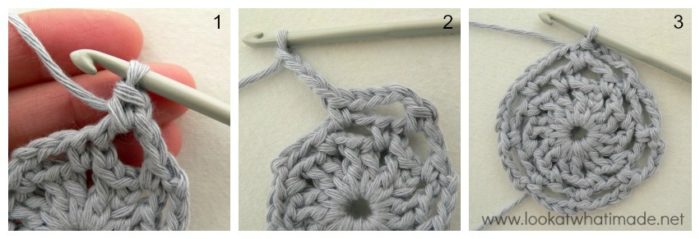
Stitch count: 8 sc’s and 8 ch-4 spaces
Round 4
This round is also straightforward. You will be making (3 x sc, ch 2, 3 x sc) in each ch-4 space around (Photos 1 and 2). You want to end up with 8 pointy petals.
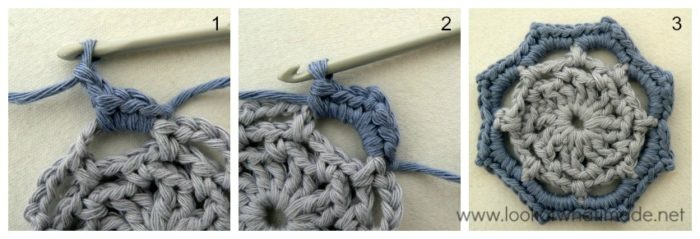
Stitch count: 48 sc‘s and 8 ch-2 spaces {8 petals}
Round 5
- If you are going to use the same colour for this round, sl st into the next 2 st’s and into the ch-2 space. Ch 1 (sc, ch 3, sc) in the same space.
- If you are going to change colours, start with a standing sc in any ch-2 space around. (Ch 3, sc) in the same space (Photos 1 and 2)
*Ch 3 and skip 3 st’s. Dc in the next st. This dc should fall in the first sc of the next “petal” (indicated with an arrow in Photo 2 and illustrated in Photo 3). Ch 3. (Sc, ch 3, sc) in the next ch-2 space (Photo 4)* x 7. Ch 3 and skip the next 3 st’s. Dc in the next st. Ch 3 and join to the first sc with a sl st.
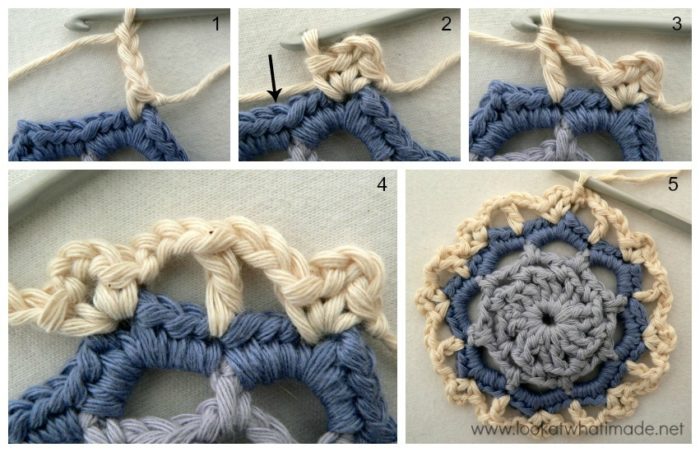
Stitch count: 8 dc’s, 16 sc’s, and 24 ch-3 spaces
Round 6
Another easy round. You want to end up with 3 sc’s (Photo 1) in each of the 24 ch-3 spaces (Photos 2 and 3).
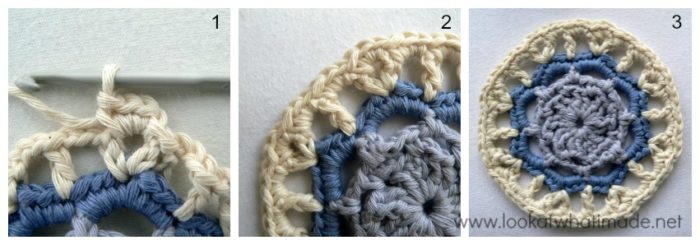
Stitch count: 72 sc’s
Round 7
- If you are going to use the same colour, sl st into the next st. Ch 1 and sc in the same st.
- If you are going to use a different colour for this round, make a standing single crochet in the central sc of any 3-sc group from the previous round (Photo 1). If you need help identifying which loops belong to which stitch, see this tutorial.
*Ch 3 and sc in the central sc of the next 3-sc group (Photo 2)* x 23. Ch 1 and join to the first sc with a hdc (Photo 3). Remember that this (ch 1, hdc) counts as a ch-3 space and effectively puts you in the centre of said space (just like in Round 2).

Stitch count: 24 sc’s and 24 ch-3 spaces {25 dc’s per side}
Round 8
This Round is a repeat of Round 3, but with 24 repeats instead of 8. Remember that you are making the first (ch 1, sc) into the same (last) space of the previous round (Photo 1).
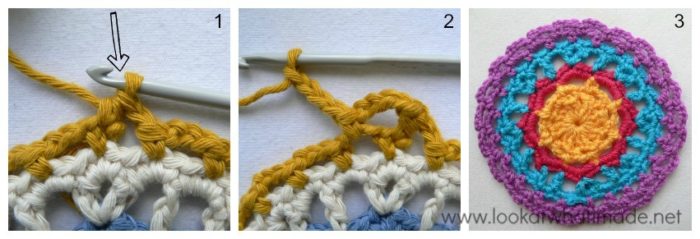
Have you spotted my error? If you take a very close look at my completed Round 8, you will notice that I only have 23 ch-4 spaces. I counted every round backwards to see where I had made the mistake. Can you spot it?
I only realized this at the end of the next round, and so I had to start from scratch!
Moral of the story? Make sure you have 24 ch-4 spaces before continuing!
Stitch count: 24 sc’s and 24 ch-4 spaces
Round 9
In this round you will be squaring up. You should have 24 ch-4 spaces to work into.
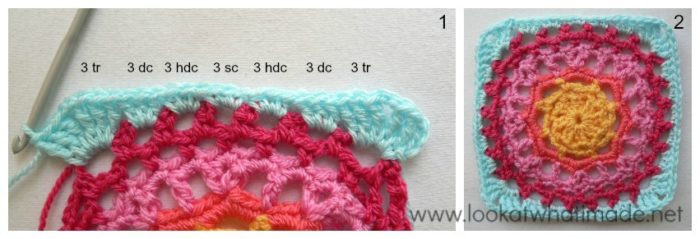
Stitch counts:
- Total: 84 st’s and 4 ch-2 corner spaces {24 tr’s, 24 dc’s, 24 hdc’s, and 12 sc’s}
- Per Side: 21 st’s {6 tr’s, 6 dc’s, 6 hdc’s, and 3 sc’s}
Round 10
If you are going to use a new colour for this round, you may want to start with a standing double crochet, instead of the initial ch-3, in any ch-2 corner space.
Where it says to dc in each stitch across, make sure that you do not accidentally skip the first stitch after the corner, which might be slightly hidden by the corner stitches of the previous round. You should have 21 dc’s between each corner.
- Photo 1 shows the corner stitches “hiding” the first stitch to be worked into.
- Photo 2 shows the corner stitches pulled to one side, exposing the first stitch to be worked into (indicated with an arrow).
- Photo 3 shows the first stitch after the corner made correctly.
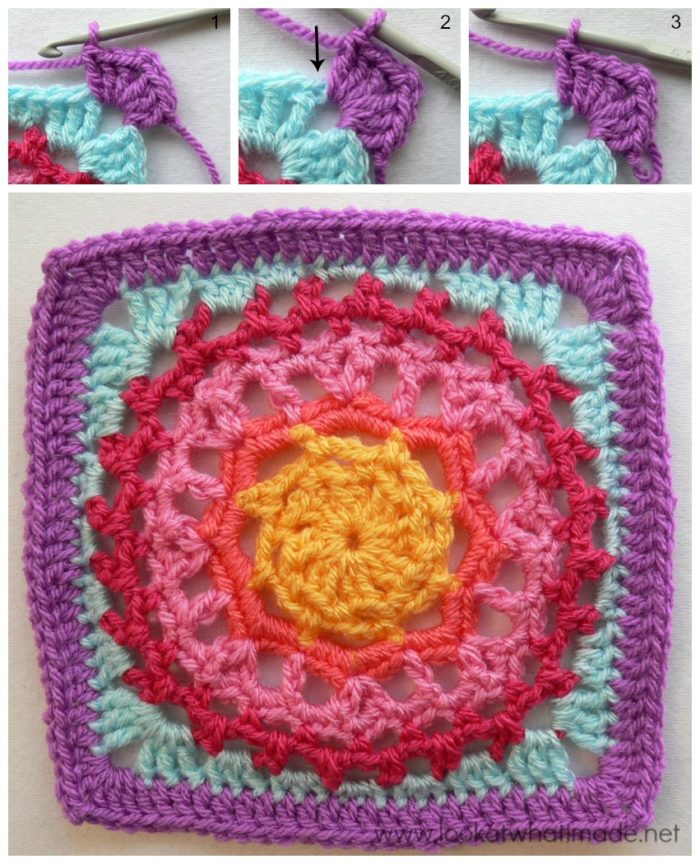
Stitch count: 108 dc’s and 4 ch-2 corner spaces {27 dc’s per side, 21 dc’s between corners}
Round 11
If you are going to use a new colour, you may want to start with a standing single crochet, instead of the (ch 1, sc), in any ch-2 corner space.
In this round, you will be working into every second stitch across. You should end up with 14 ch-2 spaces and 15 sc’s per side (not including the corner ch-2 spaces).
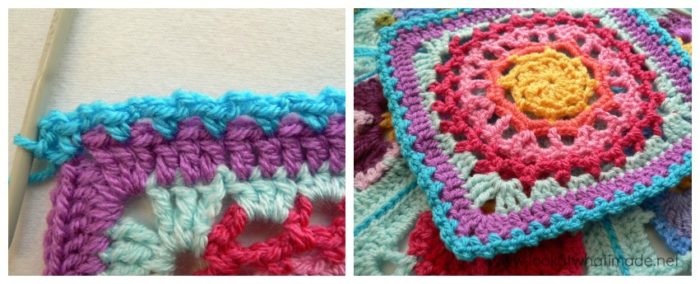
Stitch count: 56 ch-2 spaces, 4 ch-2 corner spaces, and 60 sc’s {14 ch-2 spaces and 15 sc’s per side}
Round 12
Round 12 is a breeze. You are basically making (2 dc’s, ch 2, 2 dc’s) in each corner ch-2 space (Photo 1), and 2 dc’s in each ch-2 space of each side (Photo 2). You should end up with 28 dc’s on each side (between corners).
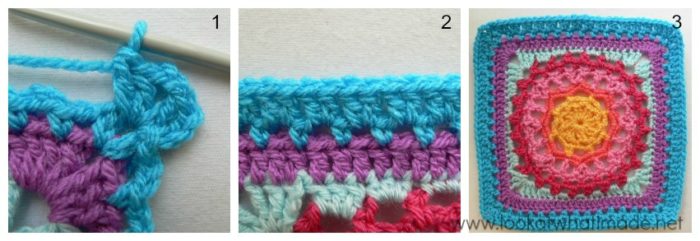
Stitch count: 128 dc’s and 4 ch-2 corner spaces {32 dc’s per side, 28 dc’s between corners}
Round 13
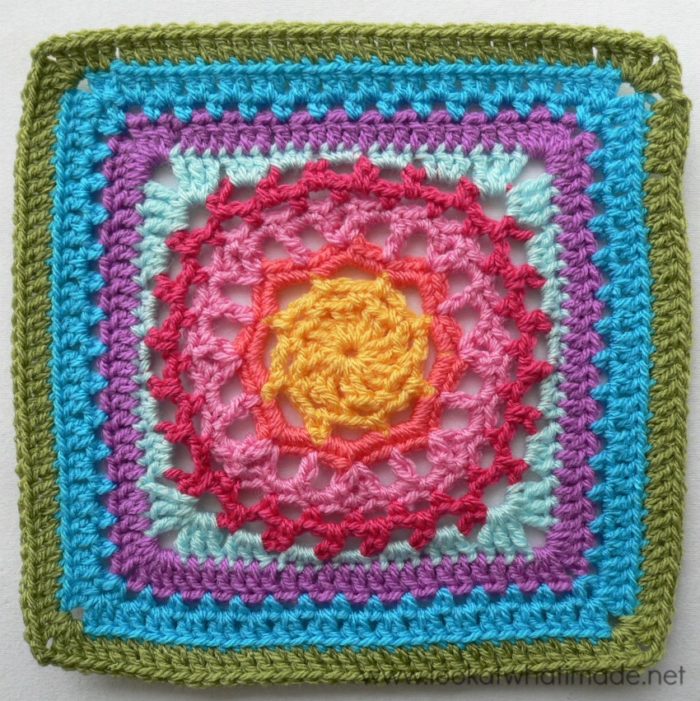
In this round, you will be working into the back loop only (blo) of each stitch across. You want to end up with 32 blo dc’s between each corner.
- Photo 2 illustrates the front and back loops.
- Photo 3 illustrates the hook inserted into the back loop only.
- Photo 4 shows the completed blo dc.

Sooo, I decided to finish this square outside so that I could watch two of the three kids while they played. They went inside, and when they came back out a few minutes later, Xander was wearing this…erm…interesting outfit.
Just look at that cheecky face! And look at Xandi holding Pieter’s hand…LOVE!
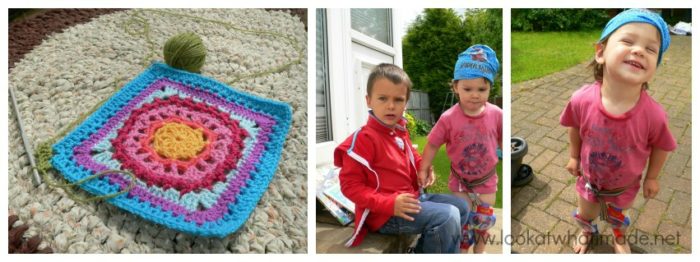 I suppose you want to see what the completed block looks like? I love the happy colours on this one.
Stitch count: 144 dc’s and 4 ch-2 corner spaces {36 dc’s per side, 32 dc’s between corners}
I have added an Optional Additional Round 14 to get my square to the same size as the other squares. You can find the instructions for that HERE.
Join the Block a Week CAL
If you would like to be part of the Block a week CAL on Facebook, please join the Official CCC Social Group (you must be logged into Facebook to do so) so that you can access and utilize the support and encouragement of all the lovely ladies on there.
You can also join the Block a Week CAL Flickr Group so that you can inspire others and be inspired yourself.
For those of you who do not like Facebook, you can always follow along with me here. I will be posting the blocks every week.
Remember to subscribe to my Weekly Newsletter if you would like to be kept in the loop. You can also like my Facebook page or follow me on Bloglovin, Google+, Pinterest, Twitter, or Instagram.
Happy Hooking!




amber says
beautiful square….where can I find the pattern for the mandala behind the square that is pictured behind the square in the picture?? Thanks!
Jenny says
There are no immediate plans from Dedri to reveal the Pansy Pizza as she calls it, but I do know she intends to refine it for release in the future. It is a work in progress! :)
Joyce van den Hout says
Thank you for all your lovely tutorials. The clear foto’s and sparkling comment shure are a big help. I think I spotted a little error however…Shouldn’t the stitch count af the end of round 5 indicate 24 ch-3 spaces? (I.s.o. ch-2spaces?)
Dedri Uys says
Indeed! Thank you for flagging it up :)
Dedri Uys says
Yes, Joyce, you are completely right. Thank you!
fariba says
Hi, your patterns are very very beutiful . Thank you so much
Dedri Uys says
Thank you, Fabrina, but I am only doing the tutorials. This pattern was written and designed by Chris Simon :)