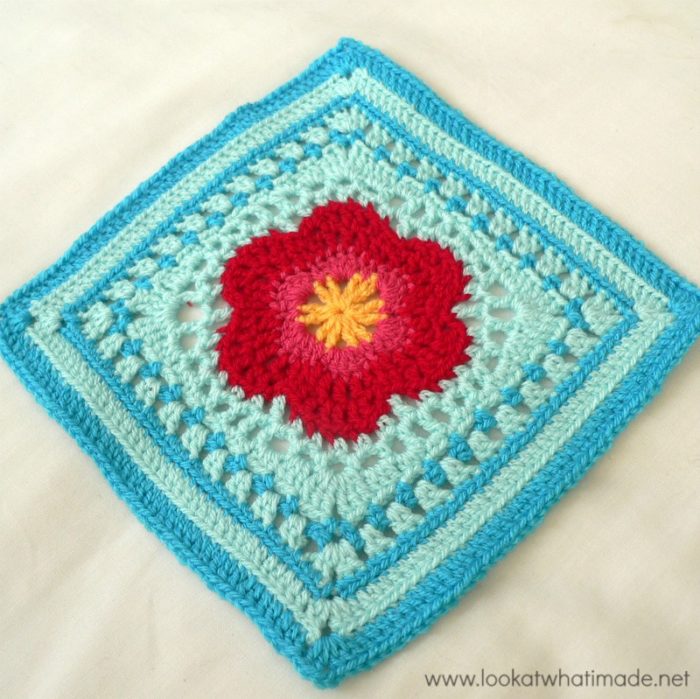
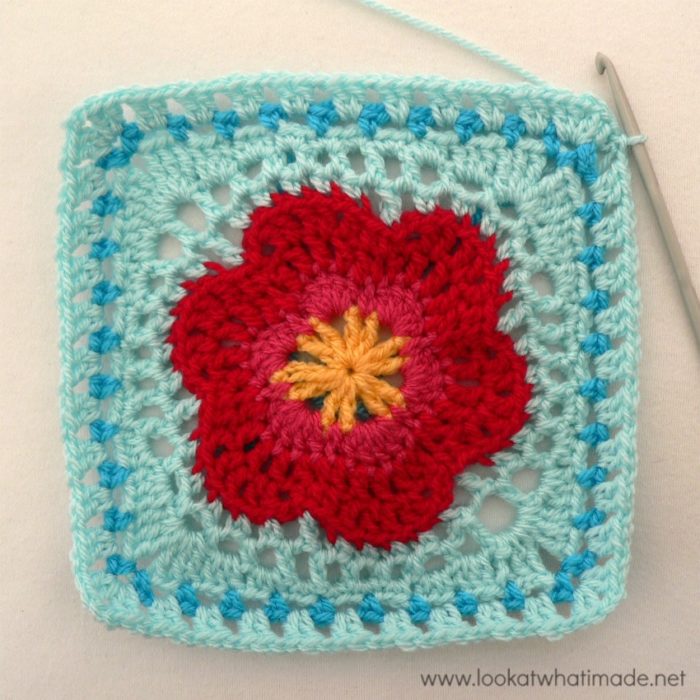
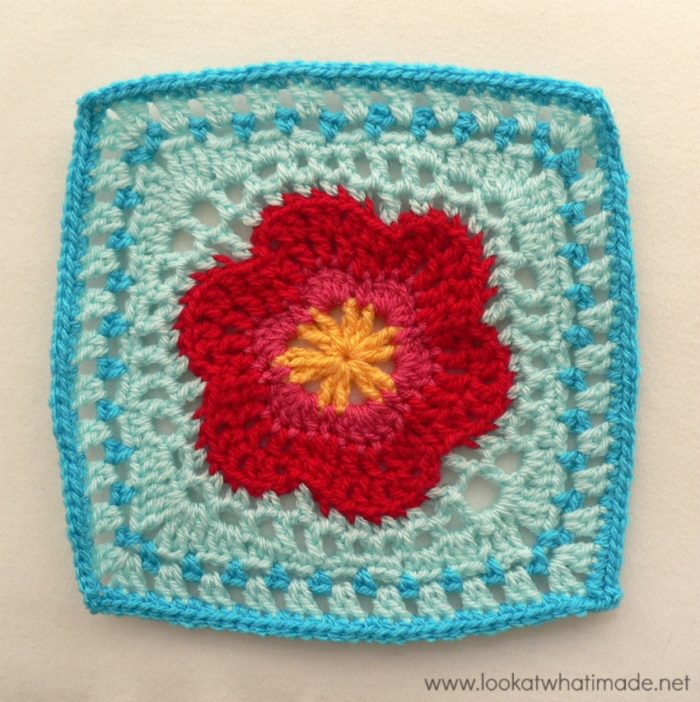
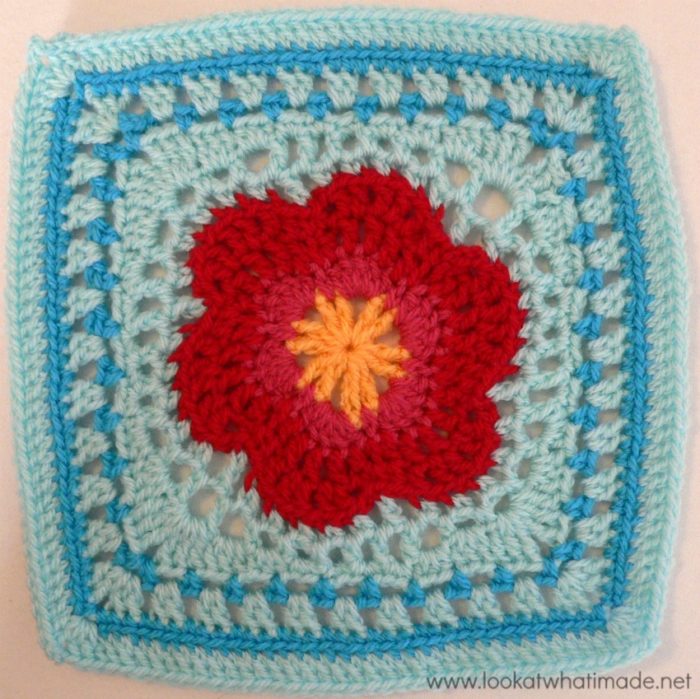
Block 16 of the Block a Week CAL (hosted by Kimberly Slifer) is Chris Simon’s gorgeous Lace Petals Square. Chris has a lot of beautiful designs, so feel free to hop on over to YarnCrazy to have a look.
This is another quick one, and apart from Round 4, in which you have to concentrate a tiny bit, it is super easy. I love the constructions of the central flower and the magic of seeing a flower turn into a hexagon, then a circle, then a square.
You can find a list of all the squares HERE.
Update: This is the square that inspired the popular Sophie’s Garden (24″ square). I will be eternally grateful to Chris for letting me use her center for Sophie’s Garden!
Lace Petals Crochet Square
{Pattern © 2005 Chris Simon. Photo tutorial done with kind permission}
Pattern
You can find the pattern here on Ravelry. If you have any problems printing the PDF, try this link instead.
Suggested Materials
- 5 mm Clover Amour Crochet Hook (US H/8 UK 6)
- Worsted weight yarn
Size
- Using the hook and yarn specified, your square should be a nice even 12″ when you are done.
- Using a 4 mm crochet hook (US G/6 UK 8) and double knit yarn, as I have done, your finished square will be about 8″ big.
My Yarn and Colour Choices
I am using the Stylecraft Special DK.
- Saffron (Round 1)
- Pomegranate (Round 2)
- Lipstick (Rounds 3-4)
- Sherbet (Rounds 5-7, 9 and 11)
- Turquoise (Rounds 8, 10, and Optional Round 12)
Notes
- The initial ch st’s in each round are counted as a stitch, except for in Rounds 2, 4, and 8.
- Stitch counts have not been supplied for all the rounds, so I have added them here.
- US Crochet Terminology used. (See this comparative chart if you need help transcribing from US to UK)
- Please Note: The yarn used in most of the tutorial photos is Drops Paris Cotton.
Lace Petals Photo Tutorial
This photo-walkthrough is NOT the actual pattern and should not be used instead of the pattern, but rather in conjunction with it.
Thank you very much to Chris Simon for giving us permission to do this photo-tutorial for her Lace Petals Square. And a special thank you to Kimberly Slifer for letting me do these tutorials and for obtaining the necessary permission.
Round 1
You can start this round with a magic ring instead of the initial ch-6 if you want.
Magic Ring Instructions for Round 1
Into a magic ring: ch 4 (this counts as your first dc and ch 1) and then make a dc (Photo 1). *Ch 2, dc, ch 1, dc (Photos 2 and 3)* x 5. Ch 2 (Photo 4) and join to the third stitch of the beginning ch-4. You should now have 6 ch-1 spaces, 6 ch-2 spaces and 12 dc’s.
If you are not familiar with working into a magic ring, this video tutorial from The Crochet Crowd is very good. Please remember, when working into a magic ring you HAVE to work away your initial tail very well. If you just cut it, your whole square might unravel!
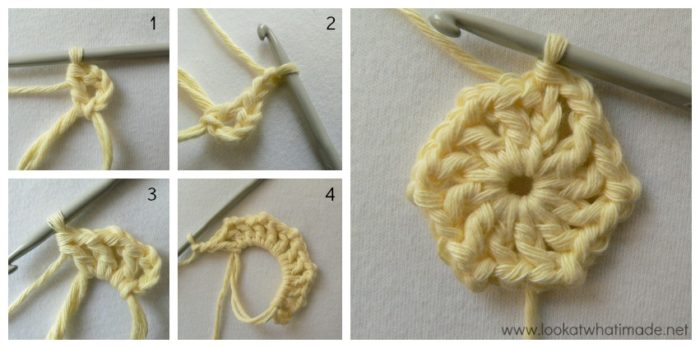 Stitch count: 12 dc’s, 6 ch-2 spaces and 6 ch-1 spaces
Round 2
- If you are going to use the same colour for Round 2, sl st into the next ch-1 space, ch 1 and sc in the same space.
- If you are going to use a new colour for Round 2, join your new yarn by making a standing single crochet in any ch-1 space around (Photo 1).
*Make 5 dc’s in the next ch-2 space (Photo 2), sc in the next ch-1 space (Photo 3)* x 5. Make 5 dc’s in the last ch-2 space (Photo 4). Join to the first sc with a sl st and finish off.
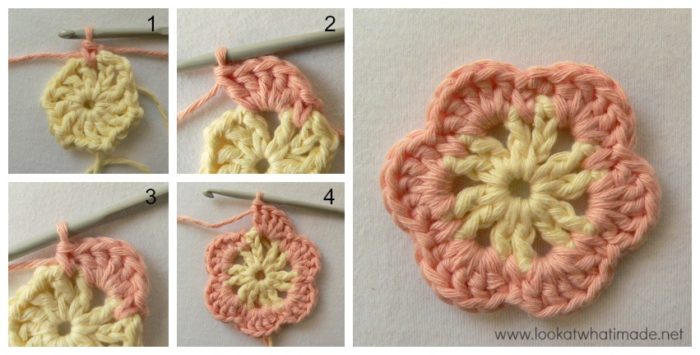 Stitch count: 30 dc’s and 6 sc’s {6 Petals}
Round 3
Start with a standing sc in any sc from the previous round (Photo 1). *(Dc, ch 1) in the next 4 dc’s. Dc in the last dc (Photo 2). Sc in the next sc (Photo 3)*. Repeat around as instructed in the pattern (Photo 4). You should have 6 petals, each containing 5 dc’s and 4 ch-1 spaces, and a sc between petals.
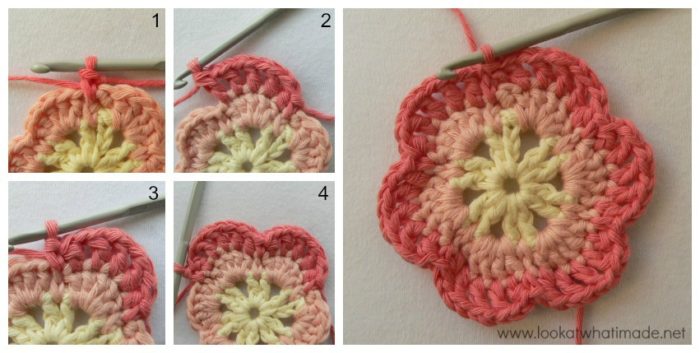 Stitch count: 30 dc’s, 6 sc’s, and 24 ch-1 spaces {6 Petals}
Round 4
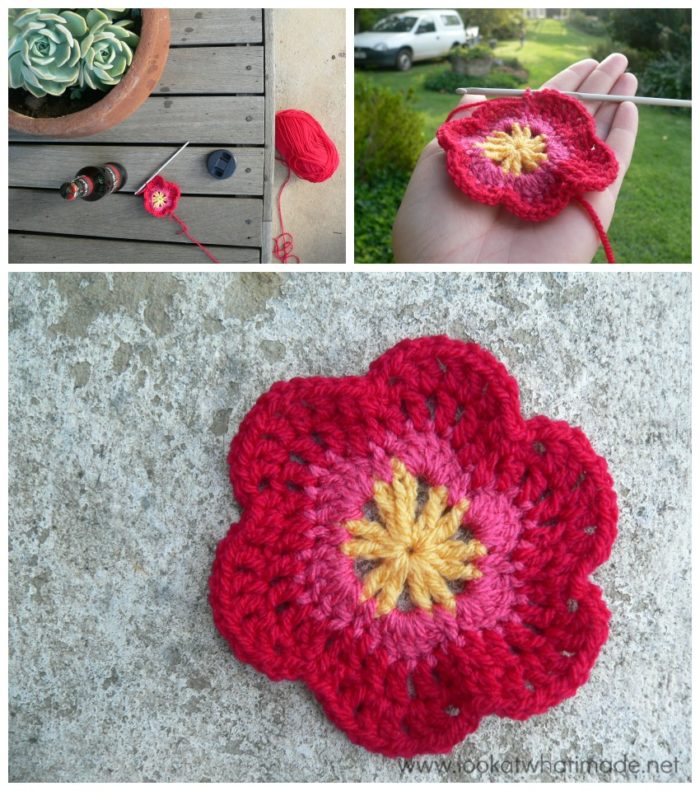
Round 4 is simple, but you have to concentrate. I had to frog this round a few times because I either forgot the ch-1’s or I made the stitches in the wrong spots.
If you are using the same colour, ch 1 and sc in the same stitch as the sl st join. If you are using a new colour, start with a standing single crochet in any sc around (Photo 1).
*Hdc in the first dc (Photo 2) and ch 1. (Dc in the next dc, ch 1, dc in the next ch-1 space, ch 1) twice (Photos 3-5). Dc in the next dc (Photo 6) and ch 1. Hdc in the last dc (Photo 7) and sc in the next sc (Photo 8).* Repeat around as instructed in the pattern and then join to the first sc with a sl st.
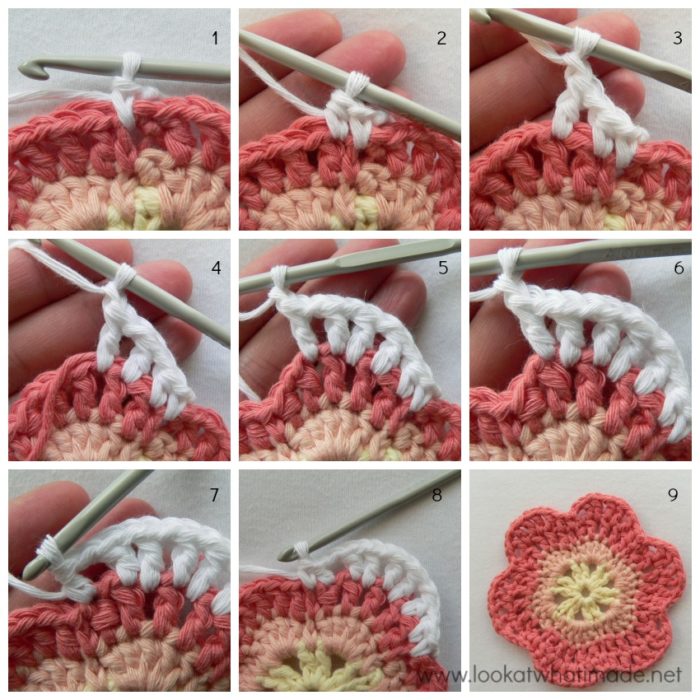 I managed to complete Round 4 when we were still at my parents-in-law’s place in South Africa. Because I am already missing them (and their gorgeous place), I thought I’d include some of the photos I took there. Notice the pretty succulent and the bottle of Black Label…
Stitch count:
- Total: 48 st’s and 36 ch-1 spaces {6 sc’s, 12 hdc’s, 30 dc’s, and 36 ch-1 spaces}
- Per Petal: 2 hdc’s, 5 dc’s, and 6 ch-1 spaces per petal {1 sc between petals}
Round 5
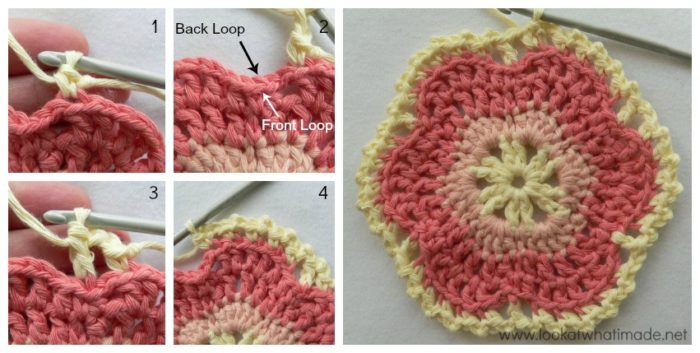
Join your yarn by making a standing single crochet in the back loop only (BLO) of the last dc of any petal around (Photo 1).
*Ch 2 and dc in the BLO of the sc between petals (Photos 2 and 3). (Ch 2, sc in BLO of the next dc) 5 times. See Photo 4.* Repeat around as instructed in the pattern and then join to the first sc with a sl st.
Stitch count:
- Total: 30 sc’s, 6 dc’s, and 36 ch-2 spaces
- Per Petal: 5 sc’s and 6 ch-2 spaces per petal, and 1 dc between petals
Round 6
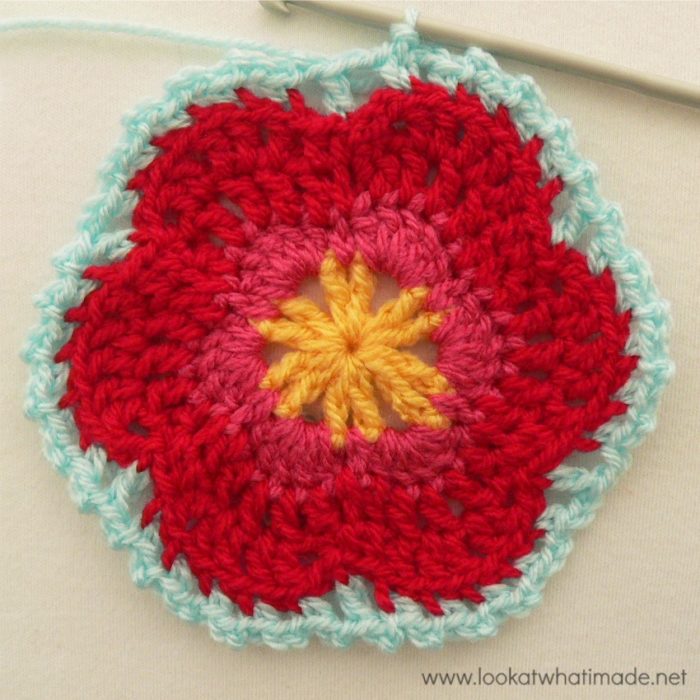
Sl st into the next ch-2 space. Ch 5 (this counts as the first dc plus ch-2) and dc in the next ch-2 space. The “dc’s” should fall on either side of the dc from the previous round (Photo 1).
*Ch 2 and hdc in the next ch-2 space. (Ch 2, sc in the next ch-2 space) twice. Ch 2 and hdc in the next ch-2 space. (Ch 2 and dc in the next ch-2 space) twice. See Photo 2.* Notice that the dc’s fall on either side of the dc from the previous round (indicated with an arrow)?
Repeat around as instructed in the pattern and then join to the third ch of the beginning ch-5 with a sl st.
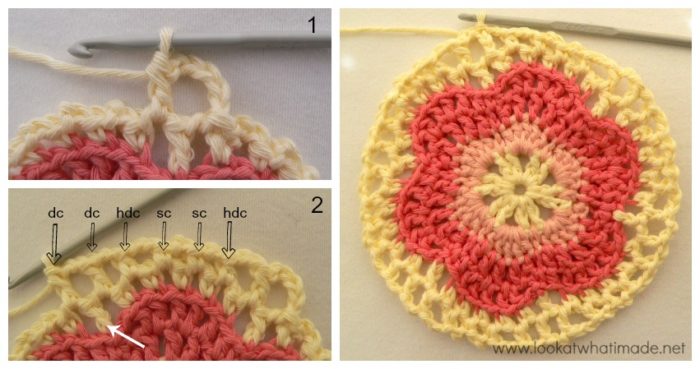 And all of a sudden the hexagon has turned into a circle. Like magic!
Stitch count: 36 st’s and 36 ch-2 spaces {12 sc’s, 12 hdc’s, 12 dc’s and 36 ch-2 spaces}
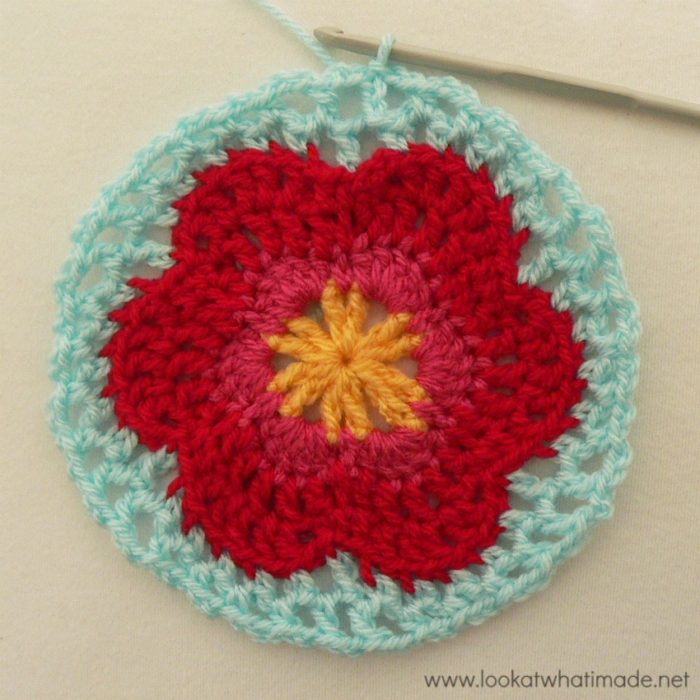
Round 7
Round 7 is straightforward and doesn’t need explaining (I don’t think). You have 36 ch-2 spaces to work into. That breaks down into 8 spaces per side and 4 corner spaces. Just in case you wanted to check at the end of each side (to prevent frogging later on).
- Total: 104 st’s and 4 ch-2 corners {24 tr’s, 24 dc’s, 24 hdc’s, and 32 sc’s}
- Per Side: 26 st’s {6 tr’s, 6 dc’s, 6 hdc’s, and 8 sc’s}
Round 8
Round 8 was a breeze. I snuck in a bit of Desperate Housewives while I was doing this round…and the next few, if I’m honest.
- Total: 40 sc’s and 40 ch-2 spaces
- Per Side: 10 sc’s and 9 ch-2 spaces (between corner spaces)
Round 9
Another easy round. Just remember those ch-1’s!
- Total: 88 dc’s, 40 ch-1 spaces, and 4 ch-2 corners
- Per Side: 22 dc’s and 10 ch-1 spaces
Round 10
At the risk of repeating myself: EASY!
Just remember to work into the ch-1 spaces as well. Also remember that working into the ch-1 spaces might slightly obscure the top of the next dc. If you need help identifying the loops of the first dc after a ch-1 space, have a look at this tutorial.
Stitch count:
- Total: 136 sc’s and 4 ch-2 corners
- Per Side: 34 sc’s per side {32 sc’s between corners}
Round 11
The only thing that might make this last round slightly tricky is the fact that you are working into the back loops, but you’ve already done that in Round 5, so you should be flying along at this point.
Stitch count:
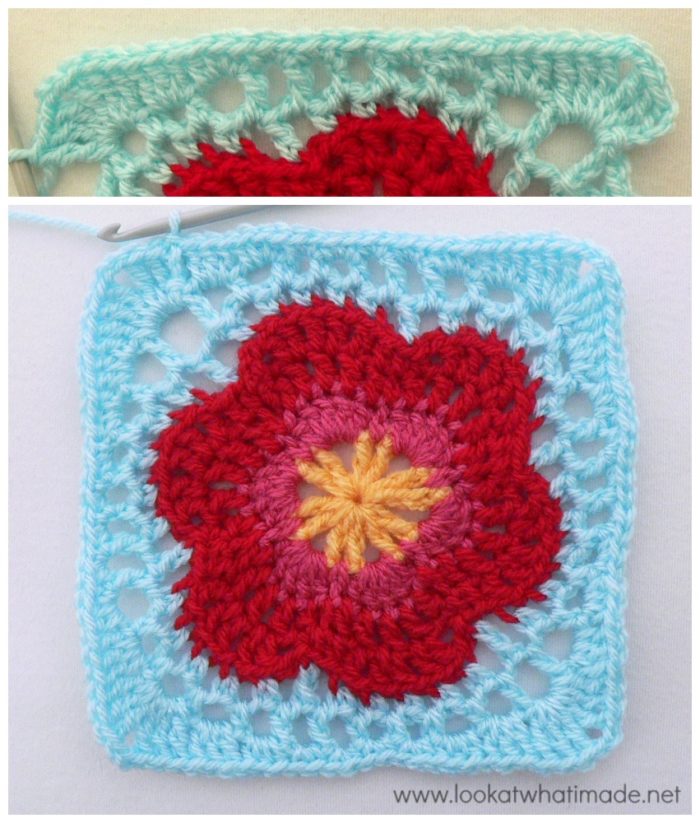
- Total: 152 dc’s and 4 ch-2 corners
- Per Side: 38 dc’s {34 dc’s between corners}
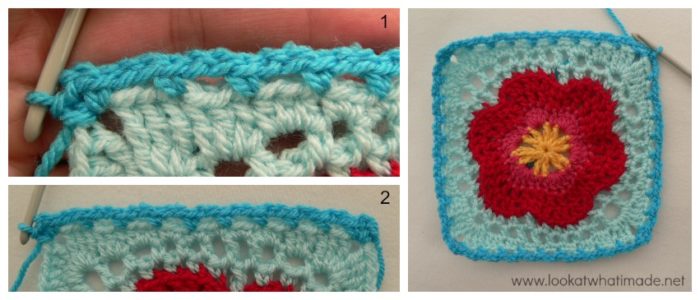
I have added an Optional Additional Round 12 to get my square to the same size as the others to date. You can find the instructions HERE.
Join the Block a Week CAL
If you would like to be part of the Block a week CAL on Facebook, please join the Official CCC Social Group (you must be logged into Facebook to do so) so that you can access and utilize the support and encouragement of all the lovely ladies on there.
You can also join the Block a Week CAL Flickr Group so that you can inspire others and be inspired yourself.
For those of you who do not like Facebook, you can always follow along with me here. I will be posting the blocks every week.
Remember to subscribe to my Weekly Newsletter if you would like to be kept in the loop. You can also like my Facebook page or follow me on Bloglovin, Google+, Pinterest, Twitter, or Instagram.
More Blogs Following the CAL
- San from Loopsan – using Stylecraft in sophisticated Parchment, Denim, Mocha and Meadow
- Lou Mander from Tea, Crochet and Me – using Stylecraft in White, Mocha and Raspberry
- Wendy from Little Wendy Crochet (Dutch photo tutorials)
Happy Hooking!



Patricia Lucas says
Am new to your site, so needless to say I’ve missed quite a few of the blocks. Can I go into your Archives and from January, 2014 through July, 2014. I have not mastered the squares, so it will take me some time to catch up. These squares are beautiful and I really want to try to do this. I made need some help.
Thanks,
Pat
Dedri Uys says
Patricia, you can find all the square to date in this post. Welcome and have fun!
Theresa says
Wow, I struggled with the flower part of this square, but eventually, SUCCESS!! Woohoo! Loving this CAL & learning ALOT along the way, Thank you!!
Theresa says
My earlier comment refered to Round 6
Theresa Bown says
I’m having endless drama with this flower. Can you pls explain what stitches come after the 2dc’s. I don’t understand how to read the pattern when it says repeat from # 4 times & * once. I’m ready to throw in the towel on this one, argh!!!!
Thank you Deidre.
Dedri Uys says
Hi Theresa. The # and * are just place markers. Ignore them until you get to the bit that starts “Repeat…”. When it tells you to repeat it, start at the instructions straight after the # (in other words the “Ch 2, hdc in next ch 2 space…) and follow the instructions again until you get to the word “Repeat…”. Do this 3 more times. You are basically following the instructions from the # to the word “Repeat…” 5 times.
Then start again at the #* and follow the instructions up until the second *. Then Ch 2 and join with a sl st as instructed.
I hope that makes more sense.
The best thing to do is just to take it slow.
If you follow the instructions in the photo tutorial for the first bit, it will give you an idea of what each repeat should look like.
Let me know if you still need help.
Dedri
Karen says
This is the first block I have found a problem with being left handed. Round 5 I have to find the right most dc and not the left. Had me puzzled for a while. Love your tutorials and would never have got this far without them. Thank you.
Dedri Uys says
Ah…I missed that, Karen. Sorry. I should have mentioned that. I hope the photos cleared it up in the end. x
tess says
I’m a little behind, but am working to get caught up… ALL these blocks are so awesome!! Thank you, Dedri!!
Dedri Uys says
Just a pleasure, Tess. I love working with these designs. Such talented designers!
Dane says
de bien beaux grannys, belles couleurs bravo a bientôt