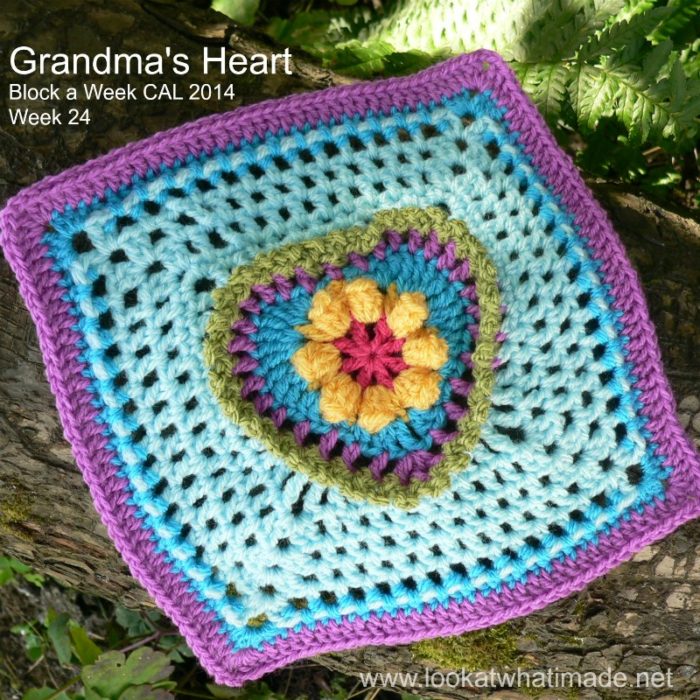
Block 24 of the Block a Week CAL (hosted by Kimberly Slifer) is Carola Wijma’s Grandma’s Heart Square. This is such a gorgeous square and Carola is both a talented designer and a joy to correspond with.
There are quite a few discrepancies in the written pattern and I suggest, with Carola’s express permission, that you use the photo tutorial below instead of the written pattern.
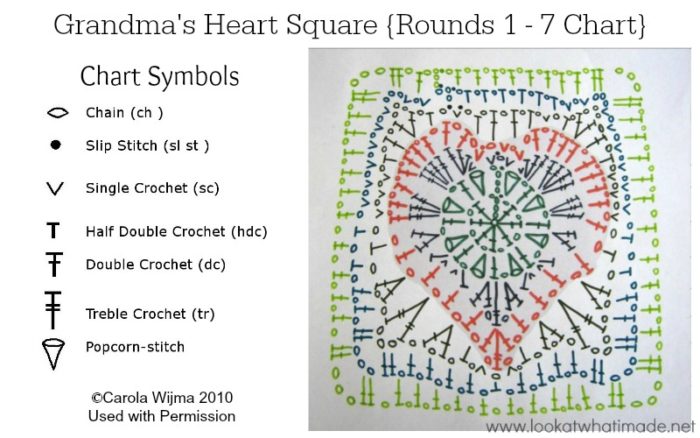
The written pattern does contain a very clear and accurate chart, as well as a few variations which are worth looking at.
Grandma’s Heart Crochet Square
{Pattern © 2010 Carola Wijma. Photo tutorial done with kind permission}
Suggested Materials
No suggested hook size or yarn weight. For a 12″ square, use hook and yarn suggested below.
- 5 mm crochet hook (US H/8 UK 6)
- Worsted weight yarn
Size
- Using the hook and yarn specified, your square should be a nice even 12″ when you are done.
- Using a 4 mm crochet hook (US G/6 UK 8) and double knit yarn, as I have done, your finished square will be about 8″ big.
Pattern
- You can download the pattern from Ravelry, although I suggest that you use this tutorial instead.
My Yarn and Colour Choices
I am using the Stylecraft Special DK “Lucy Pack”. You can read more about that in this post.
- Pomegranate (Round 1)
- Saffron (Round 2)
- Turquoise (Rounds 3 and 10)
- Magenta (Rounds 4 and 11)
- Meadow (Picot Round)
- Sherbet (Rounds 5 – 9)
Notes
- US Crochet Terminology used. (See this comparative chart if you need help transcribing from US to UK)
- Please Note: The yarn used in most of the tutorial photos is Drops Paris Cotton.
Grandma’s Heart Square Photo Tutorial and Chart
Usually I would tell you that this photo-walkthrough is NOT the actual pattern and should not be used instead of the pattern, but this week we will be rolling slightly differently.
The written pattern is very hard to follow and there are numerous transcription errors. I have asked Carola if I can do a photo tutorial for each round this week and she was happy to oblige. I have also gotten permission from her to include one of her charts, so if you want to brush up on your crochet-chart skills, you’re in for a treat!
Thank you very much to Carola Wijman for giving us permission to do this complete photo-tutorial. And a special thank you to Kimberly Slifer for letting me do these tutorials and for obtaining the necessary permission.
Abbreviations
US terminology used.
- Blo – Back loop only
- Bpdc – Back post double crochet
- Ch – Chain
- Dc – Double crochet
- Hdc – Half-double crochet
- Picot – Ch 3 and sl st in the third chain from the hook
- Popcorn stitch – see this tutorial
- Sc – Single crochet
- St/st’s – Stitch/stitches
- Tr – Treble crochet
- * – Repeat instructions between asterisks the amount of times specified
Round 1 {Dark Green on Chart}
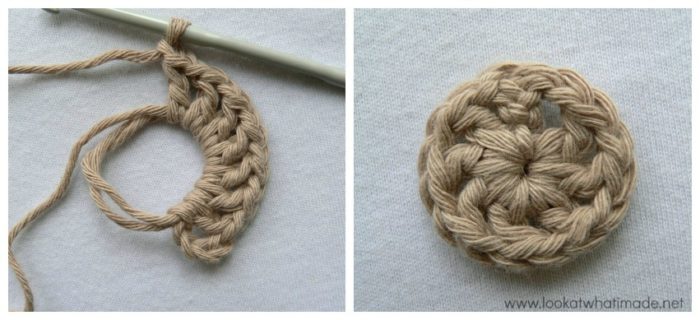
Into a magic ring: ch 4 (this counts as your first dc and ch-1). (Dc, ch 1) seven times. Join with a sl st to the third ch of the beginning ch-4.
Stitch count: 8 dc’s and 8 ch-1 spaces
Round 2 {Dark Green on Chart}
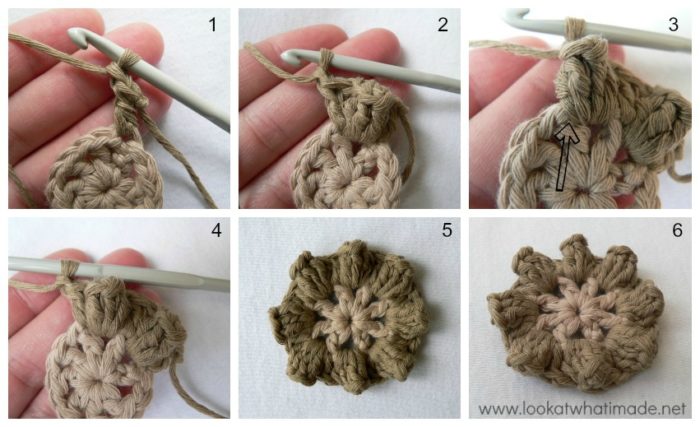
If you want to close the popcorn stitches with a ch, as I have done, feel free to do so. This pattern works whether you ch 1 or not. I find it easier to close the popcorns with a ch st.
Ch 4. This counts as your first dc and ch-1. Alternatively start with a standing double crochet and ch 1 (Photo 1).
*Make a popcorn stitch in the next ch-1 space. Dc in the next dc (Photo 2). This dc will be very tricky to get into. You will have to scootch the popcorn stitch up to find the loops (see Photos 3 and 4). Ch 1* x 7. Make a popcorn in the last ch-1 space. Join to the third ch of the beginning ch-4 (or the top of the standing double crochet) with a sl st.
Stitch count: 8 dc’s, 8 popcorn stitches, 8 ch-1 spaces.
Round 3 {Dark Blue on the Chart}
- If you are using the same colour, sl st into the next ch-1 space. Ch 1 and make a sc in the same ch-1 space.
- If you are going to use a new colour, start with a standing single crochet in any ch-1 space before a popcorn (Photo 1).
You are going to make the next 4 st’s into the space between the popcorn stitch and the next dc. Although this is not technically a space, I will refer to it as one for the purposes of this round.
So working into the space between the popcorn stitch and the next dc: (sc, hdc, dc, tr) all in the same space (Photo 2). Make 4 tr’s in the next ch-1 space (Photo 3). Make 3 tr’s in the next space (in other words, between the popcorn stitch and the next dc) – see Photo 4. Make 2 dc’s in the next ch-1 space (Photo 5). (Hdc, sc) in the next space. (Sc, hdc) in the next ch-1 space (Photo 6). Make 2 dc’s in the next space (Photo 7).
You are now going to make the pointy end of the heart by working (ch 1, tr, ch 1) into the next dc (not the space) – see Photo 8. Photo 9 shows the first half of the heart completed.
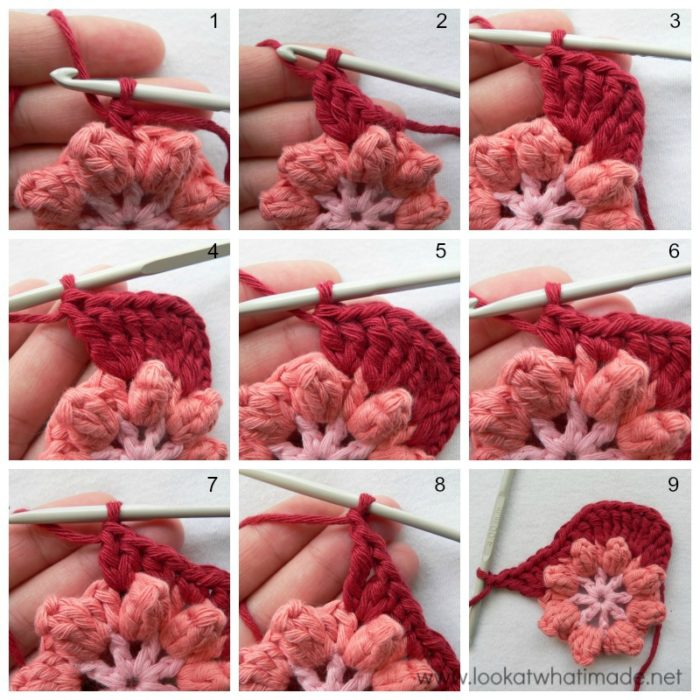 You will now make the other half of the heart, repeating the instructions above in reverse. Don’t worry, I have written the instructions out below.
Make 2 dc’s in the next ch-1 space. (Hdc, sc) in the next space. (Sc, hdc) in the next ch-1 space. Make 2 dc’s in the next space. Make 3 tr’s in the next ch-1 space. Make 4 tr’s in the next space. (Tr, dc, hdc, sc) all in the next ch-1 space. Sc in the last space. Ch 1 and join to the top of the first sc with a sl st.
Stitch count: 41 st’s and 3 ch-1 spaces {8 sc’s, 6 hdc’s, 10 dc’s, 17 tr’s}
Round 4 {Red on the Chart}
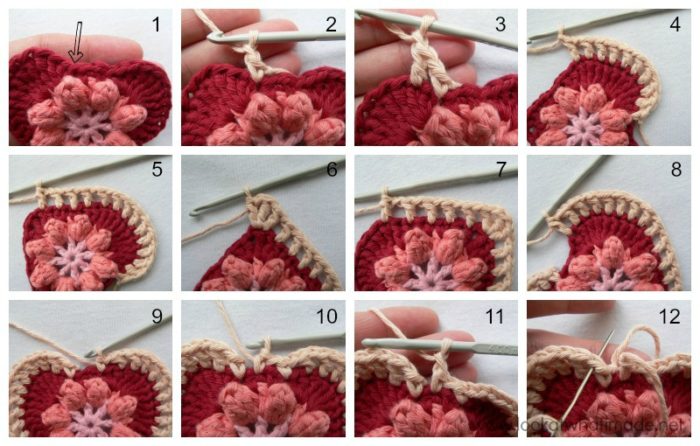
- If you are using the same colour, sl st into the next st. Ch 1 and sc in the same stitch.
- If you are using a different colour, start with a standing single crochet in the stitch after the sl st join (in other words, the second sc of the round – indicated with an arrow in Photo 1 and illustrated in Photo 2).
Ch 1 and skip the next st. Dc in the next dc (Photos 2 and 3). (Ch 1, dc) in each of the next 8 tr’s (Photo 4).
(Ch 1, skip 1, dc in the next st) four times (Photo 5). To make the corner: (ch 1, dc, ch 1, tr, ch 1, dc) all in the corner tr (Photo 6).
Ch 1 and dc in the next dc. (Ch 1, skip 1, dc in the next st) four times (Photo 7). (Ch 1, dc) in each of the next 8 st’s (in other words, in the remaining 7 tr’s and the next dc – see Photo 8). Ch 1, skip 1, sc in the next sc (Photo 9). Ch 1, skip 1 and sc into the ch-1 space (Photo 10). Ch 1 and join to the first sc with a sl st.
I am actually joining my rounds with the invisible join in this square (Photo 12), because it makes the outline of the heart more tidy.
Stitch counts: 32 st’s and 32 ch-1 spaces {3 sc’s, 28 dc’s, and 1 tr}
Round 5 {Black on the Chart}
Please note: in Rounds 5 and 6 every side is different. You might find it easier to refer back to the chart for these two rounds instead of the photos.
In this round you will be working into the back loops only (blo) of each ch. If you find this too complicated, feel free to work into the ch-1 spaces instead, but it will not be as neat once you add the picot round. You can add the picot round any time you wish. I suggest doing it right after Round 5, but you can always do it once your square is finished.
- If you are using the same colour, sl st your way to the ch-1 space between the first 2 dc’s. Remember to make the sl st’s in the back loops only (3 sl st’s). Ch 1 and sc in the blo of the same ch st. This sc should fall between the first 2 dc’s from the previous round.
- If you are using a new colour, start with a standing single crochet in the blo of the ch between the first 2 dc’s of the previous round.
(Ch 1, hdc) in the next ch. Remember that you are working into the back loops only for the entire round! (Ch 1, dc, ch 3, dc) in the next ch (Photo 1).
First Side: (Ch 1, dc) in the next ch. (Ch 1, hdc) in the next ch. (Ch 1, sc) in each of the next 3 ch’s. (Ch 1, hdc) in the next ch. (Ch 1, dc) twice in the next ch. (Ch 1, tr, ch 3, tr) in the next ch (Photo 2).
Second Side: (Ch 1, dc) twice in the next ch. (Ch 1, hdc) in the next ch. (Ch 1, sc) in each of the next 2 ch’s. These 2 sc’s should fall on either side of the corner tr from the previous round. (Ch 1, hdc) in the next ch. (Ch 1, dc) twice in the next ch. (Ch 1, tr, ch 3, tr) in the next ch (Photo 3).
Third Side: (Ch 1, dc) twice in the next ch. (Ch 1, hdc) in the next ch. (Ch 1, sc) in each of the next 3 ch’s. (Ch 1, hdc) in the next ch. (Ch 1, dc) in the next ch. (Ch 1, dc, ch 3, dc) in the next ch (Photo 4).
Fourth Side: (Ch 1, hdc) in the next ch. (Ch 1, sc) in the next ch. (Ch 1, hdc) in the next ch. (Ch 1, dc) in each of the next 2 ch’s. (Ch 1, hdc) in the next ch. Ch 1 and join to the top of the first sc with a sl st.
If you are going to continue making Round 6 in the same colour as Round 5, pull the last stitch into a long loop so that you don’t accidentally unravel it while you are making the picot round.
If you are going to make Round 6 in a new colour, bind off now and work away your tails of yarn.
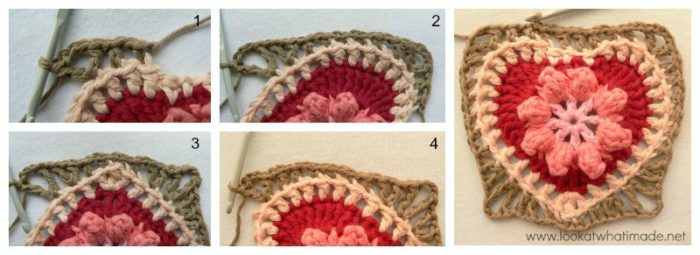
Stitch counts:
- Total: 40 st’s, 36 ch-1 spaces, and 4 ch-3 corner spaces {10 sc’s, 10 hdc’s, 16 dc’s, and 4 tr’s}
- Per Side: 10 st’s and 9 ch-1 spaces
Picot Round
You will make this round into the ch-1 spaces from Round 4. These ch-1 spaces will already contain the stitches from Round 5.
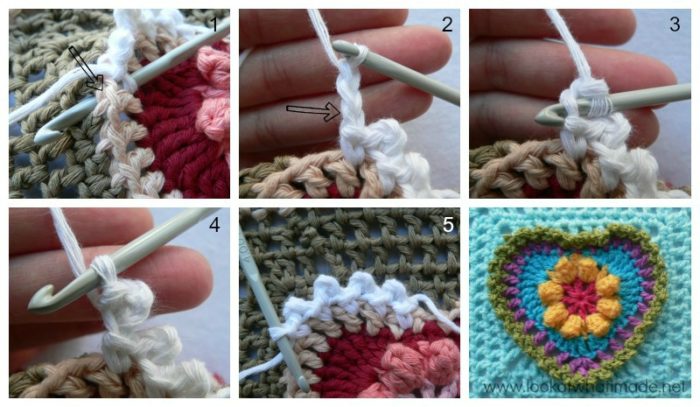
Join your yarn by making a standing single crochet in any ch-1 space around. Ch 3 (Photo 1) and sl st into the third ch from the hook (in other words, the chain farthest away from the hook – indicated with an arrow in Photo 2 and illustrated in Photos 3 and 4). This is your first picot made.
*Sc in the next ch-1 space (Photo 1 shows you how to insert your hook into the space). Ch 3 and sl st into the third ch from the hook (picot made)* x 31.
Join to the top of the first sc with a sl st, bind off and work away your tails of yarn.
Round 6 {Blue on the Chart}
This round will be worked into the ch-1 spaces from the previous round (and into the ch-3 corner spaces).
- If you are using the same colour, sl st into the ch-1 space and ch 3 (this counts as your first hdc and ch-1).
- If you are using a new colour, start with a standing half-double crochet in the first ch-1 space after the sl st join and then ch 1.
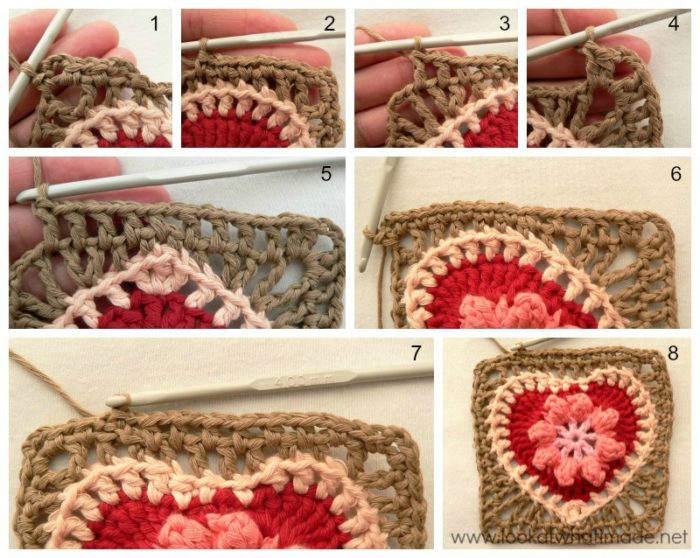
Sc in the next ch-1 space. (Ch 1, sc, ch 3, sc) in the ch-3 corner space (Photo 1).
First Side: (Ch 1, sc) in each of the next 5 ch-1 spaces (Photo 2). (Ch 1, hdc) in each of the next 2 ch-1 spaces. (Ch 1, dc) in each of the last 2 ch-1 spaces (Photo 3). (Ch 1, 2 dc, ch 3, 2 dc) in the corner ch-3 space (Photo 4). {12 st’s and 10 ch-1 spaces}
Second Side: (Ch 1, dc) in each of the next 4 ch-1 spaces. (Ch 1, hdc) in the ch-1 space over the tr from Round 4. (Ch 1, dc) in each of the next 4 ch-1 spaces (Photo 5). (Ch 1, 2 dc, ch 3, 2 dc) in the corner ch-3 space. {13 st’s and 10 ch-1 spaces}
Third Side: (Ch 1, dc) in each of the next 2 ch-1 spaces. (Ch 1, hdc) in each of the next 2 ch-1 spaces. (Ch 1, sc) in each of the next 5 ch-1 spaces. (Ch 1, sc, ch 3, sc) in the ch-3 corner space (Photo 6). {12 st’s and 10 ch-1 spaces}
Fourth Side: (Ch 1, sc) in the next ch-1 space. (Ch 1, hdc) in each of the next 6 ch-1 spaces. Ch 1 and join to the top of the first hdc with a sl st (Photo 7).
If you include the stitches at the beginning of the round, your fourth side will have 11 st’s and 10 ch-1 spaces.
Stitch counts:
- Total: 48 st’s, 40 ch-1 spaces, and 4 ch-3 corner spaces
- Per Side: as stipulated after each side
Round 7 {Light Green on the Chart}
This round will be worked into the ch-1 spaces from the previous round (10 on each side), and the ch-3 corners.
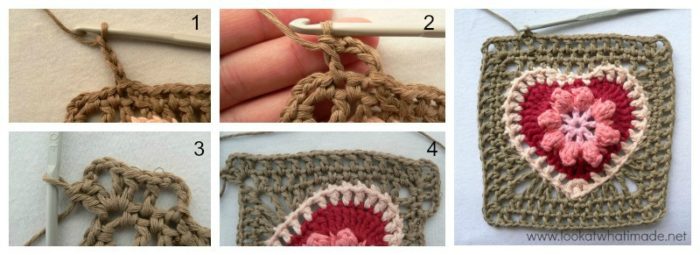
- If you are using the same colour, sl st into the next ch-1 space and ch 4 (this counts as your first dc and ch-1). See Photo 1.
- If you are using a different colour, start with a standing double crochet in the first ch-1 space after the sl st join and then ch 1.
Dc in the next ch-1 space (Photo 2). *(Ch 1, 2 dc, ch 3, 2 dc) into the ch-3 corner space (Photo 3). (Ch 1, dc) into each of the 10 ch-1 spaces across (Photo 4)* x 3. (Ch 1, 2 dc, ch 3, 2 dc) into the ch-3 corner space. (Ch 1, dc) into each of the next 8 ch-1 spaces. Ch 1 and join to the third ch of the beginning ch 4 (or the top of the standing double crochet) with a sl st.
Stitch counts:
- Total: 56 dc’s, 44 ch-1 spaces, and 4 ch-3 corner spaces
- Per Side: 14 dc’s and 11 ch-1 spaces per side
Round 8
Repeat Round 7, this time working into each of the 11 ch-1 spaces per side.
Stitch counts:
- Total: 60 dc’s, 48 ch-1 spaces, and 4 ch-3 corner spaces
- Per Side: 15 dc’s and 12 ch-1 spaces per side
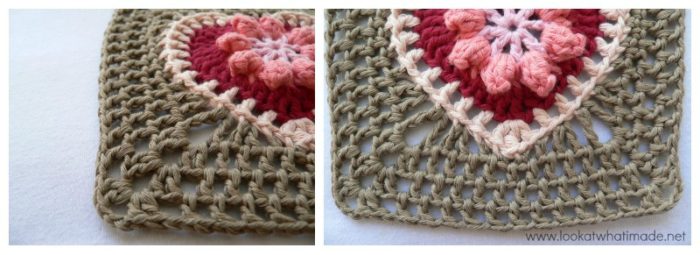
Round 9
Repeat Round 7, this time working into each of the 12 ch-1 spaces per side.
Stitch counts:
- Total: 64 dc’s, 52 ch-1 spaces, and 4 ch-3 corner spaces
- Per Side: 16 dc’s and 13 ch-1 spaces per side
Round 10
Photo 1 shows Round 9 completed.
Start with a standing hdc in any ch-3 corner space. (2 hdc, ch 2, 3 hdc) in the same corner space (Photo 1).
*Skip the first dc after the corner. (Bpdc around the post of the next dc {Photos 3 and 4}, hdc in the next ch-1 sp {Photo 5}) thirteen times. Bpdc around the post of the next dc. Skip the last dc. (3 hdc, ch 2, 3 hdc) into the corner ch-3 space (Photo 6)* x 4. Omit the last corner on the last repeat.
Join to the top of the first hdc with a sl st.
Stitch counts:
- Total: 132 st’s and 4 ch-2 corners
- Per Side: 33 st’s {14 bpdc’s and 19 hdc’s}
- If you are using the same colour, ch 3 (this counts as your first dc).
- If you are using a different colour, start with a standing double crochet in the same st as the sl st join.
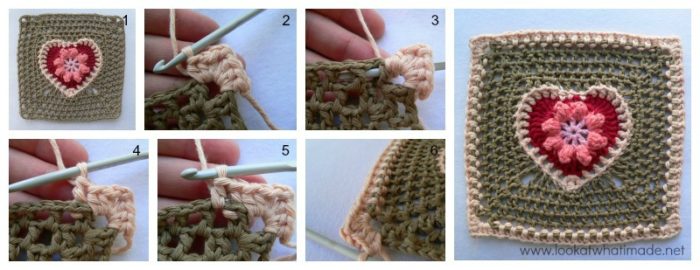
Round 11
Dc in the next 2 st’s. *(2 dc, ch 2, 2 dc) in the corner ch-2 space. Dc in each of the 33 st’s across* x 4. Omit the last 3 dc’s on the last repeat.
Join to the top of the beginning ch-3 (or the standing double crochet) with a sl st.
Stitch count: 148 st’s and 4 ch-2 corners {37 dc’s per side}
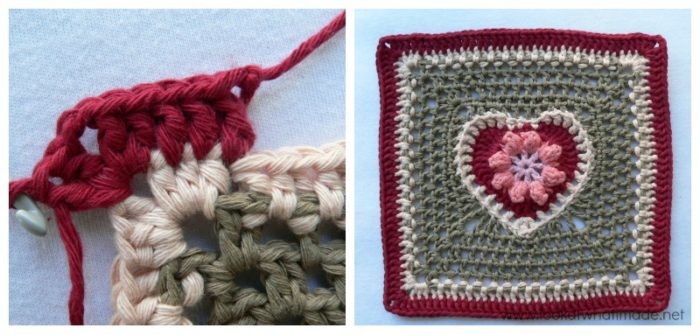
Optional Round 12
{Only if your square isn’t big enough yet}
- If you are using the same colour, ch 1 and sc in the same stitch.
- If you are using a different colour, start with a standing single crochet in the same st as the sl st join.
Sc in the next 4 st’s. *(2 sc, ch 1, 2 sc) in the corner ch-2 space. Sc in each of the 37 dc’s across* x 4. Omit the last 5 sc’s on the last repeat.
Join to the top of the first sc with a sl st and bind off. Work away your tails of yarn.
Stitch count: 164 st’s and 4 ch-1 corners {41 sc’s per side}
Now THAT deserves a drink, I think! Wonder if hubby will make me a nice cup of coffee…
Join the Block a Week CAL
If you would like to be part of the Block a week CAL on Facebook, please join the Official CCC Social Group (you must be logged into Facebook to do so) so that you can access and utilize the support and encouragement of all the lovely ladies on there.
You can also join the Block a Week CAL Flickr Group so that you can inspire others and be inspired yourself.
For those of you who do not like Facebook, you can always follow along with me here. I will be posting the blocks every week.
Consider subscribing to my Weekly Newsletter, which is sent out first thing Monday mornings. You can also like my Facebook page or follow me on Bloglovin or Google+.
More Blogs Following the CAL
- San from Loopsan – using Stylecraft in sophisticated Parchment, Denim, Mocha and Meadow
- Lou Mander from Tea, Crochet and Me – using Stylecraft in White, Mocha and Raspberry
- Wendy from Little Wendy Crochet (Dutch photo tutorials)
Happy Hooking!




Caitlyn says
Hello! When you say the squares should make an even 12’ is that being measured straight up and down or diagonally?
Jenny Lowman says
Hi Caitlin. Usually the measurement is horizontally and vertically, unless stated :)
Gail says
How many chains do you start with to form magic loop?
Jenny Lowman says
Dedri uses a magic ring that requires no chains.
Have a look at this explanation on Moogly
Link
Hope that helps :)
Patty Easton Easton says
Thank you so much for this tutorial I love this heart square. Hope all of you that did this know how talented you are. Please kept up the great work.
Carrie says
I am such a charts girl! I’m wondering if I could use this one as a standalone pattern, or would I have to use both? The chart doesn’t seem to have the whole square.
And Dedri, I would just like to thank you for doing these tutorials (and in this case a whole pattern!). I know that they are a TON of work. There is no way I would be able to constantly stop my work, take a couple pictures, make a few more stitches, etc. There are lots of beginners out there who find them priceless. So whether you stop doing them or not, please know that we are thankful for everything that you’ve done.
Carrie
Dedri Uys says
Carrie, I have no intention of stopping with the tuts. My question the other day was about my actual patterns, not the tuts. They will continue :)
Thank you so much for your kind words and for always commenting and being generally special! I appreciate you and look forward to reading what you have to say every time x
Brinda says
I am joining late, but hopefully will catch up.
Dedri Uys says
Brilliant, Brinda. Welcome :)
maura says
your link to your facebook page is not working
what is the name i should look for?
Dedri Uys says
I,’ll have a look, thanx Maura. It should work if you are logged in to fb. http://Www.facebook.com/lookatwhatimade/