My book, Amamani Puzzle Balls, has been available now for a couple of months and we continue to receive useful feedback about the book and the layout. I wanted to clear up some of the misunderstandings and confusion, so I thought it would be a good idea to do a post addressing the most frequently asked questions. I will also elaborate on some of the ways you can ensure that you are “doing it right”.
Frequently Asked Questions
How do the Puzzle Animals Work?
 These Amamani are all based on the traditional Amish Puzzle Ball and as such come apart into 3 segments, or rings, that have to be assembled to form the ball.
If you have never made or seen an Amish puzzle ball, I suggest making the Crochet Amish Puzzle Ball first (available as a free pattern HERE). This will give you a good idea of how the segments are made and how they fit together. It then becomes much easier to envision what you are aiming for when making the animals. The segments for the animals are essentially the same as for the ball. Some just have a head (and/or tail) instead of one of the lids, and some have legs instead of two of the lids.
If you do not have the time or the patience to make a ball first, I strongly suggest that you have a look at the VIDEO CLIP that Annie’s has done. It is a cute little stop-motion video of the dinosaur being taken apart and assembled again. It will give you a very good idea of what the finished segements should look like and how they will work.
I Don’t Know Where to Start!
We have had quite a few comments from people who have found the layout of the book confusing, so I am going to walk you through how the patterns should be followed, using Eleanor the Elephant as an example.
The book starts off with a Basic Parts and Pieces section.
This section contains the instructions for making the Wedges, Lids, Legs, Feet, and Basic Tail. Because these parts form the building blocks for each animal, we wanted to put them in their own little “box” so that we could refer to them as and when each individual pattern calls for them. They are useless on their own.
The Basic Parts and Pieces section also includes instructions for making a Simple Segment (as used in the Crochet Amish Puzzle Ball) and a Basic Leg Segment. Again, these should only be made as and when an Individual Pattern calls for them.
The next section is the Individual Patterns.
This is where the magic happens. It is important that you read the relevant pattern first, before jumping in and just making basic parts.
So if you turn to page 28 of the book, for example, you will find the pattern for Eleanor the Elephant. On that same page you will find a section with the heading: “Basic Parts and Pieces”.
You are instructed to do 3 things:
1. Make the Wedges
You need to make 12 wedges referring to the instructions for the wedges on page 8.
2. Make 2 Basic Leg Segments
Using the colours specified, make 2 Basic Leg Segments, referring to the instructions on page 14.
On page 14 you are, in turn, referred to the instructions for making an individual leg (when needed), and lids (when needed).
The next section (on page 15) tells you how to attach the legs and lids to the wedges. If you fast-forward to page 17, you will see a section with the heading: Attaching Feet. In this section you will be instructed to make each foot (referring to the instructions on the relevant page) and attach it.
3. Make the Third Segment (Which Contains the Head)
Make the third segment as indicated in the instructions (pages 28 – 34 of the Elephant pattern).
I hope that helps you navigate the patterns a little bit better.
I Do Not Understand the Short Rows!
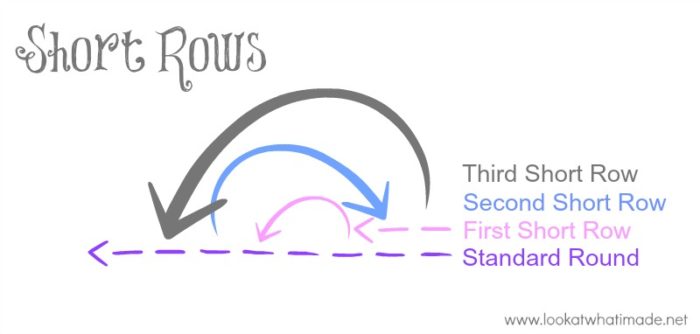
Short Rows are just rows that do not begin and end where rows traditionally begin and end. They are worked backwards and forwards across a defined number of stitches, allowing you to add height and shape to your work, or to turn your work through 90 degrees.
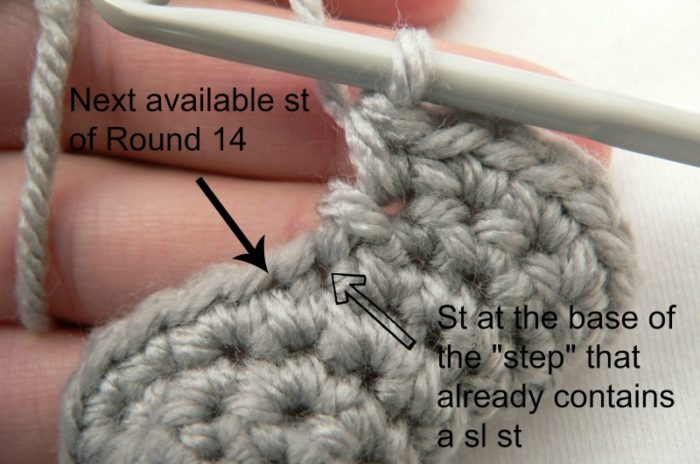
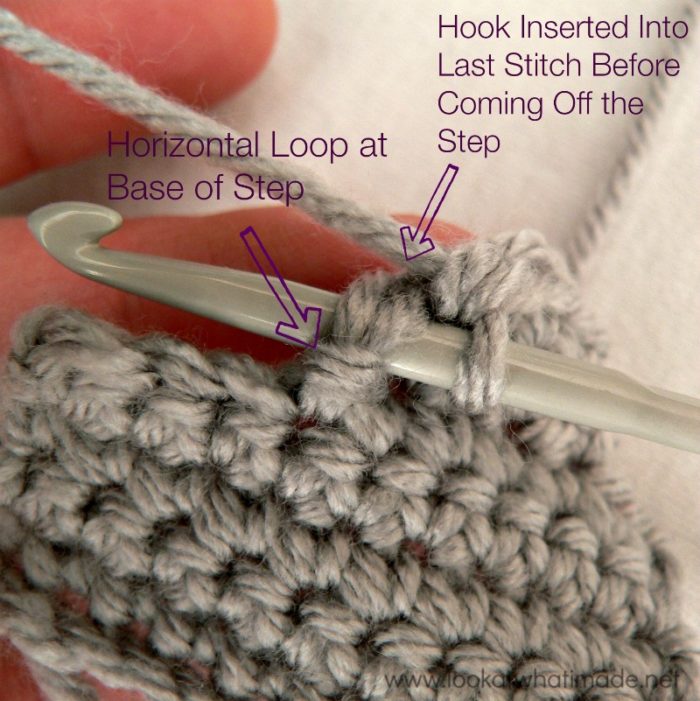
To help keep you on track, you need some sort of landmark to refer to. We use the “step” created by the (sl st, turn) at the end of each short row. This (sl st, turn) forms an angle in your work, which is why I call it a step. You will notice that the sl st at the base of the step forms a little horizontal loop, almost like a knot, that aids in identifying the last stitch before the “step”.
The photo below shows Short Row 17 of the Elephant head completed up to the “step”. The next stitch, when coming off the “step”, should be made into the first available stitch after the step (in this case, the first available stitch of Round 14), NOT the stitch at the base of the step that already contains a sl st from the previous short row.
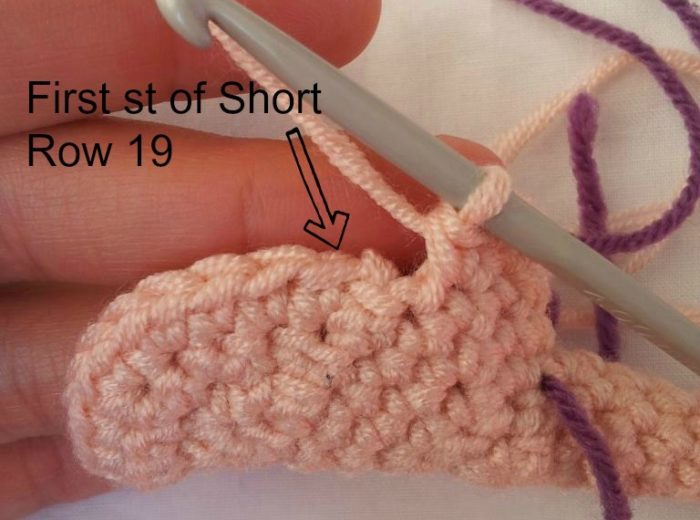
The photo below shows the first 4 sc’s of Round 20 of the Elephant head completed. The next stitch should be made into the first stitch after the “step”.
If you need more help with the short rows, have a look at the instructions for the head for Meimei the Baby Elephant. The instructions for the head (up to Round 22 only) are the same as for Eleanor, and they include more step-by-step photos.
Why Should I Use a Running Stitch Marker?
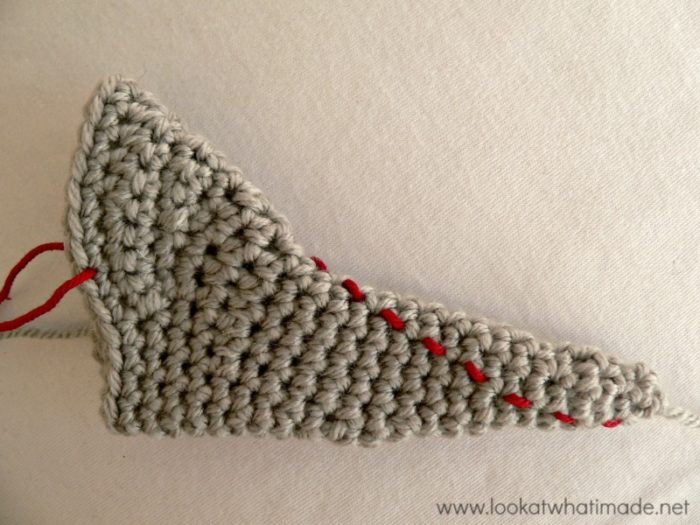
A Running Stitch Marker is a piece of scrap yarn that is flicked backwards/forwards across your work before making the first st of each complete round (not short rows). It is my favourite “tool” and I cannot stress the importance of using it enough!
Not only does this mark the first stitch of the round, but it also serves as a visual aid that you haven’t skipped/added any stitches, because it creates a running stitch up your work that will go wonky if you skip/add stitches.
I find it invaluable when deciding if and where I have made an error. You can count each round retrospectively to check that the stitch counts for each round tally up. And should you need my help with figuring out what went wrong and where, a clear photo (with a running stitch marker shown) goes a long way to helping me help you.
Once you are done, you can simply pull the scrap yarn to remove it from your work.
Please, if you aren’t already using a running stitch marker (at least for the heads and the dinosaur tail) start doing so! Especially when making the giraffe’s head.
Extra Help
Errata
You can find errata for the Amamani Puzzle Balls book HERE.
Stitch Help
Annie’s has an extensive Stitch Guide. The most useful tutorials for these patterns are:
Gauge
Although gauge doesn’t matter, it is important that you crochet as tightly as you comfortably can. If you are a naturally “relaxed” crocheter, I suggest going down a hook size so that you don’t end up with large holes in your work.
Choosing Your Hook and Yarn
I suggest using a sturdy, thick worsted weight yarn that is easy to work with and will wash and wear well. You want something that won’t stretch too much.
We have chosen Deborah Norville Everyday Yarn for these animals, because it ticks all of these boxes. It is an absolute dream to work with and it is non-pilling.
These animals come out quite big, so we do not recommend using anything thicker than a worsted weight yarn if you are making them for toys. You can, however, use thinner yarn and a smaller hook. If you need help with Standard Yarn Weights, see THIS LIST.
We suggest using a 4 mm (G/6) hook for these animals so that you don’t end up with visible holes in your finished project. If you know that you are a relaxed crocheter, consider going down to a 3.5 mm hook.
Stuffing
When stuffing the animals, it is important to stuff them thoroughly. You want them to look slightly over-stuffed, because the stuffing will relax with time and if you start off with an understuffed puzzle animal, you are going to end up with a very floppy one!
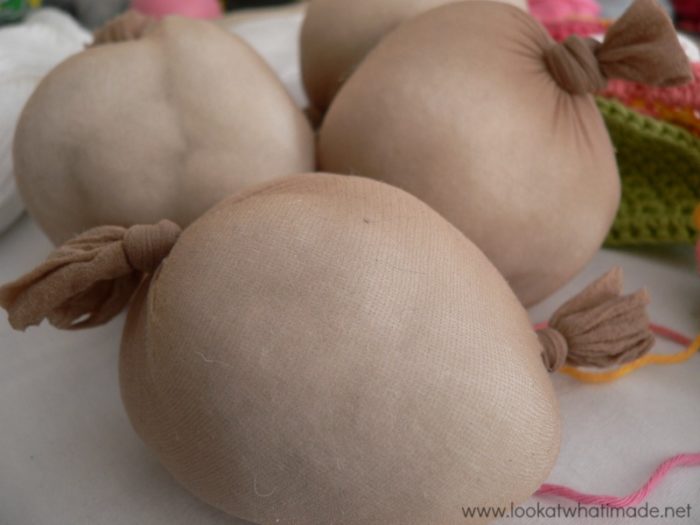
I love using stuffing bombs when stuffing my animals. Although they don’t work very well for the sculptured parts like the heads and the dinosaur’s tail, they work extremely well for the legs and wedges.
And should you, despite your best efforts, end up with a “holey” animal, stuffing bombs will help to prevent the stuffing from peeking or poking out.
I hope that you have found this post useful. Unlike a book, I can add/change/prettify this post at any time, so if you have feedback on how I can make this post more helpful or user-friendly, please let me know so that we can make this as helpful as possible.

This blog post contains affiliate links. I only link to products I personally use or would use. All opinions are my own.


Carol B says
Hi Desri,
I am waiting impatiently for your book to arrive. So excited as these animals look fabulous. In the meantime, I would like to get the yarn in readiness, could you please tell me how much I need to make the elephant?
I have just become a Grandma for the first time and feel she ‘needs’ all of them!
Many thanks.
Carol
Carol B says
Just to let you know book now arrived email no longer valid. Thank you.
Dedri Uys says
Oh good!
Dedri Uys says
I’m sorry I missed this comment, Carol. I’m glad the book has arrived now x
Janet Pitt says
Hi, I recently purchased your book Amamani puzzle book, I have started making the elephant, it says to make two ears however when you make them they are both the same so when you put them on opposite sides one is the back of the ear and the other the front, if that makes sense, how do I overcome this as they are obviously different, I do hope you can help me with this thanks
Dedri Uys says
Hi Janet. Thank you for buying my book :) The ears are both the same, as you say, and one is placed with the back of the ear facing. I didn’t find the difference between front and back noticeable, but if it bothers you, you can fasten off at the end of Row 3 and start Row 4 with the right side of Row 3 facing you so that the only difference will be between rows 3 and 4. I hope this will make the ears more acceptable. If it isn’t, please send me an email at dedriuys(at)lookatwhatimade.net and I will walk you through making an exact opposing replica.
Dedri
MaryT says
Your ideas are always so good. I have found that I can still use the yarn bombs for necks, tails and heads though. I use a longer piece of nylon section and insert it into the section/piece needing to be stuffed. I then stuff inside of the nylon until plenty full and tie it off or continue it down into the next part so that I don’t have a floppy joint between a neck/head/body/tail. So far it has worked well for me.
I hope that this helps others to be able to continue the yarn bombing in their projects.
Dedri Uys says
That’s a great idea, Mary
Mechele Squiers says
Thankyou for your posts with tips and tutorials for puzzle balls. I recently purchased the pattern book, however, as beginner crocheter, I really appreciate the clear instructions and photographs that complement the patterns. Thankyou!
Dedri Uys says
You are most welcome, Mechele. I hope you find them easy enough to make :)
Carrie says
Just wanted to say that your warning not to under stuff is very important. I didn’t stuff a lion enough on time, and after just one day of the kid playing with him, he looked like I hadn’t stuffed him at all. Thankfully the little boy didn’t mind ;).
Dedri Uys says
Thank you for the feedback, Carrie. I think it’s one of those pieces of advice that people just won’t heed until it happens to them, I’m afraid.