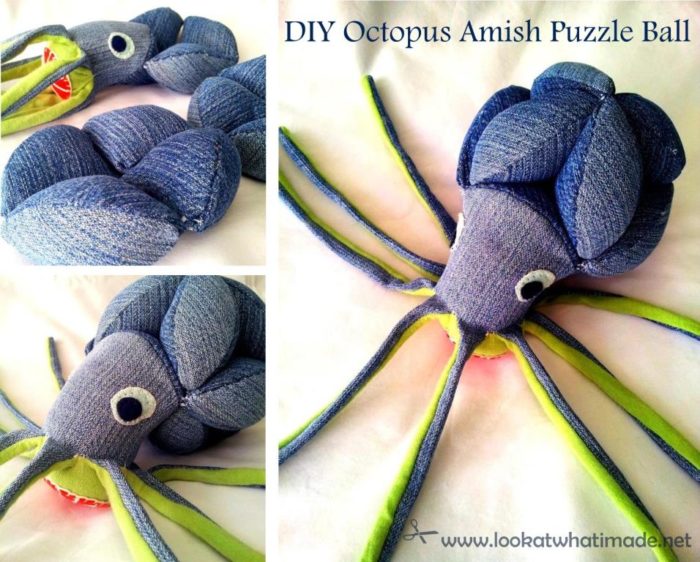
 Oliver the Octopus is a modified Amish Puzzle Ball. He comes apart into 3 segments that can be taken apart and reassembled at will. He is made from upcycled clothes – in this case an old torn Long Tall Sally Jean and a stained baby t-shirt.
If you are put off because this project looks a bit complex, don’t be! It is quite simple, actually. You just have to make a bunch of wedges (one of which contains a head) and then sew them all together. And if I can conquer my hate of hand-sewing to make this Octopus Amish Puzzle Ball, then so can you!
Most of you will by now be familiar with my Amamani (Amigurumi Amish Puzzle Animals) – a series of crochet animals based on the traditional Amish puzzle ball.
My latest Amamani is Olive the Crochet Octopus Puzzle (free pattern available here). I am crazy about Olive, and we give her lots of love. But lately she has been looking a bit blue – not good for a red octopus. So I decided that she needed a mate to keep her company. And that is how Oliver was born. Well, that and the fact that I was feeling sorry for all of you non-yarnies who have been left out of the whole puzzle-animal thing.
So allow me to show you how to make your very own Octopus Amish Puzzle Ball. There are LOADS of photos, so grab a cuppa, because this is going to be a long one!
You will need:
- Fabric in 2 contrasting colours
- A Sewing machine – you can do it by hand, but YIKES!
- A needle and thread
- Scissors and/or rotary cutter
- Felt – for the mouth and the eyes
- A plastic straw and a Chinese chopstick (this is to help you turn those skinny tentacles inside-out)
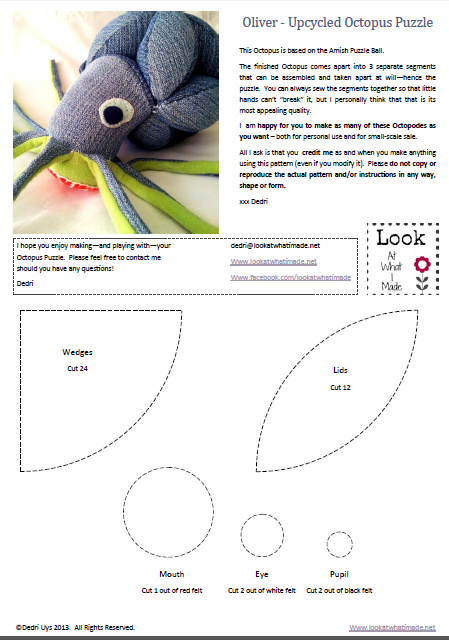
- The pattern (click on the image below to save the pattern to your computer)
- Some time and some patience
How to Make your Octopus Amish Puzzle Ball
©Dedri Uys 2013. All Rights Reserved.
Submitted to the linky party over at Craft-O-Maniac.
 First of all you will need to print the pattern and cut out the templates.
The first bit you will need to cut out is the outside of the tentacles and the head. Lay your pattern on the fabric and cut out the template. You will need to cut slits where indicated to form the tentacles. The easiest way to do this is to use a ruler and a rotary cutter.
 Next you will need to cut out 24 wedges (2 for each wedge) and 11 wedge lids (NOT 12). You will also need to cut out 2 eyes, 2 pupils, 1 mouth and the inside of the tentacles. On the far right photo below you can see that I have kept the seam of the baby t-shirt I used as the top border of my fabric. This is not necessary. As long as you use jersey cotton for the inside of the tentacles, you don’t need a seam. But as it was already there, I just used it. If you use any other fabric you can just serge that edge. It won’t show, so don’t fuss too much about it.
 Now that you have all your pieces cut out, it’s time to start serging and sewing.
Firstly serge around each wedge lid. Then serge around the curved edge of each wedge. You can serge all the way around the wedges, but I’m all for shortcuts and you can just serge them when you sew them together.
Wedges
Place one wedge on top of the other, with right sides facing, and serge and sew along the 2 straight edges. Repeat this for all the wedges so that you end up with 12 little wedge pockets.
Now place one of the lids over the opening of one of the wedges (with the right side of the fabric facing in), lining the curved edges of the lid up with the curved edges of the wedge opening. Starting at one point, sew along the curved edge, keeping your margin quite small (5 mm). Note that you don’t want to start at the very edge of the lid. You want to start (and finish) in line with the side seams of the wedge.
 When you get to the other point, lift up the foot of your sewing machine and turn the whole shebang so that you can sew down the other side of the lid. Remember that you want to stop sewing at the point where the lid encounters the side seam of the wedge (first photo below).
Hint: If you stop with the needle in the fabric, it makes it easier to turn your work without losing the place you finished sewing at.
Now sew halfway down the opposite side of the wedge lid. If you continue sewing all the way, you won’t be able to turn the wedge inside-out!
Finally turn the wedge inside-out so that the seams are on the inside and the right side of the fabric is facing out. Remember to make sure that the pointy bits are pushed all the way out.
Repeat this for 11 of the wedges. The last one is slightly different as you will attach a head to it instead of a wedge lid.

Head and Tentacles
Place the inside panel of the tentacles on top of the outside panel, with right sides facing each other, and line the tentacles up with each other. Starting from the top of the first tentacle, serge down the side of the first tentacle (through both layers) and then up and down each subsequent tentacle. Use small zigzag stitches to keep your seam to a minimum. You might find it easier to “round” the ends of the tentacles (as in the second photo from the left below), but you don’t have to.
When you have finished serging the tentacles, change to a straight stitch and sew up and down each tentacle, keeping as close as possible to the zigzag edge. If you have rounded the ends of the tentacles, cut away the excess fabric.
 Please note that only the tentacles should have been sewn together, not the band of fabric at the top of the inside panel, which needs to stay unattached from the outside panel (left-most photo below).
Now you will need to turn the tentacles inside-out. This can be an horrendous affair if you try to do it without the suggested plastic straw and chopstick, because the tentacles are VERY skinny. But if you do use a straw and a chopstick as instructed, it takes a few minutes to get them all turned right-side out.
So grab your straw and your chopstick. Insert the straw into a tentacle and push it all the way in, so that it abuts the bottom seam (right-most photo below).
 Now place the chopstick at the very point of the tentacle and push it into the straw, which forms a little tunnel. You will notice that the fabric bunches a bit at the beginning (left-most photo below). Just worry the fabric fold a bit so that it stretches over the bunched seam rather than buts up against it (second photo from the left below). Now you can rest the end of the chopstick against any sturdy surface – I just push it against my tummy. Start pulling on both side seams, pushing the chopstick into the tentacle as you go. When you can see a bit of tentacle starting to peek out (second photo from the right below), grab it and pull the rest of the tentacle, inverting it completely. It might take you one or two goes to get the hang of it, but once you’ve got it you will never again struggle with inverting skinny tubes. Trust me! This is the kind of tip you’ll want to remember even if you can’t be bothered to make this octopus Amish puzzle ball.
 Once all the tentacles have been inverted, fold the head in half (second photo from the left below) and mark the middle of the curve of the head with a pin. Now fold the last wedge in half and mark the middle of one of the curved edges with a pin as well.
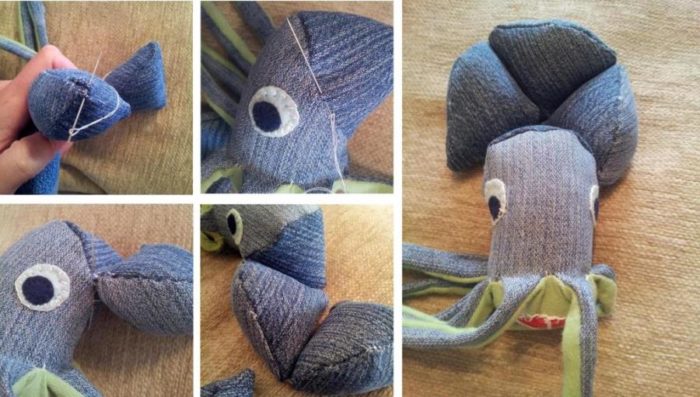
 Turn the wedge inside-out so that the seams are on the inside. Line the two pins up and pin the wedge to the right side of the head (left-most photo below). Starting from one of the seams of the wedge and finishing at the other, sew the wedge to the head.
Now wrap the remaining part of the head section around the wedge, lining up the two sides of the head section (second photo from the right below). Pin the head section to the wedge.
 The next bit is a bit tricky to explain, but so simple to do(!!). Look closely at the photos, they probably explain things a lot better than I can.
The remaining flappy parts of the head section will wrap around the bottom of the wedge AND form the seam at the back of the octopus’ tentacles (see the second photo from the right above). You will need to balance the length of the seam at the back with the amount of fabric needed to wrap around the wedge. If your back seam is too long, you won’t have enough fabric to attach the remaining side of the wedge to. If your back seam is too short, you’ll have too much fabric.
With the head section pinned to the wedge (left-most photo below), line the sides of the head up with each other again and pin them together, making sure that you only place your pin through the head section, not the top band of the inside section, which should be folded down (second photo from the left below). The extra bit at the back of the wedge (the part you just pinned together) will form the back of the head below the wedge and behind the tentacles …the chin if octopodes had chins.
Now pin the folded-down band at the top of the inside of the tentacles together (second photo from the right below). Starting from the edge of the folded-down bit, sew a seam up towards the wedge. Stop sewing when you get to the wedge.
Finally fold the head open again and close the head and wedge by sewing from one seam to the other of the remaining side of the wedge opening. Turn the whole thing inside-out.
 This is what your head should look like now.
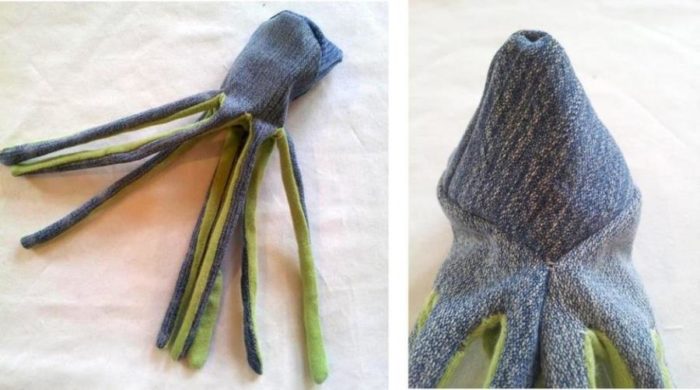
Assembling Your Octopus Puzzle Ball
Stuff the wedge and the head thoroughly. Using a needle and thread, make a running stitch all around the edge of the inside part of the tentacles, pull it tight and secure with a few stitches.
Embroider the mouth with a little bit of detail and attach the pupils to the eyes using a blanket stitch. Place the mouth over the whole in the bottom of the octopus and sew it to the octopus using a blanket stitch. Attach the eyes to the sides of the head.
 Now take one of the wedges and stuff it well. Using a ladder stitch, close the hole in the wedge, starting from the center of the wedge and working towards the seam. Before you close the hole completely, push the top bit of the side seam into the wedge and finish closing up the hole. If you don’t push this seam in, it will stick out and look ugly, duh.
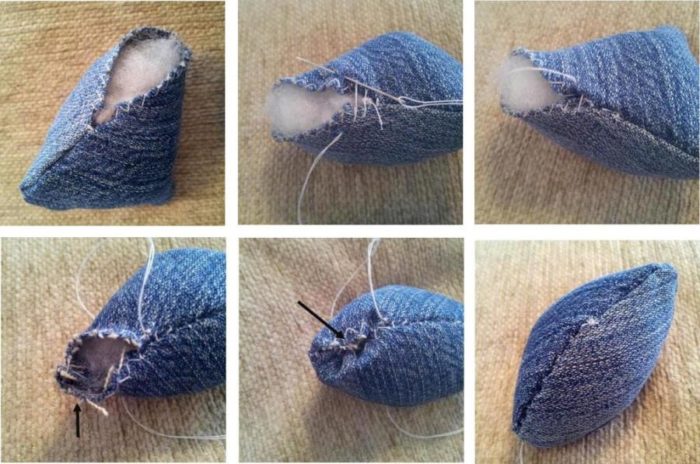
When you have closed the hole up completely, sew the wedge to the side of the head. I find that the neatest and easiest way to do this is to insert my needle through the wedge OVER the side seam (just below the lid) and then insert it OVER the side seam of the head (just below the seam attaching the head to the wedge). Work back and forth a few times, making sure to catch the seams every time. Working over the seam like this, just under the point where the lid is attached to the wedge, makes the attachment strong and less visible.
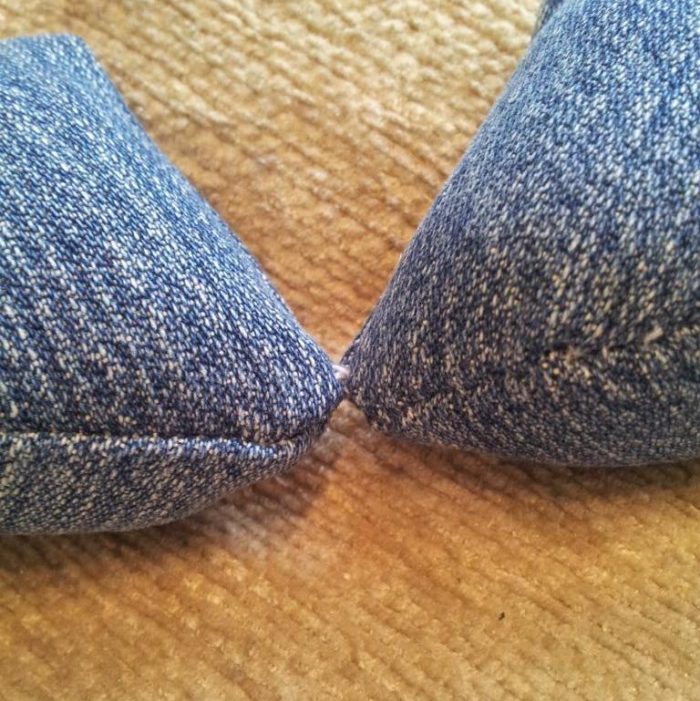
Now stuff your next wedge and attach it to the side seam of the first wedge in the same way. Attach one more wedge to the side of the second wedge.
You should now have a chain containing one head and 3 wedges. Sew the last wedge to the other side of the head (again working over the side seam) to complete the ring.
Stuff and close the remaining wedges, joining the second to the first, the third to the second and the fourth to the third in the same way as above. Close the ring by sewing the seams of the first and last wedges to each other.
This section will form part of the body of your octopus Amish puzzle ball.
Make one more segment (exactly like this one) with the remaining 4 wedges.
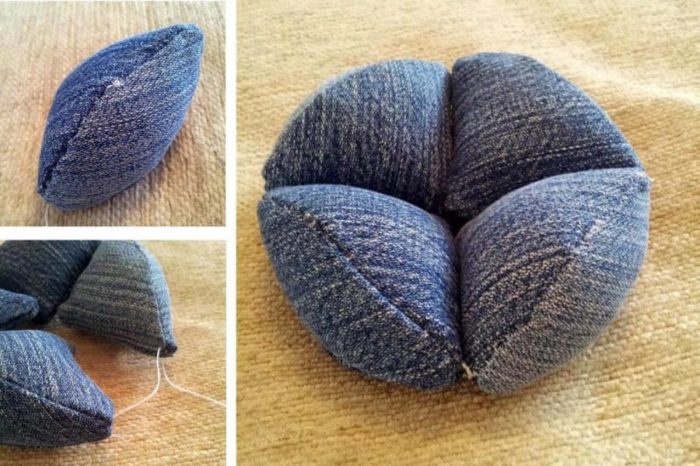 Finally – and this is the final “finally” – build your octopus puzzle ball.
Below are the instructions for building the octopus Amish puzzle ball. The photos are of Olive, but the principal is exactly the same.

The segments for the fabric octopus puzzle ball will be quite tight and you’ll need a bit of elbow grease to slip them over each other, but that is just the nature of the beast.
I hope you enjoy making – and playing with – your fabric Octopus Amish Puzzle Ball. If you have liked this tutorial and would like to show me that you like it, you can always subscribe to my newsletter or like my facebook page. Alternatively you can just leave a wee comment below x
Please feel free to contact me if you have any questions.
xxx dedri


tatie fabie says
bonjour merci pour ce partage, je met votre blog en lien sur le mien,
une petite surprise vous attends chez moi ici http://tatiefabie.canalblog.com/archives/2013/08/27/27903609.html
je vous souhaite une bonne journée et un tout tout grand merci pour l’idée héhé!
Dedri Uys says
Your Sumo Wrestler is too cute, Tatie Fabie! Love it, thanx for sharing.
Monica says
LOVE this! Definitely going to be making one in the near future. Thank you so much for this awesome pattern! :D
Dedri Uys says
I’m so glad you like him, Monica. Let me know how it goes when you get around to it x
Tess says
Thank you, Dedri. Olive is available where? Oliver looks like fun, but haven’t used a SEWING machine in years! LOL
Johanna says
Thank you, it looks so great.