It’s a Bandana Bib, Baby!
I think a Baby Bandana Bib is just about the cutest thing a little boy can wear. And I think it is the only item of baby boy clothing that kicks any frilly dress’ ass! They are also incredibly simple to make. Anyone that can use a pair of scissors and push down the pedal of a sewing machine can make these. Even if you have never sewn in your life. I am so crazy about these bibs that I would almost urge you to go out and buy a sewing machine just to make some of these. I say almost…because urging you to actually do that might be considered more than a little bit insane.
So to make your own Bandana Baby Bibs, you will need a few supplies. Stop! Don’t reach for your wallet and car keys just yet. You will already have them in your house, so read on and then go gathering.
Supplies for Making a Baby Bandana Bib
For the pattern
- 1 sheet of A3 paper or 2 sheets of A4 paper. OR a sheet from a newspaper – everyone has those, surely.
- Scissors
To make the Bandana Bib
- Scrap fabric (about as big as a sheet of A3 paper) – jersey cotton, cotton, cloth nappies, old t-shirts, bedsheets…any fabric that doesn’t have pink hearts or flowers on it.
- 2 tiny pieces of Velcro
or some Poppers
– just cut some off of an old babygrow/onesie (remembering to leave a margin of fabric around the popper) and sew them onto the finished bandana bib with a decorative stitch.
- A sewing machine (like this awesome Brother Sewing Machine
) and some cotton thread
Making the Bandana Bib Pattern
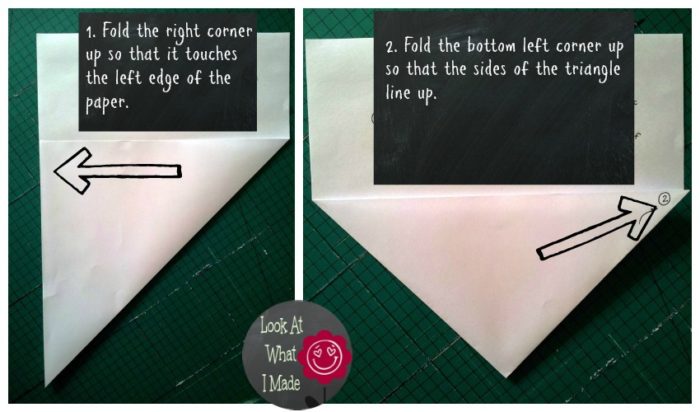
Take a sheet of A3 paper and fold the bottom right corner up until the bottom of the paper lines up with the left edge of the paper. This should give you a nice triangle. If you don’t have A3 paper, tape two pieces of A4 paper together along the length. Or use a sheet of A3-looking newspaper.
Fold the bottom left corner up so that the sides of the resulting triangle line up. Look at the photo. It speaks a thousand words. You are basically looking to fold the previous triangle in half…aargh. So difficult to explain with words.
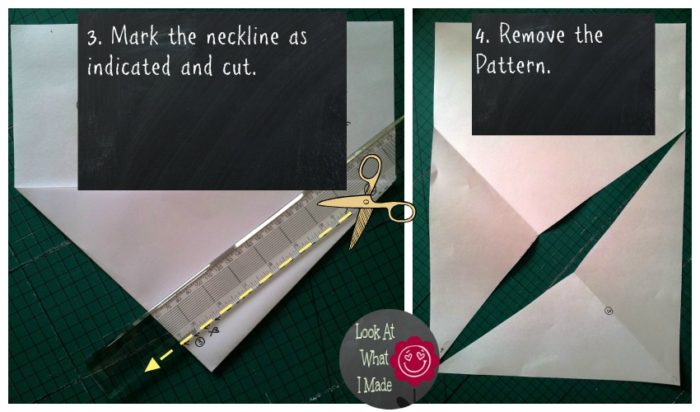
Mark the neckline as indicated in the photo below. It doesn’t matter exactly how much you slant the neckline. Just slant it some. Cut on the dotted line and remove the pattern.
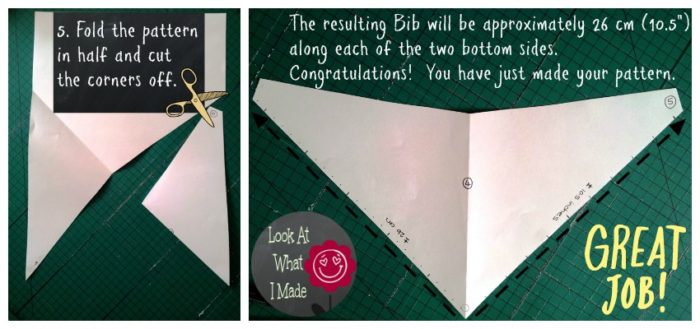
Finally fold the pattern in half along the fold and cut the top two corners off. Open your pattern up and admire your pattern-making abilities.
You will have a pattern that is roughly 10.5″ (26 cm) along the bottom sides. It will fit a boy from 0 – 2 years. So unless you have giant children, don’t adjust the pattern by too much. It seems small, but it will work. I am pretty sure your 2-year old will wear this more as a neckerchief than a bib anyways.
Making the Baby Bandana Bib
Lay your pattern on your fabric and cut out 2 pieces – one for the front and one for the back.
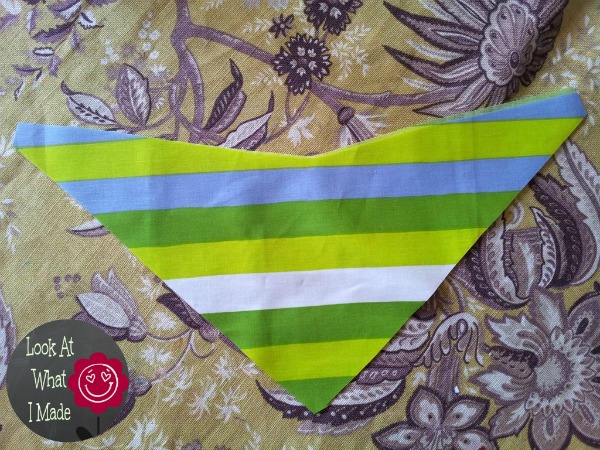
Turn the fabric over so that the right sides are together and the wrong sides of the fabric are facing out.
Starting anywhere around the edge of the bib, sew a 1/4″ seam, stopping about 2″ before you get back to the point you started at. You will need this 2″ gap to turn the bib right-side around. You will struggle to go wrong with this. Just keep the right edge of your sewing foot lined up with the edges of the fabric and sew, sew, sew. When you get to a corner, turn. When you’re almost back at the beginning, stop.
This is what your gap will look like (the gap is indicated with arrows in the photo below). I usually stop and start more or less in the middle of the top of the bandana bib because this bit is mostly hidden when a tiny tot wears it and so you can fudge as much as you want with impunity.
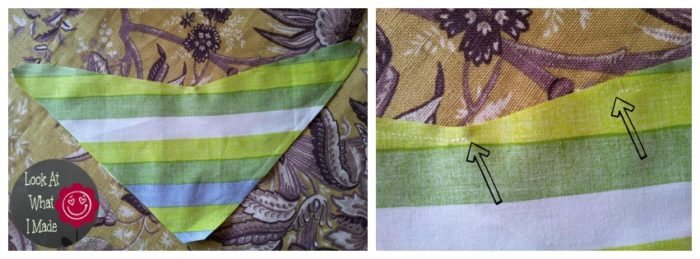
Turn the whole thing right-side out. You can iron it if you want to. Obviously I didn’t bother.
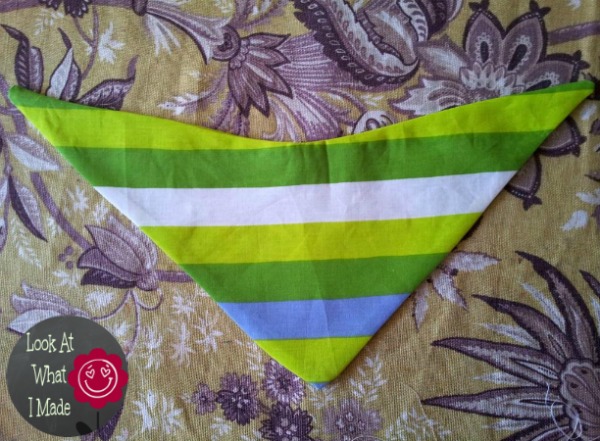
Now make a top stitch all around the bib. Most of you will know what top-stitching is. For those of you who don’t, read on and I will explain.
A top stitch is just like a seam, but it is done on the outside of the garment (the side that will ultimately show) and just inside of the sewn edges. The idea is to sew about 1/8″ in from the sides (if your original seams were 1/4″), thus catching all the layers of fabric (and seam) to prevent fraying. Not only will this prevent fraying if done even remotely right, but it will also give your finished item a more professional look.
So sew all around the sides of your bib. When you get to the “gap”, just pull the bib tight and top stitch over the gap. Make sure that you catch the 1/4″ seam allowance when you close the gap, otherwise it’s going to look yuk and will most likely fray.
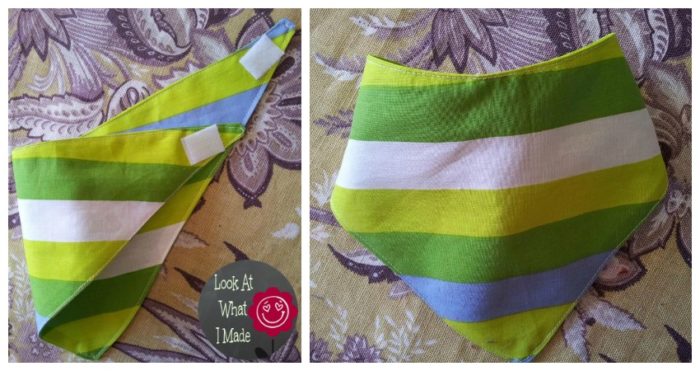
You should now have something that looks like this.
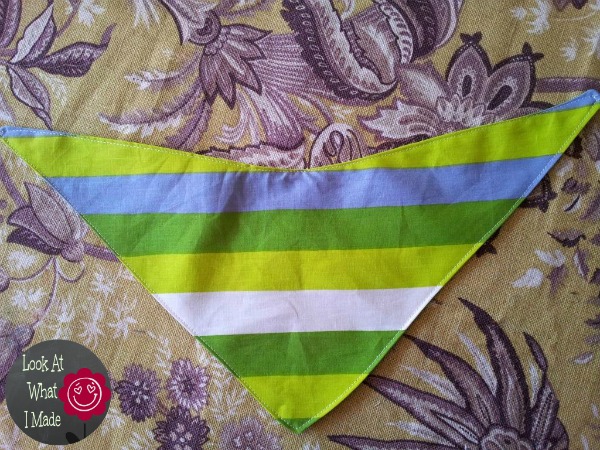
Lastly sew on your velcro or poppers. Don’t put both of them on the same side of the bib (that is, don’t put both on the front or both on the back). One goes on the front of one corner and one goes on the back of the other corner. If you accidentally mess up, no biggie. Just undo and redo.
And there you go. One completed Baby Bandana Bib.
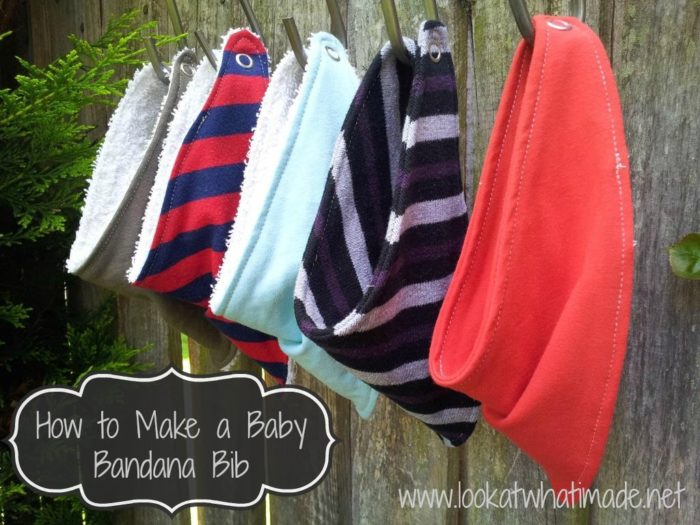
You can make these bibs out of any kind of fabric you fancy. And not just new fabric. I have made these from old jumpers, t00-small Baby Gap tops, t-shirts and old (clean) cloth diapers. If you want to know a little bit more about using upcycled fabric to make these bibs, see my post about making baby bandana bibs from old t-shirts.
If your little cowboy wears Bandana Bibs, do yourself a favour and make him some. Or better yet, make some to give away as gifts. Christmas is coming up, after all, and a few of these will make a lovely, unique and non-kitsch gift for any boy-mama.
Related Books
Remember to subscribe to my newsletter if you would like to be kept in the loop. You can also like my Facebook page or follow me on Bloglovin or Google+.
Happy Sewing!
xxx dedri


Lu from Uruguay says
Thank you so much! I used your pattern guide, as my printer is in the shop. I used polar fleece for the back and cotton for the front, and zig zagged around it (like a serger). Couldn’t have been easier or faster!!! Now I’ll make one of every pattern I have for my goddaughter. Thank you!!!!!
Dedri Uys says
You are most welcome, Lu. Have you shared any pictures somewhere?
ngoc says
These are the cutest! I’m making a bunch to give as gifts this christmas! Check out my DIY to see how they turned out https://youtu.be/fJFUQPj4bEQ
Shobha Kamath says
Many thanks for this easy to follow tutorial. I shall be making this soon for my grand daughter who is about five months old.
I am planning to give terry cloth backing.
Jenny says
Don’t forget to share photos with us when done, Shobha :)
Cassie says
The first ones I made were WAY too small for my 3 month old…I don’t know, maybe I had the wrong size of paper? Or maybe he has a big neck! But anyway, I just re-did the pattern on a bigger piece of paper…lesson learned…make sure the size will work before you cut a bunch out! Anyway, I did finish some and to be frank…I love them! I actually made them just a little bit bigger and I think I will attach two sets of snaps so they are adjustable. They are so cute and super easy and fast, perfect since I need some NOW. Thanks for the great idea!
customizable shirts says
What’s up, every time i used to check webpage posts here early in the daylight, because i enjoy
to learn more and more.
judy says
I love the tutorial but at the risk of sounding dumb you keep saying a3 or a4 paper i dont know what that is… help please
Dedri Uys says
Those are international standard paper sizes, Judy. You can have a look at this wikipedia post. A4 is what letters are usually printed on. A3 is twice that size.
Angela Jackson says
Great tutorial. I love the detailed steps and also the photos provided. Excellent work.
Lois says
Thanks heaps for this fantastic tutorial. I have been searching everywhere for something like this. My 11 y/o daughter has Cerebral Palsy and is very drooly. I have to think of her becoming a teenager soon and hate the thought of having to take cloths or baby bibs everywhere with me. (They are too small now anyhow). I will definitely be making some funky ones for her…..in the adult sizes you’ve given.
Off to start sewing…..
Dedri Uys says
Hi Lois. I would love to see them when they’re done. Also, if you think of any tips for making adult-sized ones, please let me know and I can share it here :)
Stacey says
This is great. I have 3 friends who JUST had babies and I’d love to make these for their littles. I notice on the very first photo your bibs have snaps. I am very new to sewing and am wondering if you have a tutorial on how to adhere the snaps to the ends of the bibs.
Thanks!
Dedri Uys says
Hi Stacey. I am useless at attaching snaps and always seem to mess up the first one or two, so I really should do a tutorial (for myself more than anyone else). I am sure you can find tons of tutorials on the web, though. if you find a particularly good one, let me know and I can add it here :)
Linda says
I use a button. Most sewing machines I find that Velcro picks up so much when washing and snaps don’t always work.
Erin says
Hi Dedri,
Firstly – I LOVE your blog – everything is so simple to make, and your instructions are so easy! Even for a beginner crocheter
Just a question re these bibs, I made a bunch with terry towelling backing (used some nappy cloths) – they seemed to have warped a bit around the neck, could this be due to the stretch in the towelling? Any ideas on how to get around this? Ive got a bunch more I want to make (much cheaper than the $15 you pay for one in the shops!)
Thanks so much!
Dedri Uys says
Hi Erin. I think I know what the problem is. Because the neck is slightly rounded, the fabric pulls when you turn the bibs inside-out. To fix this, just snip in from the edges of the fabric (every 1/2 inch or so), stopping right before the seam (so don’t accidentally cut through the seam). It is a little bit hard to explain in words, but if you have a look at this tutorial, you will understand exactly what I’m talking about :)
Bean and Me says
What a great tutorial . I like how simple it is especially just adding the the velcro to the edges instead of just tying it :)
Jodie Brown says
Thank you ever so much for doing this tutorial! I spent last night trawling the internet for a tutorial, and your’s was the best. So, this morning I grabbed an Ikea fleece blanket and an offcut of cotton fabric, and followed your tutorial. I think I took about 3/4 hour from making the pattern to a finished bib. I’m really, really pleased with it, as is my 3 year old! I made it for my very dribbly 1 year old, but he’s having a nap, so I tried it on my bigger one…needless to say I’ll be making another one for the baby this afternoon!!
Thank you again x
Dedri Uys says
Hi Jodie, and thank you for your lovely comment. I find that the quickest way to make them is to cut a few, then sew a few. I have a stash of pre-cut bibs, so if I need a gift in a hurry I can just grab one or two and sew them up quickly. If you’ve already got them all cut out it should only take you 15 minutes to sew one up.
Good luck with your littles x
Norma Goff says
I like your idea, and will make some little ones. What size pattern would you suggest for an adult bib, for those in nursing homes? Also, am hoping t make a waterproof adult size for a nursing home resident. Any suggestions as to how to add a waterproof lining that will still drape well? Thanks for any input you can give me!
Dedri Uys says
That sounds like a good idea :) I thought I might do a size chart at some point in the future. For now here are some rough measurements.
To fit a 14″ neck comfortably (so for a small lady), make the sides of the pattern 32 cm (12.75″).
To fit a 16″ neck comfortably (so for a large(ish) man), make the sides of the pattern 35 cm (14″).
The best thing to use for large patterns is newspaper pages.
For waterproofing I expect that parachute fabric will be the best lightweight option.
Good luck,
Dedri
Janet says
Love it, Thanks so much
Dedri Uys says
Thank you, Janet
Trisha says
I bet you could use a manila-style folder to make a pattern, yes? It’s kind of similarly sized to two pieces of paper taped together, and a little sturdier.
Loved this post, by the way! Pinned it so I can remember to make some soon!
Dedri Uys says
Yes. In fact x-rays make the best patterns in the world! I have a whole box full of patterns I made with discarded x-ray films. Although in this digital age you might be hard-pressed to get your hands on an actual x-ray :)
Deb Trester says
I am going to try these for my granddaughter. She is 8 and has rett syndrome. She drools all the time (part of the disease) and her mom is tired of baby bibs. We are trying to give her a little more dignity as she gets older. Plus all the fabrics available leave endless possibilities.
Dedri Uys says
Aw, that must be so hard on you all. And making her some alternative “bibs” sounds like a brilliant plan. Maybe you could even just fold some larger squares of fabric in half triangularly (if that makes sense) and then either add velcro attachments or just knot them (so no-sew bibs). So that they look a bit more like draped scarves than bibs, but still do the job. I would love to see some photos when you’re done.
Mitzi says
Hi! My 14 yr old Great Neice has Retts also. I’ve been making bandana bibs for my 10 month old granddaughter & decided to make some for Mary Claire too. I’m using a different pattern but was researching ones for adults. I think I may alter this pattern for her. How did yours turn out?
cinta says
cant wait to try these.. so simple and they look great
meegan says
Your post is brilliant. And funny. Thanks! I put an old cloth nappy (diaper) in between the cotton, and that was easy to do also, if you feel the urge or have an extra dribbly kid like I do!
Peace
Dedri Uys says
Thank you. That is a very good idea. Why didn’t I think of that?
Leah says
Just whipped up two of these for my 4 month old boy – so so simple!!!! (Sew simple, if you like) thanks heaps, what a great way to get more patterns into his wardrobe :-)
Dedri Uys says
I’m so pleased you found it helpful, Leah. And when he gets bigger you can always make him some bigger ones. But I like them tiny, like a neckerchief x
Holly says
Thank you so much for this tutorial! I have a baby boy myself, and have recently become interested in learning how to sew basic projects. (Maybe post-baby nesting instincts kicking in, lol?!) Anyway, I’m excited to give this project a go. Thanks again!
Dedri Uys says
I’m always excited when someone starts crafting! I hope you enjoy it and that you will make loads and loads of goodies for your little boy x