Welcome to Part 4 of the Scheepjes Ubuntu CAL 2018. Last week we completed our diamonds. Aren’t they pretty? I just love it when a plan comes together! This week, we will start on the half-diamonds, which will test a whole new set of skills :) I hope you have a lot of fun with them!
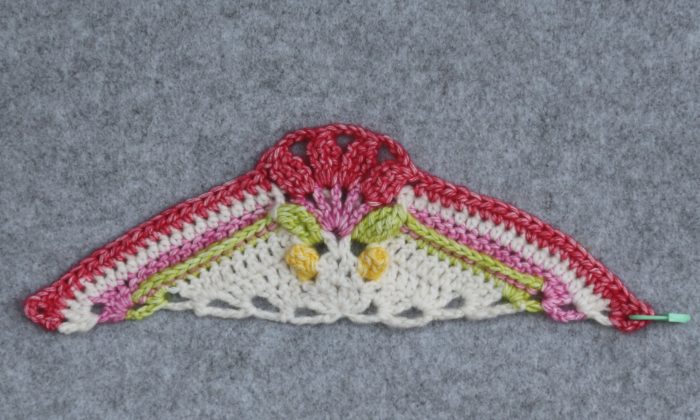
You will find all the links and information you need under ‘Resources‘ below. If you have stumbled on this post accidentally and don’t know what Ubuntu is, you can read more about it HERE (Information) and HERE (Concept).
Resources
- Part 4 Pattern PDF
- Part 4 Video Tutorial (UK terminology) by Esther Dijkstra from It’s All in a Nutshell
- Official Scheepjes – International Group (English) or the Official Scheepjes – Nederlandse Groep (Dutch). You have to be logged into Facebook in order to access the link to the groups.
- Add the CAL to your Ravelry Queue
- If you are on Instagram, you can find me HERE. Please add your photos using #scheepjesubuntucal2018 or #scheepjesubuntucal.
- Special Stitches and Techniques (including a gauge square)
Ubuntu CAL 2018 Part 4: Half-diamond Part 1
Although this pattern will not have a step-by-step photo tutorial, I will be sharing photos of each completed round (and some of the trickiest bits). I am using a different colour for each round so that you can clearly see stitch placement. I will also share notes and tips as I go.
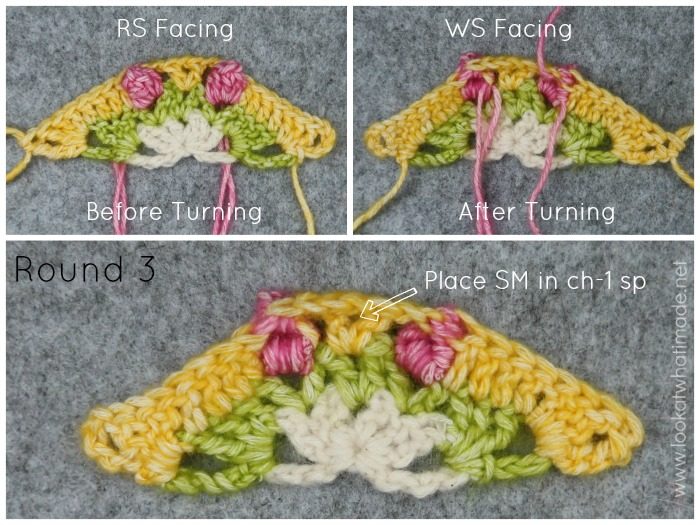
When you are turning at the end of every round, please note that the front of the last round won’t necessarily be the front of your work! You will know that the Right Side is facing you if the Popcorns are facing you.
Remember that you are making 6 of these half-diamonds, changing colours where instructed.
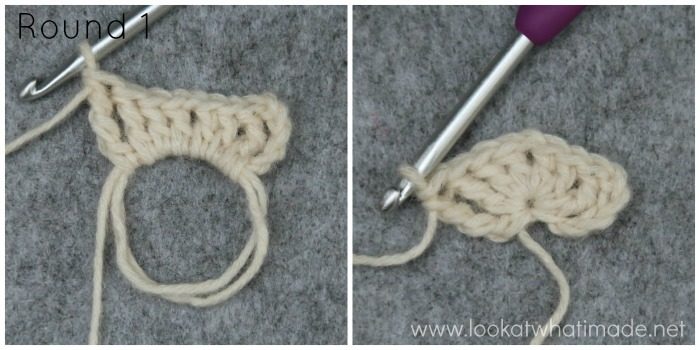
Round 1
It won’t look like much at the end of this round!
Round 2
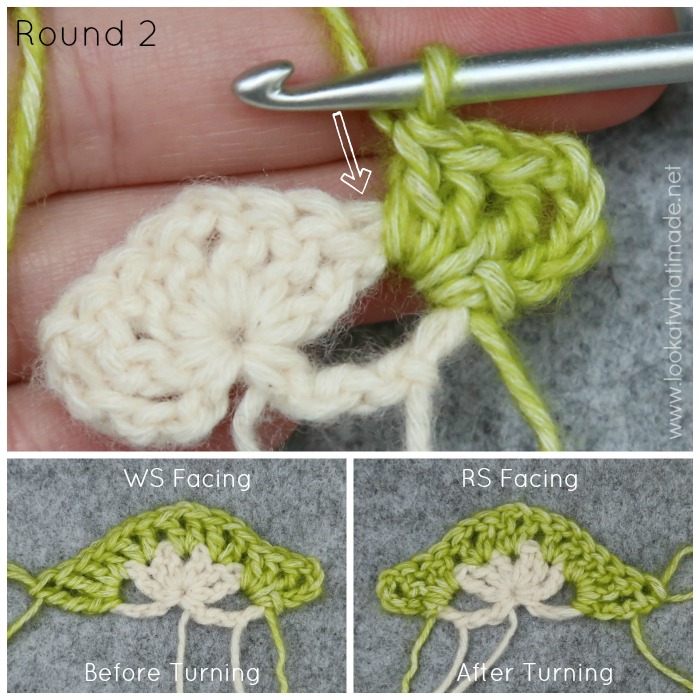
Before you start Round 2, let me give you a tip. When making the beginning and ending corners of the half-diamonds, you will be working between the first and last 2 sts of each round, instead of into the first and last st. This makes for a neater, more uniform straight edge (although the ‘straight’ edge of your half-diamond will be anything BUT straight before blocking and joining!).
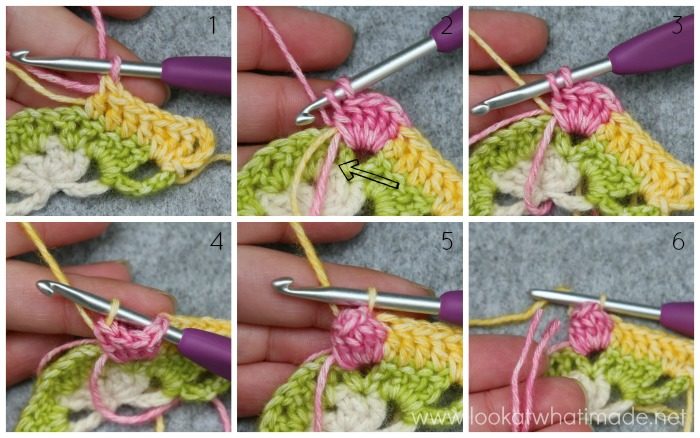
Each round will end with a sl st between the last 2 sts made, and each round will start with a beginning chain (unless otherwise specified in the pattern). Instead of turning between the final sl st and the start of the next round, you might find it easier to do the sl st/chain combination in one go, either before or after turning.
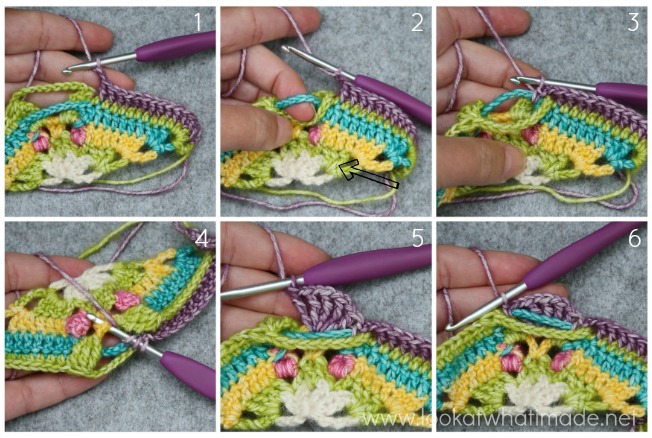
If you do it BEFORE turning, you will have to swing your hook back and insert it between the posts of the last 2 sts made {indicated with an arrow in Photo 1 and illustrated in Photo 2}. You will then make a sl st in this ‘space’ {Photo 3}, followed by the starting chain of the next round {Photo 4}. Remember to turn before continuing with the next round.
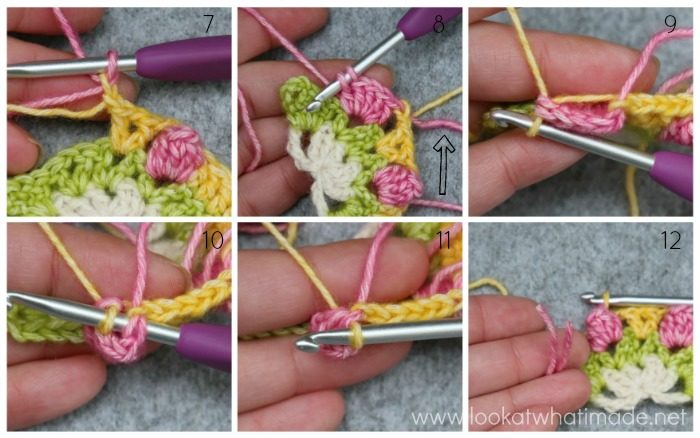
If you do it AFTER turning, turn your work first, then insert your hook between the posts of the last 2 sts made {indicated with an arrow in Photo 5 and illustrated in Photo 6}. Make a sl st in this ‘space’ {Photo 7}, followed by the starting chain of the round {Photo 8}.
I find the second option the easiest!
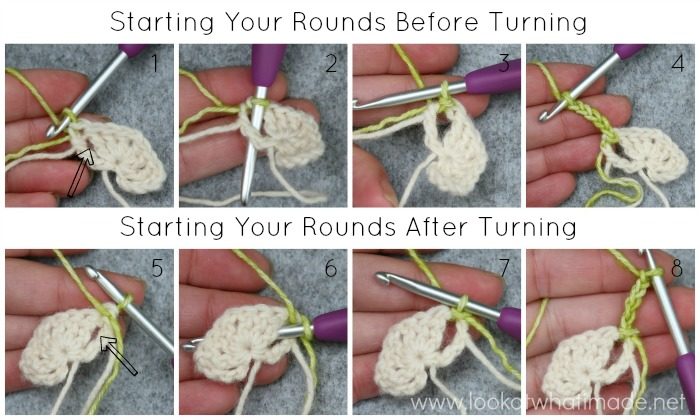
Remember that your loops will be AFTER the posts when you have turned your work, not before {see arrow indicating the first stitch to be skipped}. You might find it useful to refer back to Stitch Anatomy HERE.
Round 3
When you make your Popcorns, you might find the following useful:
Making the First Popcorn
- Change to CC1 on the last yarn-over of the last dc before the Popcorn.
- Work over your yarn ends when making the Popcorn (see arrow).
- Change to MC on the last yarn-over of the last dc of the Popcorn.
- You should now have a MC loop on your hook.
- Complete Popcorn as usual.
- Cut CC1 yarn.
Making the Second Popcorn
- Change to CC1 on the last ch before the Popcorn.
- Complete the Popcorn up to the last yarn-over, making sure not to work over ends (see arrow).
- Change to MC on the last yarn-over of the last dc of the Popcorn. You will notice that your MC forms a loop at the back.
- Pull on your working yarn to remove this loop.
- Complete your Popcorn as usual.
- Cut CC1 yarn.
Work your ends away very neatly. You might find it easier to do this when you’ve made a few more rounds to hide them in.
Remember to place a SM in the ch-1 corner space so that you can find it easily later on.
Round 4
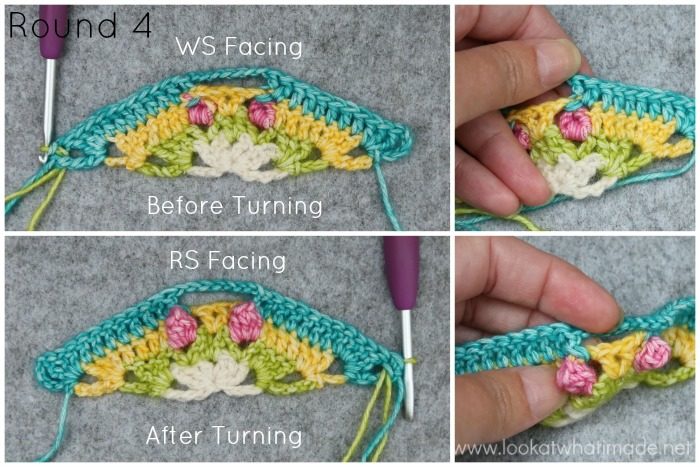
Make very sure that you are making BPdc NOT FPdc. I have included close-up photos of what the stitch should look like from the WS and the RS. On the WS, the BPdc should form a dotted line across the top of the Popcorn. On the RS, the BPdc should ‘hug’ the top of the Popcorn.
Round 5
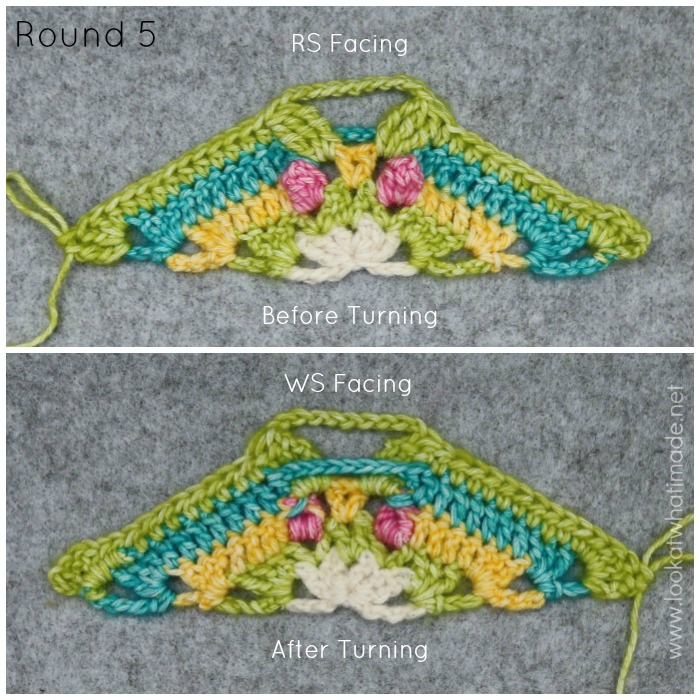
Remember to work IN FRONT OF the ch-8 sp from Round 4 (see WS Facing photo below)!!
Round 6
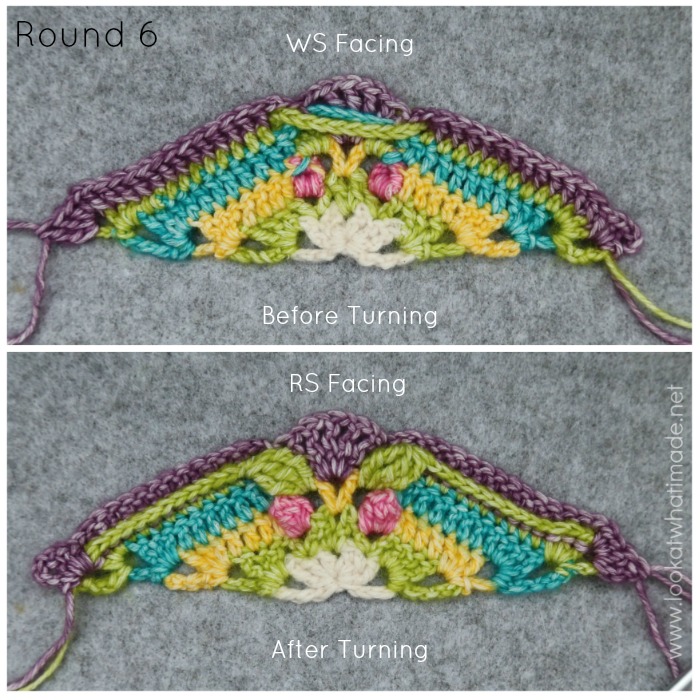
Make sure that you work BEHIND the ch-10 corner sp from Round 5 when you work into the ch-8 corner sp from Round 4 {Photos 2 and 3}! You might find it beneficial to flick the ch-10 space down and to the front so that it is well out of the way {Photo 2} Also, remember to squish the first and last st to the sides of the ch-8 sp {Photos 3 and 6}.
You can already see the ‘straight’ edge start to wave. Don’t worry about this!
Round 7
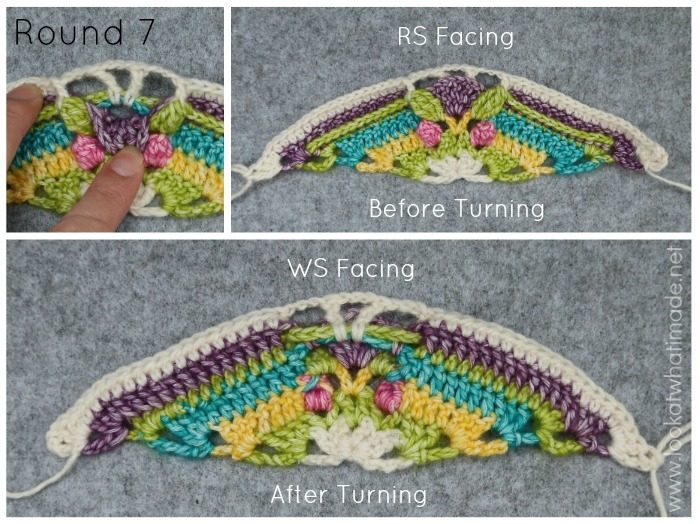
And…there the straight edge waves the other way. Again, don’t worry :)
Round 8
Please Note: The first Dtr Bobble is made BEHIND the stitches and spaces from Round 7. The middle two Dtr Bobbles enclose the central ch-3 corner sp from Round 7. The last Dtr Bobble is again made BEHIND the stitches and spaces from Round 7.
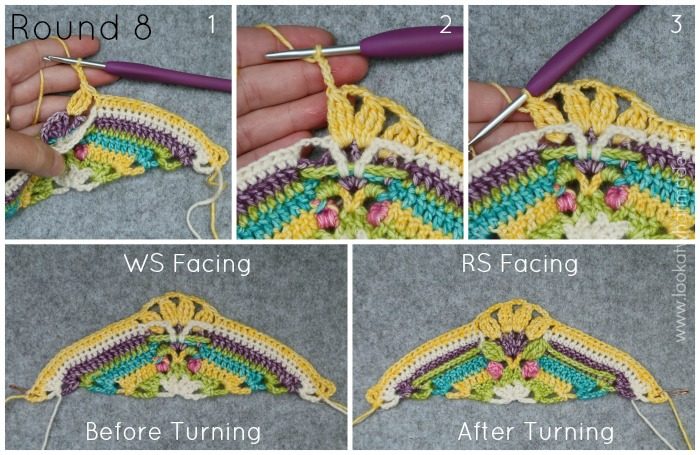
Phew! How was that? Hopefully not too bad :)
Photo Task 2
I love all your Photo Task 1 photos! How pretty are they?? As more and more people shared their experience of seeing Manta rays/moths in the finished Part 4 pieces, I thought it would be great to have another photo challenge this week.
Did you know that the collective noun for a group of moths is a ‘whisper’ or a ‘universe’? Isn’t that just delightful? So, for this task, I am going to ask you to take photos of your little moths/Manta rays/butterflies. To quote my very precise instructions on Instagram, “just tie a string around the thing”, which is exactly what Therese did when I begged her to take a pretty photo for me.
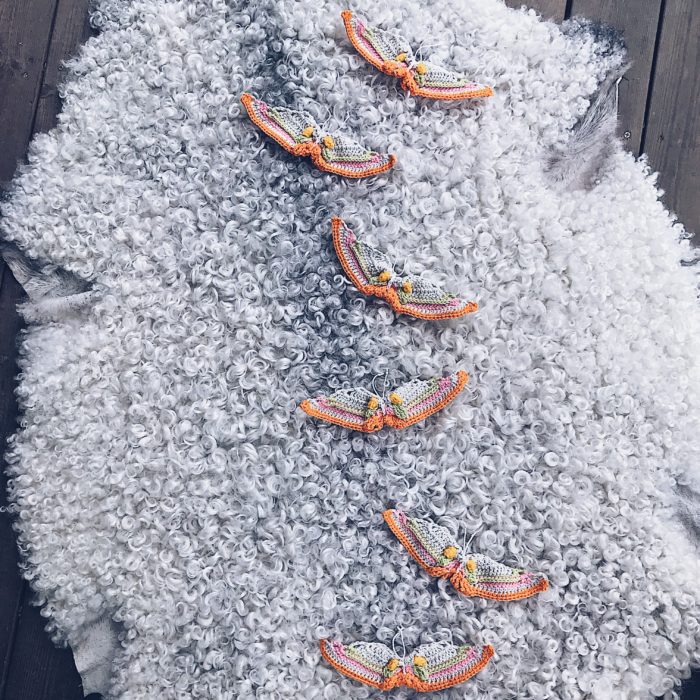
Photo Credit: Therese Eghult from Sisters In Stitch.
Photo Task 2: #ubuntuwhisper.
Please note that this photo task is not ‘officially’ part of the CAL, but more a way for us to get to know each other a bit better. I would love it if you would share these photos with me on Instagram so that we can all ‘Ooooh’ and ‘Aaaah’! I kindly request that we keep these photo tasks out of the Facebook groups as the groups are dedicated to supporting the technical aspects of the CAL. If you don’t have Instagram, please feel free to use the Contact Me button at the top of this page so that we can open a dialogue and exchange photos via email.
Have a fantastic week and I will see you back here for Part 5 next week.

This blog post contains affiliate links. I only link to products I personally use or would use. All opinions are my own.


Ada says
Destin the cal is beautiful and I am having fun with it. However I can’t get to the page to see and copy it. It says page does not exsist. Help!
Thank you and will check later in the day. From Whiting, Indiana USA.
Dedri Uys says
Thank you! It’s fixed now :)
SimoneY says
Hey Dedri, thanks again!
Just a small heads up that the link to the pdf file doesn’t work (yet)
Dedri Uys says
Fixed, thanx x
Brenda says
Lovely!
Becky says
Hello, Your “Part 4 Pattern PDF” link takes you to the Scheepjes website but says link doesn’t exist. It’s easy enough to navigate from there though so not too worried.
I’m loving this pattern. It is so much fun to work on. You write so well. Thank you for sharing your talents with the world!
Dedri Uys says
Hi. Thank you very much. I have fixed the link x
Tean Porteus says
The link to the PDF for part 4 doesn’t currently work, hope it’s OK to say. I’m keen to get started on part 4, thanks.