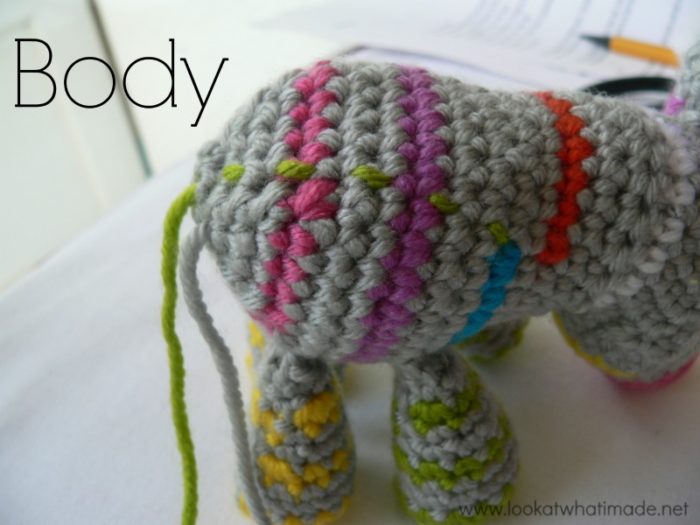
 This striped crochet animal body is not a stand-alone pattern. It is the body that Anette Bak and I will be using for our Little Zoo Zebra and Little Zoo Tiger.
Before you make the body you will have needed to complete the head for your relevant animal.
Striped Crochet Animal Body
© Anette Bak and Dedri Uys 2014. All Rights Reserved.
Materials
- 4 mm Crochet Hook (US 6/G UK 8) – you can use a smaller hook if you prefer. It’s not going to make your animal all wonky, just smaller. Make sure that you use the same hook that you used for your head and legs!
- Double knit yarn (light worsted weight /#3) OR worsted weight yarn in any colour of your choosing – again, make sure that you use the same yarn weight as for the legs and head.
- Yarn needle
- Stuffing
Abbreviations
US Terminology used. (US/UK Comparison Chart)
Special Abbreviations
RSM – Running Stitch Marker (see Notes below).
Notes
Colour Changes
- Change colour on the last yarn over of the last stitch before the colour change.
- Whenever you work in the CC, carry your MC yarn along by crocheting over it.
To make it easier for you to see where the stitches go and which row/round is which, I am using grey for the MC and a whole bunch of colours for the CC parts.
Running Stitch Marker (RSM)
I use (and advise you to use) a running stitch marker. This is just a piece of scrap yarn that gets flicked backward/forward over your work before making the first stitch of the next round. The scrap yarn will form a running stitch up the side of your work. This will help you keep track of the first stitch of each round, which will fall over the scrap yarn.
When I say “this will bring you to the scrap yarn”, I mean that your next available stitch should be the one over the scrap yarn.
Only use the running stitch marker where indicated in the pattern with RSM.
Body – Photo Tutorial
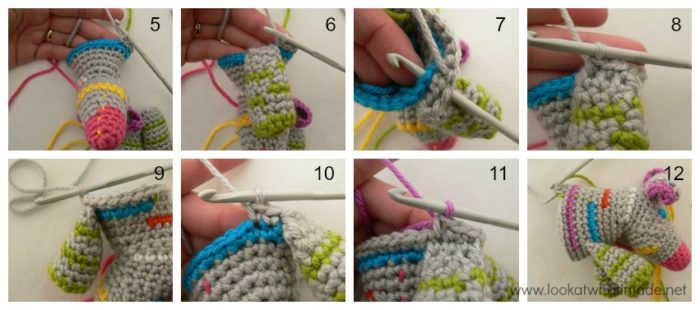
Round 1: Bridge Row: 11 x sc. Change to CC (Photos 1 and 2) – blue in this case. This will become the new start of your rounds. Place a piece of scrap yarn over your work as before and continue with the next round. Photo 3 illustrates the RSM. (11)
Round 2: *Sc inc, sc* x 7. Sc inc. Change to MC. 7 x sc. RSM (Photo 4). (30)
 Round 3: You will be attaching the front legs in this round. 7 x sc (Photo 5). Attach the first leg with the next 3 sc’s.
To do that, fold your leg flat so that the visible steps in the colour changes are pointing towards you (Photo 6). Place the leg in front of the body so that the foot is pointing towards the nose (Photo 6). Insert your hook through both layers of the first round of the leg. Then insert your hook into the next st of the body (Photo 7) and make a sc through all 3 layers. Make 2 more sc’s through all 3 layers. You want to end up with 3 sc’s worked through all 3 layers (Photo 8). Photo 9 illustrates what your leg should look like from the side.
Now sc into the next 2 st’s of Round 2 of the body (Photo 10). Attach the second leg with the next 3 sc’s (as before). Sc in each of the last 15 st’s. RSM. (30)
Round 4: 15 x sc. Change to CC (purple in this case). The last st should fall in the last stitch of the second leg attachment (Photo 11). 15 x sc. RSM. (30)
Round 5: 8 x sc. Change to MC. The last st should fall in the first st of the first leg attachment. 22 x sc. RSM. (30)
Round 6: 30 x sc. RSM. (30)
Photo 12 illustrates what the body should look like at the end of Round 6.
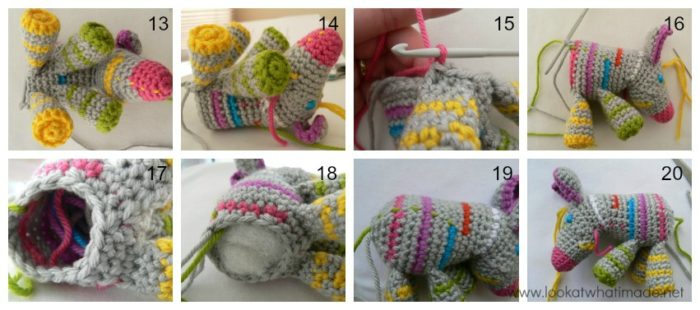
 Round 7: You will be attaching the back legs in this round. 8 x sc. Attach the third leg with the next 3 sc’s (as before). 2 x sc into Round 6 of the body. Attach the fourth leg with the next 3 sc’s (as before). Change to CC (Photo 15) – pink in this case. 14 x sc. RSM. (30)
Photos 13 and 14 illustrate what the body should look like at this point.
Round 8: Sc2tog, 3 x sc, sc2tog, sc. Change to MC. 2 x sc. *Sc2tog, 3 x sc* x 4. RSM (Photo 16). (24)
Round 9: *Sc2tog, 2 x sc* x 6. RSM (Photo 17). (18)
This is a good time to stuff your zebra (Photo 18).
Round 10: *Sc2tog, sc* x 6. (12)
Round 11: 6 x sc2tog. (6)
Bind off, leaving a 50 cm (20”) tail of yarn. This is overly generous, just so you know that I know this, but I would rather you waste 10″ than be 1″ short.
Thread the yarn through the last 6 st’s to close the hole. Then use the yarn to make your tail using these instructions.
Photos 19 and 20 above illustrate what your body should look like when completed. Notice the position of the stripes and the position of the running stitch markers (green in Photo 19 and pink in Photo 20).
Are your stripes in the same place as ours? Do your running stitch markers look like ours?
Once you have made your animal, remember to pull out the running stitch markers! And don’t forget to add the Mane!
Remember to subscribe to my newsletter if you would like to be kept in the loop. You can also like my Facebook page or follow me on Bloglovin or Google+.
Happy Hooking!


