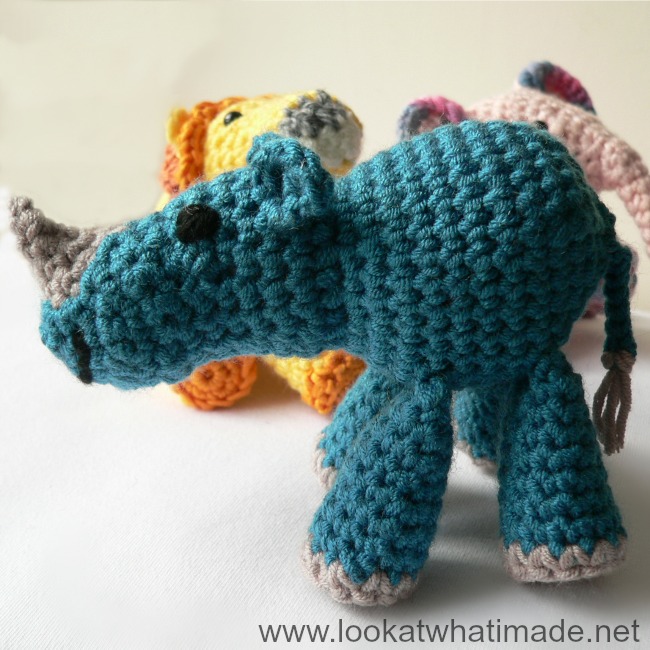
 This crochet animal body is not a stand-alone pattern. It is the body that Anette Bak and I will be using for our Little Farm and Little Zoo animals.
Before you make the body you will have needed to complete the head for your relevant animal.
Materials
- 4 mm Crochet Hook (US 6/G UK 8) – you can use a smaller hook if you prefer. It’s not going to make your animal all wonky, just smaller. Make sure that you use the same hook that you used for your head and legs!
- Double knit yarn (light worsted weight /#3) OR worsted weight yarn in any colour of your choosing – again, make sure that you use the same yarn weight as for the legs and head.
- Yarn needle
- Stuffing
Abbreviations
US Terminology used. (US/UK Comparison Chart)
| CC | Contrasting Colour |
| Ch | Chain |
| MC | Main Colour |
| Sc | Single crochet |
| Sc2tog | Single crochet 2 together (single crochet decrease) |
| Sc inc | Single crochet increase – work 2 sc’s in the same stitch |
| Sl st | Slip stitch |
| St/St’s | Stitch/Stitches |
| * | Repeat all instructions between asterisks the amount of times specified.For example: *Sc inc, 3 x sc* x 2 will mean sc inc, sc in the next 3 st’s, sc inc, sc in the next 3 st’s. |
Body
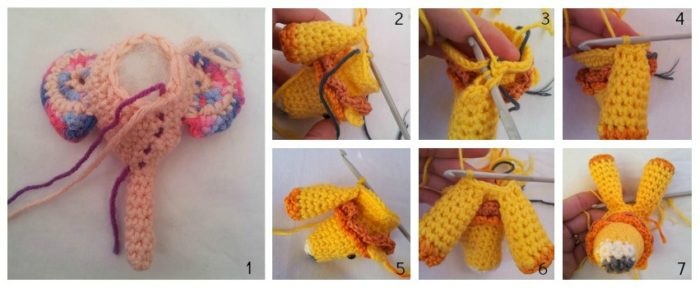
For illustration purposes I have used the elephant and the lion. Photo 1 illustrates a completed head. You are looking at the back of the elephant’s head. The last sc2tog of the head should fall below the trunk (or nose/mouth) and slightly to the right of it (left if you are left-handed). The pattern for each head will contain a clear photo of exactly where you should end up at the end of the last (or second-last) round of the head. If you do not end up in the spot indicated, your legs won’t be in the right place.
Continue where you left off with your head and remember to use that running stitch marker!
- 11 x sc inc. (22)
- *sc, sc inc* x 5. 8 x sc. *sc inc, sc* x 2. (29)
- Sc inc, 28 x sc. (30)
- You will attach the front legs in this round. Sc in the next 2 st’s of the body. Place one of the legs in front of the body with the foot pointing towards the nose/mouth of your animal and flatten the first round of the leg (Photo 2). Insert your hook through the first stitch of the leg (through both layers of the flattened foundation chain) AND the next stitch of the body (Photo 3). Make a sc through all 3 layers. Make 2 more sc’s, working through both layers of the leg AND the next 2 st’s of the body (Photo 4). Photo 5 illustrates what your attached leg should look like from the side. Sc in the next 2 st’s of the body only. Place the other leg in front of the body exactly as before and make 3 sc’s through all 3 layers (Photo 6). Photo 7 illustrates that the two front legs should fall on either side of the nose/mouth. Sc in the next 20 st’s of the body. (30)

- 30 x sc. (30)
- 30 x sc. (30)
- 30 x sc. (30)
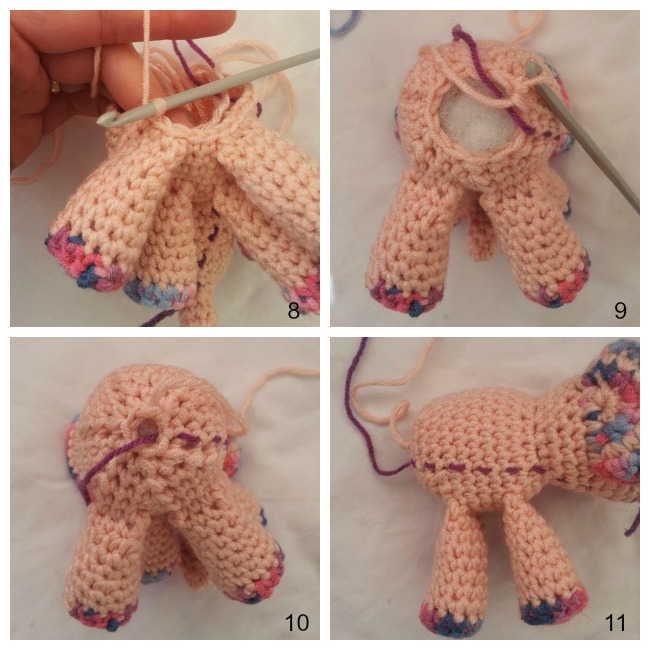
- You will be attaching the back legs in this round. Sc in the next 3 st’s of the body, now attach the first back leg as before. Sc in the next 2 st’s of the body only, now attach the last leg as before (Photo 8). Sc in the next 19 st’s. (30)
- *sc2tog, 3 x sc* x 6. (24)
- *sc2tog, 2 x sc* x 6. Now is a good time to stuff your little critter. (18)
- *sc2tog, sc* x 6 (Photo 9). (12)
- 6 x sc2tog (Photo 10). (6)
Bind off, leaving a 50 cm/20″ tail of yarn. This is overly generous, just so you know that I know this. But I would rather you waste 10″ than be 1″ short.

Tail
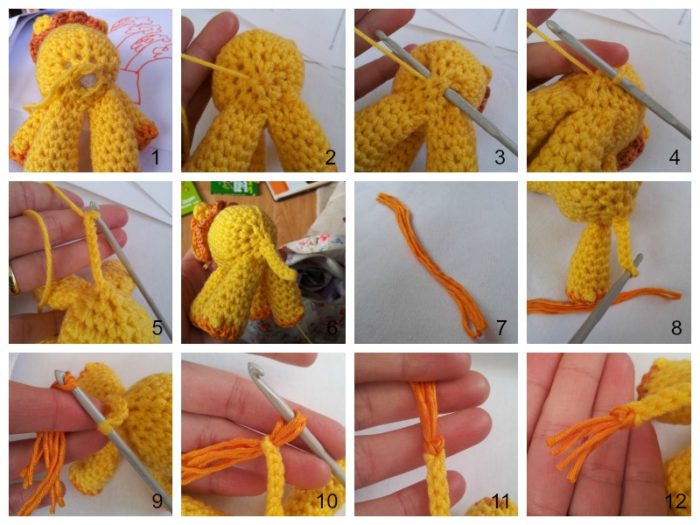
Take the long tail of yarn from the end of Round 12 of the body and weave it through the last 6 stitches. Pull them tight to close the hole (Photos 1 and 2).
Insert your hook around the “hole” by poking it into the animal on one side of the closed hole and out the other side (Photo 3). Yarn over with the long tail of yarn and pull up a loop (Photo 4).
Ch 8 (Photo 5). Working into the back bump of the chain stitches: sl st in the second ch from the hook and the remaining 6 ch st’s. Bind off and work away your tail of yarn by sewing around the base of the tail. This will make the tail a little bit more secure (Photo 6).
Tassel
Cut 3 or 4 pieces of CC yarn roughly 15 cm (6”) long (Photo 7). Why so long for such a tiny tassel? Because it is easier to work with.
Jab your hook through the end of the tail (Photo 8). Fold the pieces of yarn in half and grab them with your hook (Photo 9). Pull up a loop with all the pieces of yarn (Photo 10). Yarn over again (with ALL the pieces of yarn), and pull them all the way through the loop (Photo 11). Trim your tassel (Photo 12).
Well done! You should now have a cute little critter of your choosing.
Remember to subscribe to my newsletter if you would like to be kept in the loop. You can also like my Facebook page or follow me on Bloglovin or Google+.
Happy Hooking!


