Welcome to Part 8 of the Maya’s Meadow CAL. In this part, we will be making 20 Little Flowers. These flowers and the resulting small motifs were not initially going to be part of the blanket, but once I’d made all the large motifs, I realized that the blanket would be too skinny. So I had two options: Make 4 more large flowers or PIVOT! I chose to Pivot, and I cannot tell you how glad I am that I did. As much as I love the large flowers, I absolutely adore these small ones. So much so that I am making a Mini Maya just with small motifs. I will share that when we get to the end of the crochet-along. So here, for your hooking pleasure, are the Small Flowers!
Resources
- Introduction Post
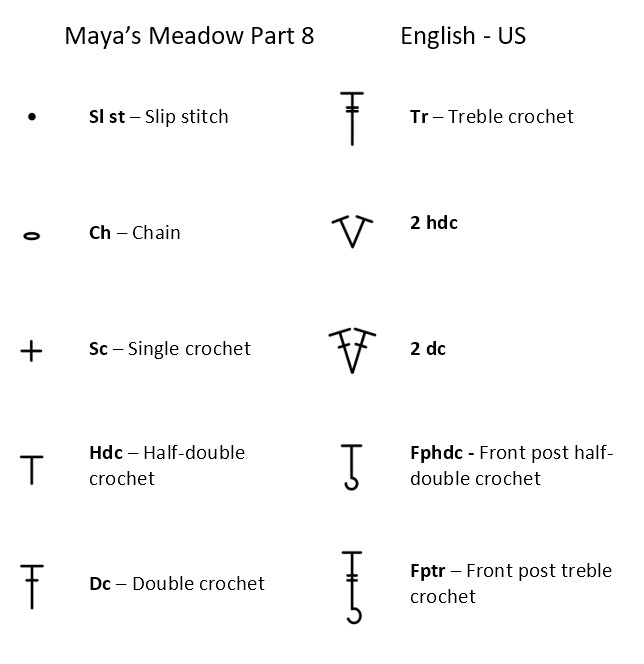
- Abbreviations and Special Stitches
- I’ve done a video tutorial for Part 8. You can find that HERE:
Translations
Part 8: Little Flowers
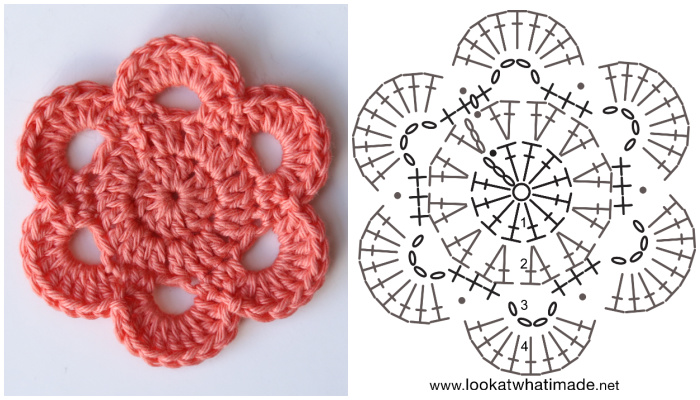
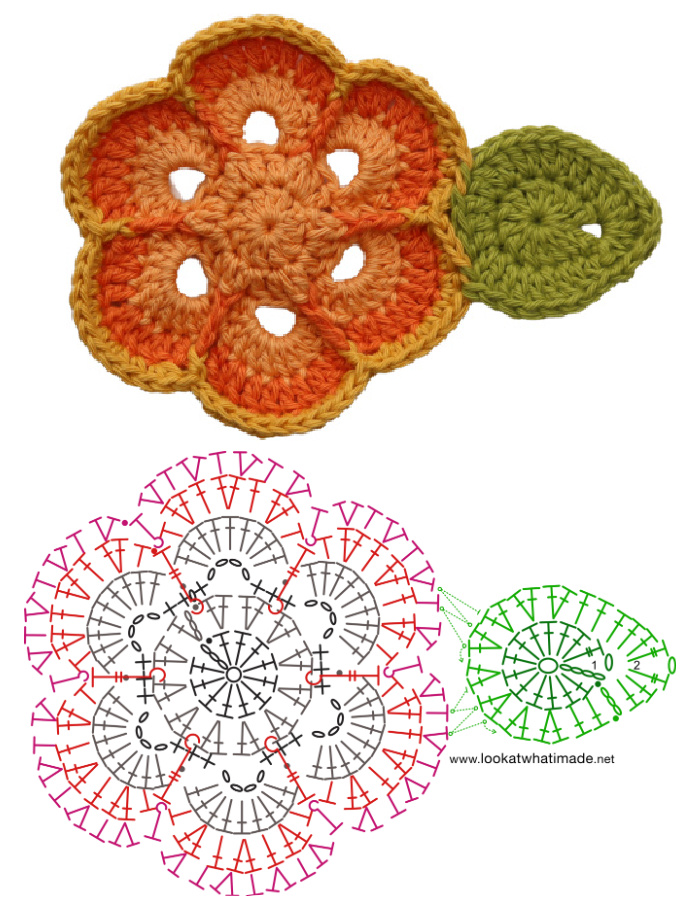
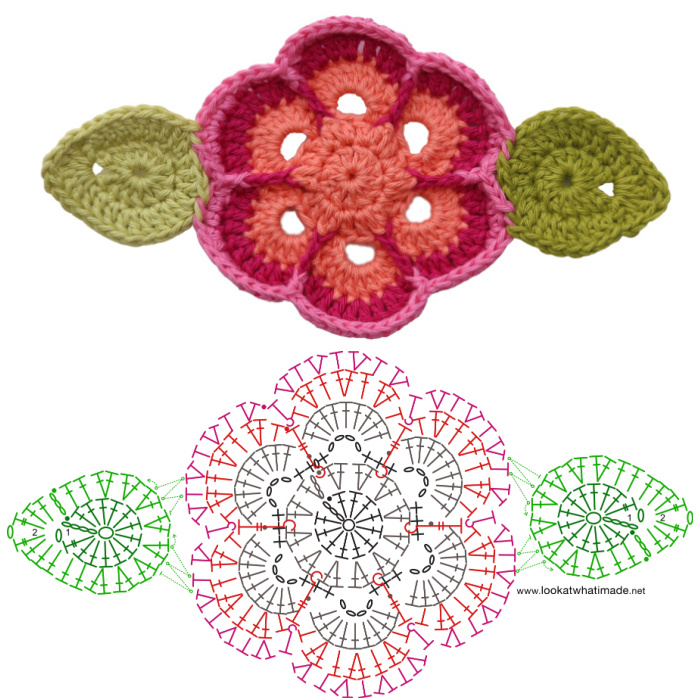
Chart and Abbreviations
Charts by Masako Kawahara from Crochet_hmmm
Instructions
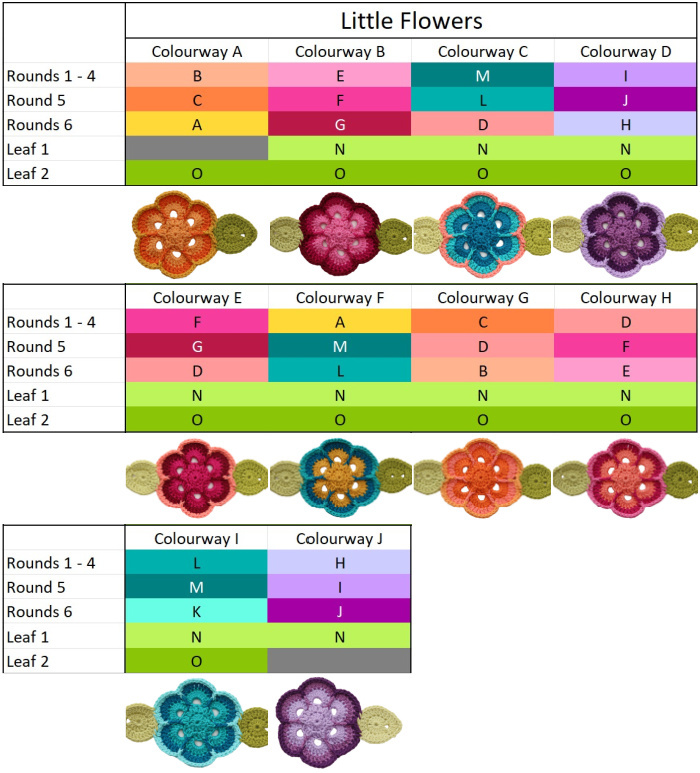
Make 2 Little Flowers in each of Colourways A to J. If you are using the yarn kit and you are working to my gauge, each Little Flower should be 9cm unblocked, and should weigh roughly 4.3g.
Round 1: Into a magic ring, ch 3 (counts as dc throughout), 11 dc. Join to the top of the beg ch-3 with a sl st. {12 dc}
Round 2: Ch 3, dc in the same st as the ch-3, make 2 dc in each of the next 11 sts. Join to the top of the beg ch-3 with a sl st. {24 dc}
Round 3: Ch 1 (doesn’t count as a st throughout), sc in the same st as the sl st join. Sc in the next st. (Ch 4, skip the next st, sc in the next 3 sts) 5 times. Ch 4, skip the next st, sc in the last st. Join to the first sc with a sl st. {18 sc and 6 ch-4 sps}
Round 4: (Skip the next st, make 9 dc in the next ch-4 sp, skip the next st, sl st in the next st) 6 times. The last sl st will fall in the st that already contains the first sl st. Fasten off. {54 dc, not including sl sts}
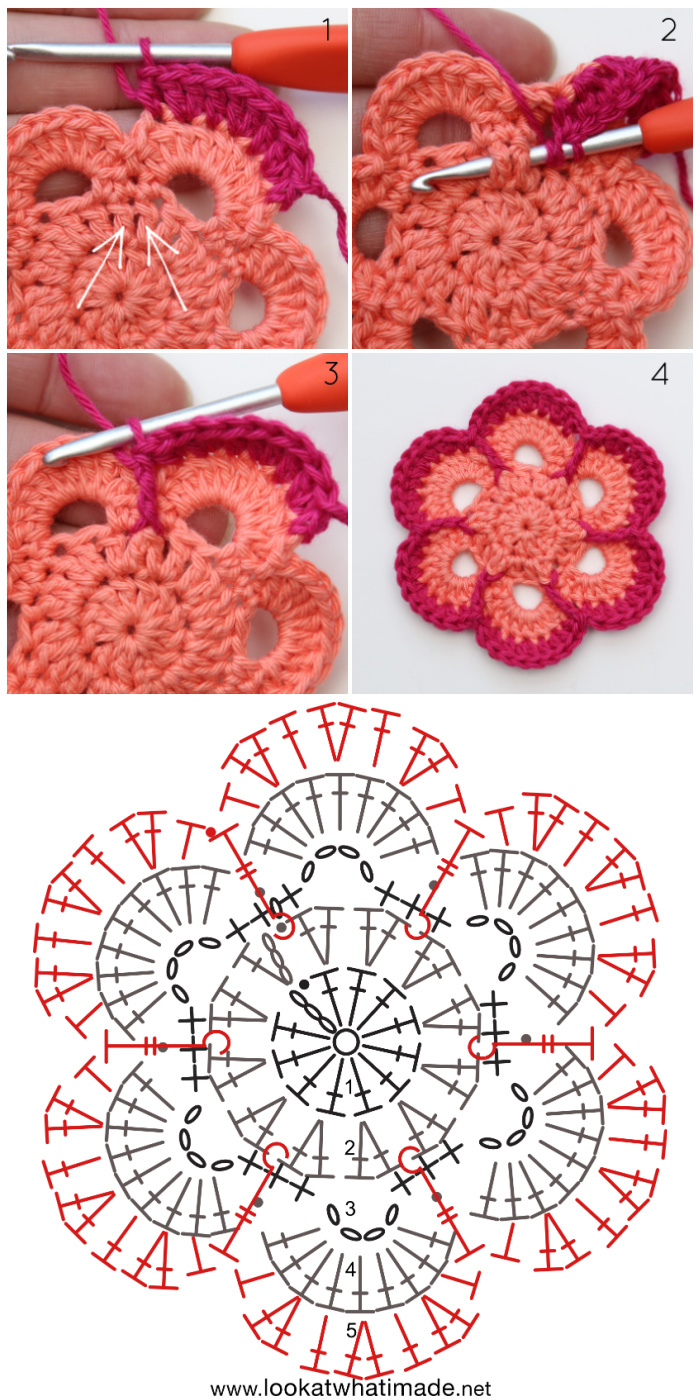
Round 5: Join your yarn by making a standing hdc in the second dc of any 9-dc group. (Make 2 dc in the next st, dc in the next st) twice. Make 2 dc in the next st, hdc in the next st {Photo 1}. Skip the last dc, FPtr around the two dc (together) from Round 2 that contain the first 2 sc from Round 3 {indicated with arrows in Photo 1 and illustrated in Photos 2 and 3}.
*Skip the first dc of the next 9-dc group, hdc in the next st. (Make 2 dc in the next st, dc in the next st) twice. Make 2 dc in the next st, hdc in the next st. Skip the last dc, FPtr around the two dc (together) from Round 2 that contain the first 2 sc from Round 3.*
Rep from * to * 4 more times. Skip the first dc of the next 9-dc group and join to the first hdc with a sl st. Fasten off {Photo 4}. {Per Repeat: 2 hdc, 8 dc, and 1 FPtr}
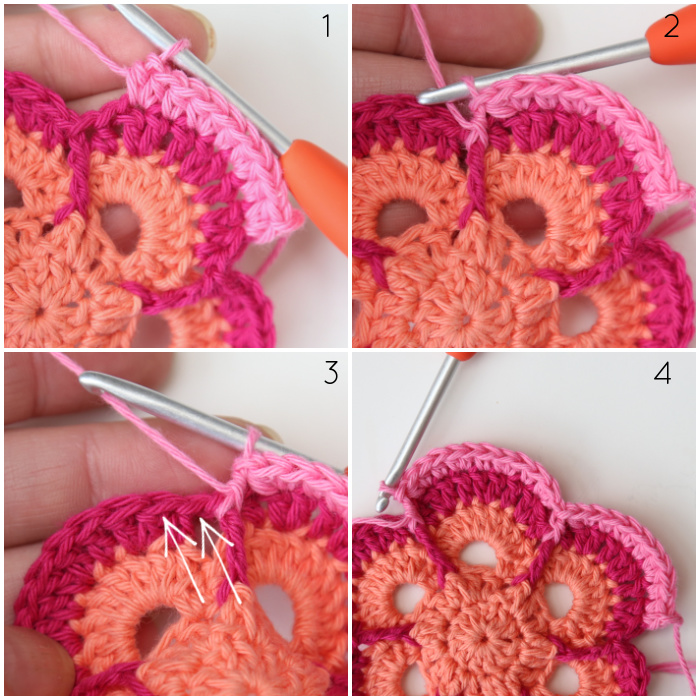
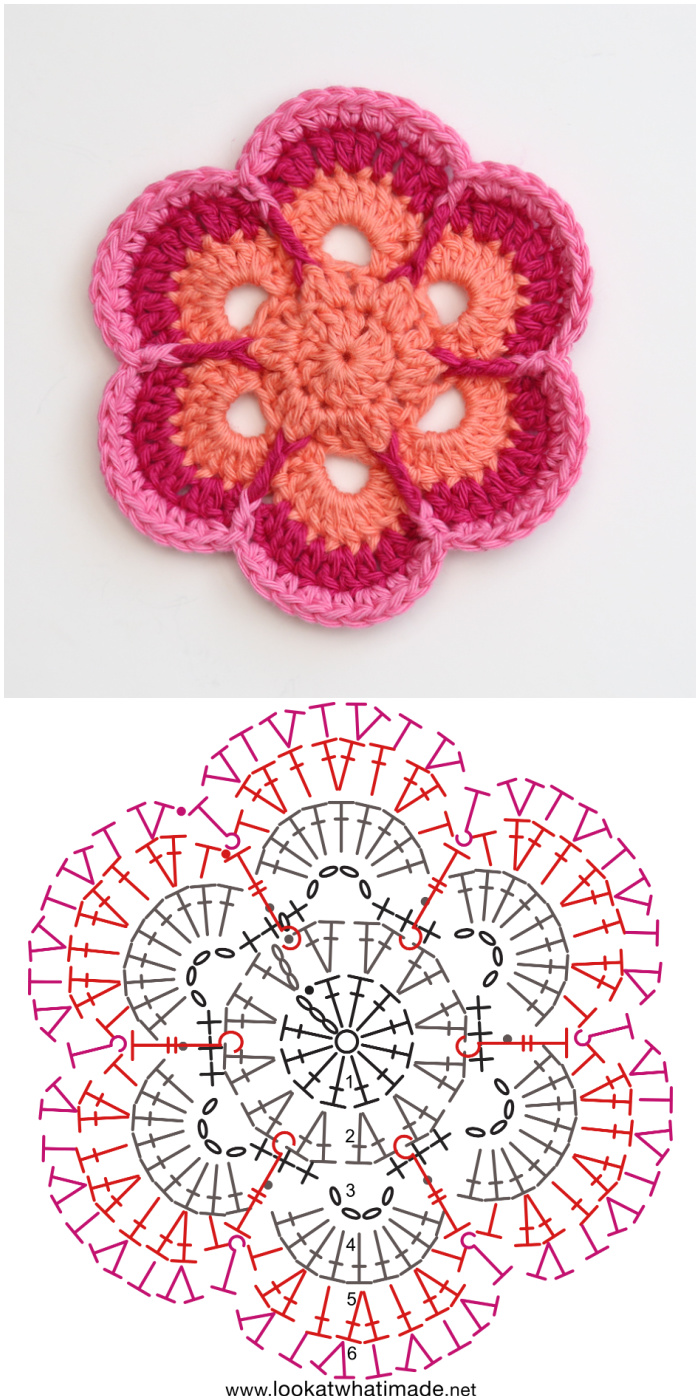
Round 6: Join your yarn by making a standing hdc in the second dc of any Petal (which will be the third st of the Petal). Hdc in the same st. (Hdc in the next st, make 2 hdc in the next st) 3 times {Photo 1}. Skip the next st, FPhdc around the FPtr {Photo 2}. Skip the first 2 sts of the next Petal {indicated with arrows in Photo 3}.
*Make 2 hdc in the next st, which should be the second dc of the first increase. (Hdc in the next st, make 2 hdc in the next st) 3 times. Skip the next st, FPhdc around the FPtr {Photo 4}. Skip the first 2 sts of the next Petal.*
*Rep from * to 4 more times. Join to the first hdc with a sl st. Fasten off and work away your ends. {Per Repeat: 11 hdc and 1 FPhdc}
Adding the Leaves
Four of your motifs will have only one leaf (two with light green leaves and two with dark green leaves). The other 16 will have two leaves – one light green and one dark green. Please consult the Colourway Diagram above to see which flowers will have one (and which colour) and which will have two.
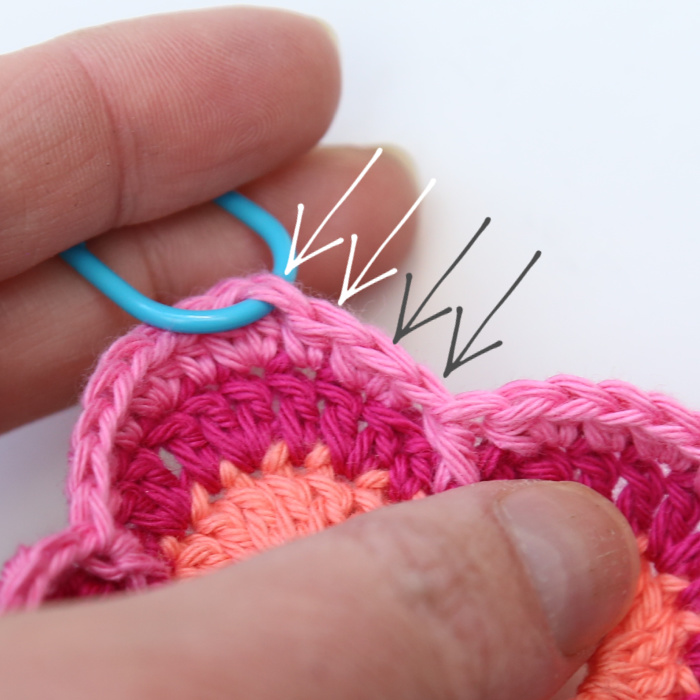
Before you start making the leaf, mark the 4th hdc of any Petal with a SM.
Leaf (Using Yarn N or O as indicated in the Colourway Diagram)
Round 1: Into a magic ring, ch 5 (counts as tr + ch-1), tr, 12 dc. Join to the fourth ch of the beg ch-5 with a sl st. {12 dc and 2 tr – not including ch-1 sp}
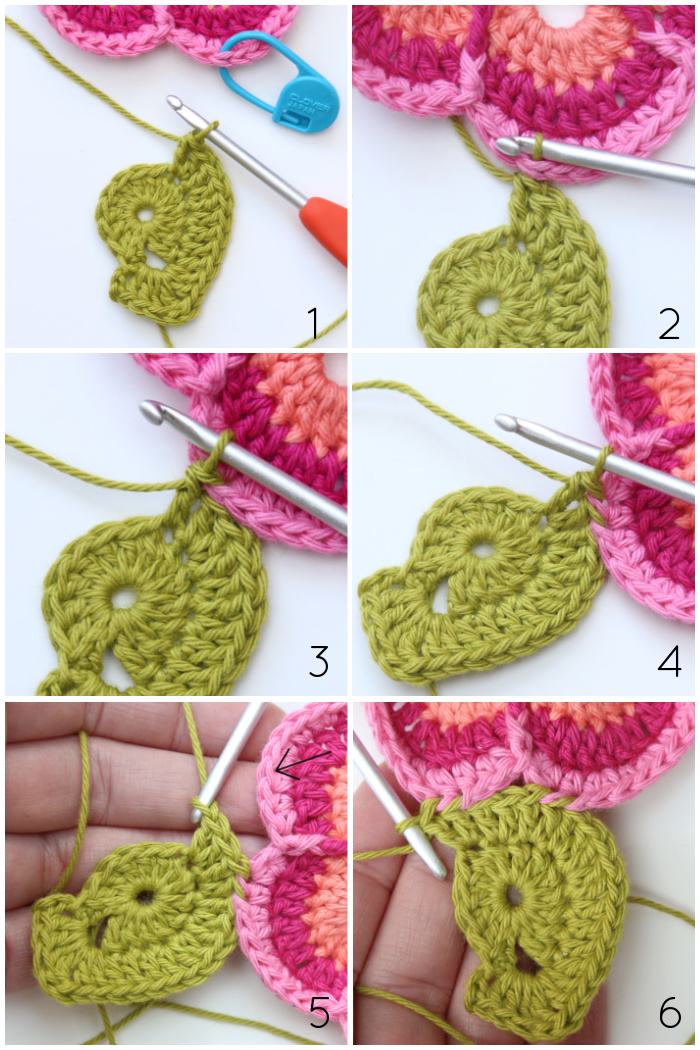
Round 2 and Joining: Ch 3 (counts as dc throughout). [2 dc, tr, ch 1, tr, 2 dc] in the ch-1 corner sp. Dc in the next 3 sts, the first one of which will be hidden, here and throughout. Make 2 dc in each of the next 3 sts {Photo 1}.
Remove your hook from your work and insert it from front to back into the marked st on the Flower. Pull the loop through {Photo 2}. Dc in the next st of the leaf {Photo 3}. This is your first joining dc made. Make another joining dc in the next st of the Flower and the same st of the Leaf to create an increase {Photo 4}.
Working only into the leaf, make 2 dc in the next st {Photo 5}.
Skip the next 5 sts on the Flower (so 2 hdc, FPhdc, 2 hdc) and make a joining dc in the next st of the Petal and Leaf. Make a joining dc in the next st of the Flower and the same st of the Leaf {Photo 6}.
Make 2 dc in each of the next 2 sts. Dc in the last 2 sts. Join to the top of the beg ch-3 with a sl st. Fasten off. {26 dc and 2 tr – not including ch-1 sp}
Motifs With Two Leaves
For motifs with 2 leaves, you will need to repeat the instructions above on the opposite side of the Flower, remembering that one of the leaves will be Colour N and one of them will be Colour O.
I really hope you enjoy making your Little Flowers. I am so excited to see them! Next week we will turn them into motifs, and then we will be ready to start joining.

This blog post contains affiliate links. I only link to products I personally use or would use. All opinions are my own.
