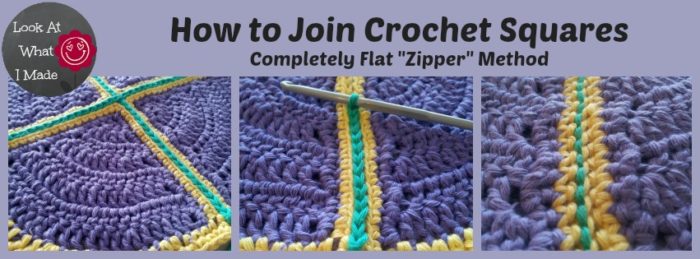
 There are so many methods for joining crochet squares. This one is my favourite, though, both for how it looks and for how flat the resulting seams are.
Let me tell you a little secret. I had used this method years ago when I just started crocheting again and had not liked the fact that it took a bit longer than some of the other methods (I know! Lazy!!). I was therefore very reluctant to give it another go. Beth, one of my testers and a very good friend, urged me to try it again. She was adamant that I would love it. And she was right!
It’s amazing :)
The zipper method does take a bit longer than the other methods out there, but give it a try and see how you like the finished result! I am calling it the “zipper” method, because that is what Beth called it. And she is right again. You crochet the blocks together as if you are zipping them up.
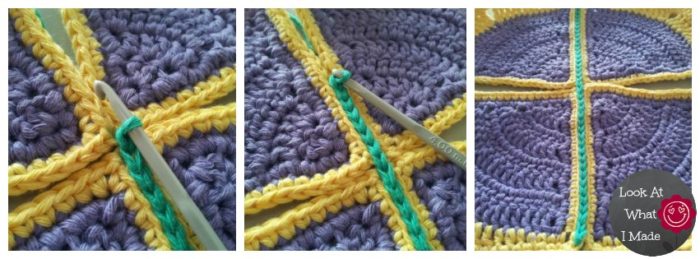
I have made the join with a contrasting colour to better illustrate how it works, but you can use the same colour as your squares and the seams will blend in effortlessly. In the pictures above you can see that the slip stitches form a flat cable on the front of the blanket and a running stitch on the back.
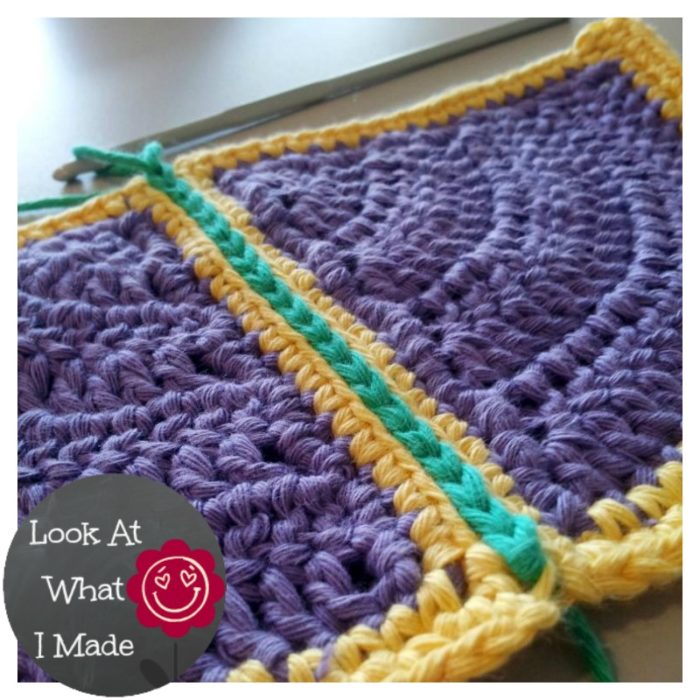 How to Join Crochet Squares Using the “Zipper” Method
Please Note: To join the squares using the zipper method, you will place the squares side by side, instead of on top of each other.
When you place the squares side by side like this, the v’s formed by the stitches of the last row/round of each square will be parallel to each other.
The 2 front loops will be farthest away from each other (so on the outside of the join).
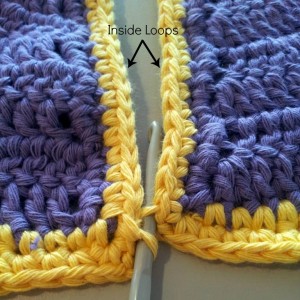
The 2 back loops will be right next to each other, so on the inside of the join. For the purposes of this tutorial I will call them the inside loops (see adjacent photo). You will be working ONLY into the inside loops (back loops).
Joining the Squares
First you will need some squares. I am using my Iced Pie Squares for this tutorial.
Next you will need to place your squares side by side with the right side of both facing up (Photo 2).
Starting with the block to your left , insert your hook from front to back into the inside loop of the first stitch. Now insert your hook from front to back into the inside loop of the first stitch of the other square (Photo 3). 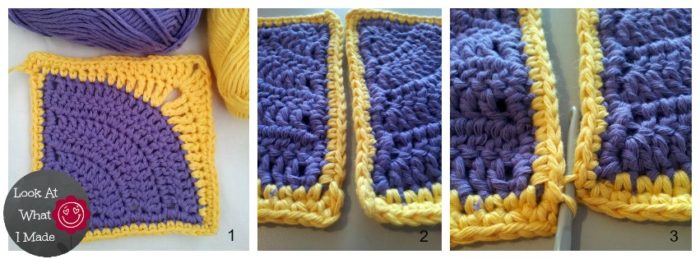
If you are going to be adding new yarn to join your crochet squares, add it now by placing a slip knot on your hook as in Photo 4. I like starting with a slip knot. If you don’t like starting with a slip knot, simply yarn over with your new colour. Pull through both of the stitches (loops) on your hook (Photo 5).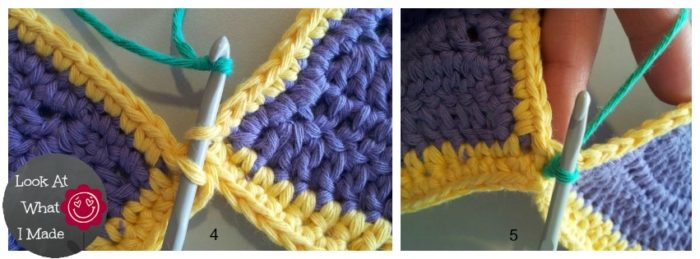
Insert your hook from front to back into the inside loop of the next stitch of the square on your left (see Photo 6). Then insert your hook from front to back into the inside loop of the next stitch of the other square (Photo 7). Grab your yarn, which will be at the back of your work, and pull through all three loops on your hook (Photo 8).
Remember to keep your tension loose. Slip stitches are not as elastic as other stitches, so if you work very tightly, your edges won’t have any “give”.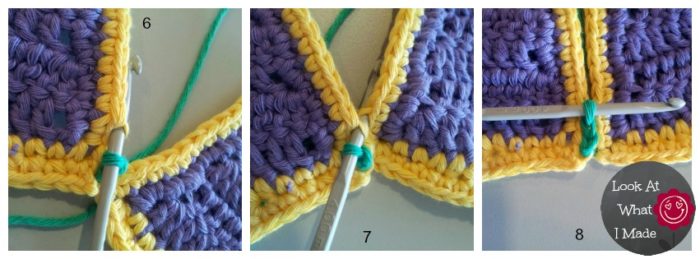
Keep working a slip stitch into the inside loops of each stitch (through both layers) this until you have joined all the stitches down the side of your squares. When you get to the end, bind off.
Photo 9 below shows a different view of what it should look like when you have inserted your hook through both of the inside loops from front to back. Inserting your hook in this way will cause the two inside loops to lie on top of each other instead of side by side. This is what makes the seam so flat.
Photo 10 illustrates the seam from the front. Photo 11 illustrates the seam from the back.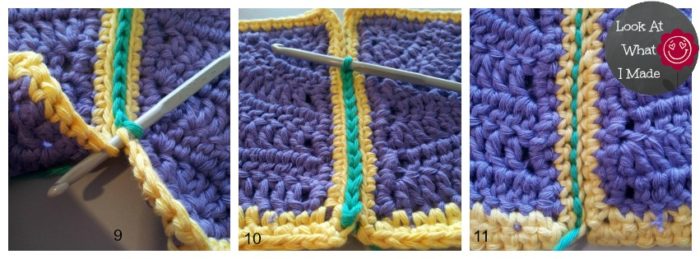
You can join these squares in a grid like Lucy from Attic24 does in her tutorial, but because you are working with the squares side by side and the yarn in the back, it becomes a bit fiddly.
If you want to try this method, don’t bind off when you have finished joining the first two squares. Lay the next two squares next to each other as before and continue slip stitching them together as instructed above. You can attach any number of squares in this fashion. The idea is that you join all the squares in one direction first and then join all the squares in the other direction.
To join the “unjoined” sides, turn the joined squares 90 degrees and repeat the whole process.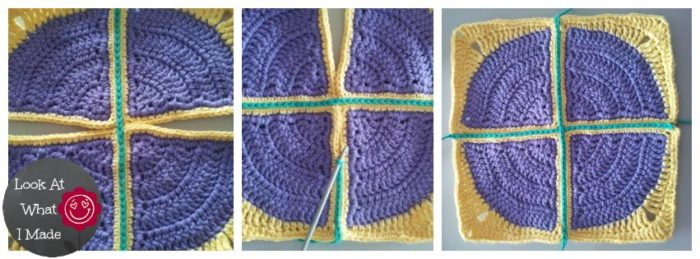
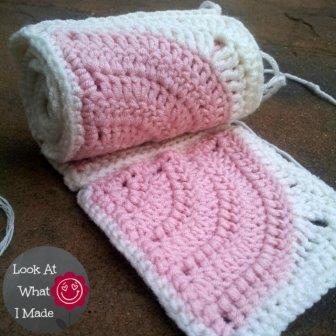
The easier method by far is to join the crochet squares to each other in long strips, as if you were making a bunch of scarves. You can then join these strips to each other using the method above.
When I make my squares I leave a 1 meter/1 yard tail of yarn when I bind off. I use this tail to attach the crochet squares to each other as I make them. If I left all the joining until the end, I would probably never complete a blanket.
If you find this “zipper” method too fiddly, have a look at this post from Knot Your Nanas Crochet. It is a round-up of 10 tutorials for joining granny squares. Of the ten, Lucy’s method (link above) is my favourite. It is both easy and very well explained.
I hope you have found this tutorial useful. If you have any questions or feedback, shoot me a comment!
More Useful Tutorials:
- Crochet in the Round: Spiral vs Joining
- Corners and the Elusive “Hidden” Stitch
- More Free Patterns and Tutorials by Lookatwhatimade
 Block a Week CAL 2014
I’m guessing that you stumbled upon this post because you like making squares. If I’m right, you might enjoy joining in the Block a Week CAL (Crochet-along) being hosted by Kimberly Slifer from the Official CCC Social Group on Facebook. We are making 45 weekly squares over the course of the year. At the end of the year we will be blocking and joining them so that we end up with a lovely blanket in time for Christmas.
I will be doing a photo tutorial (with permission from the designers) for each block (apart from the first 4), so even if you are a beginner, you should be able to follow along. Interested? You can read more about it (and find the links to date) here.
Remember to subscribe to my newsletter if you would like to be kept in the loop. You can also like my Facebook page or follow me on Bloglovin or Google+.
Happy Hooking!



Autumn Boyd says
I am using this right now for a Motif blanket and it is PERFECT. Thank you!
Mary says
Thank you for the instructions. I saw the link on a Crochet Crowd facebook post. I have always joined squares by slip stitching through the back loops from the back. This method is quite flat and the two front loops lie side to side. Your method is much classier, I really can’t wait to try it. I appreciate your talent and creativity.
jean clink says
This looks just right to me – thank you for being a pioneer!
Jo says
Because I dislike sewing so much this is my go to method! I’ve used it “accidentally” when I first started to crochet and I made a blanket with 6 panels to attach together. The designer recommended to use a mattress stitch. The blanket was 6 foot long… no way I was threading a 3m long yarn tail nor I was going to weave in extra ends if I didn’t have to ! So all the sudden the flap zipper join was like sun rays shining through the clouds lol
It might feel fiddly at first, but once you get going it becomes easier. Plus in my opinion it looks very elegant.
This tutorial is perfect and I highly recommend giving this joining method a go!
Robyn says
I am joining Mystical Lanterns in this manner – short edges first then long strips. Fiddly but looks excellent!
Dedri Uys says
Hi Robyn. I LOVE Mystical Lanterns. I’d love to see how your joins turn out, and I am sure Jane would too. Do you have a link to a photo so that we can take a look?
Dedri
Karin Jill Hunt says
I have also been wanting a joining method with this effect for ages. I’ve Ashley’s been trying on the wrong side!
At first attempt I was in despair as I couldn’t get the yarn cleanly through the three loops but the old adage of ” if you don’t succeed, try and try again” worked!!
The first loops are fiddly and I find lining up the squares tricky but after that it’s easy!
Thanks!
Bronwen Smith says
I have been looking for a method like this half my life! I’ve made a few similar attempts in the past but they were all a bit of a hack. Ill take the time to mark stitches at key points if its a large piece of work, but I think I’ve found my new favourite joining method!! Thank you!
Dedri Uys says
Oh yay! Glad I could help :)
Maresa says
Hi,
these very clear and detailed instructions are exactly what I looked for as I was very disappointed by the “regular” slip stitch join and the ridge it creates. Thank you for this tutorial!
M.
Dedri Uys says
I’m glad you found it useful :)
Joanne L says
Finally got to try this. I had seen this stitch before but couldn’t figure out the directions. I found yours searching for the original I had found but your directions are great, it actually made sense. Once I got the hang of it (which didn’t take long), it moved along quickly. Thanks.
Gosia says
Thank you for this tutorial. I used it to join the two halves of my Christmas baubles, it was a bit tricky at first but got easier on bauble number 2 already. The join looks even, flat and works great for my purpose. Only 28 t go now! Thanks again, love your blog!
Dedri Uys says
It is quite a fiddly join, but once you get used to it it is quite meditative. Have you shared any photos of your baubles? I’d love to see them.
Dedri
Jenn Jones says
I can’t wait to try this, will it work on other motif shapes? I started making African Flowers (Hexagons) but didn’t think ahead of how to join them, now I have 25 of them and if this works I’ll finally have a way to make them into a blanket.
Dedri Uys says
Hi Jenn. Yes, this will work on other shapes too :) You will need to check out a ‘joining hexies’ tutorial to see the direction of joining as hexies are joined a bit differently to squares. But the zipper stitch will def work :)
Betty says
Help. My afghan squars keep coming apart with use. I attached them with a slip stitch because I knew if no other method.
Dedri Uys says
I’m at a loss as to why this would be happening. The only thing I can think of is that the yarn you used is disintegrating? This has never happened to me, so I am not sure how to help you.
Mary says
Lots of folks crochet tightly, so their chain stitches, for example, are tighter than the bigger stitches. If this is the case, the slip stitch seam will be tighter than the fabric it is joining. As Dedri points out, it is important to stitch loosely for this seam to work well. If the seam is tight, it is more likely to break when the piece is used. Using a bigger hook might be helpful. Making a chain-one between the slip stitches can help, too.
Dr. Karen A Zilverberg says
Thanks! I needed a flat method to join squares.
Erica says
I’m eager to try this type of finish on the Afghan I’ve made. My blanket is 10 blocks x 8 blocks. Should I do the horizontal first or the vertical first? I’d like the overall look to emphasize the vertical(10 blocks). Thanks!
Jenny says
Erica, I do the vertical joins first and then join the strips horizontally.
Hope that helps
Jenny :)
Mary says
This comment is over a year later, so it might not be relevant, but here goes: If you want to emphasize the vertical line, then do the horizontal lines first. The last set of lines you do will be the continuous visual seamlines of the piece.
Ann Graham says
Can I use the zipper join if my squares have different stitch counts? They are blocked to the same size, but not all have the same count.
Dedri Uys says
Hi Ann. Yes, you can. You will just need to fudge it a bit. I have done this in the past by working into every st of the larger square (the one with more stitches) and sometimes working into the same st of the other square twice. For instance, if I have 3 sts more on one square than on the other, I would work into the same st twice THEE times along the side of the square that has fewer sts, spacing these ‘increases’ evenly.
I hope that helps.
Dedri
Cyra says
Thank you so much! I had to seam the shoulders of a hoodie for my daughter, and did not want a big annoying seam to bother her and rub against her, but I cannot do mattress stitch to save my life. I don’t know why. This worked perfectly.
Gloria says
My first granny square project! I have made granny squares with a skirt in mind. I am at the point of putting them together. I keep going back to the drawing board though. What method would you recommend that wouldn’t be too stiff, allowing for softness and closer to flat then raised? Thanks, Gloria
Dedri Uys says
Hi Gloria. I love the (sc, ch 1, skip 1) join my granny taught me. You can find that HERE.
Michelle says
Is it best to block the squares before joining? I’m making a blanket with 4 large panels and I used Tunisian crochet, which made the ends curl quite a bit.
Dedri Uys says
I always block before joining so that I am sure the joins won’t be too tight. But you don’t HAVE to. If you don’t like to block first, just make sure your joins are ok by checking for stretch periodically.
Dianne Larson Ward says
I’ve never seen this “Zipper Method” before. It’s brilliant and has a really clean crisp look. Thank you for sharing. Now I’m going to check out what other great ideas you have!
Dedri Uys says
You’re welcome. It takes a bit of time, but I think it is well worth it if that is the look you desire. If I want a much quicker method, I use the (sc, ch 1, skip 1) method.
Diana says
How do you treat the corners when they are a chain 2? Do you skip them or put a stictch in them?
Dedri Uys says
One of the chains belongs to one side of the square and the other one belongs to the other side. When joining, you will make a sl st in the first chain of the ch-2 corner. When joining the next 2 squares, you will make a sl st in the second chain of ch-2 corner from the next square. When you go to join in the perpendicular direction, you will sl st in the remaining ch’s of each corner. I hope that makes sense.