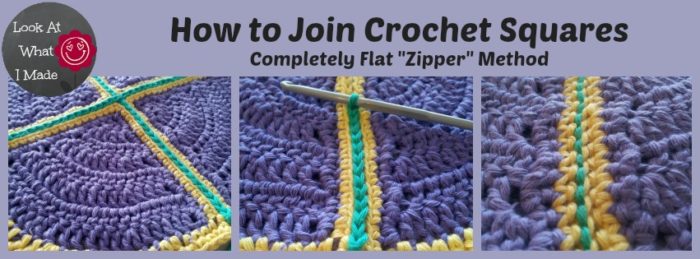
 There are so many methods for joining crochet squares. This one is my favourite, though, both for how it looks and for how flat the resulting seams are.
Let me tell you a little secret. I had used this method years ago when I just started crocheting again and had not liked the fact that it took a bit longer than some of the other methods (I know! Lazy!!). I was therefore very reluctant to give it another go. Beth, one of my testers and a very good friend, urged me to try it again. She was adamant that I would love it. And she was right!
It’s amazing :)
The zipper method does take a bit longer than the other methods out there, but give it a try and see how you like the finished result! I am calling it the “zipper” method, because that is what Beth called it. And she is right again. You crochet the blocks together as if you are zipping them up.
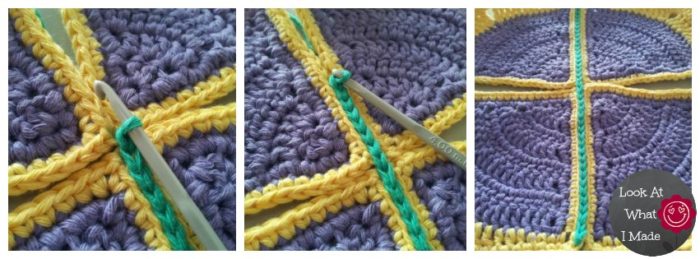
I have made the join with a contrasting colour to better illustrate how it works, but you can use the same colour as your squares and the seams will blend in effortlessly. In the pictures above you can see that the slip stitches form a flat cable on the front of the blanket and a running stitch on the back.
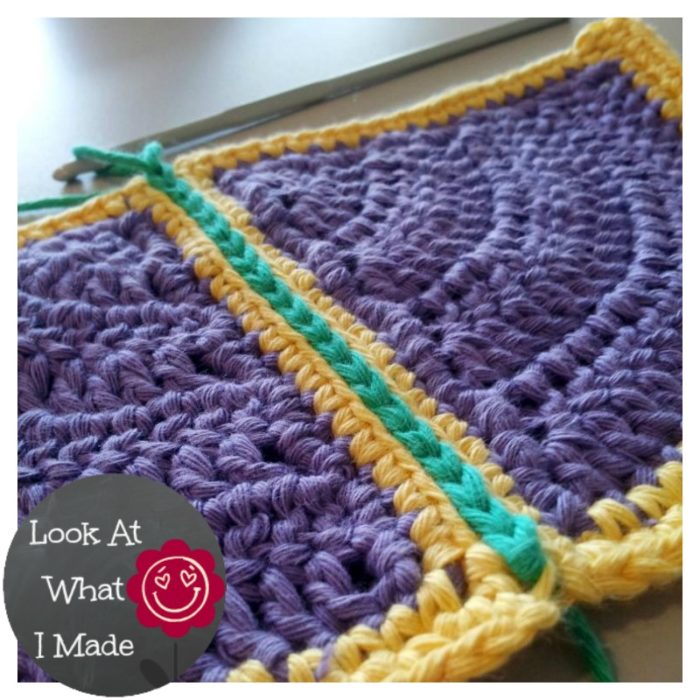 How to Join Crochet Squares Using the “Zipper” Method
Please Note: To join the squares using the zipper method, you will place the squares side by side, instead of on top of each other.
When you place the squares side by side like this, the v’s formed by the stitches of the last row/round of each square will be parallel to each other.
The 2 front loops will be farthest away from each other (so on the outside of the join).
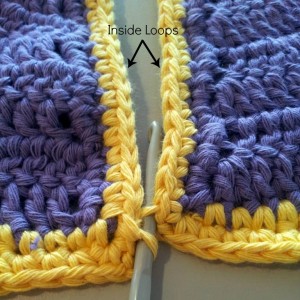
The 2 back loops will be right next to each other, so on the inside of the join. For the purposes of this tutorial I will call them the inside loops (see adjacent photo). You will be working ONLY into the inside loops (back loops).
Joining the Squares
First you will need some squares. I am using my Iced Pie Squares for this tutorial.
Next you will need to place your squares side by side with the right side of both facing up (Photo 2).
Starting with the block to your left , insert your hook from front to back into the inside loop of the first stitch. Now insert your hook from front to back into the inside loop of the first stitch of the other square (Photo 3). 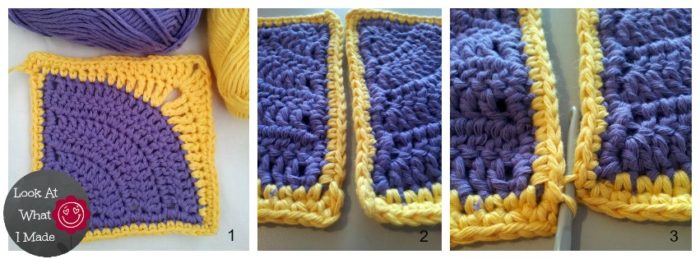
If you are going to be adding new yarn to join your crochet squares, add it now by placing a slip knot on your hook as in Photo 4. I like starting with a slip knot. If you don’t like starting with a slip knot, simply yarn over with your new colour. Pull through both of the stitches (loops) on your hook (Photo 5).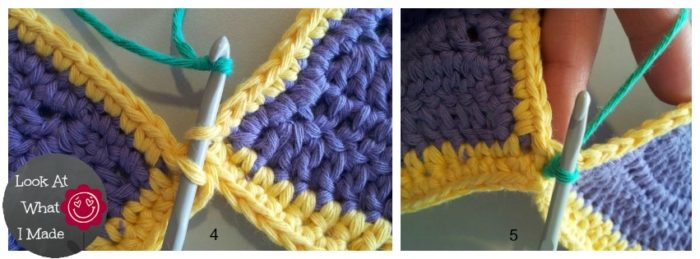
Insert your hook from front to back into the inside loop of the next stitch of the square on your left (see Photo 6). Then insert your hook from front to back into the inside loop of the next stitch of the other square (Photo 7). Grab your yarn, which will be at the back of your work, and pull through all three loops on your hook (Photo 8).
Remember to keep your tension loose. Slip stitches are not as elastic as other stitches, so if you work very tightly, your edges won’t have any “give”.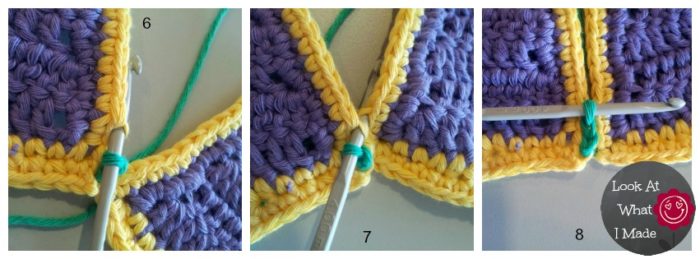
Keep working a slip stitch into the inside loops of each stitch (through both layers) this until you have joined all the stitches down the side of your squares. When you get to the end, bind off.
Photo 9 below shows a different view of what it should look like when you have inserted your hook through both of the inside loops from front to back. Inserting your hook in this way will cause the two inside loops to lie on top of each other instead of side by side. This is what makes the seam so flat.
Photo 10 illustrates the seam from the front. Photo 11 illustrates the seam from the back.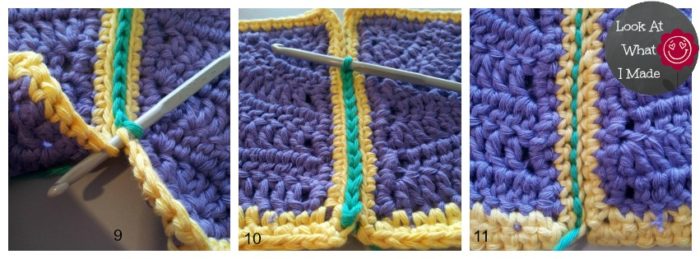
You can join these squares in a grid like Lucy from Attic24 does in her tutorial, but because you are working with the squares side by side and the yarn in the back, it becomes a bit fiddly.
If you want to try this method, don’t bind off when you have finished joining the first two squares. Lay the next two squares next to each other as before and continue slip stitching them together as instructed above. You can attach any number of squares in this fashion. The idea is that you join all the squares in one direction first and then join all the squares in the other direction.
To join the “unjoined” sides, turn the joined squares 90 degrees and repeat the whole process.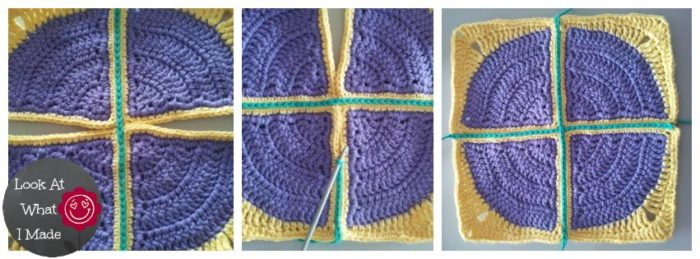
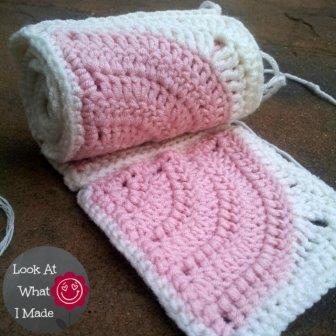
The easier method by far is to join the crochet squares to each other in long strips, as if you were making a bunch of scarves. You can then join these strips to each other using the method above.
When I make my squares I leave a 1 meter/1 yard tail of yarn when I bind off. I use this tail to attach the crochet squares to each other as I make them. If I left all the joining until the end, I would probably never complete a blanket.
If you find this “zipper” method too fiddly, have a look at this post from Knot Your Nanas Crochet. It is a round-up of 10 tutorials for joining granny squares. Of the ten, Lucy’s method (link above) is my favourite. It is both easy and very well explained.
I hope you have found this tutorial useful. If you have any questions or feedback, shoot me a comment!
More Useful Tutorials:
- Crochet in the Round: Spiral vs Joining
- Corners and the Elusive “Hidden” Stitch
- More Free Patterns and Tutorials by Lookatwhatimade
 Block a Week CAL 2014
I’m guessing that you stumbled upon this post because you like making squares. If I’m right, you might enjoy joining in the Block a Week CAL (Crochet-along) being hosted by Kimberly Slifer from the Official CCC Social Group on Facebook. We are making 45 weekly squares over the course of the year. At the end of the year we will be blocking and joining them so that we end up with a lovely blanket in time for Christmas.
I will be doing a photo tutorial (with permission from the designers) for each block (apart from the first 4), so even if you are a beginner, you should be able to follow along. Interested? You can read more about it (and find the links to date) here.
Remember to subscribe to my newsletter if you would like to be kept in the loop. You can also like my Facebook page or follow me on Bloglovin or Google+.
Happy Hooking!



Ali says
Thank you! Such a thorough tutorial with great photos
Leanna says
Wonderful tutorial Thank you for sharing. Liking on Stumble
MARJORIE SKALIN says
Thank you. Yes this takes a bit longer but it is a beautiful look that doesn’t take away from the design of the pieces. I have 52 graph picture pieces all sc that I’m putting together. Just started but it is working nicely.
FURRZANAH Bassa says
Hi Dedri/ Jenny
Thanks a million once again. My beginner crochet has really progressed with your awesome tutorials. I love your “zipper” join & have just finished joining a baby blanket I was working on. I made the squares from the block a week Cal. I think it will be my favorite join as well. I love the way it lays flat & the wrong side is gorgeous as well. You’re the best. It’s the first time that I have ever joined squares. I have excitedly started Charlotte as well and am really enjoying it. You simplify the patterns so that us beginners can do amazing things. I would have never imagined trying Sophie’s universe but have progressed to part 4.started Lydia’s blanket as well☺️☺️☺️
Can’t wait to try more amazing stuff from you.
Regards FURRZANAH
Durban. South Africa
Dedri Uys says
What a wonderful, encouraging comment, Furrzanah. I am so excited that you are flying through the projects.
Tiffany says
GREAT tutorial. Thank you. I just tried it on some scrap squares and it worked out perfectly! I will be doing this on the blanket I am currently making =)
Della Jackson says
Hi. I can’t get my squares to stay flat whatever join I use, I’ve even blocked them all first! Any ideas what I’m doing wrong?
Amanda says
hi,
just wondering if you would have a video tutorial of this,
I would really love to learn this…
Leah says
I knit too and I think and I think that this could be used on knit pieces if they were edged with a slip stitch, which is fairly common. I have never been very good a sewing things together. I’m going to add this to my Thing-to-Try list.
Dedri Uys says
Leah, it works very well with knitting. My granny uses it all the time.
Starlene says
Thanks for the good close-up photos in your tutorial. It took me a few tries to really figure out how to execute the stitch, finally realizing the yarn must be at the back of the two loops. I think I have it right but for some reason I still seem to have a very slight ridge (enough that it’s noticeable to me) on the right side of the zipper stitch. In your photos, I don’t see that you show the stitch from the right side but more from the left angle so I can’t see if your stitch is also slightly raised. I experimented with starting always on the left loop (instead of the right loop) and ended up with that same slight ridge on the left side. So I decided to try switching from right loop then next stitch left loop and continue switching and now my zipper stitch looks truly flat. I tried stretching and adjusting the stretch initially to see if it would lie flat but wouldn’t. It’s even more “fiddly” to switch from right loop to left but I like how it looks much better. Thank you again, this stitch is going to really enhance the baby blanket I’m making.
Simone says
Hi Starlene,
I had the same problem….I was holding squares back to back as it was easier, but it was pulling it to tight. I found laying it flat and crocheting together like the pattern says gives you that perfect flat stitch between the two ridges!!
Gillian says
Thank you for writing that!! I have the same ridge and cannot for the life of me figure out why! I tried your back and forth method and love it, thanks!!!
Dedri Uys says
Have you got a photo, Gillian?
BeagleMom says
oh how cool is this??!! i’ve always joined my squares this way because i’m too lazy to get out my needle and whip stitch!!!! never knew there was a name for it!!! love the way it gives a right/wrong side!!!
Lynne N says
Thank you for sharing this method with us. I want to keep this one in mind for my next blanket. So many other works in progress at the moment that it might take me a while to try it out, though. Do you ever find yourself in that position? (So many projects…not enough time! :-))
Jenny says
ALL the time, Lynne! lol
Dedri Uys says
Haha…that is my constant state of being!
Josie says
First of all, thank you SOOOOOOOOOO much for this tutorial!! I really don’t like having a ridge on a blanket, so this was perfect for me.
But now I need some advice! I’ve joined all my squares with the zipper stitch (and they look so pretty!!) but I want to border the outside with something that “matches” any suggestions?
Dedri Uys says
Josie, have you considered just making slip stitch rounds all the way around your blanket? In other words, slip stitch in the back loop of each stitch around in a spiral fashion until you have as many slip stitch rounds as you’d like. Alternatively Google the camel stitch, which gives a faux stockinette finish.
josie says
Aha!! The slip stitch in the back loops is almost a perfect match!
Thank you!! I’m getting excited that it’s close to finished!
Melody says
This is exactly what I wanted but couldn’t figure out how to do it! Thank you for sharing :)
Mandi says
How do you make the squares in the picture? Is there a site I can go to? They are exactly what I need!
Dedri Uys says
Mandi, they are called Iced Pie Squares and you can find the pattern HERE.
Marina says
I love it ! Thank you sooooo much for sharing !
EllyD says
Thank you so much Dedri :) I will definitely give this a try for the CAL14 blocks.
Dedri Uys says
That’s what I am hoping to do too, EllyD :)
Laetitia Clark says
Thank you so much for sharing. This is truly inspired and I cannot wait to try it.
Bonnie says
I love this technique! It’s been quite some time since I’ve made anything that needed to be joined. This is so nice! Thanks so much for sharing! Bonnie
Madeleen says
Just love this method! When you “join as you go” ,do you also use the “zipper” method/ Thanx for a great and inspiring tutorial.
Dedri Uys says
Madeleen, you could use it on join-as-you-go projects. I haven’t personally, but can see it working.
PamelaRuth says
This is a great method for joining crochet squares – it’s quite easy really. I’m definitely going to use it to join the squares of my next blanket.
cathy faure says
Thank you very much this is so helpful.