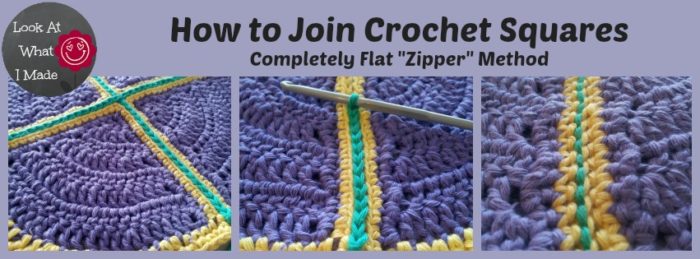
 There are so many methods for joining crochet squares. This one is my favourite, though, both for how it looks and for how flat the resulting seams are.
Let me tell you a little secret. I had used this method years ago when I just started crocheting again and had not liked the fact that it took a bit longer than some of the other methods (I know! Lazy!!). I was therefore very reluctant to give it another go. Beth, one of my testers and a very good friend, urged me to try it again. She was adamant that I would love it. And she was right!
It’s amazing :)
The zipper method does take a bit longer than the other methods out there, but give it a try and see how you like the finished result! I am calling it the “zipper” method, because that is what Beth called it. And she is right again. You crochet the blocks together as if you are zipping them up.
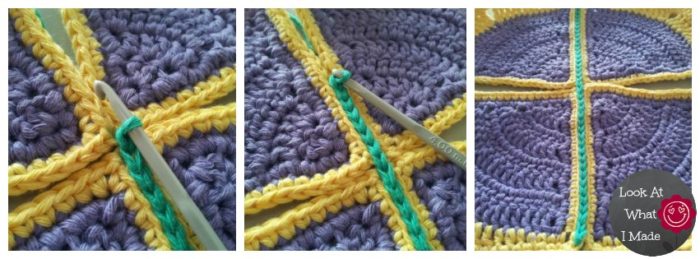
I have made the join with a contrasting colour to better illustrate how it works, but you can use the same colour as your squares and the seams will blend in effortlessly. In the pictures above you can see that the slip stitches form a flat cable on the front of the blanket and a running stitch on the back.
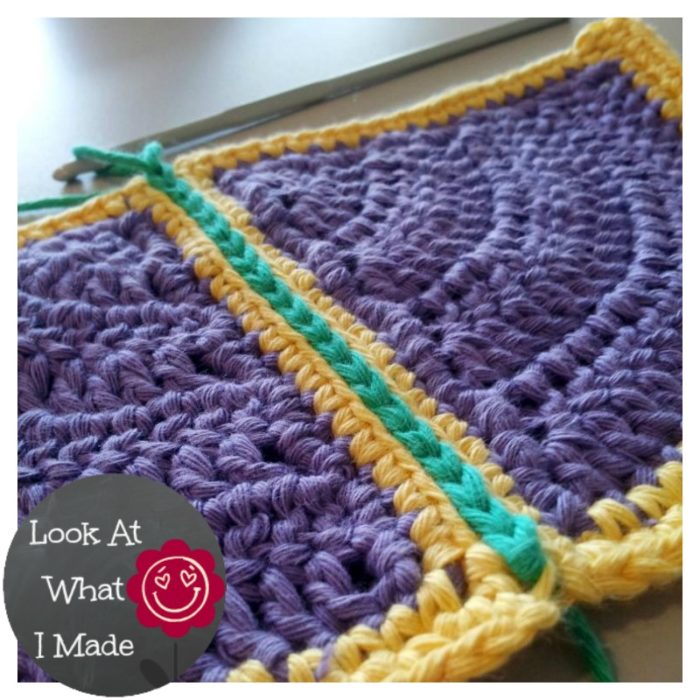 How to Join Crochet Squares Using the “Zipper” Method
Please Note: To join the squares using the zipper method, you will place the squares side by side, instead of on top of each other.
When you place the squares side by side like this, the v’s formed by the stitches of the last row/round of each square will be parallel to each other.
The 2 front loops will be farthest away from each other (so on the outside of the join).
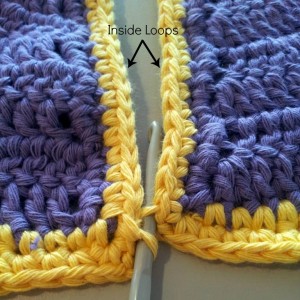
The 2 back loops will be right next to each other, so on the inside of the join. For the purposes of this tutorial I will call them the inside loops (see adjacent photo). You will be working ONLY into the inside loops (back loops).
Joining the Squares
First you will need some squares. I am using my Iced Pie Squares for this tutorial.
Next you will need to place your squares side by side with the right side of both facing up (Photo 2).
Starting with the block to your left , insert your hook from front to back into the inside loop of the first stitch. Now insert your hook from front to back into the inside loop of the first stitch of the other square (Photo 3). 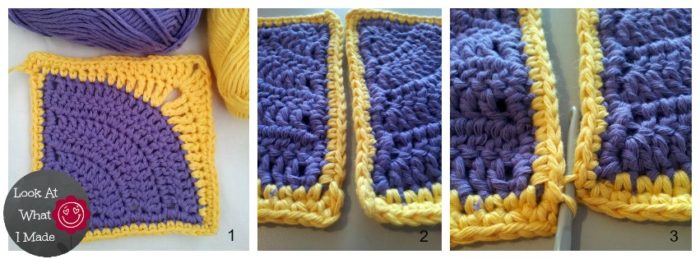
If you are going to be adding new yarn to join your crochet squares, add it now by placing a slip knot on your hook as in Photo 4. I like starting with a slip knot. If you don’t like starting with a slip knot, simply yarn over with your new colour. Pull through both of the stitches (loops) on your hook (Photo 5).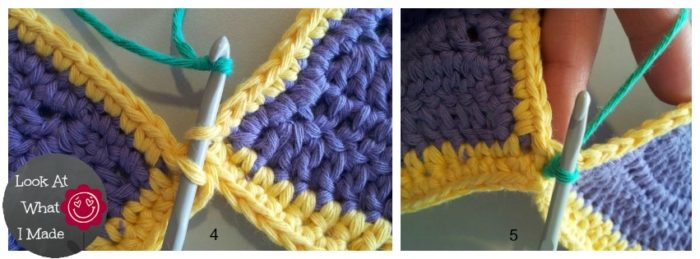
Insert your hook from front to back into the inside loop of the next stitch of the square on your left (see Photo 6). Then insert your hook from front to back into the inside loop of the next stitch of the other square (Photo 7). Grab your yarn, which will be at the back of your work, and pull through all three loops on your hook (Photo 8).
Remember to keep your tension loose. Slip stitches are not as elastic as other stitches, so if you work very tightly, your edges won’t have any “give”.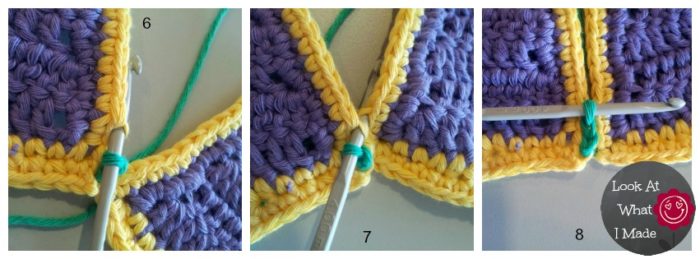
Keep working a slip stitch into the inside loops of each stitch (through both layers) this until you have joined all the stitches down the side of your squares. When you get to the end, bind off.
Photo 9 below shows a different view of what it should look like when you have inserted your hook through both of the inside loops from front to back. Inserting your hook in this way will cause the two inside loops to lie on top of each other instead of side by side. This is what makes the seam so flat.
Photo 10 illustrates the seam from the front. Photo 11 illustrates the seam from the back.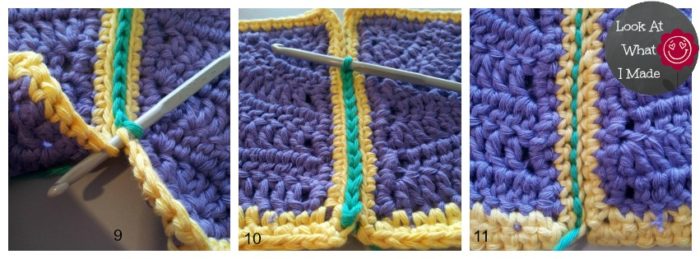
You can join these squares in a grid like Lucy from Attic24 does in her tutorial, but because you are working with the squares side by side and the yarn in the back, it becomes a bit fiddly.
If you want to try this method, don’t bind off when you have finished joining the first two squares. Lay the next two squares next to each other as before and continue slip stitching them together as instructed above. You can attach any number of squares in this fashion. The idea is that you join all the squares in one direction first and then join all the squares in the other direction.
To join the “unjoined” sides, turn the joined squares 90 degrees and repeat the whole process.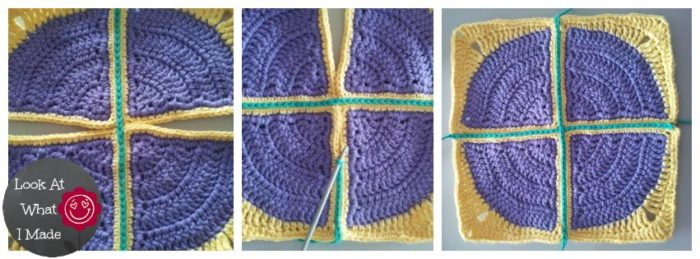
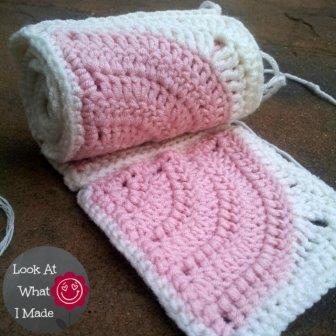
The easier method by far is to join the crochet squares to each other in long strips, as if you were making a bunch of scarves. You can then join these strips to each other using the method above.
When I make my squares I leave a 1 meter/1 yard tail of yarn when I bind off. I use this tail to attach the crochet squares to each other as I make them. If I left all the joining until the end, I would probably never complete a blanket.
If you find this “zipper” method too fiddly, have a look at this post from Knot Your Nanas Crochet. It is a round-up of 10 tutorials for joining granny squares. Of the ten, Lucy’s method (link above) is my favourite. It is both easy and very well explained.
I hope you have found this tutorial useful. If you have any questions or feedback, shoot me a comment!
More Useful Tutorials:
- Crochet in the Round: Spiral vs Joining
- Corners and the Elusive “Hidden” Stitch
- More Free Patterns and Tutorials by Lookatwhatimade
 Block a Week CAL 2014
I’m guessing that you stumbled upon this post because you like making squares. If I’m right, you might enjoy joining in the Block a Week CAL (Crochet-along) being hosted by Kimberly Slifer from the Official CCC Social Group on Facebook. We are making 45 weekly squares over the course of the year. At the end of the year we will be blocking and joining them so that we end up with a lovely blanket in time for Christmas.
I will be doing a photo tutorial (with permission from the designers) for each block (apart from the first 4), so even if you are a beginner, you should be able to follow along. Interested? You can read more about it (and find the links to date) here.
Remember to subscribe to my newsletter if you would like to be kept in the loop. You can also like my Facebook page or follow me on Bloglovin or Google+.
Happy Hooking!



Ruth Theron says
Hallo Dedri, Hier vanuit Tulbagh net dankie vir jou tutorial oor die aanmekaar hekel deur die zipper metode. Dit het my nou amper ‘n halfuur geneem om die hang of it te kry met die deurtrek van die draad en nou hte ek die oorwinning behaal. Ek is nogal trots op my 73 jaar wat dit onder die knie het. Gaan dit beslis gebruik vir ons blokke. Groete. Ruth Theron
Dedri Uys says
Ruth, hulle sê mos ‘n mens is nooit te oud om te leer nie :) Mag ek op 73 ook nog nuwe goed kan en wil leer. Ek is bly jy hou daarvan. Dit vat ‘n bietjie lank, maar ek vind dit baie kalmerend om so te sit en stik-hekel.
ILOOMALOT says
Thank you OH SO MUCH for this fabulous tutorial! I had been contemplating how to join my baby blanket together and then I found this! I just finished joining it and I will never do it another way – this is just perfect!!!
Dedri Uys says
Oh, I’m pleased that you liked it. It IS quite tedious…until you get hooked.
Lyn says
Hi Dedri,
I love your squares and the way the join looks! I want to try it on some squares that I have but I’m wondering if you would be able to post a photo of the first stitch that you do when you use the “tail” that you leave. I have left a tail but not sure whether you need to tie off the last stitch before the tail or leave it and use it to do the first joining stitch. If you use it for the first stitch, how do you do it, given that there would be a stitch on the hook – I’m not sure what I should be doing next. Thank you so much – it looks great and I’m very keen to have a go at it. Thanks heaps. Lyn
Dedri Uys says
Hi Lyn
I am on holiday at the moment, so don’t have any squares I can take photos of for you. But if you want to use the tail (which is what I do if I don’t want a contrasting join), tie off the last stitch by pulling the tail all the way through the last stitch. Then hold the tail behind your blocks and insert your hook as instructed in the tutorial (into the “inside” loop of the first st of both blocks). Grab the tail of yarn (which will be behind your blocks) and pull up a loop. Then insert your hook into the “inside” loops of the next st of each block and make a sl st. Continue as per the tutorial. If this still doesn’t make sense, please drop me a line again and I will try and get you some photos.
Thank you,
Dedri
Lyn says
Hi Dedri,
Thanks so much for your reply – that clears it up perfectly! I’ve wanted to do a flat stitch and this looks like the perfect one. Thanks again so much, I appreciate it very much. Enjoy your holiday!
Lyn
Carmen says
Me ha encantado su blog y la forma de unir los cuadritos es la que más me ha gustado.
Un saludo,
Carmen
Dedri Uys says
Thank you, Carmen.
Sangeetha says
Hi Dedri,
Great tutorial and your photos are superb! I have always used the join-as-you-go method. Next time I am going to try your zipper method. Thank you for the lovely tutorial.
Love from India. :)
Dedri Uys says
Aw, thank you. If you do try it, please let me know how it goes. I would love to see some pictures of your finished project x
ingrid adams says
Hi, Diedrie, I just want to thank you for your wonderful zipper method for joining squares. My daughter asked me to help my little grandsons and their second grade class by crocheting together squares that the children crochet in their class to help raise money for their Waldorf School. I was born and raised in Germany and know how to crochet – but did not have a crochet needle in my hands for more than fifty years. Still knew how – but had never put anything like this together. We made 77 squares – and I finished putting them together yesterday. The blanket is beautiful thanks to you. I don’t have a way to send a picture. Just wanted to say “thanks”. It was time consuming – but worth the effort. Aloha, Ingrid. I live in Honolulu.
Dedri Uys says
Thank you for your lovely comment, Ingrid. I am so pleased that you liked the zipper method and wish I could have seen your blanket. I hope they make lots of money with the blanket!
Aloha,
Dedri
Anum says
wow!!! this is something I came up myslef and thought I was doing it wrong… this gave me confidence
and ohhh what beautiful colours you have used I am sooo in love
Dedri Uys says
Thank you, Anum. Good on you for experimenting. It doesn’t really matter if you are doing something “right” or “wrong” if you like the way it turns out.
Caryn says
This looks easy enough to do actually. I’ve never been very good at following written direction for crochet patterns so the photos help me out GREATLY! Much appreciated! BTW – your work is beautiful!
Dedri Uys says
Thank you, Caryn. I hope you like this method once you get to using it :)
tammy says
Absolutely love this joining method!!! It is truely stunning effect!!! Thank you!!!
Dedri Uys says
Thank you, Tammy :)
Scroogie says
Thank you. This does look great but I totally understand your hesitancy to use it. It is slow. I could have done three in the time it takes to do one but it does look great when it’s finished.
Dedri Uys says
Yes, lol. And I’m not really getting faster at it. But I am using it for anything and everything that needs joining.
Kelli says
Hi Dedri, I have just finished all my starburst filet squares and was in a bit of a pickle about how to join them. I didn’t like the single crochet look or any of them until I found your method! It looks really nice and is what I had pictured in my head of how I wanted my blanket to look. (It’s for a boy and a lot of the joining methods were a bit too girly looking). I just have one question though. When you change to stitch in the other direction, what do you do when you get to the middle of 4 squares? Do you go over the existing zipper stitch with a chain one or anything like that?
Thanks, Kelli
Dedri Uys says
Hi Kelli
Chaining one between blocks will work just fine. I find it a bit fiddly attaching them in a grid like you are proposing, so I always just use the tails of yarn to crochet the blocks to each other so that I end up with a bunch of “scarves”. I then attach these strips to each other when I’m done. Does that make sense?
Scroogie says
If you made a stitch over the first one rather than a chain it would lay flatter probably.
Janet says
This is lovely! Next time I will definitely use this method of joining crochet blocks. Very nice.
Dedri Uys says
Thank you, Janet. The more I do it, the faster I get at it. I don’t think I will ever use anything else again.
Elaine says
ABSOLUTELY LOVE THIS!!!!!! this is my new “go to stitch” for joining EVERYTHING… I never heard of this but its genius. OHH the possibilities are ENDLESS (LOL). Thank you for the tutorial as it makes it so much easier to comprehend. I can’t wait to try it. Starting a new project now just to give it a try!! thanks again..<3
Dedri Uys says
Hehe, I love your enthusiasm, Elaine. Let me know how it goes :)
Linda White says
I love your method of joining squares….the explanation, the photos are excellent and easy to follow. I am about a third of the way joining the squares on my afghan and I love the look. Thanks!
Dedri Uys says
Linda, I am so pleased that you like it. I would love to see your finished afghan x
Rina Blaauw says
Dit ltk baie netjies, sal dit beslis gebruik
Dedri Uys says
Laat weet my gerus hoe dit uitdraai, Rina x
Dandelion Daze says
Thanks for this great tutorial! The photos and explanations make it very clear. I usually join my blocks with slip stitch or single crochet which gives the raised join that I rather like, but sometimes you need a flat join. Since I really dislike whip stitching, this is perfect! I’ll give it a go soon.
Heather
Dedri Uys says
I hope it works out well for you, Heather x
Joanita says
Wow! Love this method! Definitely going to give this a try. Got a project coming up that will need a good finish like this. Thanks so much for sharing :) Great tutorial!
Dedri Uys says
Just a pleasure, Joanita. I love those little Odd-balls of yours! They are perfectly kooky and gorgeous.
Chris H says
Very nice technique!! Thanks for posting and including photos!
tatie fabie says
oui c’est une jolie façon de joindre, quand je fais un cube ( joue tpour enfant) je fais aussi mais en prenant le brin avant de la maille du deuxième carré, par le dessous cela donne des angles parfaits.
“boucle à l’intérieur”: chez nous elles sont nommées “brin avant” et “brin arrière” de la maille, en fait c’est la position du brin de la maille quand on a l’ouvrage devant soi, en avant ou en arrière, donc le nom cette maille change si on tourne l’ouvrage. sont pas compliqués ces “frenchies” hein? héhé!
bonne journée A+ bises
marjam17 says
I don’t understand what you are referring to when you say inside loop. Please use front loop or back loop please or send me a email explaining this. Your explanation above makes absolutely no sense to me at all.
Dedri Uys says
I have added a photo to try and clarify. Let me know if it still doesn’t make sense.