 There are so many methods for joining crochet squares. This one is my favourite, though, both for how it looks and for how flat the resulting seams are.
Let me tell you a little secret. I had used this method years ago when I just started crocheting again and had not liked the fact that it took a bit longer than some of the other methods (I know! Lazy!!). I was therefore very reluctant to give it another go. Beth, one of my testers and a very good friend, urged me to try it again. She was adamant that I would love it. And she was right!
It’s amazing :)
The zipper method does take a bit longer than the other methods out there, but give it a try and see how you like the finished result! I am calling it the “zipper” method, because that is what Beth called it. And she is right again. You crochet the blocks together as if you are zipping them up.
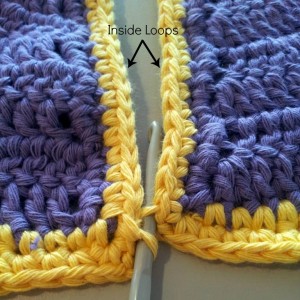
I have made the join with a contrasting colour to better illustrate how it works, but you can use the same colour as your squares and the seams will blend in effortlessly. In the pictures above you can see that the slip stitches form a flat cable on the front of the blanket and a running stitch on the back.
 How to Join Crochet Squares Using the “Zipper” Method
Please Note: To join the squares using the zipper method, you will place the squares side by side, instead of on top of each other.
When you place the squares side by side like this, the v’s formed by the stitches of the last row/round of each square will be parallel to each other.
The 2 front loops will be farthest away from each other (so on the outside of the join).
The 2 back loops will be right next to each other, so on the inside of the join. For the purposes of this tutorial I will call them the inside loops (see adjacent photo). You will be working ONLY into the inside loops (back loops).
Joining the Squares
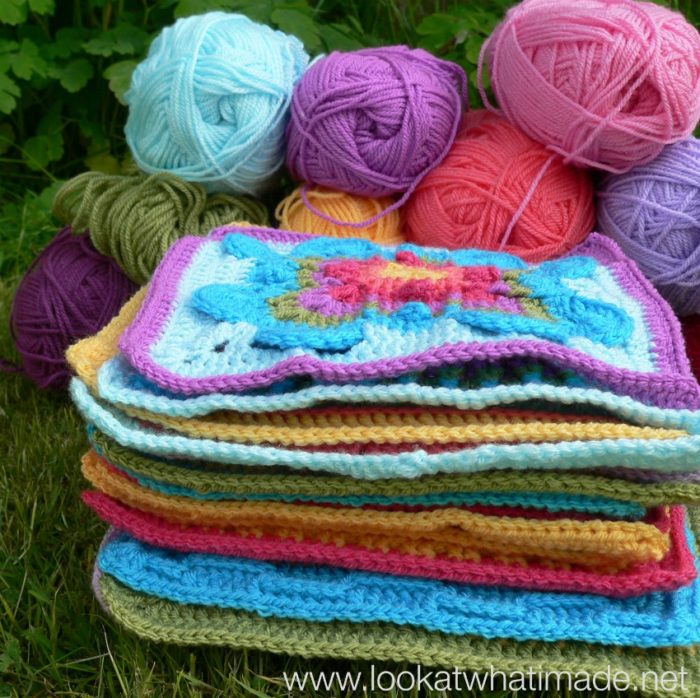
First you will need some squares. I am using my Iced Pie Squares for this tutorial.
Next you will need to place your squares side by side with the right side of both facing up (Photo 2).
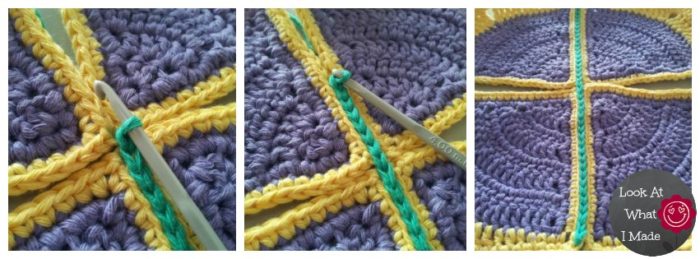
Starting with the block to your left , insert your hook from front to back into the inside loop of the first stitch. Now insert your hook from front to back into the inside loop of the first stitch of the other square (Photo 3). 
If you are going to be adding new yarn to join your crochet squares, add it now by placing a slip knot on your hook as in Photo 4. I like starting with a slip knot. If you don’t like starting with a slip knot, simply yarn over with your new colour. Pull through both of the stitches (loops) on your hook (Photo 5).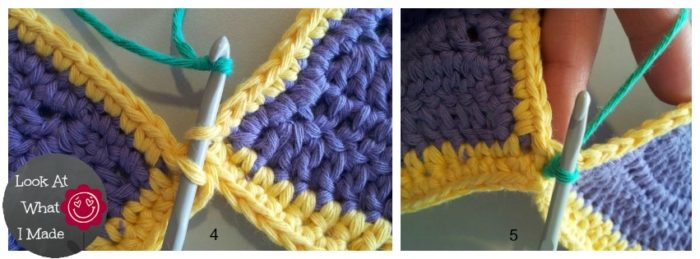
Insert your hook from front to back into the inside loop of the next stitch of the square on your left (see Photo 6). Then insert your hook from front to back into the inside loop of the next stitch of the other square (Photo 7). Grab your yarn, which will be at the back of your work, and pull through all three loops on your hook (Photo 8).
Remember to keep your tension loose. Slip stitches are not as elastic as other stitches, so if you work very tightly, your edges won’t have any “give”.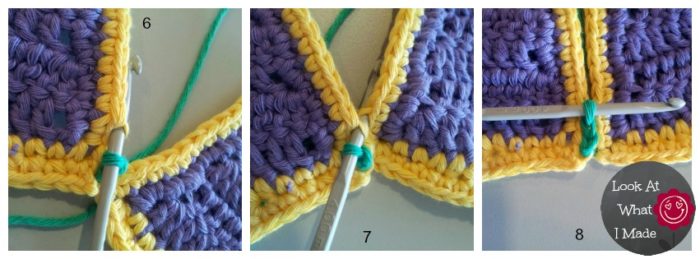
Keep working a slip stitch into the inside loops of each stitch (through both layers) this until you have joined all the stitches down the side of your squares. When you get to the end, bind off.
Photo 9 below shows a different view of what it should look like when you have inserted your hook through both of the inside loops from front to back. Inserting your hook in this way will cause the two inside loops to lie on top of each other instead of side by side. This is what makes the seam so flat.
Photo 10 illustrates the seam from the front. Photo 11 illustrates the seam from the back.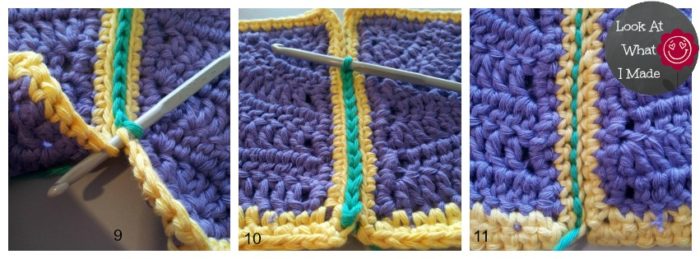
You can join these squares in a grid like Lucy from Attic24 does in her tutorial, but because you are working with the squares side by side and the yarn in the back, it becomes a bit fiddly.
If you want to try this method, don’t bind off when you have finished joining the first two squares. Lay the next two squares next to each other as before and continue slip stitching them together as instructed above. You can attach any number of squares in this fashion. The idea is that you join all the squares in one direction first and then join all the squares in the other direction.
To join the “unjoined” sides, turn the joined squares 90 degrees and repeat the whole process.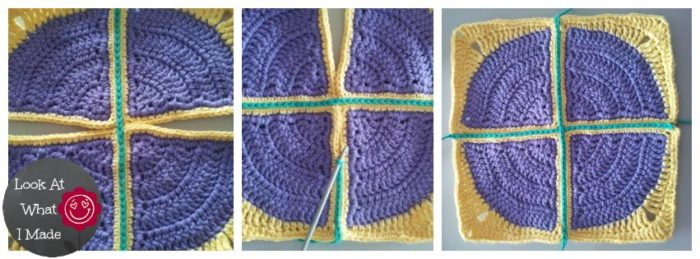

The easier method by far is to join the crochet squares to each other in long strips, as if you were making a bunch of scarves. You can then join these strips to each other using the method above.
When I make my squares I leave a 1 meter/1 yard tail of yarn when I bind off. I use this tail to attach the crochet squares to each other as I make them. If I left all the joining until the end, I would probably never complete a blanket.
If you find this “zipper” method too fiddly, have a look at this post from Knot Your Nanas Crochet. It is a round-up of 10 tutorials for joining granny squares. Of the ten, Lucy’s method (link above) is my favourite. It is both easy and very well explained.
I hope you have found this tutorial useful. If you have any questions or feedback, shoot me a comment!
More Useful Tutorials:
- Crochet in the Round: Spiral vs Joining
- Corners and the Elusive “Hidden” Stitch
- More Free Patterns and Tutorials by Lookatwhatimade
 Block a Week CAL 2014
I’m guessing that you stumbled upon this post because you like making squares. If I’m right, you might enjoy joining in the Block a Week CAL (Crochet-along) being hosted by Kimberly Slifer from the Official CCC Social Group on Facebook. We are making 45 weekly squares over the course of the year. At the end of the year we will be blocking and joining them so that we end up with a lovely blanket in time for Christmas.
I will be doing a photo tutorial (with permission from the designers) for each block (apart from the first 4), so even if you are a beginner, you should be able to follow along. Interested? You can read more about it (and find the links to date) here.
Remember to subscribe to my newsletter if you would like to be kept in the loop. You can also like my Facebook page or follow me on Bloglovin or Google+.
Happy Hooking!


Julia says
Hi newbie to crochet and I am probably gonna be asking a bit of a silly question here, but do you need to have all your blanket squares matched up before you start to use the zipper join or can you just do them in blocks and attach them to each other at a later date
Jenny Lowman says
Hi Julie. The choice is entirely yours. Either way will create a lovely blanket at the end of it all :)
Elizabeth says
Would this work for hexagon motifs rather than squares?
Jenny Lowman says
Hi Elizabeth, I would imagine you could use it for any straight sided shapes :)
Jenny