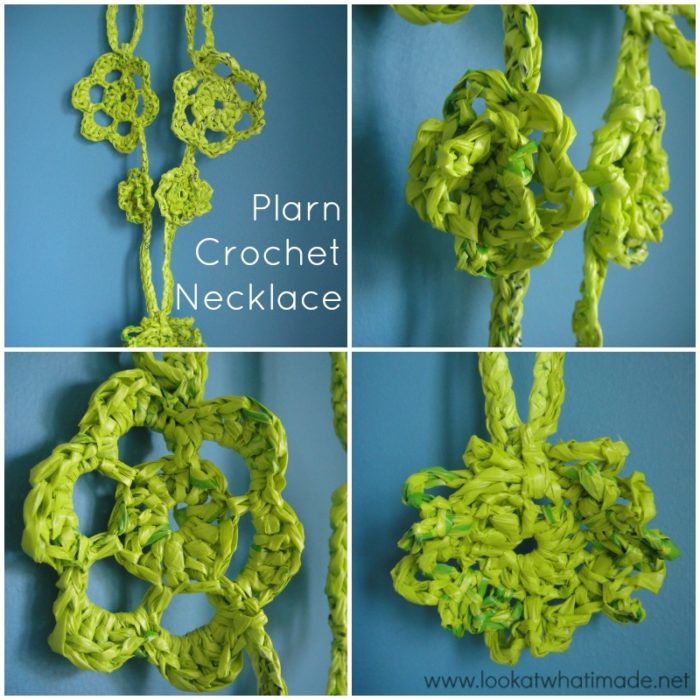
This crochet necklace started its life in the hospital while I was waiting for Jaco to be discharged. This is my first foray into the world of necklaces, so keep that in mind if you see a bit of shoddy crochetery.
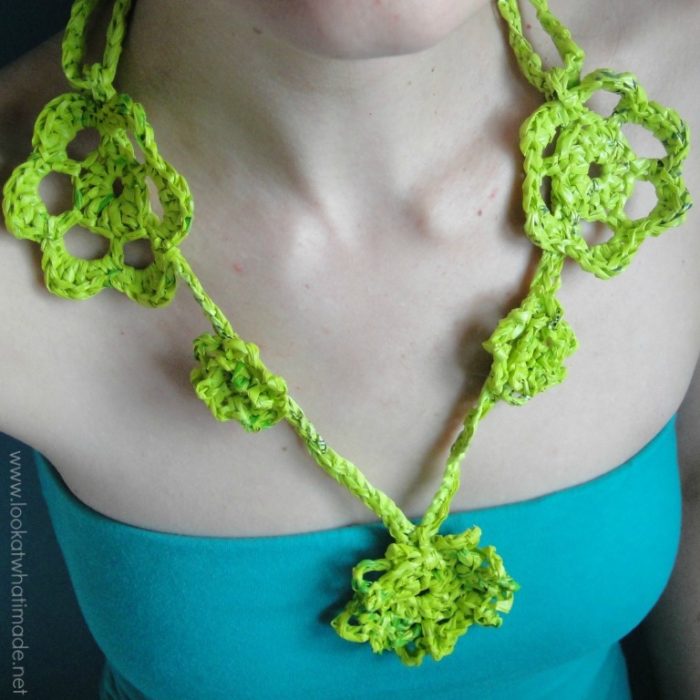
It is made from Budgens plastic bags. I don’t know if I will use these bags again as the plarn tends to stick to the hook while you work – beware of hard shiny plastic bags!!
I had great fun making it nonetheless. If I make it again, I will use cotton, bamboo, or silk.
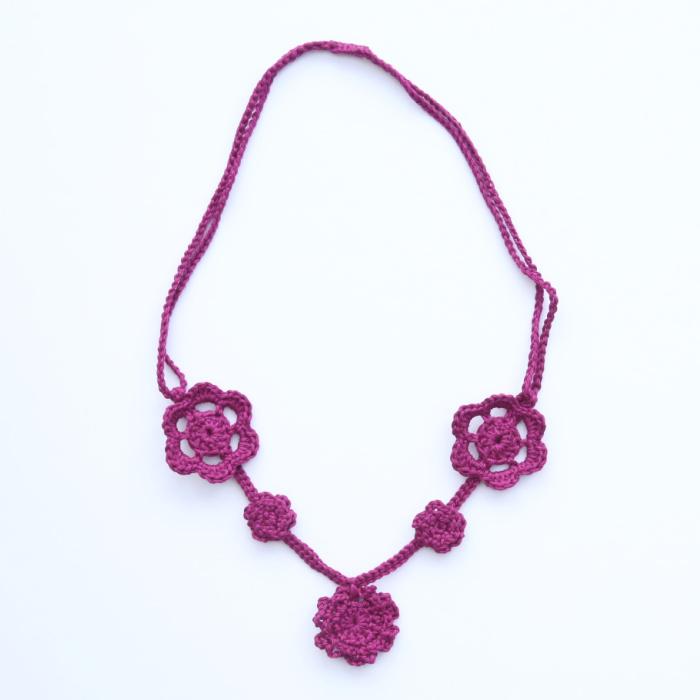
Update 2021: I have remade this necklace in Scheepjes Catona, using a 3mm hook. This yielded a much smaller necklace. The only thing I needed to change was to chain 200 for the back part instead of 70 (I’ve made a note of that in the pattern below). This pattern was originally published in 2011.
Resources
- Add this pattern to your Ravelry Queue
Abbreviations
US Terminology Used.
- Ch – Chain
- Dc – Double crochet
- Hdc – Half-double crochet
- Sc – Single crochet
- Sl st – Slip stich
- Sp/sps – Space/spaces
- St/sts – Stitch/stitches
- [] – Indicated sts to be worked into the same st/sp
- () – Repeat instructions between parentheses the number of times specified
Materials
Original Plarn Necklace
- Plarn
- 6mm Crochet hook
- Yarn needle
Smaller Catona Version
- Scheejes Catona
- 3mm crochet hook
- Yarn needle
Instructions
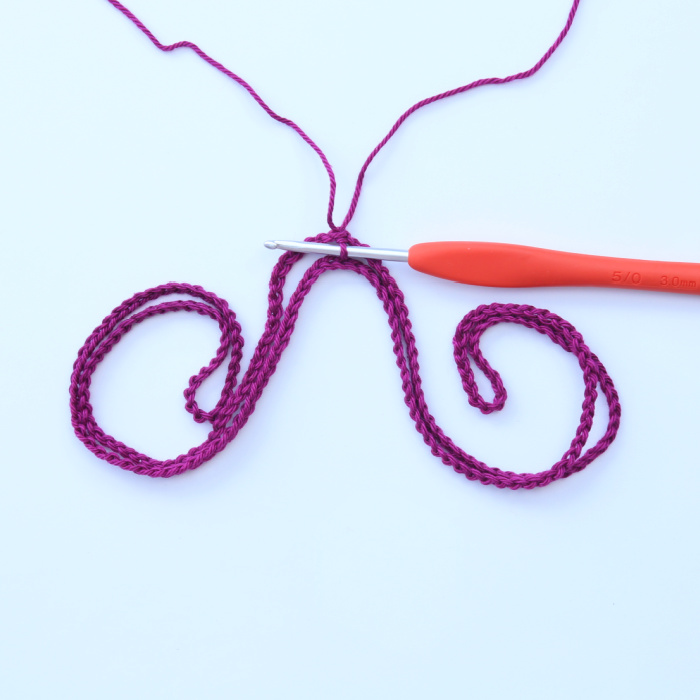
Necklace front
Ch 80. Sl st in the second ch from the hook and each ch across. Fasten off but don’t work away your ends. {79 sts}
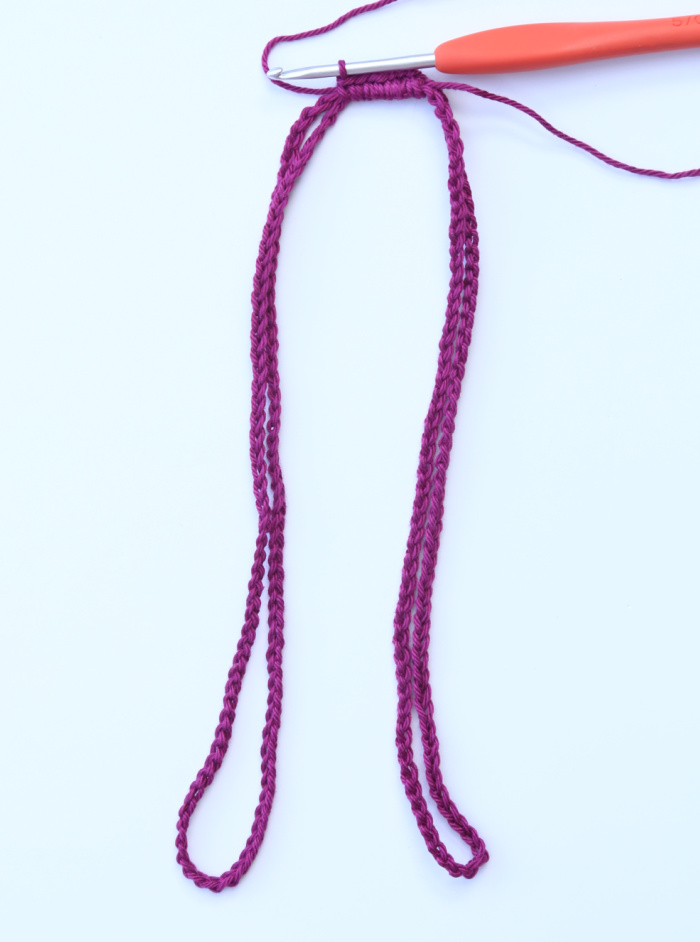
Necklace back
- For the original plarn version – Ch 70.
- For the Catona version – Ch 200.
Join to the first ch with a sl st to form a ring. Fold the ring in half so that your hook is more or less in the middle of the folded bit.
Working over both strands, make 7 sc.
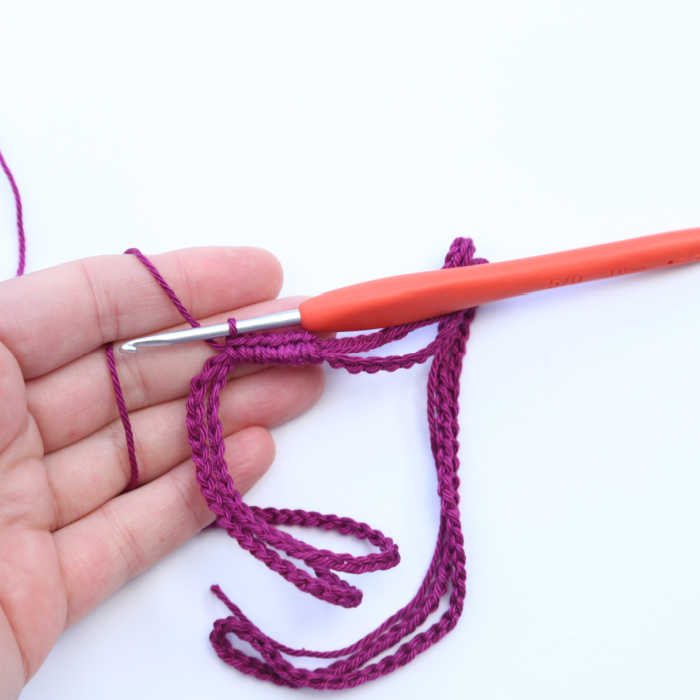
This will form a ‘tube’ over both strands. One of the strands will be stationary because it is attached to the 7 sc, but you will be able to slide the other strand through the tube.
Before you continue, make sure that the ends on both sides of the tube are equal by tugging on the strand that can move. When the tube is central, fasten off and work away both ends.
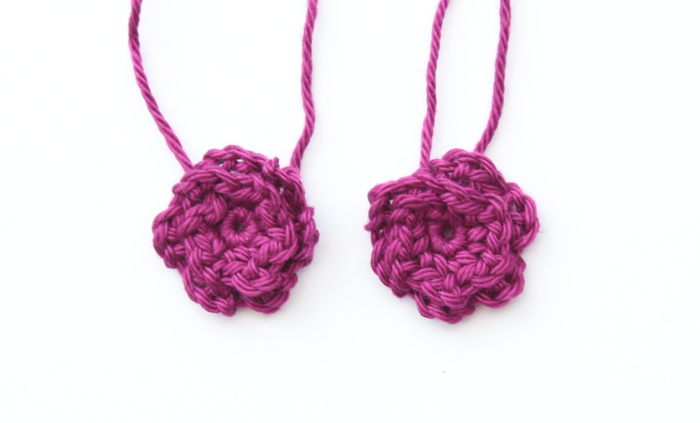
Small Flower
Make 2
Round 1: Working into a Magic Ring, make 6 sc. Join to the front loop of the first sc with a sl st. {6 sc}
Round 2: Ch 3. (Sc in the front loop only of the next st, ch 2) 5 times. {5 sc, 5 ch-2 sps, and 1 ch-3 sp}
Round 3: (Sc in the back loop only of the next st, ch 3) 6 times. Ch 3 and make a sl st in the back loop only of the next st, which will already contain a sc. Fasten off but don’t work away your ends. {6 sc and 7 ch-3 sps}
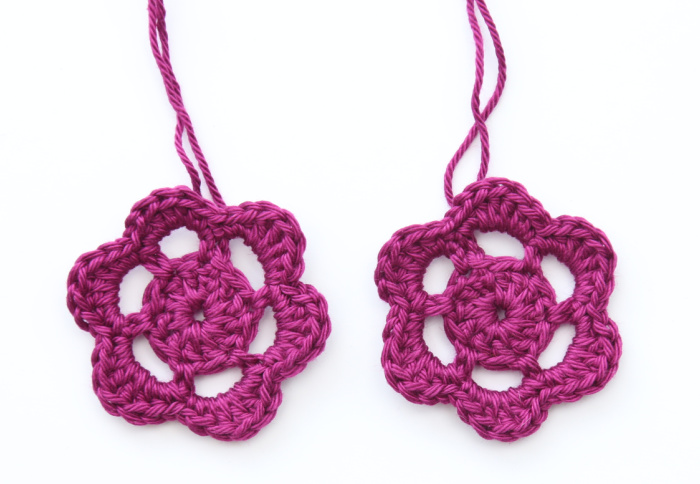
Large Flower
Make 2
Ch 4. Join to the first ch with a sl st to form a ring.
Round 1: Ch 3 (counts as first dc). Make 11 dc into the ring. Join to the top of the beginning ch-3 with a sl st. {12 dc}
Round 2: Ch 1 (doesn’t count as a st). Sc in the same st as the sl st join. (Ch4, skip the next st, sc in the next st) 5 times. Ch 4 and join to the first sc with a sl st. {6 sc and 6 ch-4 sps}
Round 3: Into each ch-4 sp: [sc, hdc, 3 dc, hdc, sc]. Join to the first sc with a sl st. Fasten off but don’t work away your ends. {6 Petals}
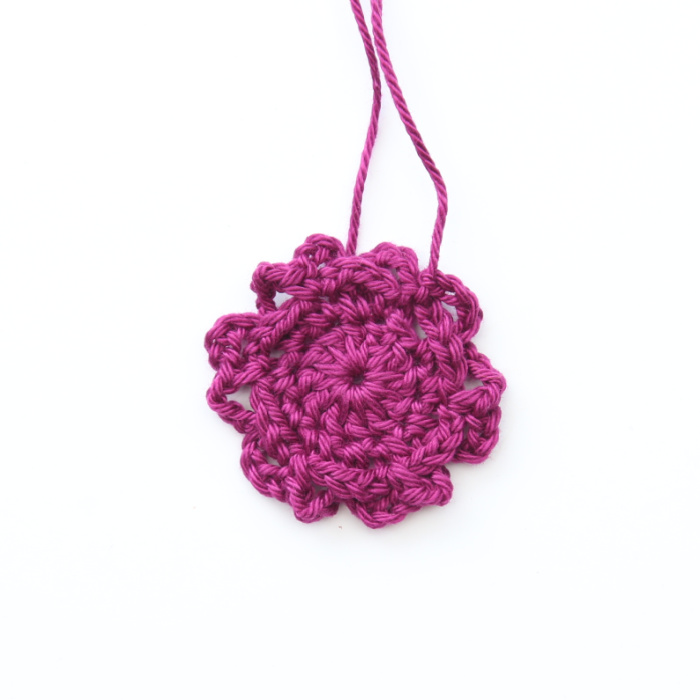
Central Flower
Make 1
Ch 4. Join to the first ch with a sl st to form a ring.
Round 1: Ch 3 (counts as first dc). Make 11 dc into the ring. Join to the top of the beginning ch-3 with a sl st. {12 dc}
Round 2: Ch 1 (doesn’t count as a st). Sc in the same st as the sl st join. (Ch4, skip the next st, sc in the next st) 5 times. Ch 4 and join to the first sc with a sl st. {6 sc and 6 ch-4 sps}
Round 3: (Ch 4. Working behind the next ch-4 sp from Round 2, sc in the skipped st from Round 1. Ch 4, sc in the next sc from Round 2) 5 times. Ch 4. Working behind the next ch-4 sp from Round 2, sc in the skipped st from Round 1. Ch 4, join to the first sc from Round 2 with a sl st. This sc will already contain a sl st. Fasten off but don’t work away your ends. {12 sc and 12 ch-4 sps}
Assembly
Using the yarn ends from the flowers, sew the flowers onto the front chain of your necklace. The Central Flower needs to be joined in the middle of the chain so that it hangs in the middle of your necklace more or less like a pendant.
You can space the other 4 flowers however you want, but you should leave at least 1cm/0.5″ of chain sticking out above the top flowers. Make sure that your font chain doesn’t twist!
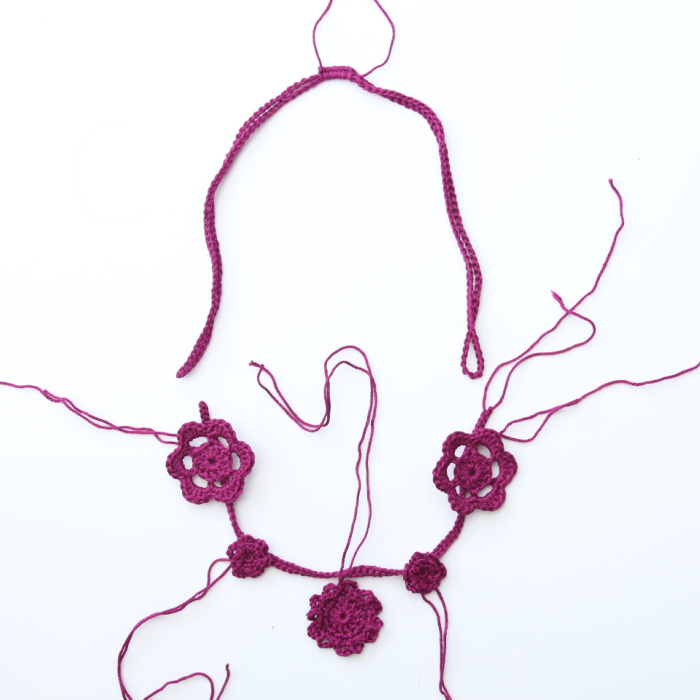
When you have sewn all your flowers to the front chain, it is time to join the front and back parts of your necklace.
To do this, feed the front part of your necklace through the loops formed on both sides of the back part and attach it to itself. Hmmm.
What I mean is: you want, in essence, to double the ends of the front part of the necklace over onto themselves so that the back part of the necklace runs through the loops. Still not as clear as it is in my head, but look at the photos and it will hopefully make sense.
And there you have it… a simple crochet necklace that takes a little over an hour to complete.

This blog post contains affiliate links. I only link to products I personally use or would use. All opinions are my own.


Rosinska says
Creating jewelry with unconventional materials like plastic bags is a creative and eco-friendly approach. The plarn necklace you’ve crafted shows your ingenuity in repurposing materials. When using plarn, you might find that a smoother yarn like cotton, bamboo, or silk could make the crocheting process smoother. Keep up the innovative work, and your crochet endeavors will continue to evolve beautifully.
Jenny Lowman says
Thank you!