I designed this border for my Banksia Baby Blanket. I have called it Whipsiderry because the popcorns remind me of the beautiful rocks at Whipsiderry beach, and the waviness of the border reminds me of the way the tide creeps in slowly at first, before swallowing the beach in minutes.
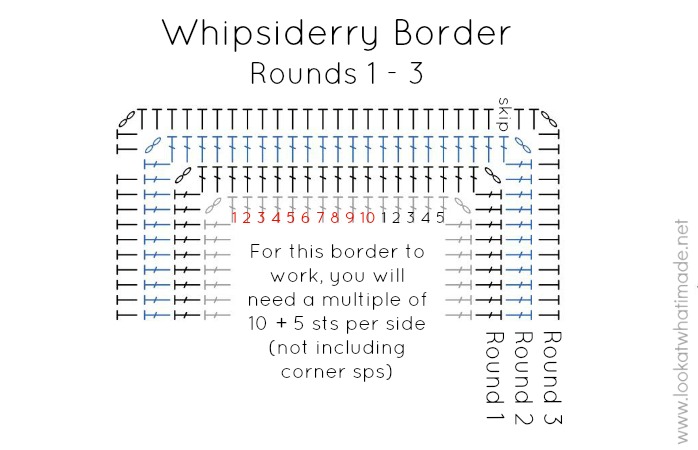
If you would like to add this border to an existing blanket, please note that you will need a multiple of 10 + 5 stitches per side (not including corner chain spaces).
If you would like to attach it to my Banksia Baby Blanket, please see THIS post.
Whipsiderry Border Photo Tutorial
© Dedri Uys 2019. All Rights Reserved. Tested by Anna Moore of the Jeanette at Sunset blanket.
![]()
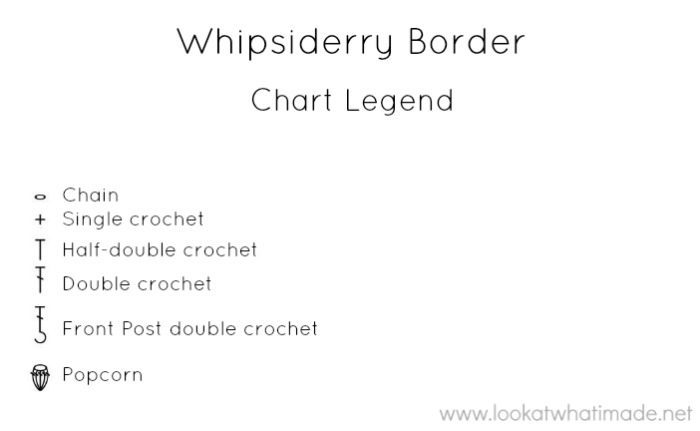
Abbreviations and Charts
US Terminology Used
- Beg – Beginning
- Ch – Chain
- Dc – Double Crochet
- Hdc – Half-double Crochet
- Rem – Remains/remaining
- Sc – Single crochet
- Sl st – Slip Stitch
- Sp/sps – Space/spaces
- St/sts – Stitch/Stitches
Punctuation
* An asterisk indicates pattern repeats. You will need to repeat all the instructions between asterisks the number of times specified. This is a hard-core repeat and will consist of multiple instructions.
Square Brackets [] indicate repeats. You will need to repeat the instructions between square brackets the number of times specified. This is a lower level repeat.
Parentheses () are used to indicate a group of stitches to be worked into the same stitch/space. Parentheses are also used to indicate a repeat when using square brackets would be too confusing.
Special Stitches
Popcorn – Make 5 dc in the same stitch. Remove your hook from the last stitch. Insert your hook into the first dc of the 5-dc group. Grab the last stitch with your hook and pull it through the first stitch to create the Popcorn.
(FP) Front Post – Identify the post of the stitch you want to work around. Insert your hook from the front to the back and then from the back to the front around the post of the stitch so that the post lies in front of your hook. Complete your stitch as normal.
I have included a few charts in this pattern. Here is the Stitch Legend:
Instructions
The square I am using to demonstrate the border on is the first 8 rounds of the Banksia Baby Blanket.
Border Round 1
With RS facing, join Yarn B by making a standing dc in any ch-2 corner sp. (Dc, ch 2, 2 dc) in the same ch-2 sp. This is your first corner made.
*Dc in each st across. (2 dc, ch 2, 2 dc) in the next ch-2 corner sp.*
Repeat from * to * 3 more times, omitting the last corner on the last repeat. Join to the first dc with a sl st.

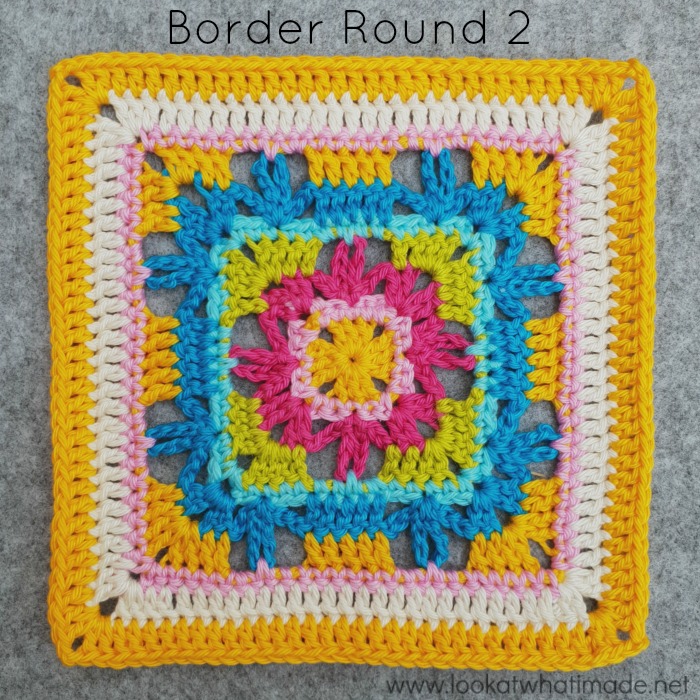
Border Round 2
Sl st in the next st and into the ch-2 corner sp. Ch 3. (Dc, ch 2, 2 dc) in the same ch-2 sp. This is your first corner made.
*Dc in each st across. (2 dc, ch 2, 2 dc) in the next ch-2 corner sp.*
Repeat from * to * 3 more times, omitting the last corner on the last repeat. Join to the top of the beg ch-3 with a sl st.
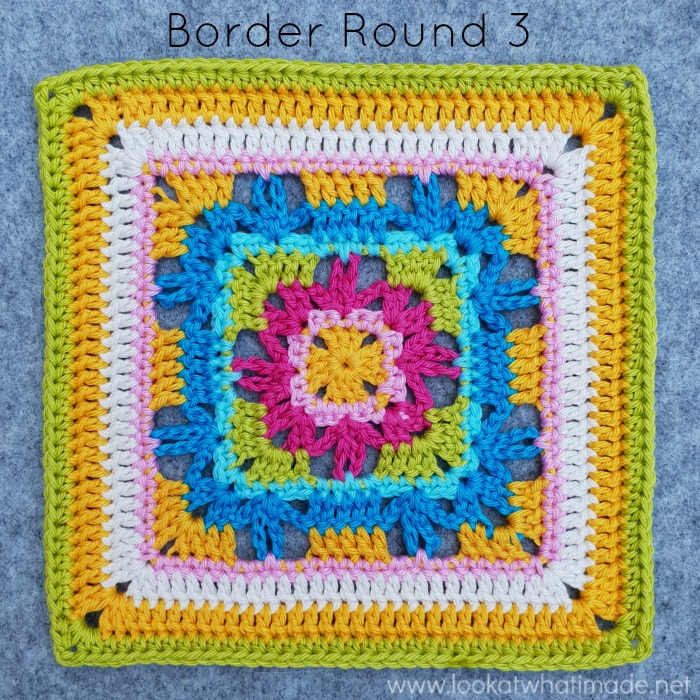
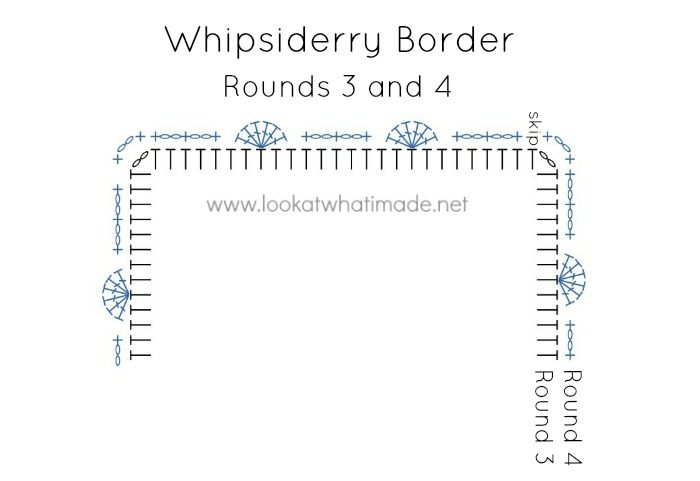
Border Round 3
Sl st in the next st and into the ch-2 corner sp. Ch 2 (counts as hdc throughout). (Hdc, ch 2, 2 hdc) in the same ch-2 sp. This is your first corner made.
*Skip the first (hidden) st. Hdc in each rem st across. (2 hdc, ch 2, 2 hdc) in the next ch-2 corner sp.*
Repeat from * to * 3 more times, omitting the last corner on the last repeat. Join to the top of the beg ch-2 with a sl st.
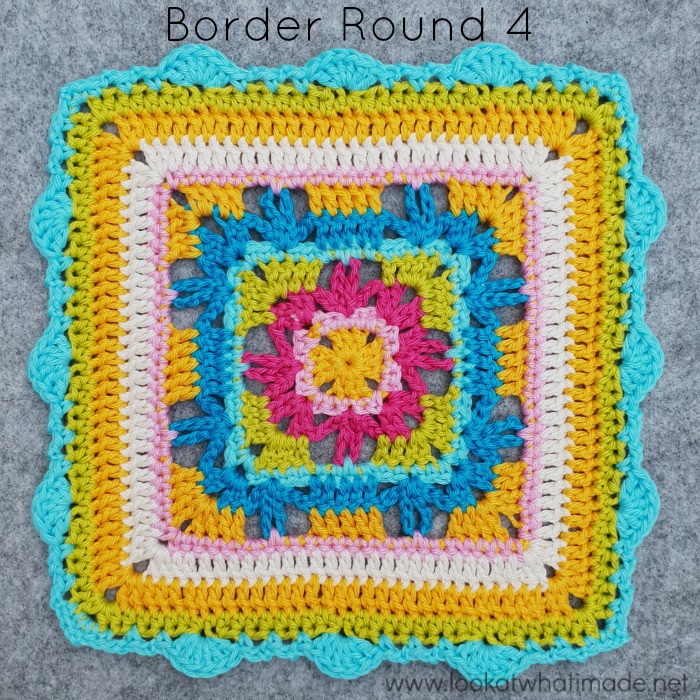
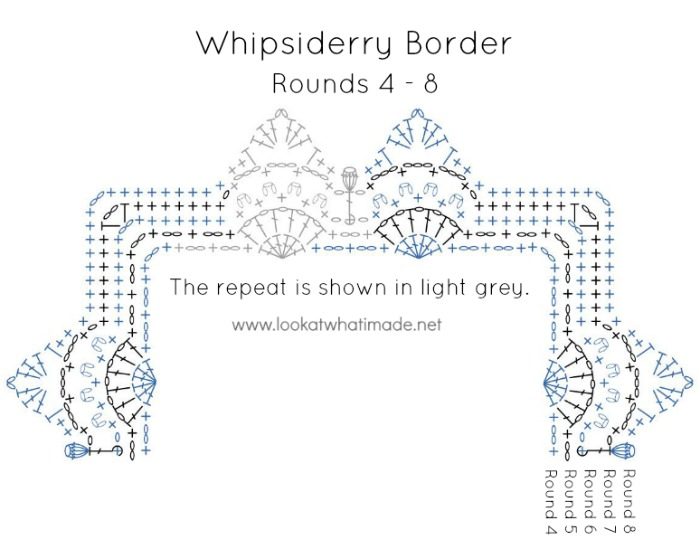
Border Round 4
Sl st in the next st and into the ch-2 corner sp. (Ch 1, sc, ch 2, sc) in the same ch-2 sp. This is your first corner made.
*Skip the first (hidden) st. Sc in the next st. (Ch 2, skip the next st, sc in the next st) twice. [Skip the next 2 sts, 6 dc in the next st, skip the next 2 sts, sc in the next st. (Ch 2, skip the next st, sc in the next st) twice] until no sts rem before next corner sp. (Sc, ch 2, sc) in ch-2 corner sp.*
Repeat from * to * 3 more times, omitting the last corner on the last repeat. Join to the first sc with a sl st.
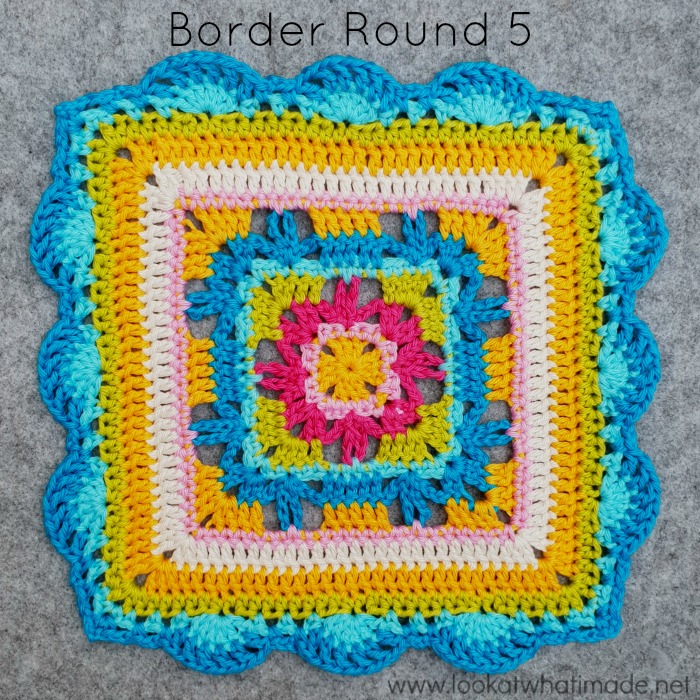
Border Round 5
Sl st into the ch-2 corner sp. (Ch 1, sc, ch 2, sc) in the same ch-2 sp. This is your first corner made.
*(Ch 2, sc in the next ch-2 sp) twice. Working into the 6-dc group: (Dc in the next dc, ch 1) five times. Dc in the last dc of the 6-dc group. [Sc in the next ch-2 sp. Ch 2, sc in the next ch-2 sp. Working into the 6-dc group: (Dc in the next dc, ch 1) 5 times. Dc in the last dc of the 6-dc group] until you have worked into every 6-dc group. (Sc in the next ch-2 sp, ch 2) twice. (Sc, ch 2, sc) in the ch-2 corner sp.*
Repeat from * to * 3 more times, omitting the last corner on the last repeat. Join to the first sc with a sl st.
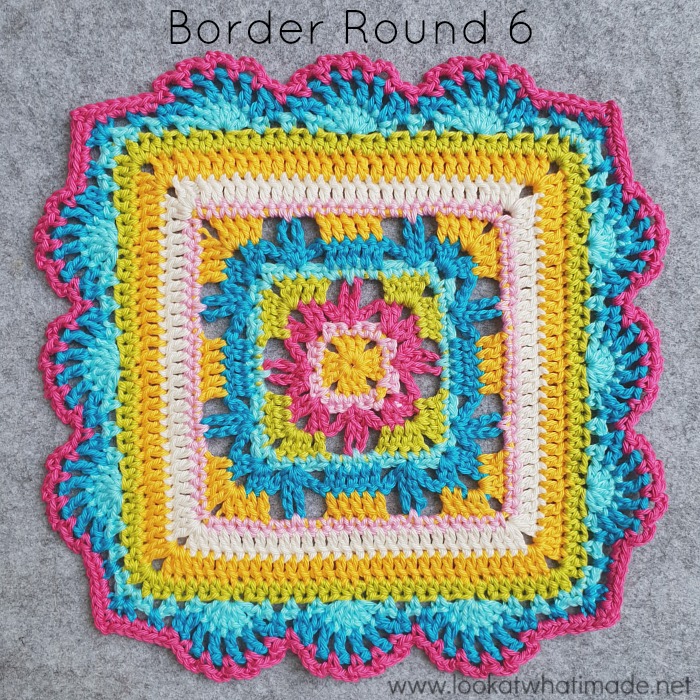
Border Round 6
Sl st into the ch-2 corner sp. (Ch 1, sc, ch 2, sc) in the same ch-2 sp. This is your first corner made.
*(Sc in the next st, 2 sc in the next ch-2 sp) twice. (Sc in the next ch-1 sp, ch 3) 4 times. Sc in the next ch-1 sp. [Ch 1, sc in the next ch-2 sp, ch 1. (Sc in the next ch-1 sp, ch 3) 4 times. Sc in the next ch-1 sp] until 2 ch-2 sps rem before the ch-2 corner sp. (2sc in the next ch-2 sp, sc in the next st) twice. (Sc, ch 2, sc) in the ch-2 corner sp.*
Repeat from * to * 3 more times, omitting the last corner on the last repeat. Join to the first sc with a sl st.
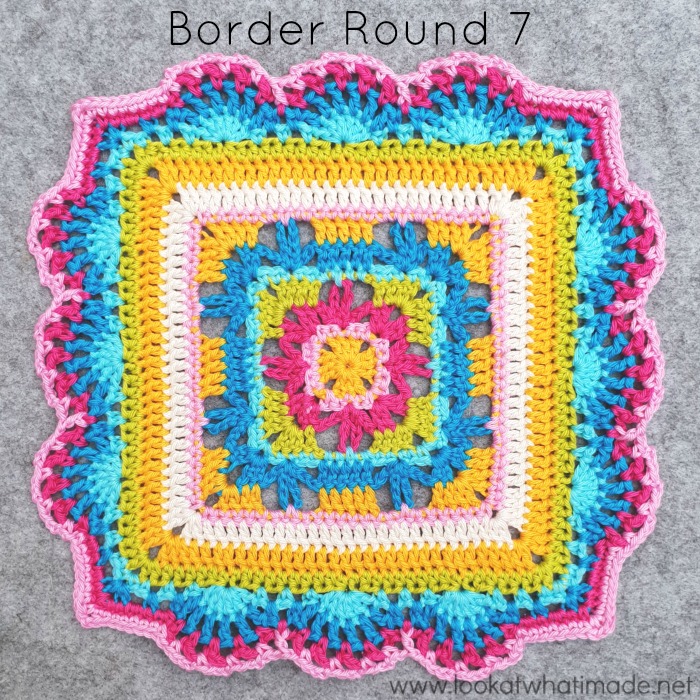
Border Round 7
Sl st into the ch-2 corner sp. (Ch 1, hdc, ch 2, hdc) in the same ch-2 sp. This is your first corner made.
*Sc in the first 7 sts. Ch 1 and skip next sc. (Sc in the next ch-3 sp, ch 3) 3 times. Sc in the next ch-3 sp. [Ch 1, skip next sc, FPdc around next sc, ch 1. (Sc in the next ch-3 sp, ch 3) 3 times. Sc in the next ch-3 sp] until no ch-3 sps rem. Ch 1 and skip next sc. Sc in the last 7 sts. (Hdc, ch 2, hdc) in the ch-2 corner sp.*
Repeat from * to * 3 more times, omitting the last corner on the last repeat. Join to the first sc with a sl st.
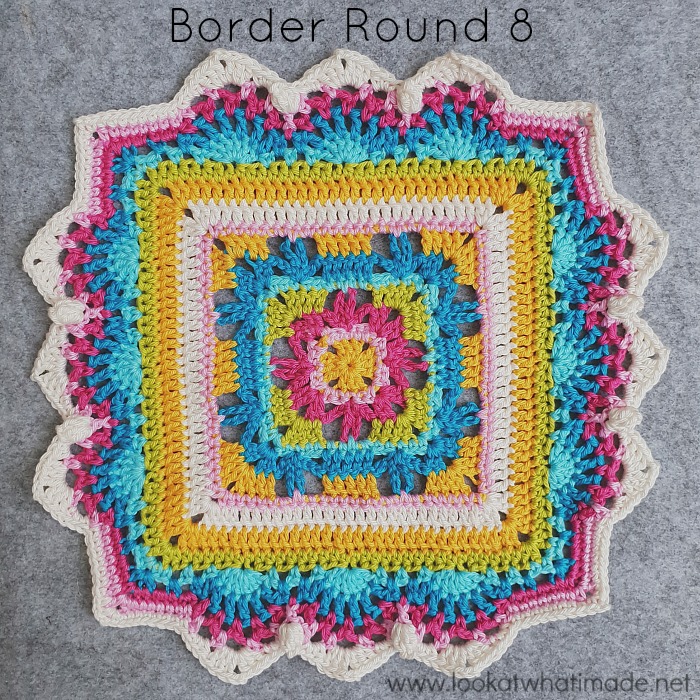
Border Round 8
Sl st into the ch-2 corner sp. (Ch 1, sc, ch 2, sc) in the same ch-2 sp. This is your first corner made.
*Sc in the first 8 sts. Skip the ch-1 sp and the next sc. (2 sc, hdc) in the next ch-3 sp. (3 dc, ch 2, 3 dc) in the next ch-3 sp. (Hdc, 2 sc) in the next ch-3 sp. [Make a Popcorn in the next FPdc. (2 sc, hdc) in the next ch-3 sp. (3 dc, ch 2, 3 dc) in the next ch-3 sp. (Hdc, 2 sc) in the next ch-3 sp] until no ch-3 sps rem. Skip the next sc and the ch-1 sp. Sc in last 8 sts. (Sc, ch 2, sc) in the ch-2 corner sp.*
Repeat from * to * 3 more times, omitting the last corner on the last repeat. Join to the first sc with a sl st. Fasten off and work away your ends.
I hope that this border brings you as much joy (and more) as I felt when designing it.
More Border Patterns

This blog post contains affiliate links. I only link to products I personally use or would use. All opinions are my own.


Kathy says
I used this lovely pattern to edge a blanket. However, I used a dark grey color. Result is, you sre not able to see the detail of the pattern. I recommend using light colors only.
Caren says
Hello, I love this edging! If I wanted to make it on the edge of a scarf (no corners) how would I adjust the multiples of 10+5?
Thanks!
Jenny Lowman says
You need multiples of 10+5 stitches on each edge for this to work, Caren.
Elena says
hey! Im still a beginner so sorry if this is a stupid question but how do you crochet this border for a bigger blanket?
Jenny Lowman says
Hi Elena. You just need to have multiples of 10 stitches per side, plus 5.
“If you would like to add this border to an existing blanket, please note that you will need a multiple of 10 + 5 stitches per side (not including corner chain spaces).”
Deborah Latuszek says
Oh I sure hope you can help me! After completing the Vintage and Sunshine Charlotte’s Universe…how many ADDITIONAL YARDS OF DK YARN will I need to add a WHIPSIDERRY BOARDER…PLEASE?
This is all so new to me…I’m just a beginner. I’ve never tried to crochet such an intricate, beautiful pattern.
Thank you so much for using this creative talent God gave you!
Dedri Uys says
Hi Deborah,
I haven’t added the border to my Charlotte, so I cannot give you exact round-by-round weights. Using Anna’s yardages to calculate it, though, I can tell you that you will need roughly 350m extra to complete those rounds.
Sheilagh Ann Stroud says
Dear Dedri,
Thank you for such a beautiful border. I used it after the Banksia Border to finish my Vintage Charlotte.
I just was not ready to say Goodbye to Charlotte.
sheilagh
Dedri Uys says
Hi :) I am so glad you did. I think the Banksia Border finishes her off beautifully x
Noelene Hewitt says
Finishing off my second Sophie using three Scheepjes Whirl “ Melting Macaron”. When I finished I still had a lot of the Whirl left and wanted to use it all. Added the Boronia Border, first, then this Whipsiderry border. Finished the Whirl and have used a Bubble Whirlette to do the last few rows. Thank you for your wonderful designs!
Jenny Lowman says
That sounds lovely Noelene. We’d love it if you could share a photo via the Facebook page (just search for Lookatwhatimade and then upload a pic in the Community section) :)
BW
Jenny :)
Jo says
Lovely pattern!
Jenny Lowman says
We’re glad you like it, Jo!
BW
Jenny :)
Bo says
Lovely Border, Dedri! Thanks for the wonderful pattern. And the clear explication. Your work is colourful and joyful!!
Lisa Barton Hale says
I love this border. Do you think it would look good on the Charlotte dream blanket?
Dedri Uys says
I think it would look lovely! You may have to do some mathematical magic to get to the correct stitch count :)
June Bodenstein says
Thank you again for this lovely border, you are a big SA star (born SA Star.
Priscilla says
It is a beautiful border! I love it. I will have to find something to use it on!
Love, Priscilla
Diana says
Hi, I am making this for my grandson. Sort of, I’ve been making 3 different size squares, small Med, and large. Hopefully I can figure out how to fit them all together. I so enjoy your makes and your blog! Thank you again for adding so very much to the crochet universe!
Dedri Uys says
Thank you for your lovely comment, Diana. I would love to see your blanket when it’s finished. It sounds like it’s going to be sooo pretty.
Marie Vangen says
How very, very beautiful your work is. Thank you so much for sharing and your wonderful detail in the pattern and notes. Marie
Dedri Uys says
Hi Marie
Thank you!