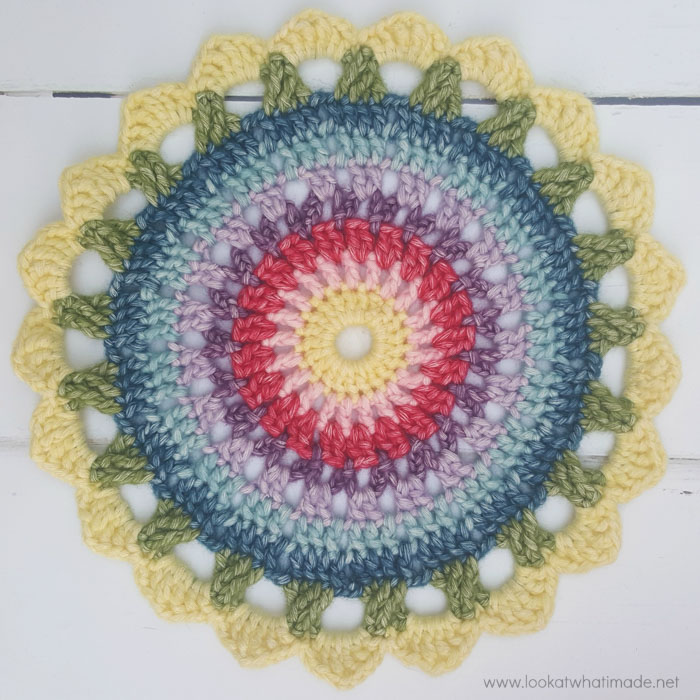
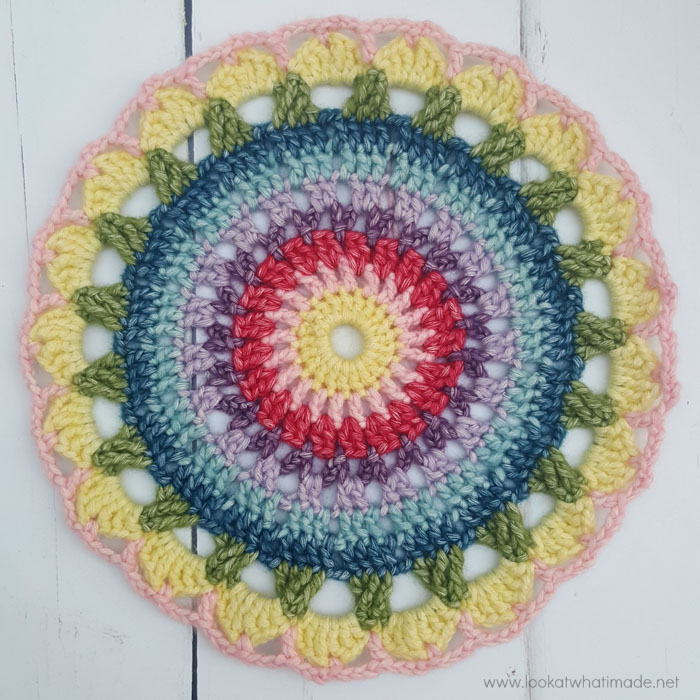
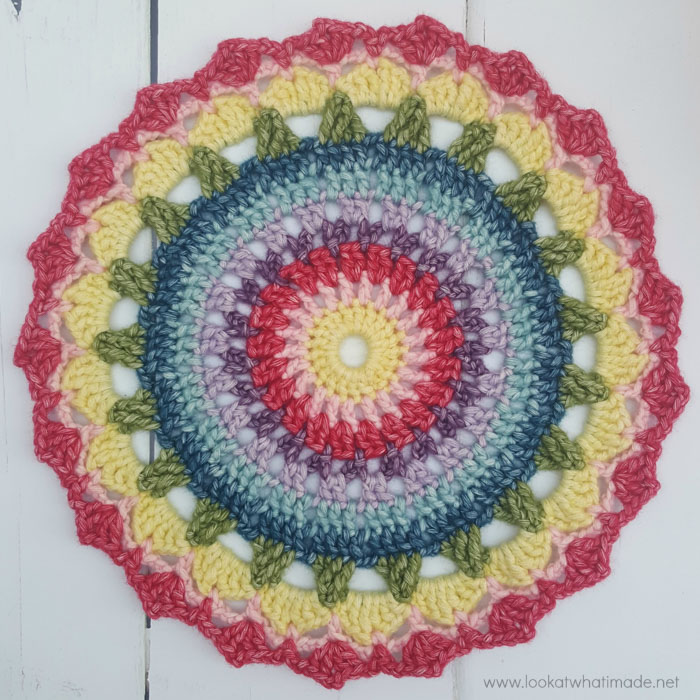
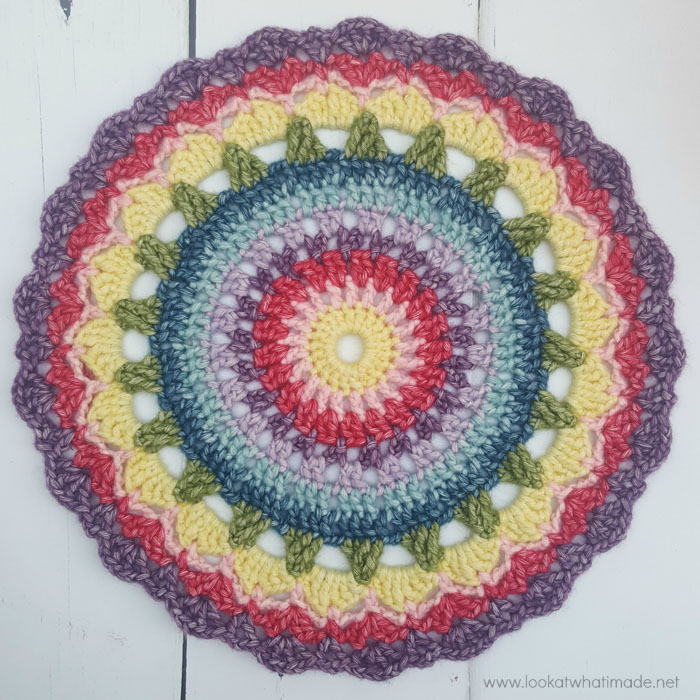
Mandala 21 was designed by my friend John Kelly 3 years ago and remains one of my most feel-good makes. Sadly, John no longer designs, so after closing down his website, he has permitted me to publish both his mandala patterns on my website. Mandala 21 is the first of the two we will be sharing with you.

Now and then, we stumble across a pattern that just begs to be made. For me, this is one of those patterns. I can’t tell you quite why I reacted so strongly to Mandala 21 when I first saw it, but I just had to make it immediately!
I used this pattern to make a rug, which you can read more about HERE. That rug spends its life draped over the back of our couch, as it has done since I first made it three years ago. It makes me smile every time I see it… even when (or maybe especially when) Xander is using it as a magic carpet or a shield or a cloak.
If you feel like being whooshed back three years…right back to when we were still living in the old house, and I was still working on Sophie… you can have a look at THIS PHOTO my husband took of me napping on the couch with my rugs draped over the back.
When John gave me permission to share his patterns with you, I was all set to publish this pattern within the week, but then I thought: “Why not have a bit of fun with it first?” So I did!
I hosted an Instagram party where I shared the instructions in dribs and drabs over the course of five days. I have never seen a pattern shared in round-sized snippets before, so even though people were crocheting along, it wasn’t really what we are used to calling a crochet-along (CAL).
I have to tell you that the spontaneity and fun of the exercise really fed my soul! It has been ages since I last pulled a Nike and just ‘did it’.
I had an absolute blast meeting so many new and wonderful people and seeing their progress by round. And, as an added bonus, there are now loads of photos on Instagram that you can scroll through to get colour inspiration! You can find them all at #notacal.
Mandala 21 Pattern
Pattern © John Kelly 2014. All Rights Reserved.
Photo Tutorial © Dedri Uys 2017.
Mandala 21 is a simple pattern with a few challenging bits. It is perfectly suited to adventurous beginners :)
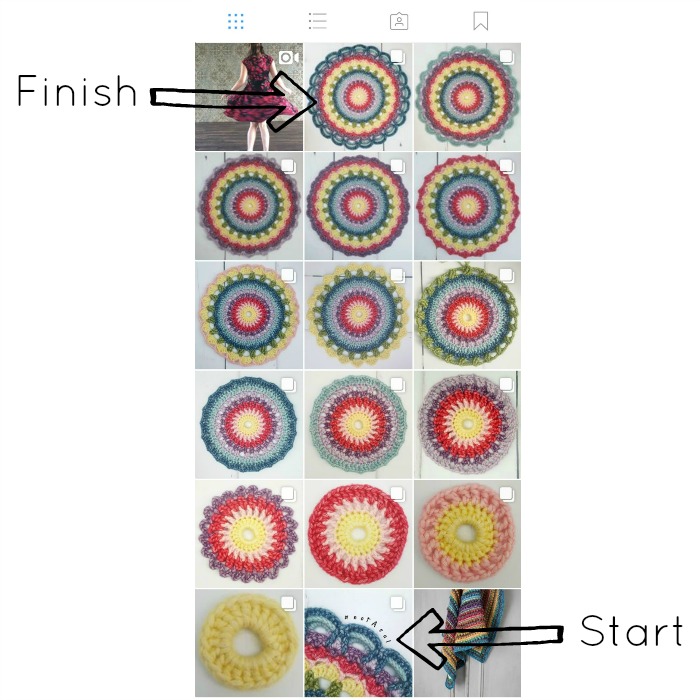
If you would like to follow along on Instagram instead, please look for the photos between the photo of me twirling at the latest Scheepjes Bloggers Weekend and the photo that says #notacal. To find the instructions, swipe on any of the notacal phots.
Materials
- Scheepjes Stonewashed XL (70% cotton/30% acrylic), 50g/75m/82yds
- Colour A – Citrine (857)
- Colour B – Rose Quartz (860)
- Colour C – Red Jasper (847)
- Colour D – Deep Amethyst (851)
- Colour E – Lilac Quartz (858)
- Colour F – Amazonite (853)
- Colour G – Blue Apatite (845)
- Colour H – Canada Jade (846)
- 5mm crochet hook
Abbreviations
Us Terminology (US/UK Conversion Chart HERE)
- Beg – Beginning
- BP – Back post (see Special Stitches)
- Ch – Chain
- Dc – Double crochet
- Dtr – Double treble crochet
- FP – Front post (see Special Stitches)
- Sl st – Slip stitch
- Sp/sps – Space/spaces
- St/sts – Stitch/stitches
- Tr – Treble crochet
Punctuation
* and (): Asterisks and parentheses indicate pattern repeats. You will need to repeat all the instructions between asterisks/parentheses the number of times specified.
Parentheses are also used to indicate a group of stitches to be worked into the same stitch/space.
Special Stitches
- Standing Stitches – Standing Stitches are the same as regular stitches, but they are made ‘in air’ with a slip knot already on your hook. You might find this Standing Dc Tutorial useful.
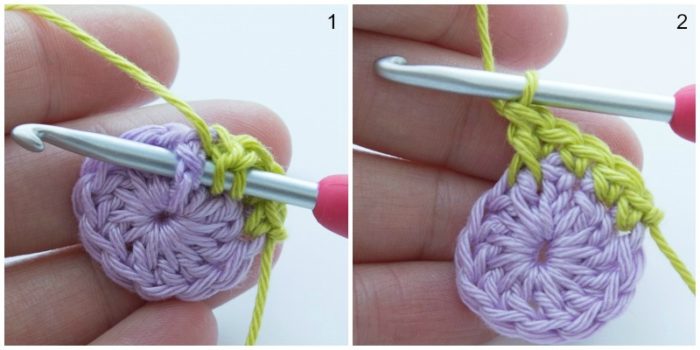
- Back Post Stitches – Identify the post of the stitch you want to work around. Insert your hook from the back to the front and then from the front to the back around the post of the stitch so that the post lies behind your hook {Photo 1}. Complete your stitch as normal {Photo 2}. You might find it easier to twist your work forward so that you can see what you are doing.
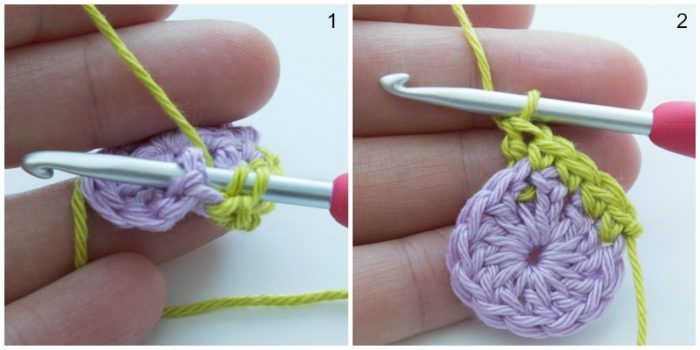
- Front Post Stitches – Identify the post of the stitch you want to work around. Insert your hook from the front to the back and then from the back to the front around the post of the stitch so that the post lies on top of your hook {Photo 1}. Complete your stitch as normal {Photo 2}.
- Crab Stitch (Optional) – Start with a Standing Single Crochet {Photo 1}. To make the next stitch, swing your hook under your hand, by twisting your wrist, and insert it into both loops of the stitch BEFORE the stitch you just worked into {Photo 2}. Yarn over and pull up a loop {Photo 3}. Yarn over and pull through both loops on your hook {Photo 4}.Continue making your stitches in this way, inserting your hook into both loops of the stitch before the stitch you just worked into each time {Photo 5}.
Gauge
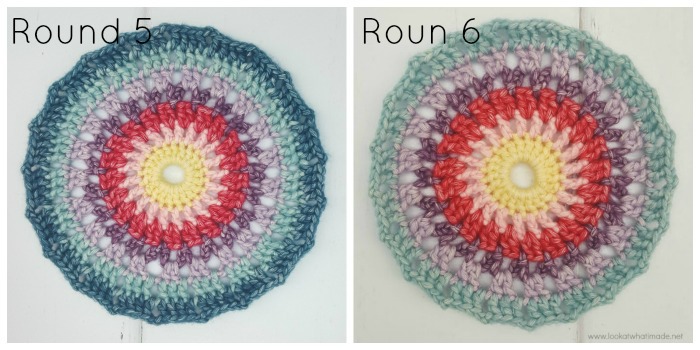
At the end of Round 3, your mandala should be 9 cm (3.5”) in diameter.
Size
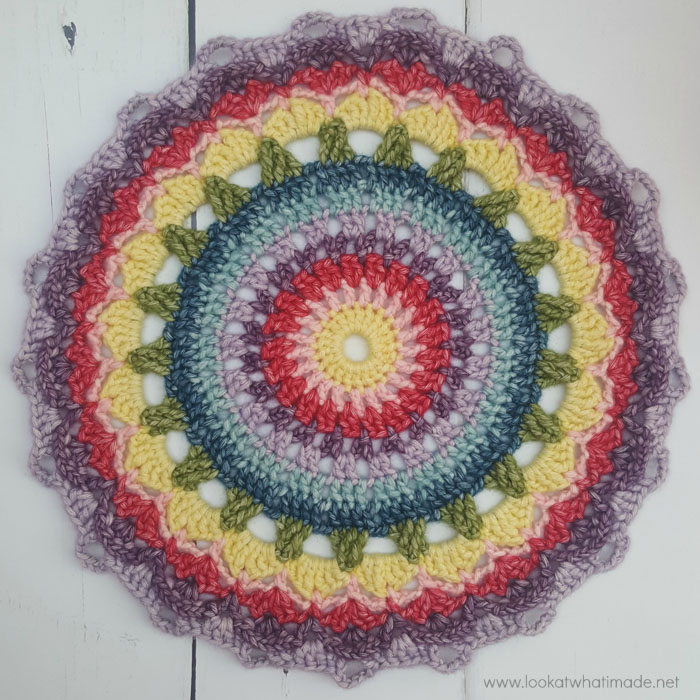
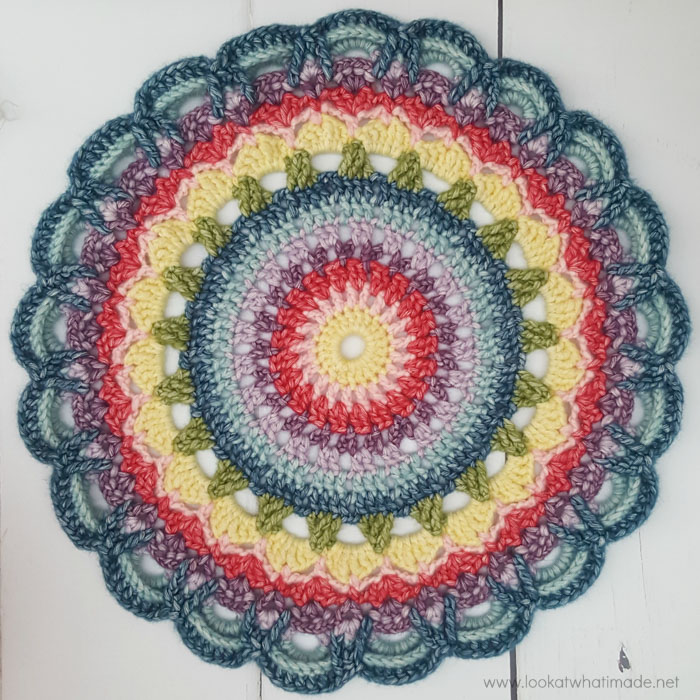
38 cm diameter (blocked).
Notes
- Fastening Off and Colour Changes – You can make this mandala in one colour or many colours. If you decide to change colours, as I have done, you will need to fasten off at the end of every round. Fastening off is not mentioned at the end of each round unless you specifically need to fasten off regardless of your colour choices.
- Invisible Join – If you change colours, I suggest using the Invisible Join instead of the sl st join.
- Nomenclature – Occasionally a set of stitches will be given a name like Shell or V-stitch. These names are only to help you identify the set of stitches to work into in the next round or to help you count repeats.
Instructions
Ch 8, join to the first ch with a sl st to form a loop.
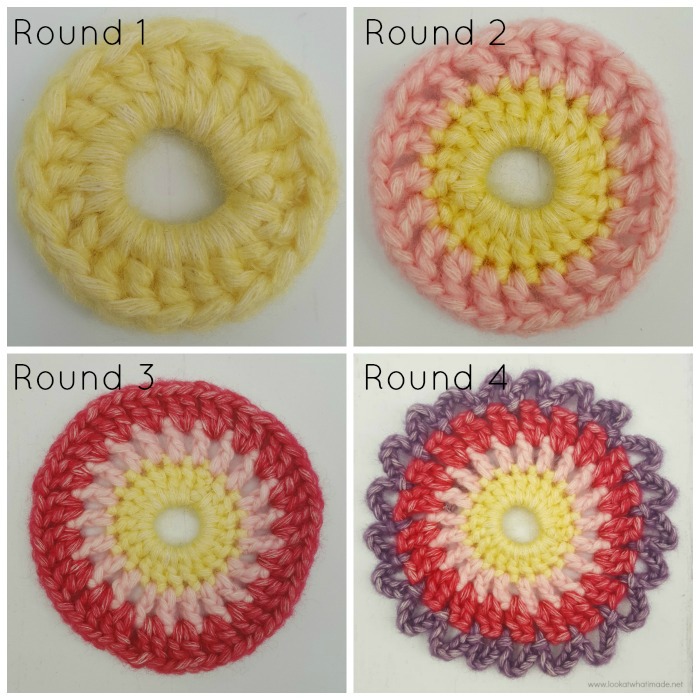
Round 1 {Colour A}
Ch 3 (counts as first dc throughout), make 20 dc into the loop. Join to the top of the beg ch-3 with a sl st.
Stitch Count: 21 dc.
Round 2 {Colour B}
- If you are using the same colour, ch 4 (counts as dc + ch-1 sp)
- If you are using a new colour, join your yarn by making a standing dc in any st around, then ch 1.
(Dc in next st, ch 1) 20 times. Join to the third ch of the beg ch-4 with a sl st.
Stitch Count: 21 dc and 21 ch-1 sps.
Round 3 {Colour C}
- If you are using the same colour, sl st into the next ch-1 sp. Ch 3 and dc in the same ch-1 sp.
- If you are using a new colour, join your yarn by making a standing dc in any ch-1 sp, then dc in the same sp.
(Ch 1, make 2 dc in the next ch-1 sp) 20 times. Ch 1 and join to the top of the first dc with a sl st.
Stitch Count: 42 dc and 21 ch-1 sps.
Round 4 {Colour D}
- If you are using the same colour, sl st into the next st and the next ch-1 sp. Ch 6.
- If you are using a new colour, join your yarn by making a sl st in any ch-1 sp. Ch 6.
(Sl st into the next ch-1 sp, ch 6) 20 times. Sl st in the last ch-1 sp, which will already contain the first sl st. Fasten off and work away your ends.
Stitch Count: 21 ch-6 sps – not including sl sts.
Round 5 {Colour E}
Join your yarn by making a standing dc in any ch-6 sp. Make a dc in the same ch-6 sp. (Ch 2, make 2 dc in the next ch-6 sp) 20 times. Ch 2, join to the first dc with a sl st.
Stitch Count: 42 dc and 21 ch-2 sps.
Round 6 {Colour F}
- If you are using the same colour, ch 3.
- If you are using a new colour, join your yarn by making a standing dc in the first dc of any 2-dc group.
Dc in the next st, dc in the next ch-2 sp. (Ch 2, dc in the next 2 sts, dc in the next ch-2 sp) 20 times. Ch 2 and join to the first dc with a sl st.
Stitch Count: 63 dc and 21 ch-2 sps.
Round 7 {Colour G}
- If you are using the same colour, ch 3.
- If you are using a new colour, join your yarn by making a standing dc in the first dc of any 3-dc group.
Dc in the next 2 sts, dc in the next ch-2 sp. (Ch 2, dc in the next 3 sts, dc in the next ch-2 sp) 20 times. Ch 2 and join to the first dc with a sl st.
Stitch Count: 84 dc and 21 ch-2 sps.
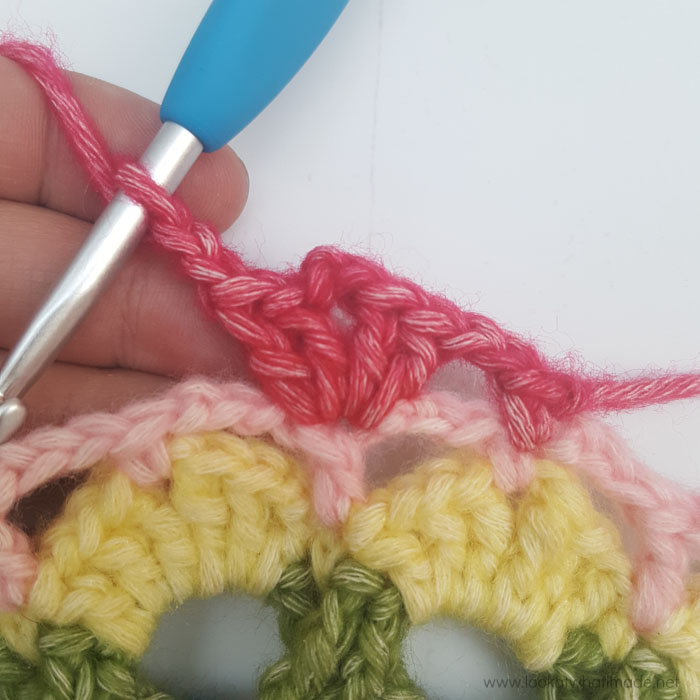
Round 8 {Colour H}
- If you are using the same colour, ch 4 (counts as tr).
- If you are using a new colour, join your yarn by making a standing tr in the first dc of any 4-dc group.
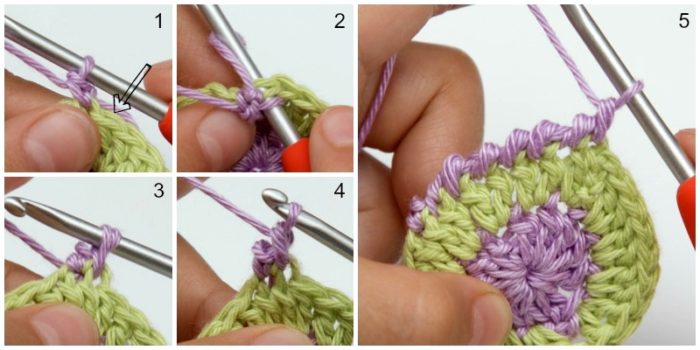
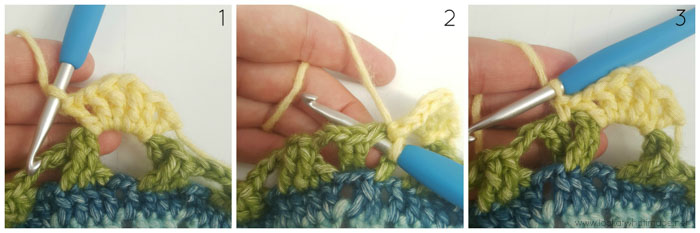
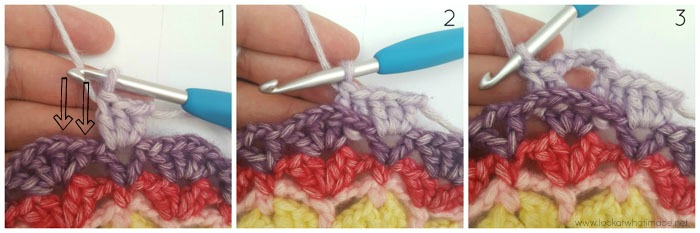
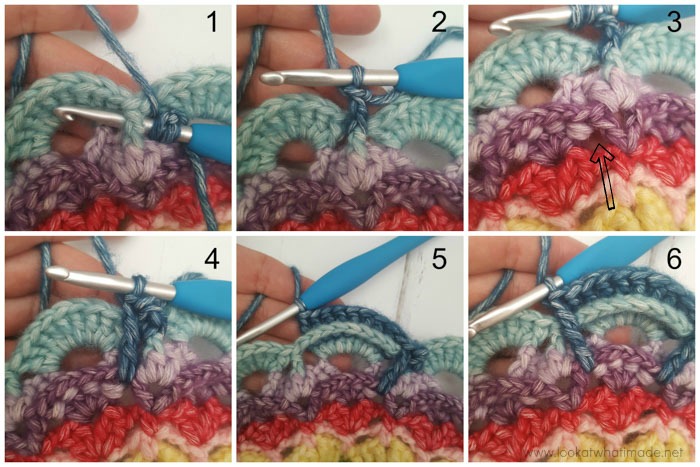
Tr in the next st, ch 3. *Tr in the last 2 dc of the next 4-dc group {Photo 1}. Working behind the two tr just made, tr in the first 2 dc of the same 4-dc group {Indicated with arrows in Photo 2 and illustrated in Photos 3 – 5}. You will find it easier to do this if you fold your work towards you so that you can see the tops of the stitches from Round 7. Ch 3 {Photo 6}*
Repeat from * to * 19 more times. This should bring you back to the beginning of your work, where the first 4-dc group only contains 2 tr {Photo 7}. Working in front of these first 2 tr, tr in the last 2 dc of the first 4-dc group {Photos 8 and 9}. Join to the first tr with a sl st.
Stitch Count: 84 tr and 21 ch-3 sps – 21 Cable Sections.
Round 9 {Colour A}
- If you are using the same colour, sl st in the next st and in the next ch-3 sp. Ch 4 (counts as dc + ch-1 sp).
- If you are using a new colour, join your yarn by making a standing dc in any ch-3 sp. Ch 1.
(Dc, tr, ch 1, tr, dc, ch 1, dc) in the same ch-3 sp {Photo 1}. Sc between the second and third tr of the next Cable Section {Photos 2 and 3}.
*(Dc, ch 1, dc, tr, ch 1, tr, dc, ch 1, dc) in the next ch-3 sp. Sc between the second and third tr of the next Cable Section.* Repeat from * to * 19 more times. Join to the first dc with a sl st. Fasten off and work away your ends.
Stitch Count: 21 sc, 84 dc, 42 tr, and 63 ch-1 sps – 21 Petals, each containing 4 dc, 2 tr, and 3 ch-1 sps.
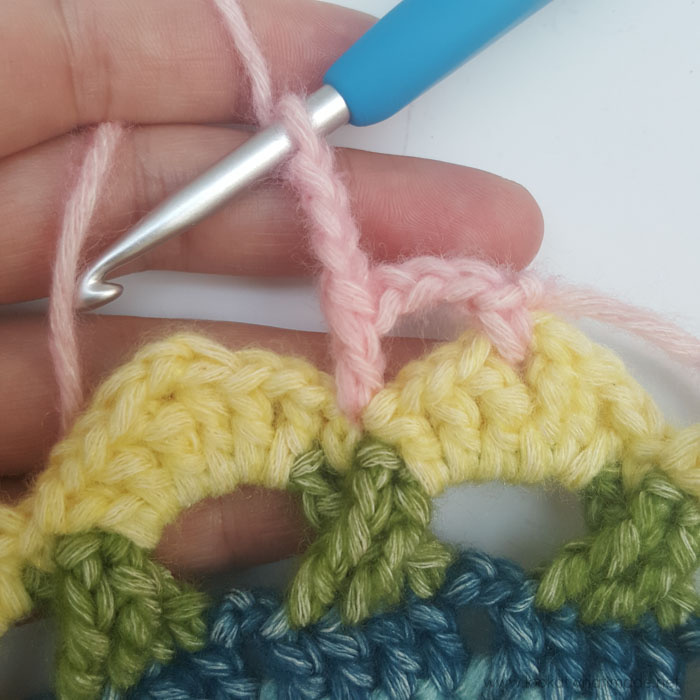
Round 10 {Colour B}
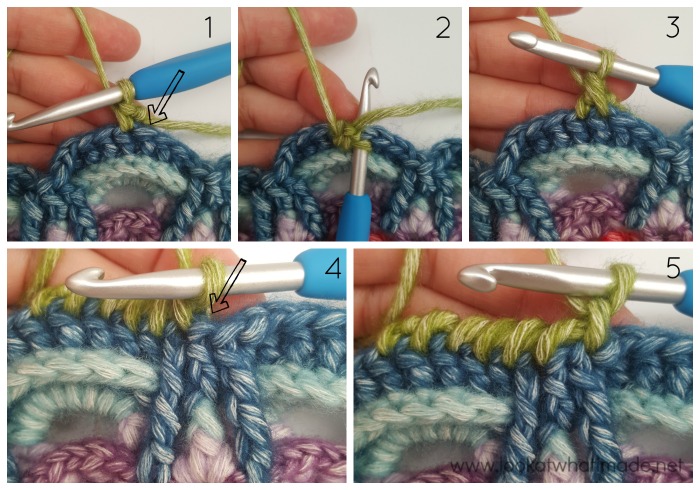
Join your yarn by making a standing sc in the ch-1 sp at the top of any Petal. Ch 3, dc in the next sc (which you will find between Petals), ch 3 {See photo below}. (Sc in the ch-1 sp at the top of the next Petal, ch 3, dc in the next sc, ch 3) 20 times. Join to the first sc with a sl st.
Stitch Count: 21 sc, 21 dc, and 42 ch-3 sps.
Round 11 {Colour C}
- If you are using the same colour, ch 1 (doesn’t count as a st), sc in the same st.
- If you are using a new colour, join your yarn by making a standing sc in any sc around.
Ch 2, make 2 dc in the next dc, ch 2, make 2 dc in the same dc. This is your first Shell made. Ch 2 {See photo below}. *Sc in the next sc, ch 2, (2 dc, ch 2, 2 dc) in the next dc, ch 2.* Repeat from * to * 19 more times. Join to the first sc with a sl st.
Stitch Count: 21 sc, 84 dc, and 63 ch-2 sps – 21 Shells and 21 sc.
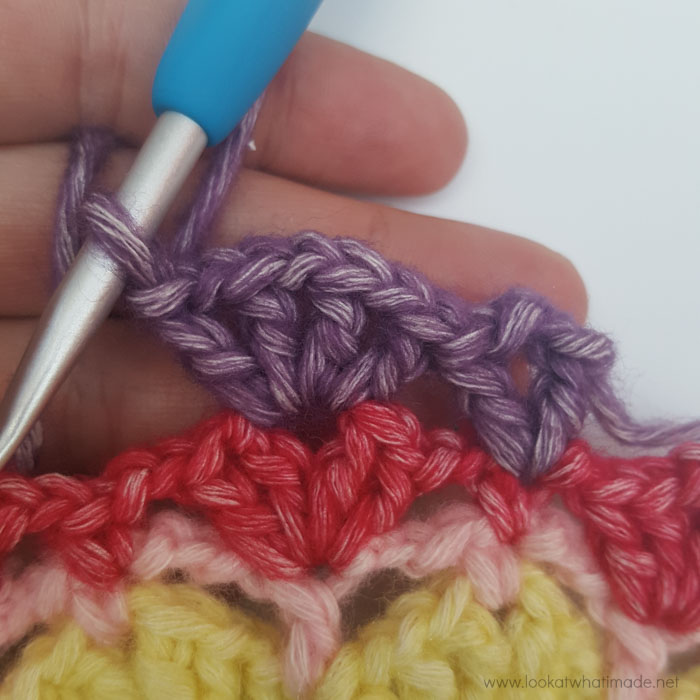
Round 12 {Colour D}
- If you are using the same colour, ch 5 (counts as dc + ch-2 sp), dc in the same st. This is your first V-stitch made.
- If you are using a new colour, join your yarn by making a standing dc in any sc around. Ch 2, dc in the same st. This is your first V-stitch made.
(Dc, ch 1) 3 times in the ch-2 sp at the top of the next Shell. Dc in the same ch-2 sp. This is your first Shell made – see photo below. *(Dc, ch 2, dc) in the next sc. (Dc, ch 1) 3 times in the ch-2 sp at the top of the next Shell. Dc in the same ch-2 sp.* Repeat from * to * 19 more times. Join to the first dc with a sl st.
Stitch Count: 126 dc, 63 ch-1 sps, and 21 ch-2 sps.
Round 13 {Colour E}
- If you are using the same colour, sl st into the next ch-2 sp, ch 3, make 2 dc in the same ch-2 sp.
- If you are using a new colour, join your yarn by making a standing dc in any ch-2 sp around. Make 2 dc in the same ch-2 sp.
BPdc around the first 2 dc of the next Shell {Indicated with arrows in Photo 1 and illustrated in Photo 2}. Ch 5, BPdc around the last 2 dc of the same Shell {Photo 3}. *Make 3 dc in the ch-2 space of the next V-stitch. BPdc around the first 2 dc of the next Shell. Ch 5, BPdc around the last 2 dc of the same Shell.* Repeat from * to * 19 more times. Join to the first dc with a sl st. Fasten off and work away your ends.
Stitch Count: 63 dc, 84 BPdc, and 21 ch-5 sps.
Round 14 {Colour F}
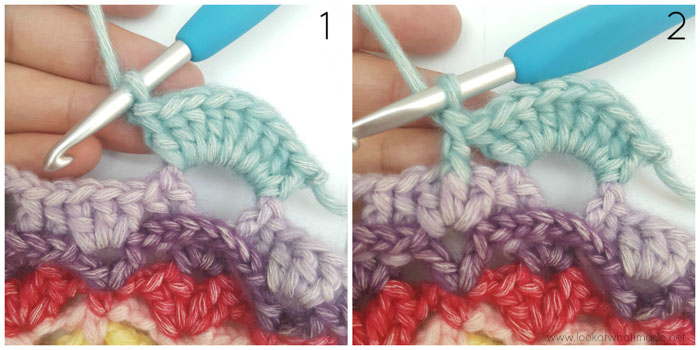
Join your yarn by making a standing dc in any ch-5 sp around. Make 8 dc in the same ch-5 sp {Photo 1}. Skip the next 3 sts and make a FPdc around the next st, which should be the central dc of the 3-dc group made into the V-stitch from Round 12 {Photo 2}. (Make 9 dc in the next ch-5 sp. Skip the next 3 sts and make a FPdc around the next st) 20 times. Join to the first dc with a sl st. Fasten off and work away your ends.
Stitch Count: 189 dc and 21 FPdc.
Round 15 {Colour G}
Join your yarn by making a standing FPdc around any FPdc from the previous round {Photos 1 and 2}. Make a dtr between the V-stitch and the Shell from Round 12 {Indicated with an arrow in Photo 3 and illustrated in Photo 4}. BPdc in the next 9 sts of Round 14 {Photo 5}. Make a dtr between the Shell and the V-stitch from Round 12 {Photo 6}. *FPdc around the next FPdc from Round 14. Make a dtr between the V-stitch and the Shell from Round 12. BPdc in the next 9 sts of Round 14. Make a dtr between the Shell and the V-stitch from Round 12.* Repeat from * to * 19 more times. Join to the first FPdc with a sl st. Fasten off and work away your ends.
Stitch Count: 21 FPdc, 42 dtr, and 189 BPdc.
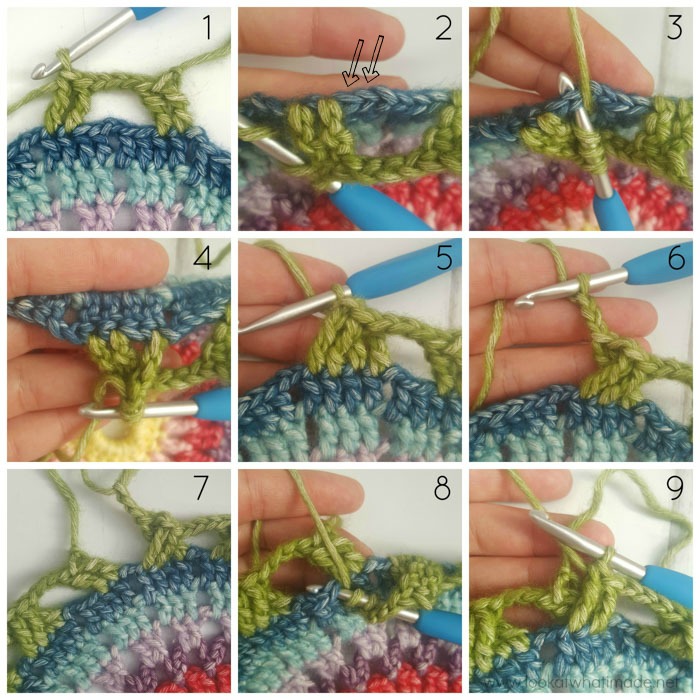
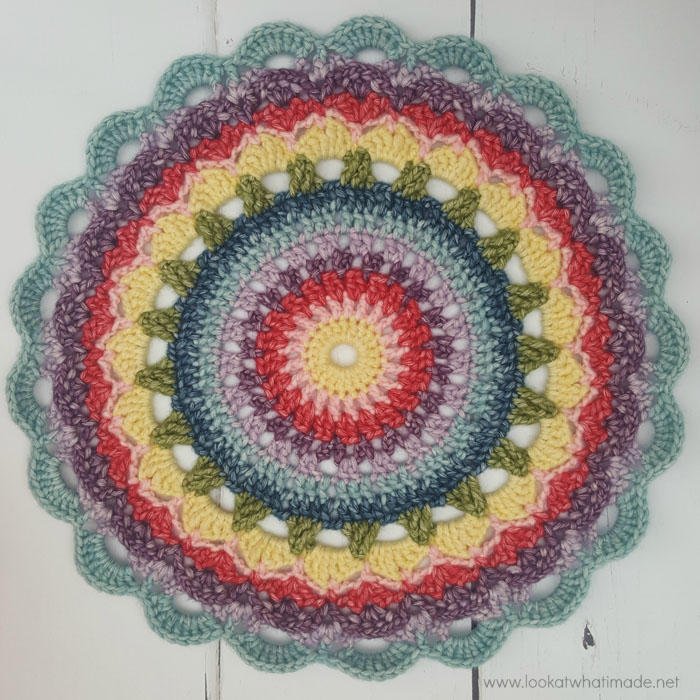
Optional Round 16 {Colour H}
This round is, as the title suggests, optional. I don’t add it if I am making a smallish mandala, but if I am making a rug as I did HERE, I like to add a crab stitch border to give the edge some substance.
Join your yarn by making a standing sc in any BPdc around {Photo 1}. Make a Crab Stitch in each st up to and including the next dtr {Photos 2 – 4}. *Skip the next FPdc {Indicated with an arrow in Photo 4} and make a Crab Stitch in each st up to and including the next dtr.* Repeat from * to * 19 more times. Skip the next FPdc and make a Crab Stitch in each rem st. Fasten off and work away your ends, making sure to ‘catch’ the first Crab Stitch for a neat finish.
Stitch Count: 252 sts
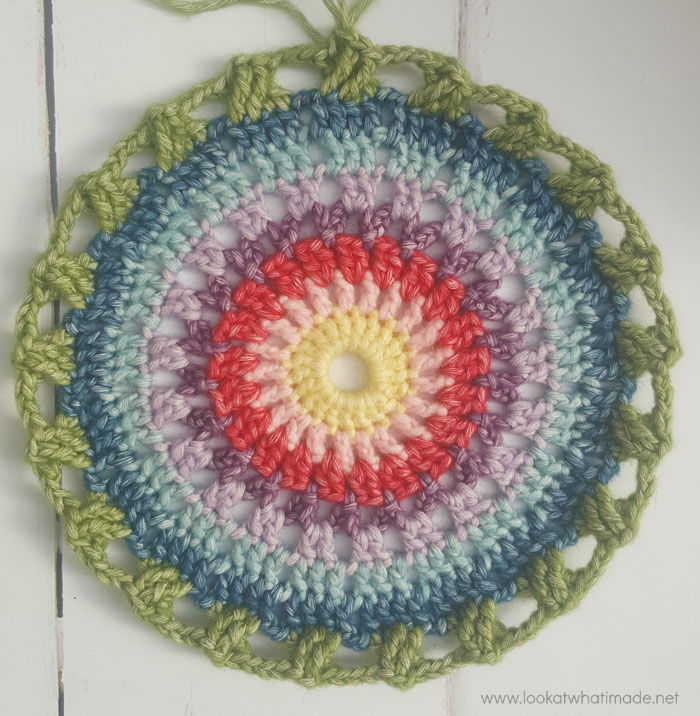
Optional Round 16 Alternative
If you are looking for a more ornate finish, the wonderful ana.moraissoares on Instagram has created a little picot edging that rounds this piece of perfectly. You can find the instructions for that HERE on Instagram.
If you decide to try your hand at Mandala 21, please share photos using either #notacal or #mandala21 so that we can see your photos. And please remember to credit John when you mention the designer.

This blog post contains affiliate links. I only link to products I personally use or would use. All opinions are my own.


Pip says
It took me so long to find a free mandala rug pattern and as soon as I found this I knew this was the one! Thank you so much for sharing this pattern.
Jenny Lowman says
Enjoy, Pip! Have you seen Dedri’s Camping In Cornwall rug? Another beauty, and round :)
Rene Roper says
How do l get all 21of the mandala patterns TYIA.
Jenny says
Rene, I believe that is just the name of the pattern for that mandala. I am not so sure it means there are 20 others out there to do as well.
BW Jenny
Astan says
Literally dropped everything, got 14 balls of old acrylic, now am 8 rounds deep into making this with my very own 7-strand, colour changing yarn Thanks Dedri & John this is one pluuuuush mat in the making
Dedri Uys says
Oh yay! It does make for a gorgeous mat/rug. I’m so happy you are enjoying it. I hope you share photos so that I can see x
Astan says
Where can I add photo’s for you to see? Is it on here? :) Thanks
Jenny says
Hi!
You can send us photos on the Lookatwhatimade.net Facebook page. We always love to see your work!
Jenny :)
Remy Franco says
This is beautiful! I’ll definitely will try to do this, stand by I’ll be posting my comments as I go along.
Thank you for sharing.
Jenny says
We look forward to it, Remy :)
Jenny
Judy says
Uh oh – I just had the same reaction – I MUST make this RIGHT AWAY… Sheesh… thanks Dedri and John, but that’s one powerful pattern. I’ll try to post a pic and let you know how long it took me… to do the first one… :-)
Dedri Uys says
I’m glad you like it, Judy!
Petro Pretorius says
Beautiful