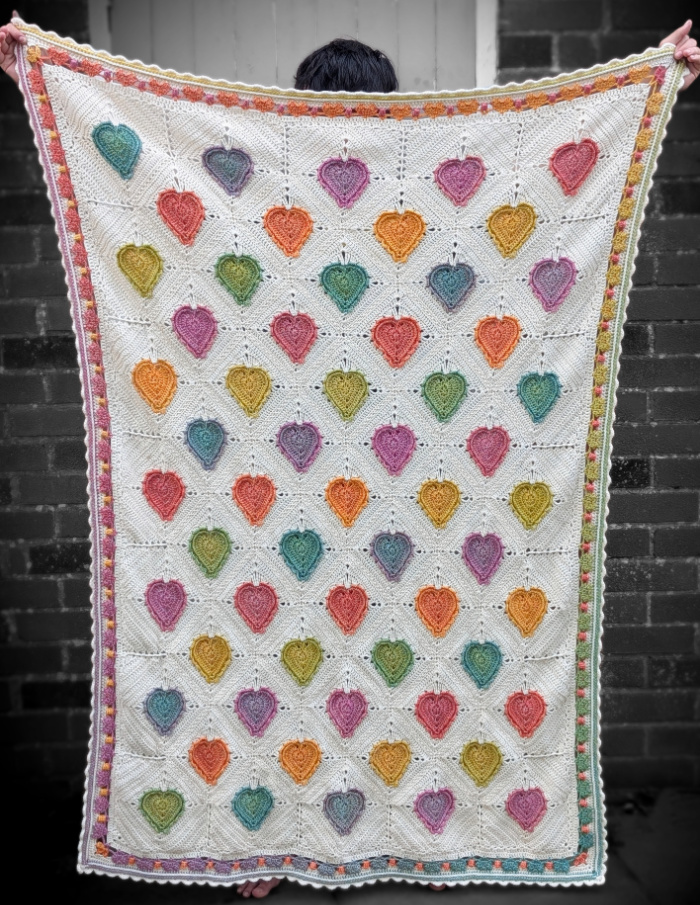
Welcome to the free pattern for my Little Love Notes crochet blanket. This blanket is made from simple crochet heart motifs, joined together and finished with a border of even more hearts. I cannot tell you how much fun I had making the motifs for this blanket. Chasing the slow, joyful colour changes of the yarn while making the hearts was an absolute delight.
When I started the border, I realised just how many small hearts I was about to crochet. To make the repetition more joyful, I decided to think of someone in my life with each heart I made, letting one name flow into the next.
Each heart became a little love note.
And the last one… was for me.
Little Love Notes Crochet Blanket Pattern
© Dedri Uys 2026. Charts by Masako Kawahara. All Rights Reserved.
Index
- Information
- Heart Motifs
- Joining the Motifs
- Squaring Up the Blanket
- Heart Border
- Yarn Usage per Part
- Colouring-in Template (if you choose to go rogue)
Information
Gauge
- At the end of Round 5, your heart should weigh roughly 4g and measure 9cm/3.5” wide.
- At the end of Round 6, your heart should weigh roughly 4.7g and measure 11cm/4.3” wide (from ch-5 to ch-5 through the widest part). If it weighs more than 5.1g, you risk running out of the recommended yarn amounts.
- At the end of Round 10, your motif should weigh roughly 12.8g and measure 14cm/5.5”. If it weighs more than 14.4g, you risk running out of the recommended yarn amounts.
Size
120cm x 165cm (47” x 65”)
The finished blanket will weigh roughly 1170g.
Resources
- Work in Progress Post – if you fancy finding out a bit more about how this blanket came to be…
- Video Tutorials:
- Hashtag: #LittleLoveNotesBlanket
If you prefer a formatted ad-free US PDF version of this pattern (with charts by the talented Masako Kawahara and limited photos), you can buy it in my Ravelry Store HERE or in my Etsy Shop HERE.
Materials and Yarn Kits
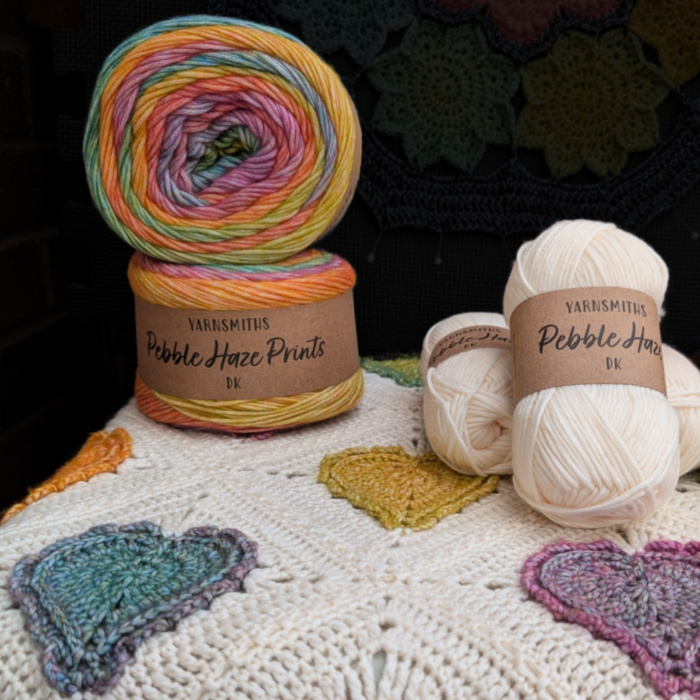
- Yarn A – Yarnsmiths Pebble Haze Print DK (150g/435m, 33% acrylic, 67% cotton); 2D350 x 3 balls
- Yarn B – Yarnsmiths Pebble Haze DK (50g/145m; 33% acrylic, 67% cotton); 2C050 x 18 balls*
- 4.5 mm crochet hook (I used 5 mm because I crochet tightly)
* Please see Yarn Usage per Part
Yarn Kits for the Little Love Notes blanket are available from my Wool Warehouse Shop. They include all the yarn needed to make the blanket (21 balls), as well as a printed copy of the pattern (US Terminology). Kits are priced at £42 each.
Abbreviations
US Terms
- Beg– Beginning
- BP– Back post
- Ch– Chain
- Dc– Double crochet
- Dtr – Double treble crochet
- FP – Front post
- Hdc– Half-double crochet
- Rem– Remaining/remains
- Rep – Repeat
- RS – Right side
- Sc – Single crochet
- SM – Stitch marker
- Sp/sps– Space/spaces
- St/sts– Stitch/stitches
- Tr– Treble crochet
- WS – Wrong side
- * – Repeat instructions between asterisks the number of times specified
- ()– Repeat instructions between brackets the number of times specified.
- [] – Used to indicate stitches made into the same st/sp.
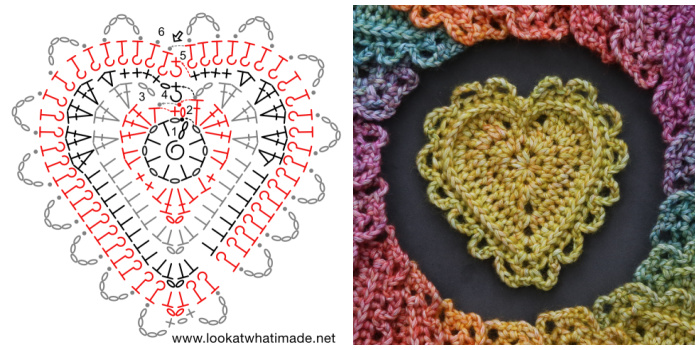
Chart Legend
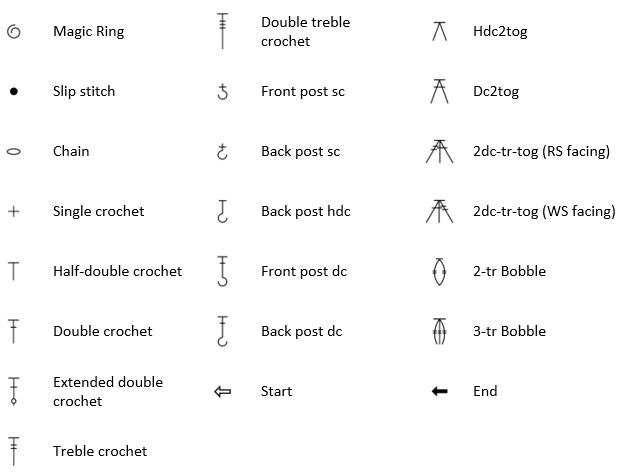
Special Stitches
2dc-tr-tog
Yarn over and insert your hook into the indicated st/sp. Yarn over and pull up a loop. Yarn over and pull through 2 loops. Yarn over and insert your hook into the next st/sp. Yarn over and pull up a loop. Yarn over and pull through 2 loops. Yarn over twice and insert your hook into the next st/sp. Yarn over and pull up a loop. (Yarn over and pull through 2 loops) twice.* Yarn over and pull through all 4 loops on your hook.
2-tr Bobble
Yarn over twice and insert your hook into the indicated st/sp. Yarn over and pull up a loop. (Yarn over and pull through 2 loops) twice. Yarn over twice and insert your hook into the same st/sp. Yarn over and pull up a loop. (Yarn over and pull through 2 loops) twice. Yarn over and pull through all 3 loops on your hook.
3-tr Bobble
Yarn over twice and insert your hook into the indicated st/sp. Yarn over and pull up a loop. (Yarn over and pull through 2 loops) twice. *Yarn over twice and insert your hook into the same st/sp. Yarn over and pull up a loop. (Yarn over and pull through 2 loops) twice.* Rep from * to * once. Yarn over and pull through all 4 loops on your hook.
Extended Double Crochet (Edc)
Yarn over, insert your hook into the indicated st, yarn over and pull up a loop. Yarn over and pull through ONE loop. (Yarn over and pull through two loops) twice.
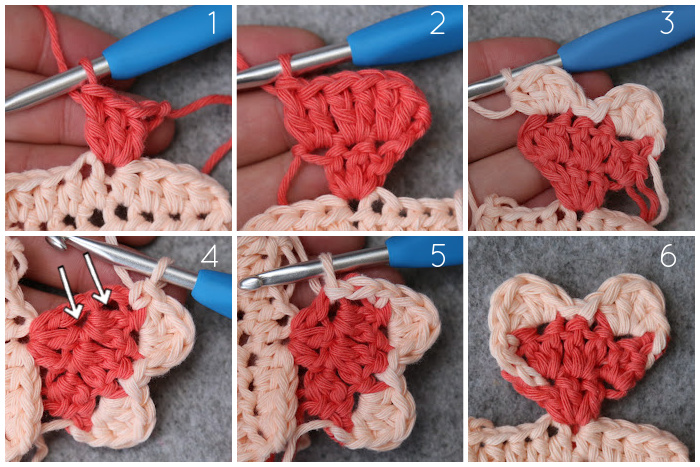
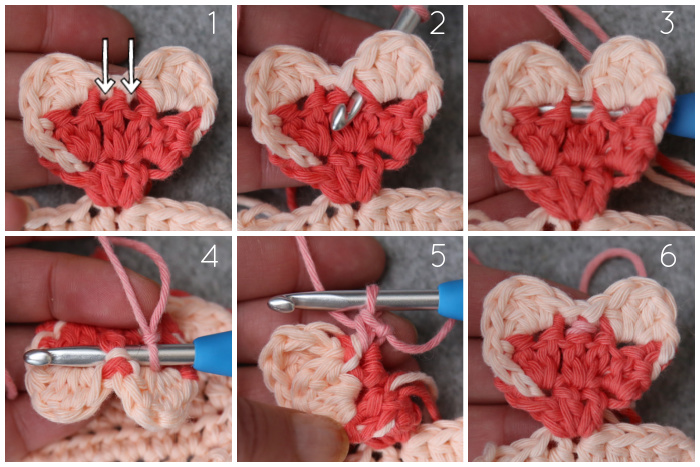
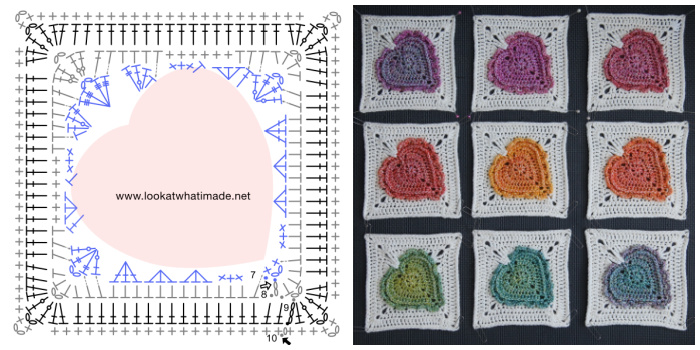
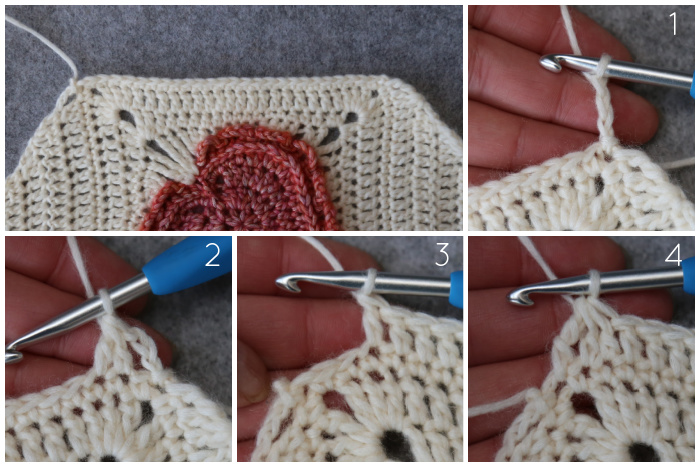
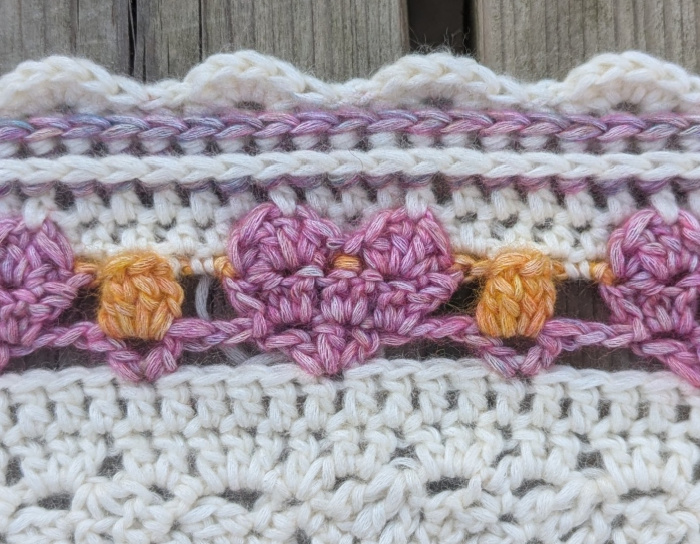
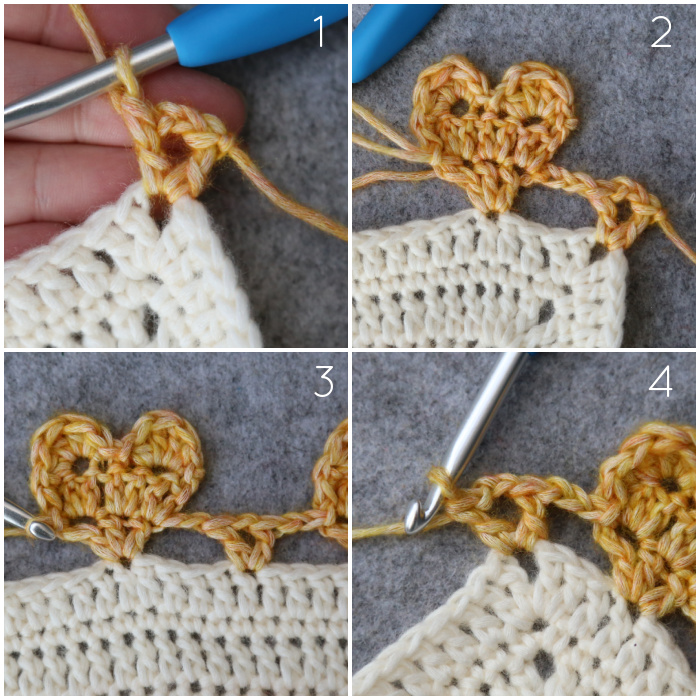
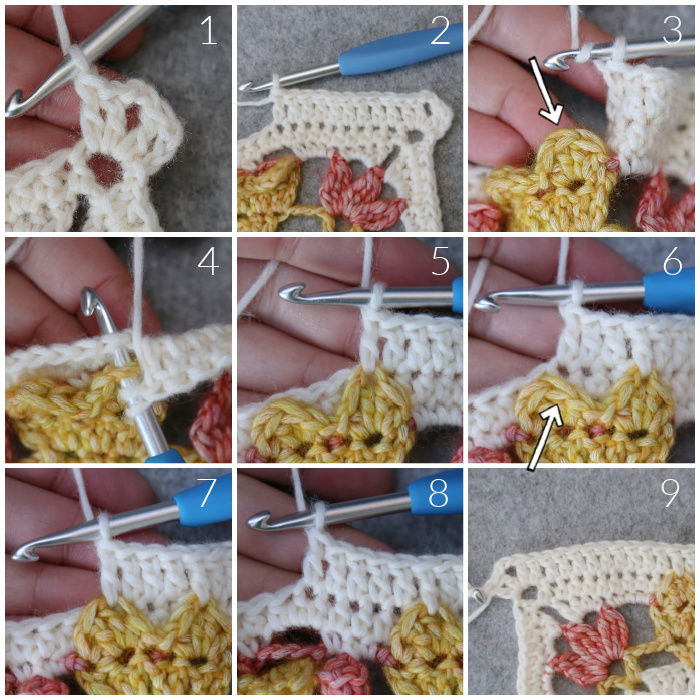
Heart
You will make these Hearts in Border Round 3. I am using a contrasting colour for Row 3 and the sl sts so that you can clearly see where the stitches are placed.
Row 1: Make 3 dc in the indicated st {Photo 1}, TURN. {3 dc}
Row 2: Ch 2 (doesn’t count as a st), make 2 dc in each of the 3 sts {Photo 2}, TURN. {6 dc}
Row 3: Skip the first dc. [hdc, 2 dc, hdc] in the next st. Sl st in the next 2 sts. [Hdc, 2 dc, hdc] in the next st {Photo 3}. Make a sc in the last st {Photo 4}. {4 hdc, 4 dc, and 1 sc, not including 2 sl sts}
Sl sts: Working down the side of the heart, sl st in the side of the ch-2 from Row 2, sl st in the top of the last st of Row 1 {Indicated with arrows in Photo 4 and illustrated in Photo 5}.
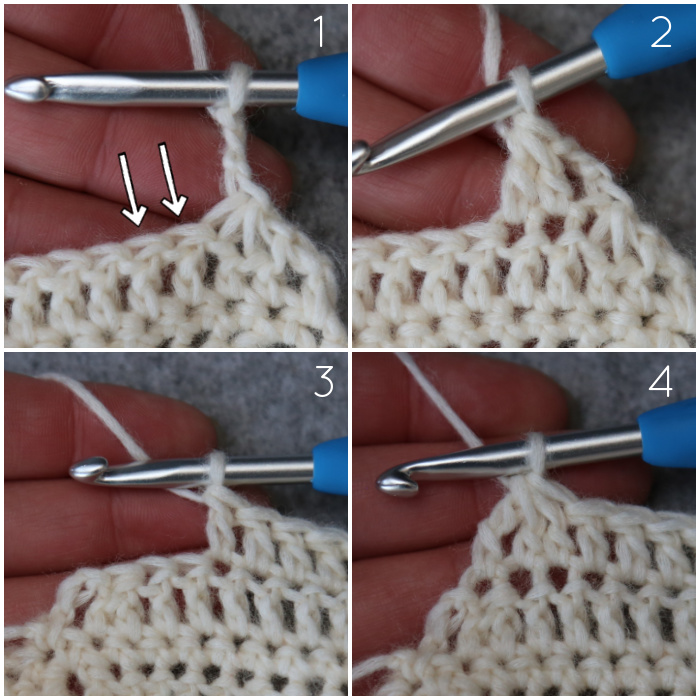
Modified Back Post Single Crochet (MBPsc)
This is the same as a Back Post Sc, but instead of inserting your hook around the post of the stitch BELOW the loops, you will insert your hook INTO the loops – which will already contain sl sts from Row 3 of the Heart. Please see the arrows in Photo 1 below.
Insert your hook from back to front into the top of the fourth dc from Row 2 of the Heart {Photo 2}, then insert it from front to back into the top of the fifth dc from Row 2 of the Heart {Photos 3 and 4}. Yarn over and pull up a loop. Yarn over and pull through both loops {Photo 5}. This will create two lines (like an equation mark) on the front of your work {Photo 6}.
Notes
- Making the Blanket Bigger or Smaller – If you want to make the blanket bigger or smaller, you will need an uneven number of squares along each side for the border to work out.
- Adding the Border to an Existing Blanket – If you would like to add the border to an existing blanket, you will have to make sure that you have a multiple of 10 + 5 stitches along each side of your blanket, at which point you can continue with Border Round 2.
- Photo Tutorials – I sometimes use contrasting colours in the photos to make it easier for you to see stitch placement.
Heart Motifs
You will need to make 59 of these motifs.
The first 2 rounds of the Heart are joined at the end. Rounds 3 – 6 are worked in a spiral.
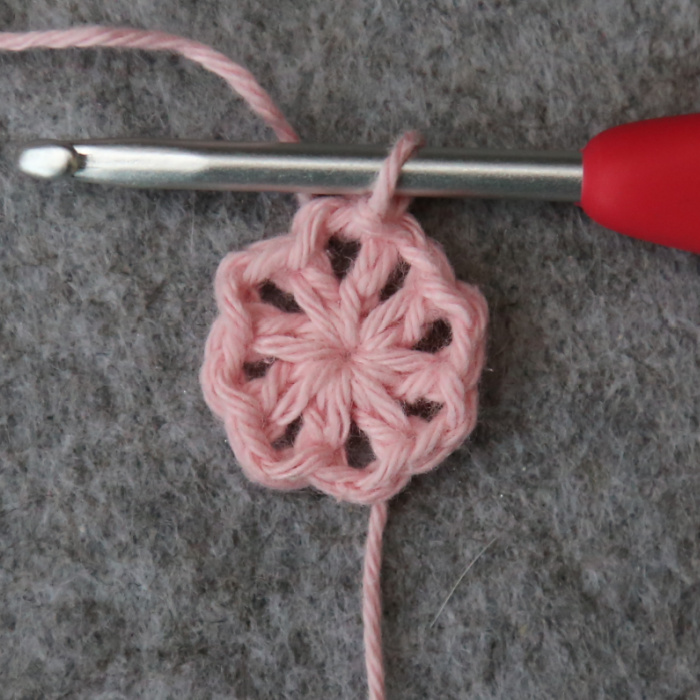
Round 1
With Yarn A (starting from the inside out) and working into a magic ring, ch 3 (counts as hdc + ch-1), (hdc, ch 1) 7 times. Join between the beg ch-3 and the first hdc with a sl st.
Stitch Count: 8 hdc and 8 ch-1 sps.
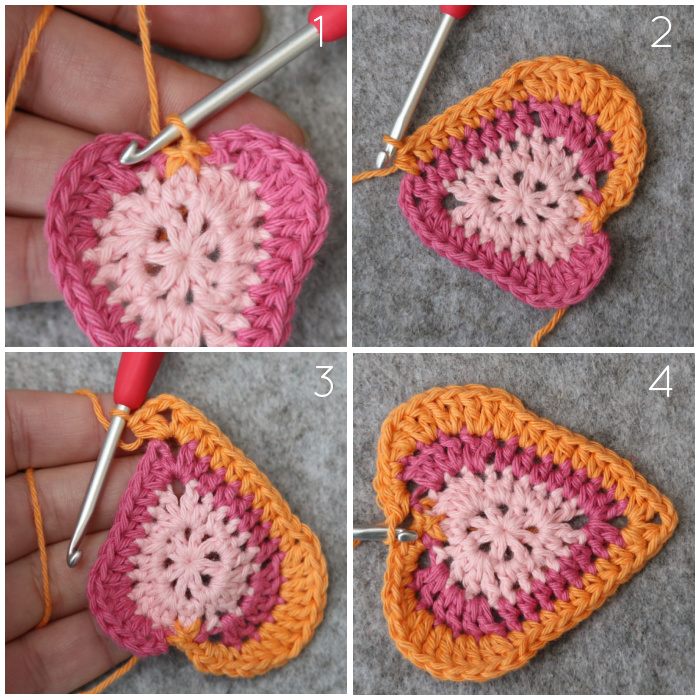
Round 2
Ch 1 (doesn’t count as a st throughout), sc in the same ch-1 sp {Photo 1}. If you are going to find this sc hard to identify in Round 4, mark it with a SM. [Hdc, 3 dc] in the next ch-1 sp, 2 hdc in the next ch-1 sp, 2 sc in the next ch-1 sp {Photo 2}. [Hdc, dc, ch 2, dc, hdc] in the next ch-1 sp. This is your pointy corner made {Photo 4}. [Hdc, sc] in the next ch-1 sp, 2 hdc in the next ch-1 sp, make 4 dc in the last ch-1 sp {Photo 4}. Join to the first sc with a sl st.
Stitch Count: 4 sc, 8 hdc, 9 dc, and 1 ch-2 sp
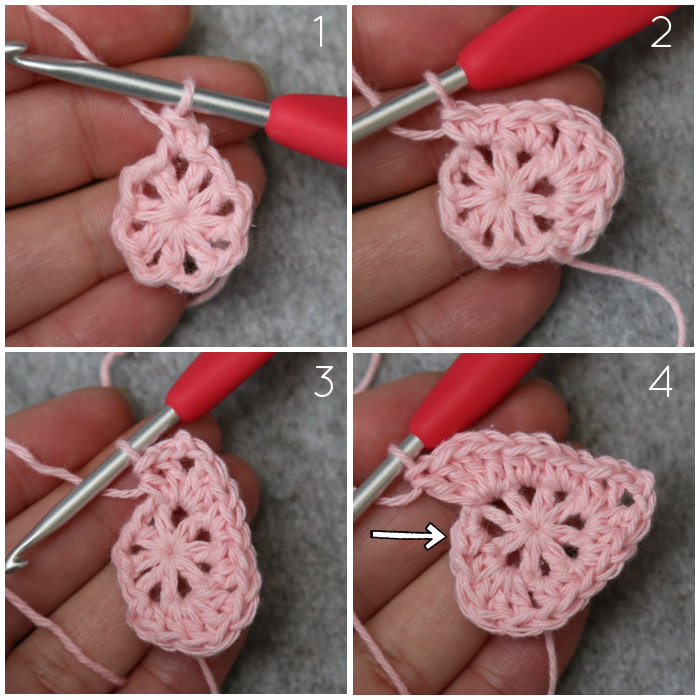
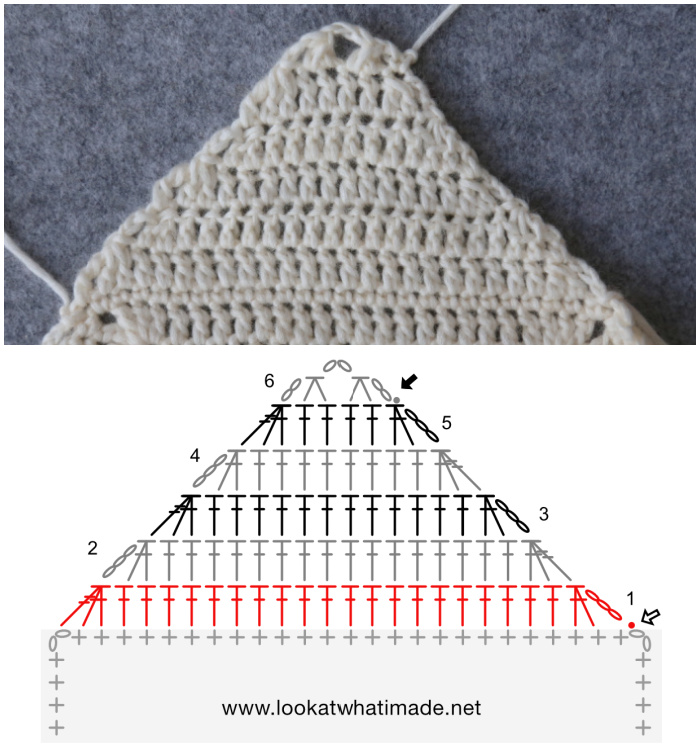
Round 3
Sl st in the next hdc, ch 2 (counts as ch-2 sp) {Photo 1}. Make 2 dc in each of the next 3 sts. Hdc in the next 6 sts {Photo 2}. [2 hdc, ch 2, 2 hdc] in the next ch-2 corner sp {Photo 3}. Hdc in the next 6 sts, make 2 dc in each of the next 3 sts. Ch 2, sl st in the next st {Photo 4}.
Stitch Count: 16 hdc, 12 dc, and 3 ch-2 sps
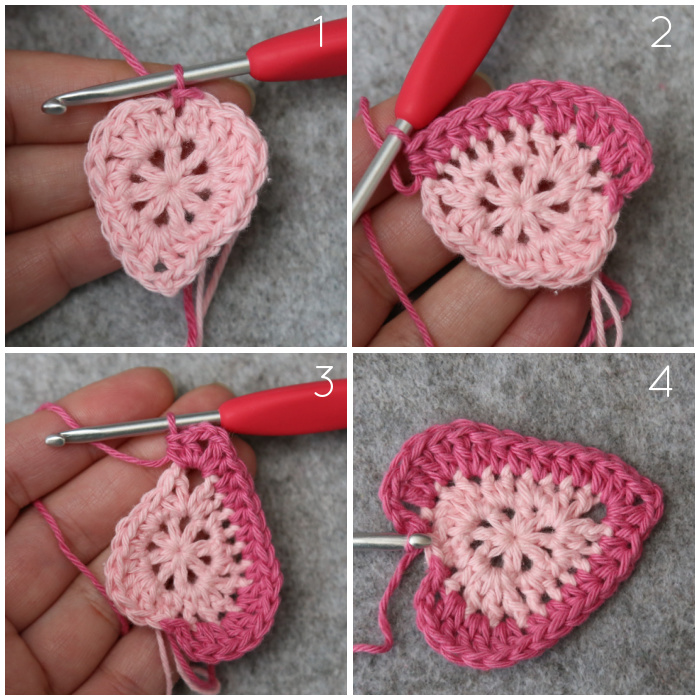
Round 4
FPsc around the sc from Round 2 that already contains a sl st (you may have marked it with a SM, in which case you can remove the SM) {Photo 1}. Ch 1, make 3 sc in the next ch-2 sp. Sc in the next dc. Make 2 hdc in the next st. Make 2 dc in each of the next 4 sts. Hdc in the next 8 sts {Photo 2}. [2 hdc, ch 2, 2 hdc] in the next ch-2 corner sp {Photo 3}.
Skip the first (hidden) st. Hdc in the next 7 sts. [Hdc, dc] in the next st. Make 2 dc in each of the next 3 sts. Make 2 hdc in the next st, sc in the next st. Make 3 sc in the next ch-2 sp {Photo 4}.
Stitch Count: 8 sc, 1 FPsc 24 hdc, 15 dc, and 1 ch-2 sp
Round 5
Mark the first BPhdc of this round with a SM.
FPsc around the FPsc from Round 4 {Photo 1}. BPhdc around the next 24 sts, being careful not to skip the first one {Photo 2}. [Hdc, ch 2, hdc] in the next ch-2 corner sp {Photo 3}. BPhdc around the next 23 sts. The last one will be a bit tricky to make {Photo 4}.
Stitch Count: 1 FPsc, 2 hdc, 47 BPhdc, and 1 ch-2 sp.
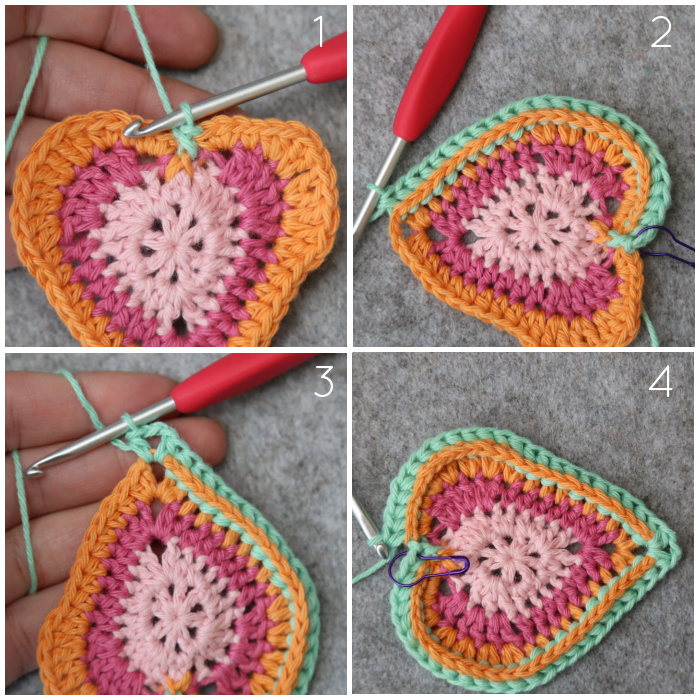
Round 6
Skip the first FPsc of Round 5, which will be hidden anyway. Sl st in the first 3 BPhdc, the first of which will contain a SM {Photo 1}. (Ch 5, skip the next st, sl st in the next 2 sts) 7 times. Ch 5, skip the last st {Photo 2}.
Sc in the ch-2 corner sp, ch 1, sc in the next (hidden) st. This is your corner made {Photo 3}.
(Ch 5, skip the next st, sl st in the next 2 sts) 7 times. Ch 5, skip the next st, sl st in the next st. Fasten off and work away your ends {Photo 4}.
Stitch Count: 2 sc, 16 ch-5 sps, and 1 ch-1 sp, not including sl sts.
Round 7
In this round, you will find the skipped sts from Round 5 in the middle of each ch-5 sp from Round 6. When working into these sts, you will work behind the ch-5 sps from Round 6 so that they lie in front of Round 7.
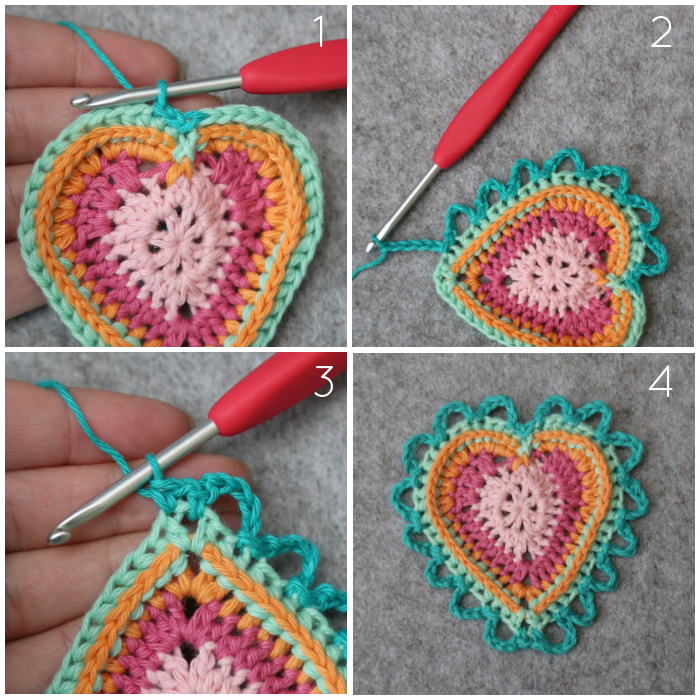
With Yarn B, join your yarn by making a standing sc in the ch-1 corner sp from Round 6. Ch 2, sc in the same ch-1 corner sp. This is your first corner made {Photo 1}.
Make 3 sc in the next skipped st from Round 5, make 3 hdc in each of the next 2 skipped sts from Round 5, make 3 dc in the next skipped st from Round 5. [Edc, tr, ch 2, tr, edc] in the next skipped st from Round 5. This is your second corner made {Photo 2}.
[Dc, 3 hdc] in the next skipped st from Round 5. [Hdc, 3 sc] in the next skipped st from Round 5. [Hdc, dc, edc, tr] in the next skipped st from Round 5. Working into the first (marked) BPhdc of Round 5: [2 dtr, ch 2, 2 dtr]. Remove the SM. This is your third corner made {Photo 3}.
[Tr, edc, dc, hdc] in the next skipped st from Round 5. [3 sc, hdc] in the next skipped st from Round 5. [3 hdc, dc] in the next skipped st from Round 5. [Edc, tr, ch 2, tr, edc] in the next skipped st from Round 5. This is your fourth corner made {Photo 4}.
Make 3 dc in the next skipped st from Round 5, make 3 hdc in each of the next 2 skipped sts from Round 5, make 3 sc in the last skipped st from Round 5. Join to the first sc with a sl st {Photo 5}. Sl st into the next ch-2 corner sp.
Stitch Count: 14 sc, 22 hdc, 10 dc, 6 edc, 6 tr, 4 dtr, and 4 ch-2 sps
Round 8
Ch 2 (counts as hdc). [Hdc, ch 2, 2 hdc] in the same ch-2 sp. This is your first corner made {Photo 1}.
Hdc in the next 15 sts. [2 hdc, ch 2, 2 hdc] in the next ch-2 sp. This is your second corner made {Photo 2}.
Skip the first (hidden) st. Hdc in the next 3 sts, sc in the next 6 sts, hdc in the next 5 sts, dc in the last st. [2 edc, ch 2, 2 edc] in the next ch-2 sp. This is your third corner made {Photo 3}.
Skip the first st. Dc in the next st, hdc in the next 5 sts, sc in the next 6 sts, hdc in the last 3 sts. [2 hdc, ch 2, 2 hdc] in the next ch-2 sp. This is your fourth corner made {Photo 4}.
Hdc in the next 15 sts. Join to the top of the beg ch-2 with a sl st. Sl st in the next st and in the ch-2 corner sp {Photo 5}.
Stitch Count: 12 sc, 58 hdc, 2 dc, 4 edc, and 4 ch-2 sps
Round 9
Ch 3 (counts as dc). [Dc, edc, ch 2, edc, 2 dc] in the same ch-2 sp. This is your first corner made.
*Skip the first (hidden) st, dc in the next 18 sts.** [2 dc, edc, ch 2, edc, 2 dc] in the next ch-2 sp.* Rep from * to * 3 times, and from * to ** once. Join to the top of the beg ch-3 with a sl st.
Stitch Count per Side: 22 dc and 2 edc, not including ch-2 corner sps
Round 10
Ch 1. Sc in the same st as the sl sts join. Sc in the next 2 sts, the first of which will be tricky to get into.
([Sc, ch 2, sc] in the next ch-2 sp. Skip the first st, sc in the next 23 sts) 3 times. [Sc, ch 2, sc] in the last ch-2 sp. Skip the first st, sc in the next 20 sts. Join to the first sc with a sl st. Fasten off and work away your ends.
Stitch Count Per Side: 25 sc, not including ch-2 corner sps
Joining the Motifs
If you are left-handed, you will need to flip these instructions. Every time I say right, you go left. Every time I say left, you go right.
You will join your Heart Motifs in a grid as pictured below. Because this blanket is made with a colour-change yarn, you may have to play with the layout a little bit, depending on where your colour changes fall.
I was fortunate to get 11 Hearts from each complete colour change, so I chose to lay them out in the order I made them (as per A below). I also toyed with layout B, which is LOVELY but less playful than A. You are, of course, welcome to arrange the coloured Hearts however your heart desires.
![]()
For the joining, you can use whichever method you prefer. I chose to use my Granny’s (sc, ch 1, skip 1) method, creating the joins as a zigzag starting with the bottom two rows… so that is what I will explain below.
Joining Row 1
Hint: You may find it easier to clip the squares together with stitch markers before crocheting or sewing them together.
Lay the last two rows out in order of your colour preference, with RS facing you.
Starting on the right with a standing st in Yarn B:
*Fold the top square over onto the one diagonally to the right of it so that the RS are facing each other.
Starting in the ch-2 corner sp on the right and working through both layers: Make a sc in the ch-2 corner sp. (Ch 1, skip the next st, sc in the next st) 12 times. Ch 1, skip the last st. Sc in the next ch-2 corner sp. Ch 2 before joining the next side.
Unfold your work so that you can see the RS of both squares.
Fold the same top square onto the one diagonally to the left of it so that RS are facing each other.
Sc in the ch-2 corner sp. (Ch 1, skip the next st, sc in the next st) 12 times. Ch 1, skip the last st. Sc in the next ch-2 corner sp. Ch 2 before joining the next side.
Unfold your work so that you can see the RS of the joined squares.*
Repeat from * to * for each of the top squares until the whole row is joined, omitting the last ch-2 on the last repeat. Fasten off and work away your ends.
![]()
Joining Row 2
Lay the next row out as per the template below.
Starting on the right with a standing st in Yarn B:
*Fold the top square over onto the one diagonally to the left of it so that the RS are facing each other.
Starting in the ch-2 corner sp on the right and working through both layers: Make a sc in the ch-2 corner sp. (Ch 1, skip the next st, sc in the next st) 12 times. Ch 1, skip the last st. Sc in the next ch-2 corner sp. Ch 2 before joining the next side.
Unfold your work so that you can see the RS of both squares.
Fold the next top square onto the same square from the second row so that RS are facing each other.
Sc in the ch-2 corner sp. (Ch 1, skip the next st, sc in the next st) 12 times. Ch 1, skip the last st. Sc in the next ch-2 corner sp.** This will bring you to the junction where four of the squares meet. Make a sc in the ch-2 from the previous joining row.
Unfold your work so that you can see the RS of the joined squares.*
Repeat from * to * 2 more times, and from * to ** once. Fasten off and work away your ends.
![]()
Joining Row 3
Lay the next row out as per the template below.
Starting on the right with a standing st in Yarn B:
*Fold the top square over onto the one diagonally to the right of it so that the RS are facing each other.
Starting in the ch-2 corner sp on the right and working through both layers: Make a sc in the ch-2 corner sp. (Ch 1, skip the next st, sc in the next st) 12 times. Ch 1, skip the last st. Sc in the next ch-2 corner sp. This will bring you to the junction where four of the squares meet. Make a sc in the ch-2 from the previous joining row.
Unfold your work so that you can see the RS of both squares.
Fold the same top square onto the one diagonally to the left of it so that RS are facing each other.
Sc in the ch-2 corner sp. (Ch 1, skip the next st, sc in the next st) 12 times. Ch 1, skip the last st. Sc in the next ch-2 corner sp. Ch 2 before joining the next side.
Unfold your work so that you can see the RS of the joined squares.*
Repeat from * to * for each of the top squares until the whole row is joined, omitting the last ch-2 on the last repeat. Fasten off and work away your ends.
![]()
Joining Subsequent Rows
Keep joining your rows like this, repeating Joining Row 2 and Joining Row 3 until all your squares are joined.
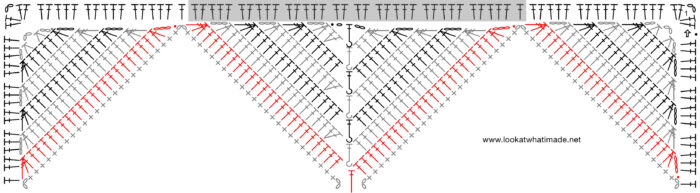
Squaring Up the Blanket
Now we will fill in the gaps on the sides of the blanket (Full triangles), after which we will create four corners (Half triangles). Here is a sample version showing what you are aiming for:
![]()
Full Triangles
First, we will fill in the gaps along the sides of the blanket by making triangles into them. The triangles will be worked back in forth in rows, into the ‘valleys’ between squares.
Row 1
With RS facing, join Yarn B with a sl st in the pointy-out ch-2 corner sp of any square. Ch 3, skip the next st, dc2tog in the next 2 sts. This counts as a tr-2dc-tog {Photos 1 and 2}.
Dc in next 22 sts {Photo 3}. Skip the ch-2 corner sp. Dc in next ch-2 corner sp {Photo 4}. This ch-2 sp will be the ch-2 corner of the square between squares, and will already contain two joining sc. Skip the ch-2 corner sp of the next square AND the first st. Dc in the next 22 sts {Photos 5 and 6}. 2dc-tr-tog in the last 2 sts and the ch-2 corner sp {Photo 7}. TURN.
Stitch Count: 45 dc, 1 tr-2dc-tog, and 1 2dc-tr-tog
Row 2
With WS facing, ch 3, dc2tog over the next 2 sts. This counts as your tr-2dc-tog, here and throughout {Photos 1 and 2}.
Dc in the next 16 sts {Photo 3}. Make 2 dc in the next st {Photo 4}. Skip the next 3 sts, BPdc around the next st, which will be the dc made into the ch-2 sp of the square between squares {Photos 4 – 6}. Skip the next 2 sts, dc in the next 18 sts {Photos 7 and 8}, 2dc-tr-tog in the last 3 sts {Photo 9}. TURN.
Stitch Count: 36 dc, 1 BPdc, 1 tr-2dc-tog, and 1 2dc-tr-tog
Row 3
With RS facing, ch 3, dc2tog over the next 2 sts {Photos 1 and 2}, dc in the next 14 sts {Photo 3}. Skip the next 2 sts, FPdc around the next st, which will be the BPdc {Photos 4 and 5}. Skip the next 2 sts, dc in the next 14 sts {Photos 6 and 7}, 2dc-tr-tog in the last 3 sts {Photo 8}. TURN.
Stitch Count: 28 dc, 1 FPdc, 1 tr-2dc-tog, and 1 2dc-tr-tog

Row 4
With WS facing, ch 3, dc2tog over the next 2 sts, dc in the next 8 sts. Make 2 dc in the next st. Skip the next 3 sts, BPdc around the next st, which should be the FPdc. Skip the next 2 sts, dc in the next 10 sts, 2dc-tr-tog in the last 3 sts. TURN.
Stitch Count: 20 dc, 1 BPdc, 1 tr-2dc-tog, and 1 2dc-tr-tog
Row 5
With RS facing, ch 3, dc2tog over the next 2 sts, dc in the next 6 sts. Skip the next 2 sts, FPdc around the next st, which will be the BPdc. Skip the next 2 sts, dc in the next 6 sts, 2dc-tr-tog in the last 3 sts. TURN.
Stitch Count: 12 dc, 1 FPdc, 1 tr-2dc-tog, and 1 2dc-tr-tog
Row 6
With WS facing, ch 3, dc2tog over the next 2 sts, make 2 dc in the next st. Skip the next 3 sts, BPdc around the next st, which will be the FPdc {Photo 1}. Skip the next 2 sts, dc in the next 2 sts, 2dc-tr-tog in the last 3 sts {Photo 2}. TURN.
Stitch Count: 4 dc, 1 BPdc, 1 tr-2dc-tog, and 1 2dc-tr-tog
Row 7
With RS facing, ch 2, skip the next 2 sts. FPdc around the BPdc {Photo 1}, ch 1, skip the next 2 sts, sl st into the last st {Photo 2}. Fasten off and work away your ends.
Stitch Count: 1 FPdc, 1 ch-1 sp, and 1 ch-2 sp

The triangle will dip in a little bit where you have made the FPdc/BPdc stitches. Just give it a good tug to stretch those post stitches. You may even hear a satisfying little ‘crrrrr’ as they stretch into place.
Repeat these Full Triangles until you have worked into every gap along the sides of the blanket.
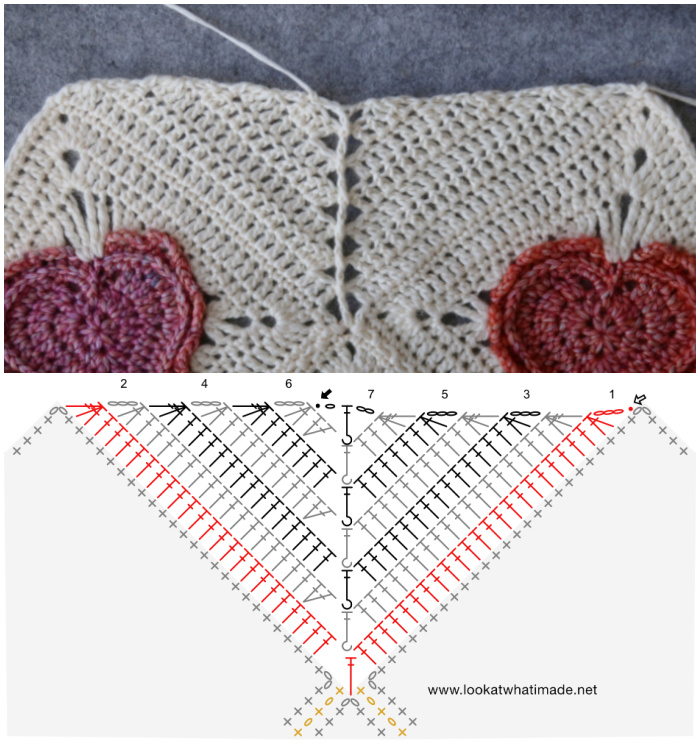
Half Triangles
Now we will make a Half Triangle into each of the four corner squares as follows…
Row 1
With RS facing, join Yarn B by making a sl st in the ch-2 corner sp at the start of any corner square. Ch 3, skip the next st, dc2tog in the next 2 sts. This counts as a tr-2dc-tog {Photos 1 and 2}. Dc in next 20 sts {Photo 3}, 2dc-tr-tog in the last 2 sts and the ch-2 corner sp {Photo 4}. TURN.
Stitch Count: 20 dc, 1 tr-2dc-tog, and 1 2dc-tr-tog
Row 2
With WS facing, ch 3, dc2tog over the next 2 sts {Indicated with arrows in Photo 1 and illustrated in Photo 2}. This counts as your tr-2dc-tog, here and throughout. Dc in the next 16 sts {Photo 3}, 2dc-tr-tog in the last 3 sts {Photo 4}. TURN.
Stitch Count: 16 dc, 1 tr-2dc-tog, and 1 2dc-tr-tog
Row 3
With RS facing, ch 3, dc2tog over the next 2 sts. Dc in the next 12 sts, 2dc-tr-tog in the last 3 sts. TURN.
Stitch Count: 12 dc, 1 tr-2dc-tog, and 1 2dc-tr-tog
Row 4
With WS facing, ch 3, dc2tog over the next 2 sts. Dc in the next 8 sts, 2dc-tr-tog in the last 3 sts. TURN.
Stitch Count: 8 dc, 1 tr-2dc-tog, and 1 2dc-tr-tog
Row 5
With RS facing, ch 3, dc2tog over the next 2 sts. Dc in the next 4 sts, 2dc-tr-tog in the last 3 sts. TURN.
Stitch Count: 4 dc, 1 tr-2dc-tog, and 1 2dc-tr-tog
Row 6
With WS facing, ch 2, hdc2tog over the next 2 sts {Photos 1 and 2}. Ch 2 (this counts as ch-2 corner sp) {Photo 3}. Hdc2tog over the next 2 sts {Photo 4}. Ch 2, sl st in the next st {Photos 5 and 6}. Fasten off and work away your ends.
Stitch Count: 2 hdc2tog and 3 ch-2 sps
Heart Border
Note: If you would like to add this border to another blanket, ensure that you have a multiple of 10+5 stitches per side (not including ch-2 corner sps), and then start from Border Round 2 below.
Border Round 1
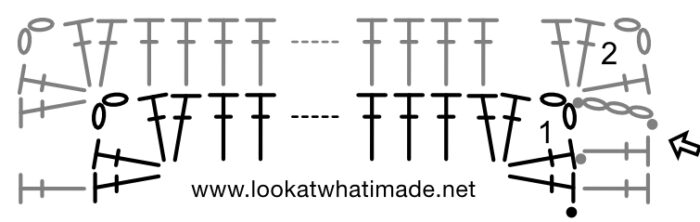
With RS facing, join Yarn B by making a standing dc in any ch-2 corner sp around. [Dc, ch 2, 2 dc] in the same ch-2 corner sp. This is your first corner made.
*Working into the first half triangle: (make 3 dc in the side of the next row, make 2 dc in the side of the next row) 3 times.
**Dc in the ch-2 sp of the next square. Working into the next full triangle: (make 3 dc in the side of the next row, make 2 dc in the side of the next row) 3 times. Make 2 dc in the next ch-2 sp, which will be to the right of the FPdc (left, if you are left-handed). Make 2 dc in the next ch-1 sp, which will be to the left of the FPdc (right, if you are left-handed). (Make 3 dc in the side of the next row, make 2 dc in the side of the next row) 3 times.**
Rep from ** to ** until you have worked into each full triangle along the side.
Dc in the ch-2 sp of the last square. Working into the last half triangle: (make 3 dc in the side of the next row, make 2 dc in the side of the next row) 3 times. [2 dc, ch 2, 2 dc] in the next ch-2 corner sp.*
Rep from * to * 3 more times, omitting the last corner on the last repeat. Join to the top of the first dc with a sl st.
Stitch Counts:
- Per Short Side: 175 dc, not including ch-2 corner sps
- Per Long Side: 245 dc, not including ch-2 corner sps
At this point, you should have a multiple of 10 + 5 sts on each side.
Border Round 2
Sl st in the next st and in the ch-2 corner sp. Ch 3 (counts as dc). [Dc, ch 2, 2dc] in the same ch-2 sp. This is your first corner made.
*Skip the first (hidden) st, dc in each rem st across. [2 dc, ch 2, 2 dc] in the next ch-2 corner sp.*
Rep from * to * 3 more times, omitting the last corner on the last repeat. Join to the top of the beg ch-3 with a sl st. Fasten off and work away your ends.
Stitch Counts:
- Per Short Side: 178 dc, not including ch-2 corner sps
- Per Long Side: 248 dc, not including ch-2 corner sps
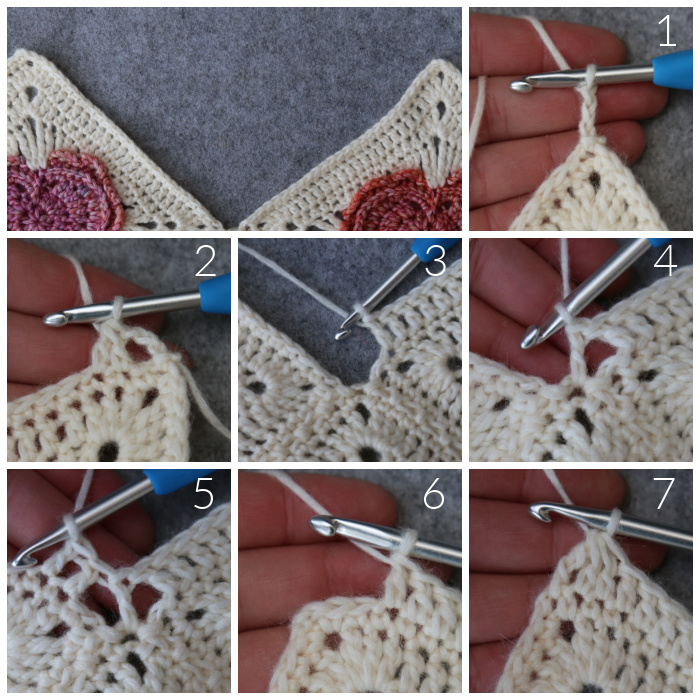
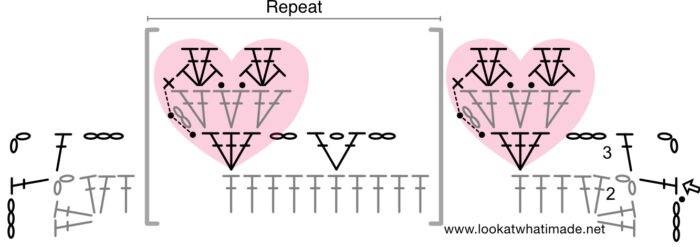
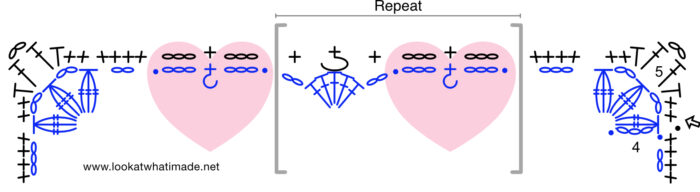
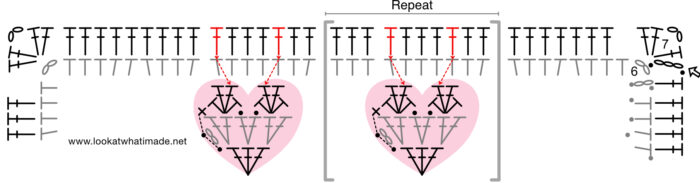
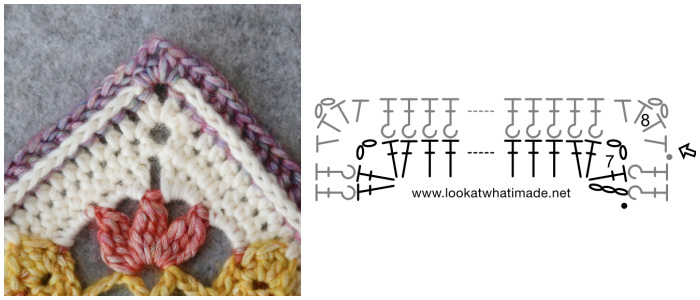
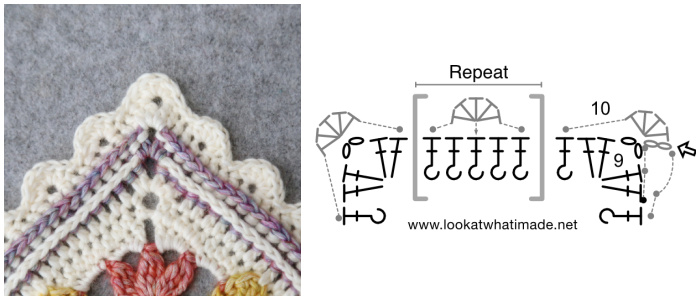
Border Round 3 {Hearts}
When making the Hearts in this round (see Special Stitches), I treated them like a prayer shawl, thinking of one person while making each heart. I tried not to think about who I SHOULD be thinking about, letting the names and people lead into each other like a web. I made the very last one for myself. Also, my colour changes worked out perfectly, starting with yellow-orange and ending with yellow-orange. That made me smile a lot!
Join Yarn A by making a standing dc in any ch-2 corner sp. [Ch 2, dc] in the same ch-2 sp. This is your first corner made {Photo 1}.
* Ch 3, skip the next 4 sts, make a Heart in the next st {Photo 2}. (Ch 2, skip the next 4 sts, [dc, ch 1, dc] in the next st. Ch 2, skip the next 4 sts, make a Heart in the next st {Photo 3}) until 3 sts rem. Ch 3, skip the next 3 sts. [Dc, ch 2, dc] in the next ch-2 corner sp {Photo 4}.*
Rep from * to * 3 more times, omitting the last corner on the last repeat. Join to the top of the first dc with a sl st.
Stitch Counts:
- Per Short Side: 36 dc, 18 Hearts, 17 ch-1 sps, 34 ch-2 sps, and 2 ch-3 sps, not including ch-2 corner sps
- Per Long Side: 50 dc, 25 Hearts, 24 ch-1 sps, 48 ch-2 sps, and 2 ch-3 sps, not including ch-2 corner sps
A Note if you are using a Colour-change Yarn for Yarn A (like I am doing)
Pause before continuing and take a look at the first few Hearts made and the colour currently on your hook.
- If they are the same or similar, that will mean that your Popcorns in the next round will be the same (or very similar to) the Hearts from this round, making them ‘pop’ less. You may wish to fasten off in this case, and start the next round in a corner where there is a stark contrast between the upcoming colour and the first few Hearts after the corner.
- If the upcoming colour is already in stark contrast to you first few Hearts, you don’t need to fasten off.
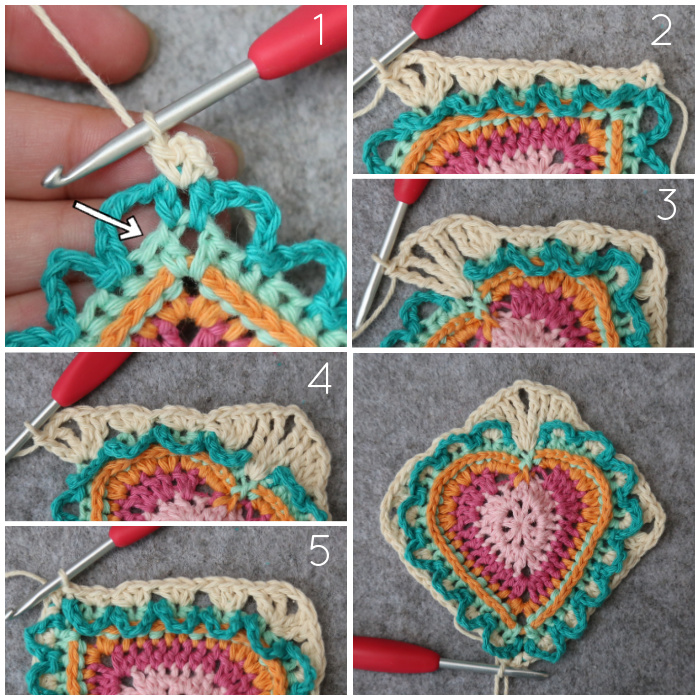
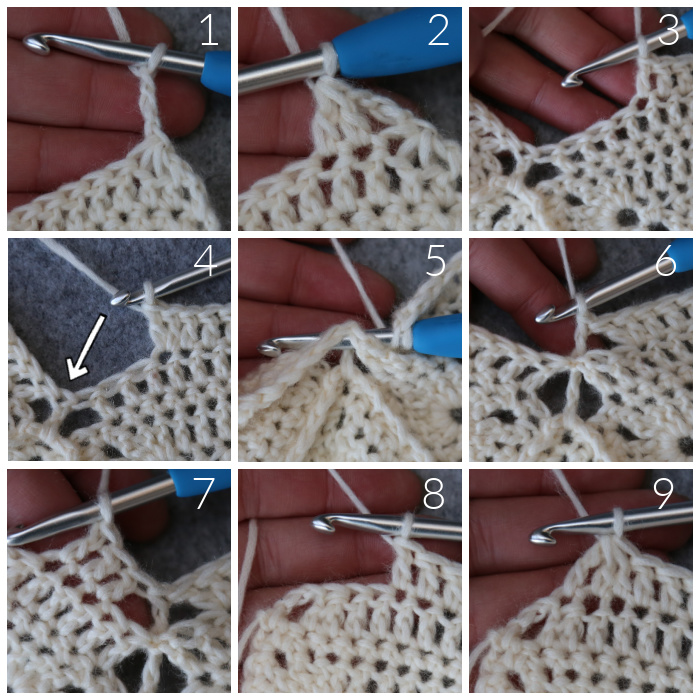
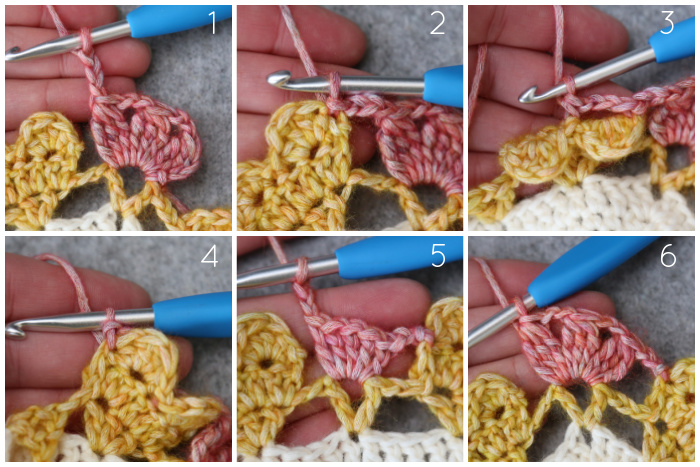
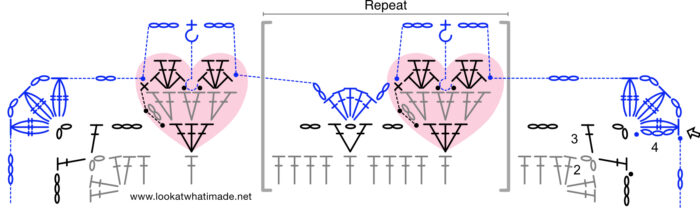
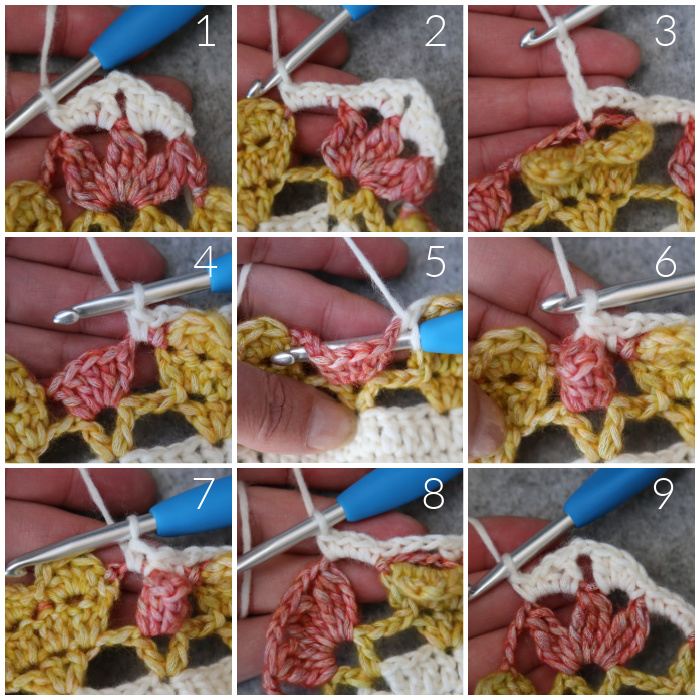
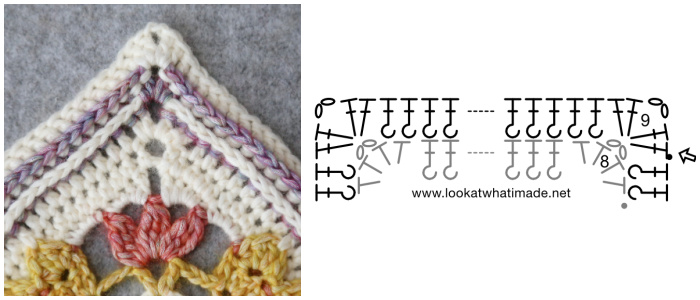
Border Round 4 {Really Lazy Popcorns}
In this round, you will only be working into the Hearts, the ch-1 sps, and the ch-2 corner sps. The Popcorns in this round are Really Lazy Popcorns, which means you will be making a 5-dc Shell in this round and then catching them together in the next round.
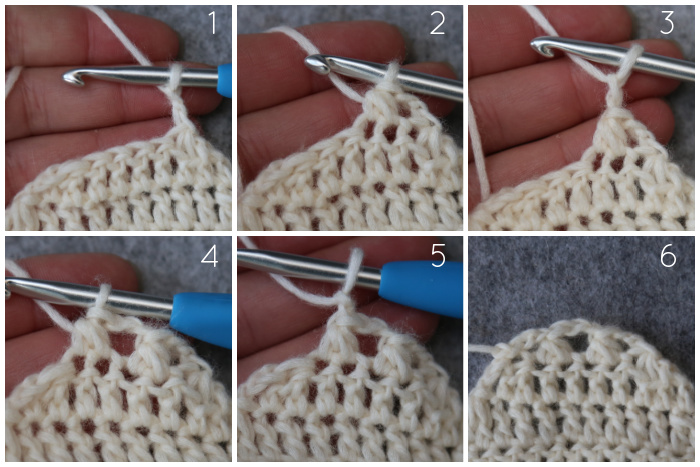
- If you didn’t fasten off in the previous round, sl st in the ch-2 corner sp. Ch 3, make a 2-tr Bobble in the same ch-2 corner sp. This counts as your first 3-tr Bobble.
- If you DID fasten off, join Yarn A by making a standing 3-tr Bobble in any (suitably contrasty) corner around. I started in the second ch-2 corner sp.
[Ch 2, 3-tr Bobble, ch 2, 3-tr Bobble] in the same ch-2 corner sp. This is your first corner made.
*Ch 3 {Photo 1}, (Sl st in the first hdc of Row 3 of the Heart {Photo 2}. Ch 3, make a MBPsc in the fourth dc of Row 2 of the Heart {Photo 3}. Ch 3, sl st in the last sc of Row 3 of the Heart {Photo 4}. Ch 2, make 5 dc in the next ch-1 sp, ch 2 {Photo 5}) until one Heart rem.
Sl st in the first hdc of Row 3 of the Heart, ch 3, make a MBPsc in the fourth dc of Row 2 of the Heart, ch 3, sl st in the last sc of Row 3 of the Heart. Ch 2, [3-tr Bobble, ch 2, 3-tr Bobble, ch 2, 3-tr Bobble] in the next ch-2 corner sp {Photo 6}.*
Rep from * to * 3 more times, omitting the last corner on the last repeat. Join to the top of the first 3-tr Bobble with a sl st. Fasten off and work away your ends.
Stitch Counts:
- Per Short Side: 18 MBPsc, 17 5-dc Shells, 2 3-tr Bobbles (not including corner 3-tr Bobble), 37 ch-2 sps, and 37 ch-3 sps
- Per Long Side: 25 MBPsc, 24 5-dc Shells, 2 3-tr Bobbles (not including corner 3-tr Bobble), 51 ch-2 sps, and 51 ch-3 sps
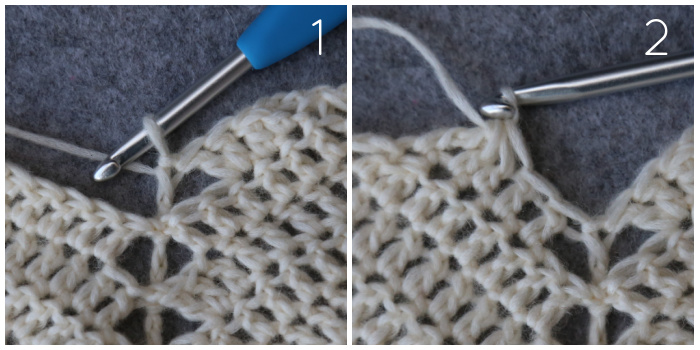
Border Round 5
You will find the corner ch-2 sps between 3-tr Bobbles.
Join Yarn B by making a standing sc in the first ch-2 sp of any corner. [Sc, hdc, dc] in the same ch-2 sp. Ch 2, [dc, hdc, 2 sc] in the second ch-2 sp of the corner. This is your corner made {Photo 1}.
*Make 4 sc in the next ch-3 sp {Photo 2}. (Ch 3, skip the next ch-3 sp, sc in the next MBPsc. Ch 3 {Photo 3}, skip the next ch-3 sp, sc in the next ch-2 sp {Photo 4}. FPsc around the next 5-dc Shell to create your Popcorn {Photos 5 and 6}, sc in the next ch-2 sp {Photo 7}) until no more 5-dc Shells rem.
Ch 3, skip the next ch-3 sp, sc in the next MBPsc. Ch 3, skip the next ch-3 sp, make 4 sc in the next ch-2 sp {Photo 8}. [2 sc, hdc, dc] in the first ch-2 sp of the next corner. Ch 2, [dc, hdc, 2 sc] in the second ch-2 sp of the next corner {Photo 9}.*
Rep from * to * 3 more times, omitting the last corner on the last repeat. Join to the top of the first sc with a sl st.
Stitch Counts:
- Per Short Side: 64 sc, 17 FPsc, 2 hdc, 2 dc, and 36 ch-3 sps, not including ch-2 corner sp
- Per Long Side: 85 sc, 24 FPsc, 2 hdc, 2 dc, and 50 ch-3 sps, not including ch-2 corner sp
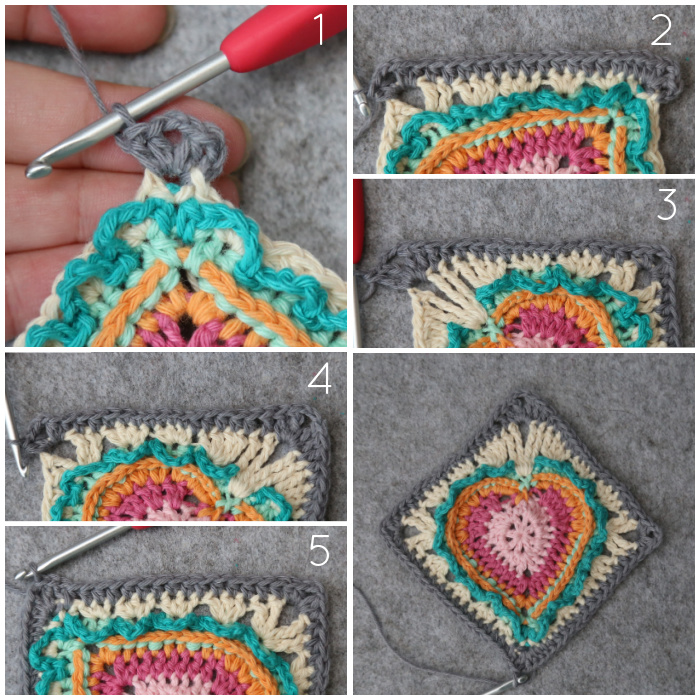
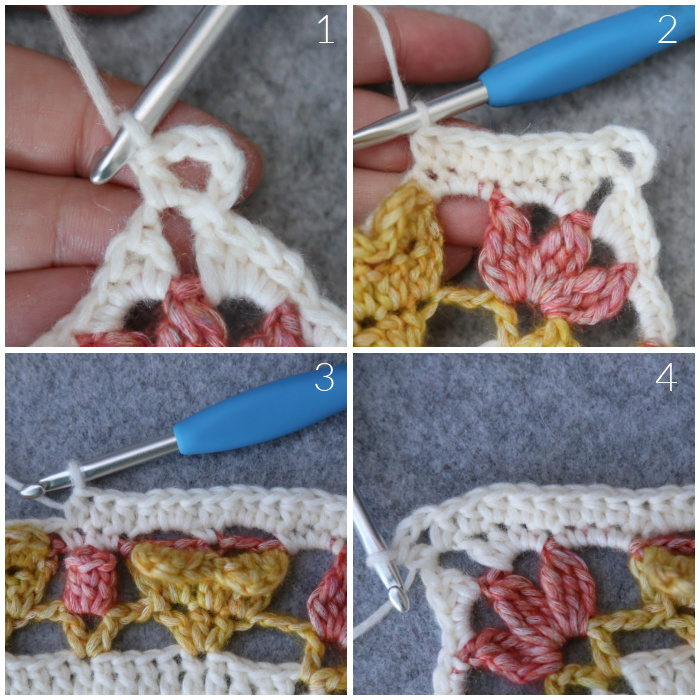
Border Round 6
Sl st in the next 3 sts and the ch-2 corner sp. Ch 4 (counts as hdc + ch-2). Hdc in the same ch-2 sp. This is your corner made {Photo 1}.
*Skip the first st, hdc in the next 7 sts {Photo 2}. (Make 3 hdc in the next ch-3 sp, hdc in the next sc, make 3 hdc in the next ch-3 sp, hdc in the next 3 sts {Photo 3}) until 2 ch-3 sps rem. Make 3 hdc in the next ch-3 sp, hdc in the next sc, make 3 hdc in the last ch-3 sp. Hdc in the last 8 sts. [Hdc, ch 2, hdc] in the next ch-2 corner sp {Photo 4}.*
Rep from * to * 3 more times, omitting the last corner on the last repeat. Join to the second ch of the beg ch-4 with a sl st.
Stitch Counts:
- Per Short Side: 194 hdc, not including ch-2 corner sp
- Per Long Side: 264 hdc, not including ch-2 corner sp
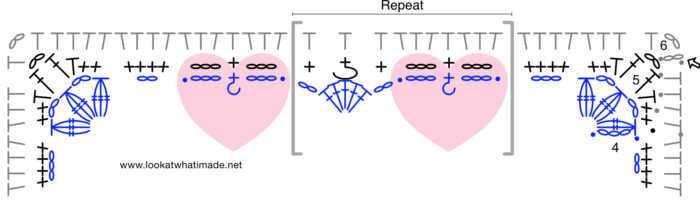
Border Round 7
In this round, we will be catching the Hearts from Round 3 by working into the two ‘bumps’ that form the top of the Heart.
Sl st in the next ch-2 corner sp. Ch 3 (counts as dc). [Dc, ch 2, 2 dc] in the same ch-2 corner sp. This is your corner made {Photo 1}.
*Skip the first st, dc in the next 9 sts. The last one should fall in the second hdc made into the ch-3 sp {Photo 2}. **Make a dc in the next st AND the second dc of the first Heart ‘bump’ together {Photos 3 – 5}. Dc in the next 3 sts, the last of which should be the second hdc made into the next ch-3 sp. Make a dc in the next st AND the first dc of the next Heart ‘bump’ together {Photos 6 and 7}.*** Dc in the next 5 sts, the last of which should be the second hdc made into the next ch-3 sp {Photo 8}.**
Rep from ** to ** until 1 Heart rem, then repeat from ** to *** once. Dc in the last 9 sts. [2 dc, ch 2, 2 dc] in the next ch-2 sp {Photo 9}.*
Rep from * to * 3 more times, omitting the last corner on the last repeat. Join to the top of the beg ch-3 with a sl st. Fasten off and work away your ends.
Stitch Counts:
- Per Short Side: 197 dc, not including ch-2 corner sp
- Per Long Side: 267 dc, not including ch-2 corner sp
Border Round 8 {Back Post}
Join Yarn A by making a standing hdc in any ch-2 corner sp. [Hdc, ch 2, 2 hdc] in the same ch-2 sp. This is your corner made.
*Make a BPdc around each st across. [2 hdc, ch 2, 2 hdc] in the next ch-2 corner sp.*
Rep from * to * 3 more times, omitting the last corner on the last repeat. Join to the first hdc with a sl st. Fasten off and work away your ends.
Stitch Counts:
- Per Short Side: 201 sts (4 hdc and 197 BPdc), not including ch-2 corner sp
- Per Long Side: 271 sts (4 hdc and 267 BPdc), not including ch-2 corner sp
Border Round 9 {Back Post}
Join Yarn B by making a standing dc in any ch-2 corner sp. [Dc, ch 2, 2 dc] in the same ch-2 sp. This is your corner made.
*Make a BPdc around each st across. [2 dc, ch 2, 2 dc] in the next ch-2 corner sp.*
Rep from * to * 3 more times, omitting the last corner on the last repeat. Join to the first dc with a sl st.
Stitch Counts:
- Per Short Side: 205 sts (4 dc and 201 BPdc), not including ch-2 corner sp
- Per Long Side: 275 sts (4 dc and 271 BPdc), not including ch-2 corner sp
Border Round 10 {Scallops}
Sl st in next st and ch-2 corner sp. Ch 2 (counts as hdc). Make 4 hdc in the same ch-2 sp. This is your corner made.
*Skip the first 2 sts, sl st in the next st. (Sl st in the next st, skip the next st, make 5 hdc in the next st. Skip the next st, sl st in the next st) until 2 sts rem. Sl st in the next st, skip the last st, make 5 hdc in the ch-2 corner sp.*
Rep from * to * 3 more times, omitting the last corner on the last repeat. Join to the top of the beg ch-2 with a sl st. Fasten off and work away your ends.
Stitch Counts:
- Per Short Side: 40 Scallops, not including corner Scallops
- Per Long Side: 54 Scallops, not including corner Scallops
Yarn Usage per Part
The table below shows how much yarn I used (TOTAL), and how much yarn the pattern suggests (10% allowance).
![]()
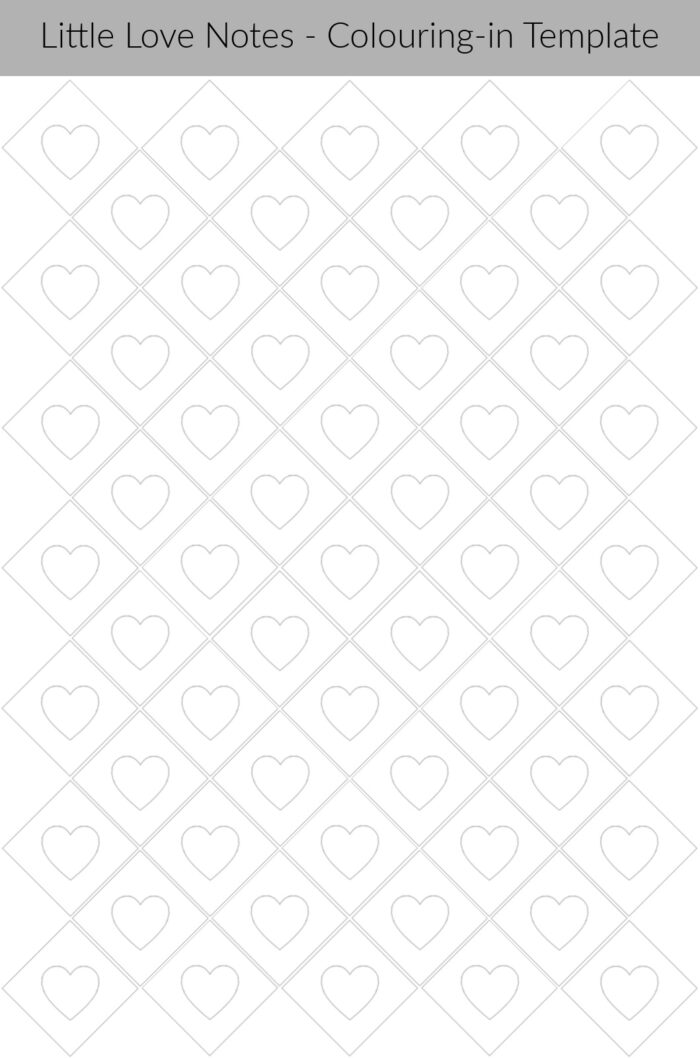
Colouring-in Template
If you want to use single colours or scrap yarn to make the hearts, you can use this colouring-in template to plan your colour placement.
I hope that you enjoy making this blanket, and that it ticks whatever box you need ticked – fun make, whimsical, nostalgic, cathartic, meditative…
I would love to see how your Little Love Notes turns out, so please do tag me if you share photos x

This blog post contains affiliate links. I only link to products I personally use or would use. All opinions are my own.
