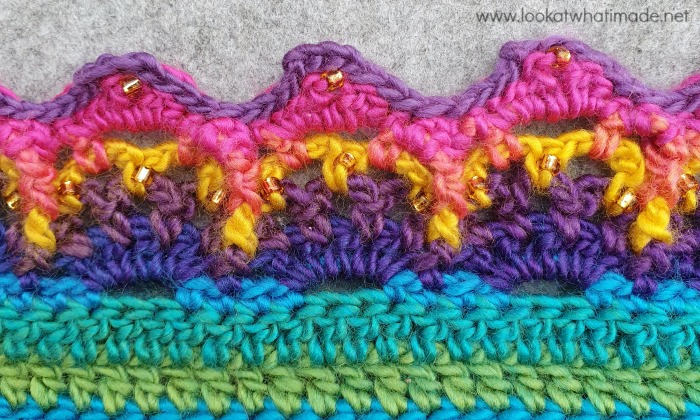
This Life in Colour Crochet Shawl is a celebration of colour with a tiny spot of bling. The pattern is easy to memorise, making it perfect for on-the-go crochet. Choose your colours mindfully, paying attention to the ones that make your heart sing! Let it tell the story of your life in colour!
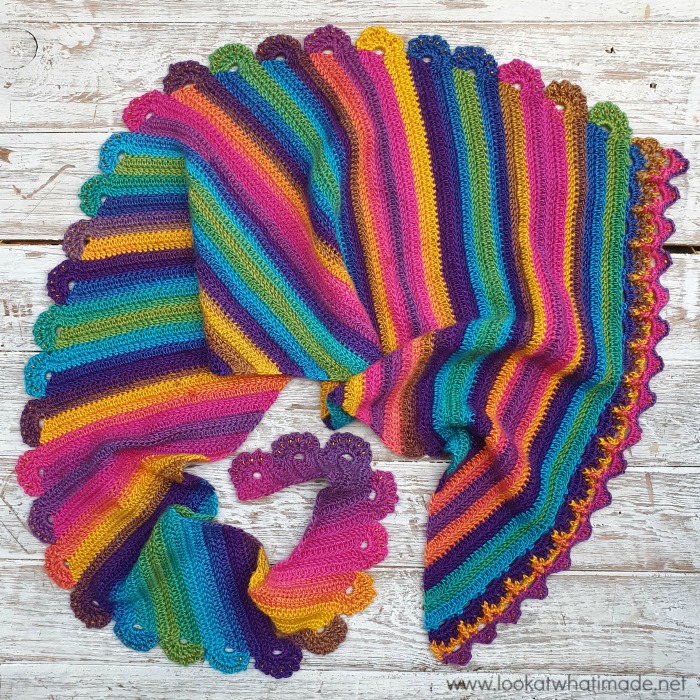
I designed this crochet shawl for a workshop I did at Unravel in February. Every time I look at it, I am reminded of a wonderful weekend spent in the company of fellow crocheters. I am especially reminded of spending time with two very dear friends: Lynnette (who helped me teach at the workshops) and her beautiful mother Pat.

Today is a rainy London day and I was sitting here having a little when-will-I-see-my-friends-again pity party. It was (morbid) fun for a while, but then I got bored of it. So I decided to focus on happy things and share this pattern with you. If nothing else, it will hopefully make your eyeballs happy :)
The Life in Colour shawl is a narrow crescent triangle, worked from the pointy end. It incorporates a floral bead-as-you-go edge and is finished off with a decorative border (which can be left out if you prefer). It is also easy to customise the size to suit your requirements or the amount of yarn you have.
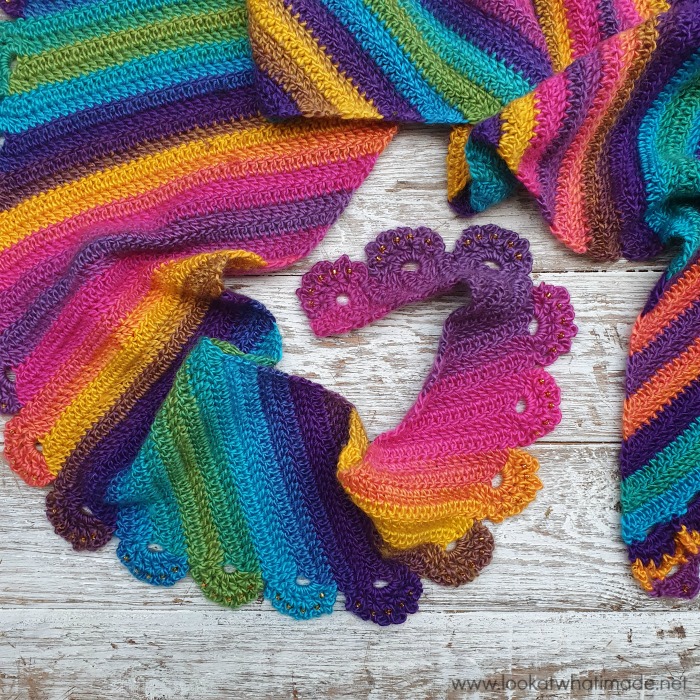
I went for a medium colour-change yarn with a lot of vibrant colours, but it would look beautiful in a single colour or a longer colour-change. In fact, I’m just finishing off a Whirl version in Green Tea Tipple, and will share that as soon as it is done.
Life in Colour Crochet Shawl Pattern
© Dedri Uys 2020. All Rights Reserved. Tested by Anna Moore.
Contents
Resources
- Hashtag: If you share photos, please use #lifeincolourshawl so that we can find your projects and have a gleeful look.
- You can buy Scheepjes Our Tribe from the following retailers:
- Black Sheep Wools (International)
- Wool Warehouse (International)
- Deramores (International)
- Caro’s Atelier (Netherlands)
- Knotty House (Canada)
- More Retailers
- Add This Crochet Pattern to Your Ravelry Queue
If you prefer an ad-free US PDF version of this pattern (written-only with charts), you can buy it HERE in my Ravelry Store.
Information
Difficulty
Intermediate Pattern.
Materials
- 3 x balls of Wanderlust (100% acrylic, 100g/232m/253yds) – Hawaii (457)
- 4mm crochet hook
- Beading Needle and yarn needle
- 233 Debbie Abrahams Size 6 beads (Colour 31)
Gauge
At the end of the third pattern repeat (Row 13), your shawl should measure 14cm from the starting point to the top of the last row.
Size
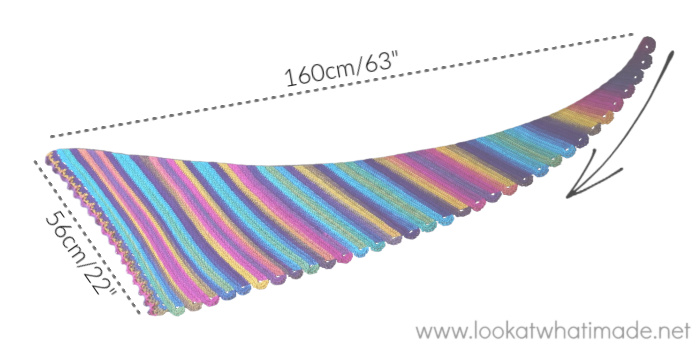
Your completed shawl will be 160cm (63”) long and 56cm (22”) along the Final Edge.
Abbreviations
US Terminology
- Ch – Chain
- Dc – Double crochet
- Hdc – Half-double crochet
- Rem – Remaining/remains
- Rep – Repeat
- Sc – Single crochet
- Sl st – Slip stitch
- Sp/sps – Space/spaces
- St/sts – Stitch/stitches
- Tr – Treble crochet
Special Stitches & Techniques
- BC (Bead chain) – Move one bead so that it abuts your hook. Yarn over and pull through, enclosing the bead in the chain.
- BP (Back Post) – Identify the post of the stitch you want to work around. Insert your hook from back to front and then from front to back around the post of the stitch so that the post lies behind your hook. Complete your stitch as normal.
- BSC (Bead single crochet) – Insert your hook into the indicated st/sp. Yarn over and pull up a loop. Move one bead so that it abuts your hook. Yarn over and pull through both loops, enclosing the bead in the sc.
- Dc2tog (Double crochet 2 together) – Yarn over, insert your hook into the indicated st and pull up a loop. Yarn over and pull through 2 loops. Yarn over, insert your hook into the next st and pull up a loop. Yarn over and pull through 2 loops. Yarn over and pull through all 3 loops on your hook.
- FP (Front Post) – Identify the post of the stitch you want to work around. Insert your hook from the front to the back and then from the back to the front around the post of the stitch so that the post lies on top of your hook. Complete your stitch as normal.
Punctuation
* An asterisk indicates pattern repeats. You will need to repeat all the instructions between asterisks the number of times specified. This is a hard-core repeat and will consist of multiple instructions.
Parentheses () indicate repeats. You will need to repeat the instructions between parentheses the number of times specified. This is a lower level repeat.
Square Brackets [] are used to indicate a group of stitches to be worked in the same stitch/space.
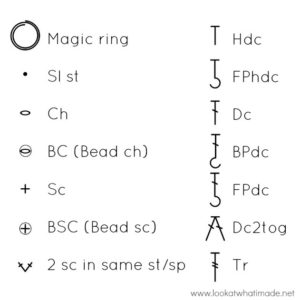
Crochet Chart Legend
Notes
RS/WS: After the first repeat, you will recognise the RS of your work as the side with the beads showing.
Loading Beads: Because this shawl uses three balls of yarn, it’s a bit tricky to figure out exactly how many beads to ‘load’ as you start each new ball. It is very much gauge dependant. To help you out, I will tell you how many beads I used at the end of each ball (total). I much prefer loading too many beads than too few, because that way you don’t have to cut your yarn to add more. At the end of my first ball, I had completed Row 77 (135 beads). At the end of my second ball, I had completed Row 111 (191 beads). By the end of the shawl, I still had 30g of yarn left (233 beads).
Customising Size: If you would like to make a bigger/smaller shawl, please see Customising Size.
I have created a document that lists the stitch counts at the end of each row. You can find that HERE.
Body of the Shawl
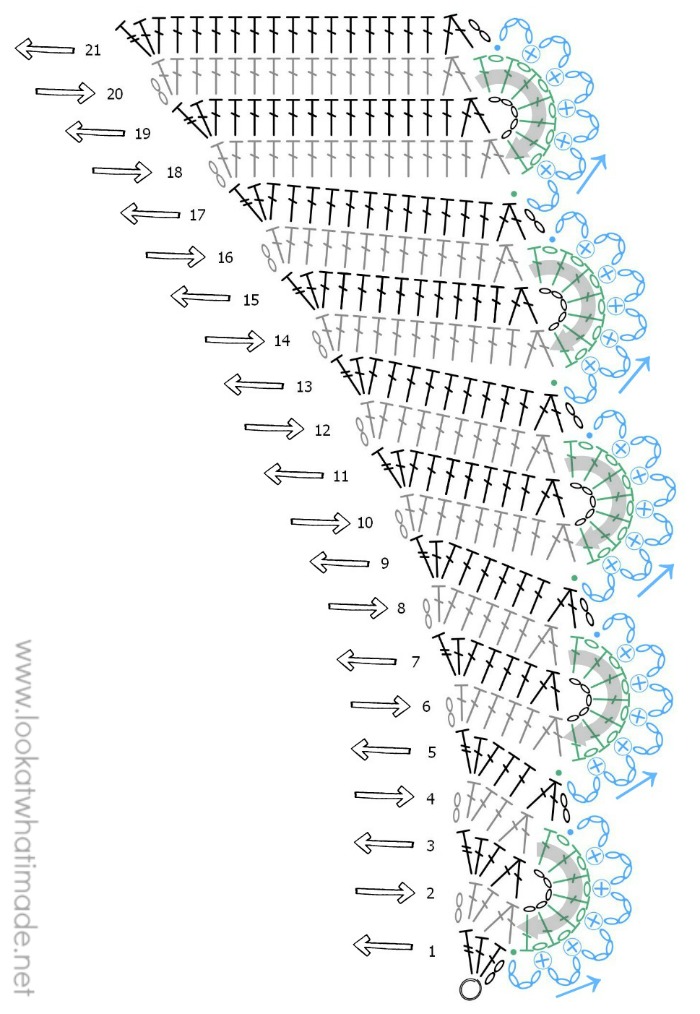
To start, load 135 beads (see Loading Beads above).
Make a magic ring.
Row 1
Into the magic ring: ch 2 (doesn’t count as a st throughout), 2 dc, tr. TURN. {2 dc and 1 tr}
First Flower Repeat
Row 2
Ch 2, make 2 dc in the st at the base of the ch-2. Dc2tog over the last 2 sts. TURN. {3 dc}
Row 3
Ch 5 (counts as ch-5 loop throughout), dc2tog over the first 2 sts, [2 dc, tr] in the last st. TURN. {3 dc, 1 tr and 1 ch-5 loop}
Row 4
Ch 2, make 2 dc in the st at the base of the ch-2. Dc in the next st, dc2tog over the last 2 sts. Do not turn. {4 dc}
Short Row 1
In this row you will start creating the flowers that run along the edge of the shawl.
[Dc, ch 1] 6 times into the ch-5 loop. Dc into the same ch-5 loop. Join to the top of the first dc of Row 1 with a sl st. TURN. {7 dc and 6 ch-1 sps}
Short Row 2
In this row you will complete the flowers that run along the edge of the shawl, adding beads as you go. The beads will be visible on the side facing away from you, which will become the ‘right side’ (RS) of your work.
Ch 4. (BSC in the next ch-1 sp of Short Row 1, ch 4) 5 times. Sl st in the last ch-1 sp of Short Row 1. Do not turn. {5 BSC and 6 ch-4 loops}
Row 5
Ch 2, dc2tog over the next 2 sts, which will be the first dc of Short Row 1 and the last dc2tog of Row 4. Dc in the next 2 sts, [2 dc, tr] in the last st. TURN. {5 dc and 1 tr}
Second Flower Repeat
Row 6
From this point on, you will be able to identify the RS of your work as the one where the beads are visible and the flowers are to your left (right, if you are left-handed).
With RS facing, ch 2, make 2 dc in the st at the base of the ch-2. Dc in the next 3 sts, dc2tog over the last 2 sts. TURN. {6 dc}
Row 7
With WS facing, ch 5, dc2tog over the first 2 sts. Dc in the next 3 sts, [2 dc, tr] in the last st. TURN. {6 dc, 1 tr and 1 ch-5 loop}
Row 8
With RS facing, ch 2, make 2 dc in the st at the base of the ch-2. Dc in the next 4 sts, dc2tog over the last 2 sts. Do not turn. {7 dc}
Short Row 1
With RS facing, [Dc, ch 1] 6 times into the ch-5 loop. Dc into the same ch-5 loop. Join to the top of the first st of Row 5 with a sl st. TURN. {7 dc and 6 ch-1 sps}
Short Row 2
With WS facing, ch 4. (BSC in the next ch-1 sp of Short Row 1, ch 4) 5 times. Sl st in the last ch-1 sp of Short Row 1. Do not turn. {5 BSC and 6 ch-4 loops}
Row 9
With WS facing, ch 2, dc2tog over the next 2 sts, which will be the first dc of Short Row 1 and the last dc2tog of Row 8. Dc in the next 5 sts, [2 dc, tr] in the last st. TURN. {8 dc and 1 tr}
Subsequent Flower Repeats
Row 10
With RS facing, ch 2, make 2 dc in the st at the base of the ch-2. Dc in each st until 2 sts rem, dc2tog over the last 2 sts. TURN.
Row 11
With WS facing, ch 5, dc2tog over the first 2 sts. Dc in each st until 1 st rem, [2 dc, tr] in the last st. TURN.
Row 12
With RS facing, ch 2, make 2 dc in the st at the base of the ch-2. Dc in each st until 1 dc and 1 dc2tog rem before the ch-5 loop. Dc2tog over the last 2 sts. Do not turn.
Short Row 1
With RS facing, [Dc, ch 1] 6 times into the ch-5 loop. Dc into the same ch-5 loop. Join to the top of the first st of Row 9 with a sl st. TURN. {7 dc and 6 ch-1 sps}
Short Row 2
With WS facing, ch 4. (BSC in the next ch-1 sp of Short Row 1, ch 4) 5 times. Sl st in the last ch-1 sp of Short Row 1. Do not turn. {5 BSC and 6 ch-4 loops}
Row 13
With WS facing, ch 2, dc2tog over the next 2 sts, which will be the first dc of Short Row 1 and the last dc2tog of Row 12. Dc in each st until 1 st rem, [2 dc, tr] in the last st. TURN.
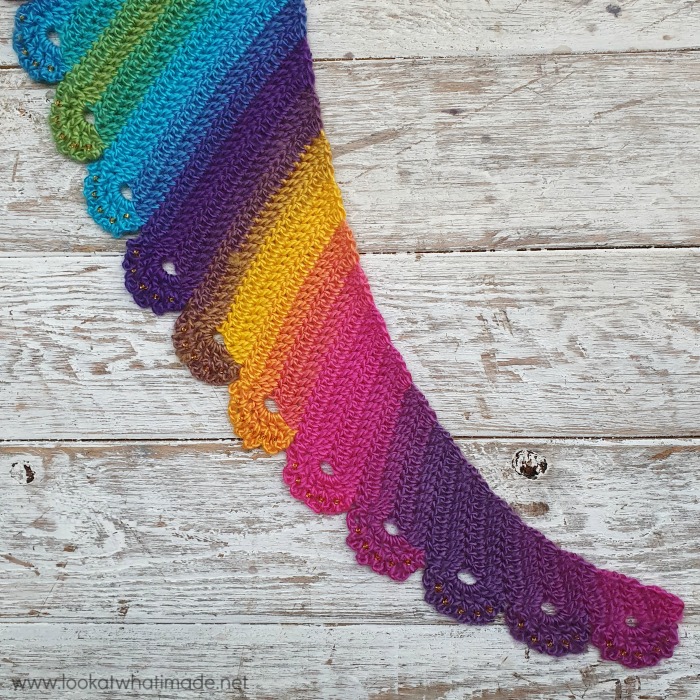
Continuing
Rows 14 – 133
Repeat Rows 10 to 13 of the pattern until you have a total of 33 Flowers along the edge of your shawl, remembering to load beads as needed.
Stitch Count at the end of Row 133: {101 dc and 1 tr}
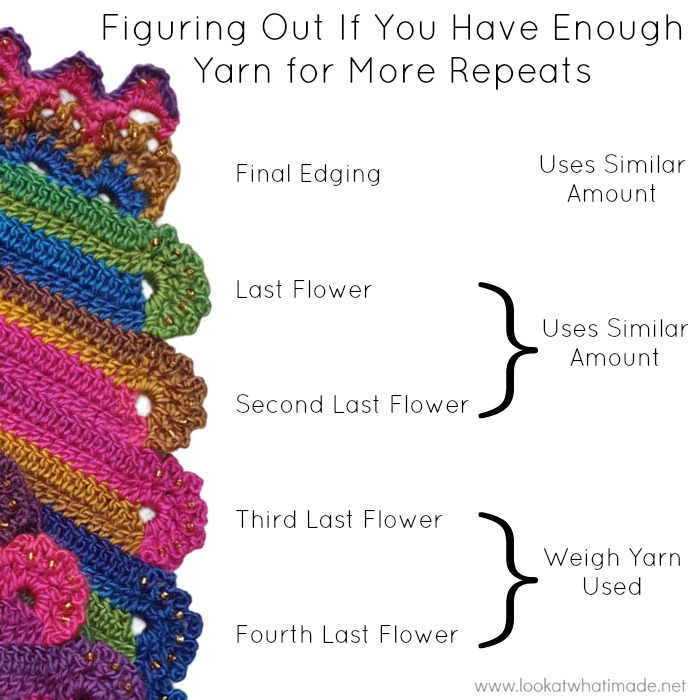
Please Note: You will need at least 30g of yarn for the last 2 repeats and 25g for the Final Edging, so weigh your yarn at the end of Row 125 (31 Flowers). If you have more than 55g left, you can continue to do another 2 repeats to bring you to 33 Flowers. If you don’t have enough yarn left, start the Final Edging after Row 125.
Customising Size
If you want to crochet a bigger (or smaller) shawl, make sure that you stop on an uneven number of total repeats/Flowers. This will give you a multiple of 6 sts in the last row, which is what you will need for the Final Edging to work out.
If you are trying to figure out if you will have enough yarn for more pattern repeats, here is what I do:
When my remaining yarn starts looking like it won’t last for many more repeats plus the Final Edging, I weigh how much yarn I use for two repeats.
- If I have less than double that amount of yarn left, I proceed to the Final Edging.
- If I have more than double that amount of yarn left, I do another two repeats and then proceed to the Final Edging.
- If I have more than three times that amount of yarn left, I make two more repeats, weigh what I have used, and reassess.
Final Edging
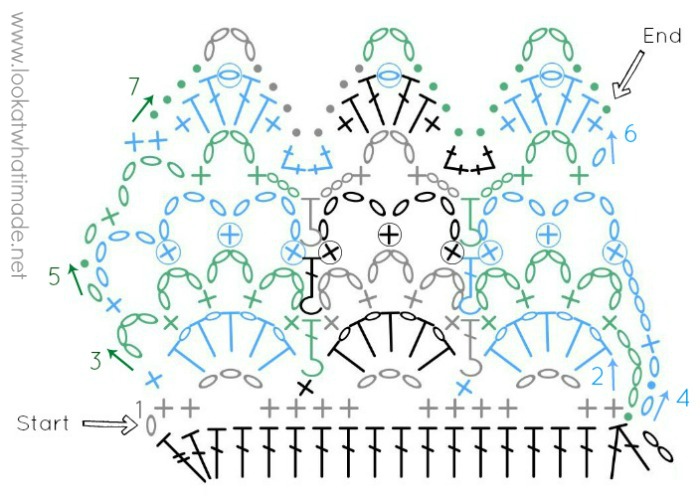
From the second Edging Row, the repeats are depicted in grey/black.
Edging Row 1
With RS facing, ch 1 (doesn’t count as a st throughout), sc in the first 2 sts. (Ch 3, skip the next 2 sts, sc in the next 4 sts) until 4 sts rem. Ch 3, skip the next 2 sts, sc in the last 2 sts. TURN.
Stitch Count: 68 sc and 17 ch-3 sps
Edging Row 2
With WS facing, ([Dc, ch 1] 4 times into the ch-3 sp. Dc into the same ch-3 sp. Skip the next 2 sc and sc in the third sc) until 1 ch-3 sp rem. [Dc, ch 1] 4 times into the ch-3 sp. Dc into the same ch-3 sp. Skip the next sc and sc in the last sc. TURN.
Stitch Count: 17 sc, 85 dc, and 68 ch-1 sps
Edging Row 3
With RS facing, (Ch 4, sc in the next ch-1 sp) 4 times. FPdc around the next sc.
*(Sc in the next ch-1 sp, ch 4) 3 times. Sc in the last ch-1 sp. FPdc around the next sc.* Rep from * to * until 1 Scallop rem. (Sc in the next ch-1 sp, ch 4) 4 times. Join by making a sl st in the first st of the last row of the shawl, which will already contain the last sc from Edging Row 1. TURN.
Stitch Count: 68 sc, 16 FPdc, and 53 ch-4 sps
Edging Row 4
With WS facing, ch 1, sl st into the first ch-4 sp. Ch 1, sc into the same ch-4 sp. (Ch 4, BSC in the next ch-4 sp) 3 times. BPdc around the next FPdc.
*(BSC in the next ch-4 sp, ch 4) twice. BSC in the next ch-4 sp. BPdc around the next FPdc.* Rep from * to * until you have worked around every FPdc. (BSC in the next ch-4 sp, ch 4) 3 times. Sc in the last ch-4 sp. TURN.
Stitch Count: 2 sc, 51 BSC, 16 BPdc, and 36 ch-4 sps
Edging Row 5
With RS facing, ch 1, sl st into the first ch-4 sp. Ch 1, sc into the same ch-4 sp. (Ch 4, sc in the next ch-4 sp) twice. Ch 3.
*FPhdc around the next BPdc. Ch 3, sc in the next ch-4 sp. Ch 4, sc in the next ch-4 sp. Ch 3.* Rep from * to * until one BPdc rem. FPhdc around the last BPdc. Ch 3, sc in the next ch-4 sp. Ch 4, sc in the next ch-4 sp. TURN.
Stitch Count: 35 sc, 16 FPhdc, 32 ch-3 sps, and 18 ch-4 sps
Edging Row 6
With WS facing, ch 1. [sc, hdc, dc, BC, dc, hdc, sc] in the first ch-4 sp.
*(Make 2 sc in the next ch-3 sp) twice. [Sc, hdc, dc, BC, dc, hdc, sc] in the next ch-4 sp.* Rep from * to * until 1 ch-4 sp rem. Make 2 sc in the last ch-4 sp. TURN.
Stitch Count: 100 sc, 34 hdc, 34 dc, 17 BC
Edging Row 7
With RS facing, skip the first sc, sl st in the next 4 sts.
*Ch 4, skip the next BC and sl st in the next 4 sts. Skip the next 2 sts and sl st in the next 4 sts.* Rep from * to * until 1 BC rem. Ch 4, skip the last BC and sl st in the next 3 sts.
Stitch Count: 135 sl st and 17 ch-4 sps
More Crochet Shawl Patterns
- My Story Shawl
- My Voyage Shawl
- Hide and Seek in the Hydrangeas Shawl

This blog post contains affiliate links. I only link to products I personally use or would use. All opinions are my own.


Isla says
Can you tell me how you managed to get full rows of single colour? Do you have to cut your yarn into colours and change at the end of each row??
Sorry if that’s a daft question!
Jenny Lowman says
Hi Isla. The yarn is graduated, and that is how the pattern worked up. No cutting of yarn involved at all :)
Charmaine says
HAVE YOU EVER THOUGHT ABOUT DOING A VIDEO TUTORIAL
Love the look of this , hope my little brain can work this pattern out.
Thanks Charmaine
Jenny Lowman says
No video on the horizon as yet, Charmaine, but do give it a go. It is a lovely pattern, and expertly written by Dedri as usual!
BW
Jenny
Kim says
I’ve just finished this scarf. It’s going to be a beautiful Christmas present for my mum. Stringing the beads nearly drove me to drink but otherwise it was a lovely make.
Is there anything I can do to stop it curling? I think I might crochet a bit tight, still very much a beginner.
Thankyou for the lovely pattern xx
Dedri Uys says
Hi Kim, I hope your mom loves it! I’m not quite sure what you mean about the curling. Have you got a photo so that I can see?
Dedri
Clarissa D Brown says
Could you please tell me which ‘Wanderlust’ color you used for the shawl? I love the vibrant colors! Thank you!
Dedri Uys says
I used Hawaii (457)
annette says
Hi Dedri,
have really enjoyed all you patterns and When I saw this shawl I just had to make it. It all went fine until I got to the end´and I counted 33 flowers but not by any counting the right amount of final stitches- I have no idea how that happened as i followed the instructions!!! Anyways I finished on a divided with 6 so all well even if the end is shorter than it should be … I´m happy with it – used my own hand spun/dyed alpaca so a little difficult to add beads so left them out… Thanks for all you great work… Stay safe -cheers Annette from a very hot Spain 33 in the shade….
Dedri Uys says
I’m glad it worked out in the end. How special that you could make it with your own spun/dyed yarn! Enjoy the heat!
Linda says
That is wonderfully bright and colorful. I love it!
Dedri Uys says
Thank you :)
Sharon says
This is absolutely beautiful! I’m only learning to crochet and can’t wait for classes to start back again so I can learn to do gorgeous things like this xx
Dedri Uys says
Hi Sharon.
Have you had a look at the video tutorials by It’s All in a Nutshell? They are really good and beginners have learned to crochet following Esther through some quite complex patterns. Give it a go!