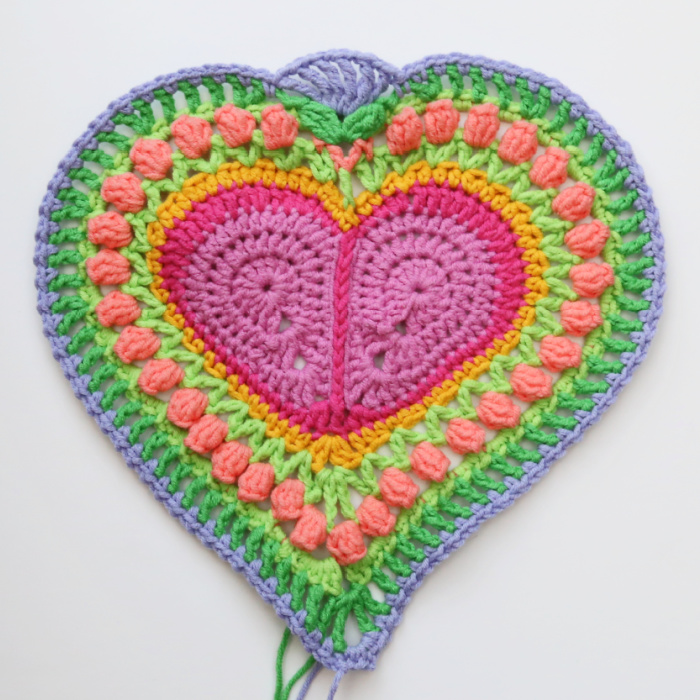
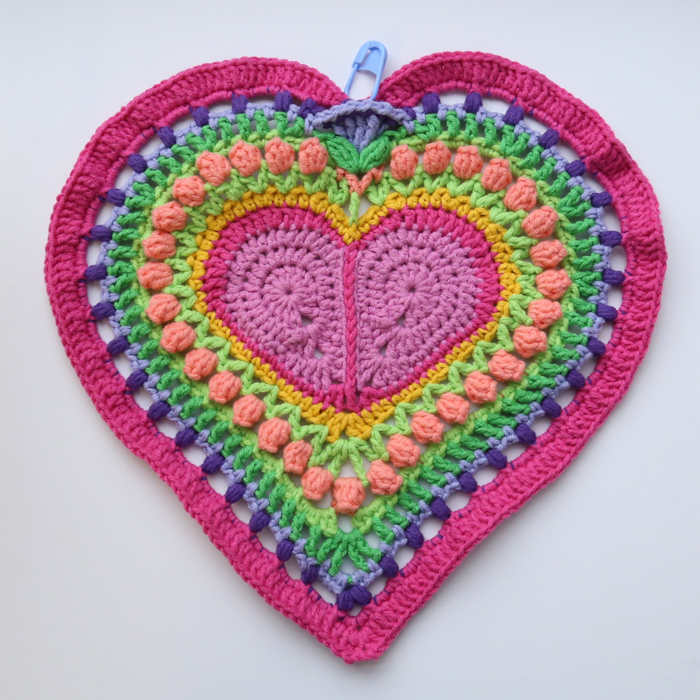
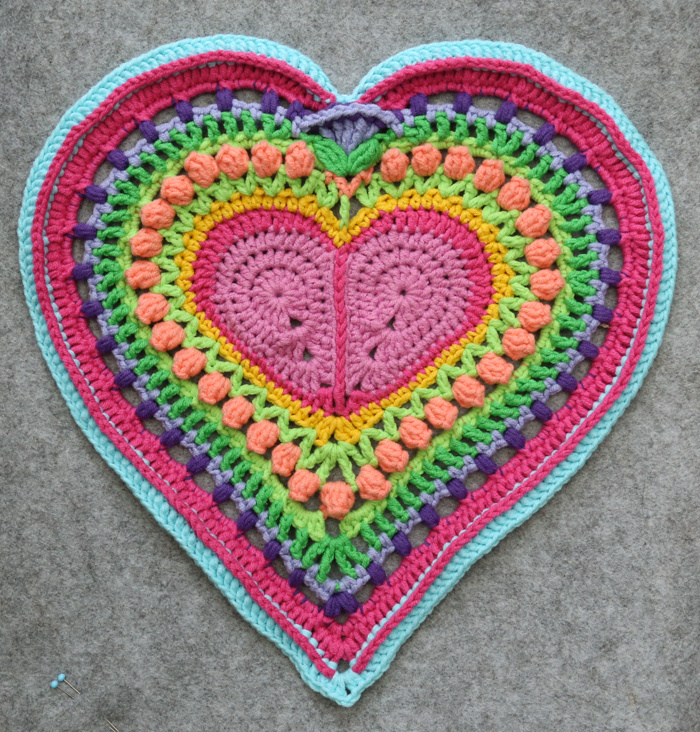
Welcome to Part 1 of the ‘I Carry Your Heart’ Mandala. In this part, I will show you how to crochet the heart motif that forms the centre of the mandala. You will need to make four hearts, following the instructions below.
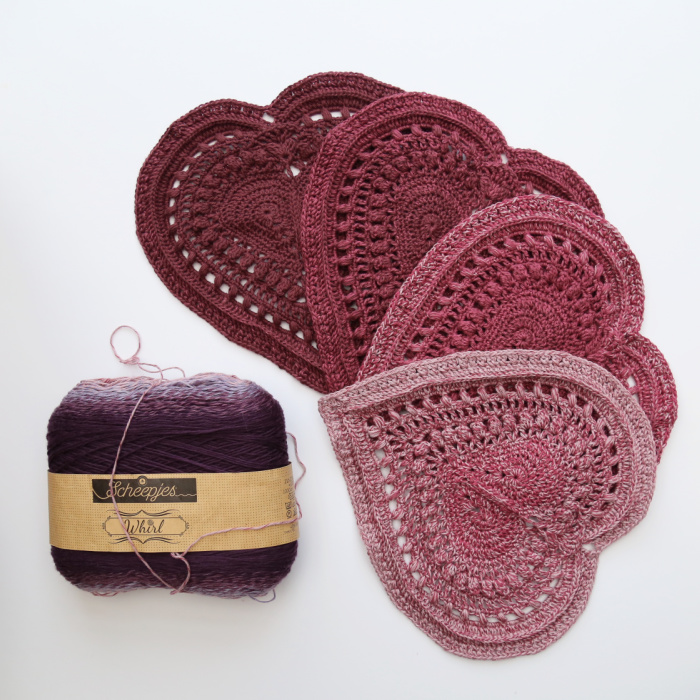
Please note that I am using Scheepjes Softfun for the tutorial photos so that it is easier to see how the rounds interact with each other. You can find the information for the Rainbow Scheepjes Softfun version in THIS POST for the Mini CAL.
Resources
- I Carry Your Heart Mandala Information (Materials, Size, Links)
- Add This Pattern to Your Ravelry Queue
- Hashtag: #iCarryYourHeartCrochet
- PDF: I will be releasing a Paid PDF for this mandala when we have shared all 3 parts. In the meantime, you can use the PDF button at the bottom of this post to save an ad-free version of Part 1 as a PDF.
Part 1 Video Tutorials
Translations
- Dutch Information Post by Michael Wassenaar
- Japanese Information Post by Masako Kawahara
Size of One Heart (Ish)
It is quite tricky to give a size for a heart. Where do you measure from and to? What I can tell you is that each heart (using Scheepjes Whirl), was roughly 25cm long and 25cm wide (depending on how I stretched it or how severely I blocked it). Each heart weighed approximately 22.5g.
If you are going to use a different yarn weight and wish to create only the heart, you will need roughly:
- 130m of double knit yarn (using a 4mm hook) to create a 29cm x 29cm heart, OR
- 170m of Aran/Worsted Weight yarn (using a 5.5mm hook) to create a 39cm x 39cm heart
Abbreviations
US Terminology
- Beg – Beginning
- BLO – Back Loop Only
- BP – Back Post
- Ch – Chain
- Dc – Double crochet
- Dtr – Double treble crochet
- FP – Front Post
- Hdc – Half-double crochet
- RS – Right side
- Sc – Single crochet
- Sp/sps – Space/spaces
- St/sts – Stitch/stitches
- SM – Stitch Marker
- Tr – Treble crochet
- WS – Wrong side
Punctuation
- * – repeat instructions between asterisks the number of times specified.
- () – repeat instructions between parentheses the number of times specified.
- [] – square brackets are used to indicate stitches to be made in the same st/sp.
Special Stitches
3-tr Bobble
Yarn over twice and insert your hook into the indicated st/sp. Yarn over and pull up a loop. (Yarn over and pull through 2 loops) twice.
Yarn over twice and insert your hook into the same st/sp. Yarn over and pull up a loop. (Yarn over and pull through 2 loops) twice.
Yarn over twice and insert your hook into the same st/sp. Yarn over and pull up a loop. (Yarn over and pull through 2 loops) twice. Yarn over and pull through all 4 loops on your hook.
Popcorn Stitch
Make 5 dc in the indicated st/sp. Remove your hook from the last dc and insert it into the first dc of the 5-dc group. Grab the last st with your hook. Pull the last st through the first st to complete the Popcorn.
Puff Stitch
Yarn over and insert your hook into the indicated st/sp. Yarn over again and pull up a long loop. (Yarn over and insert your hook into the same st/sp. Yarn over again and pull up a long loop) 3 more times. Yarn over and pull through all 9 loops on your hook. Ch 1 to close the Puff Stitch. This ch-1 will form a little loop on top of your Puff Stith, which you will work into in subsequent rounds.
Sc2tog
Insert your hook into the indicated st/sp. Yarn over and pull up a loop. Insert your hook into the next indicated st/sp. Yarn over and pull up a loop. Yarn over and pull through all 3 loops on your hook.
TrV
[Tr, ch 1, tr] in the indicated st/sp.
V-stitch
[Dc, ch 1, dc] in the indicated st/sp.
Techniques
If you need help with any of the following techniques, please see the Techniques Section for Charlotte’s Universe HERE:
- Magic Ring
- Stitch Anatomy (super helpful)
- Standing Stitches
- Post Stitches
- Omitting
- Working Away Ends
For a neater way to end your rounds when using different colours for each round or fastening off at the end of a round, see THIS TUTORIAL for the Invisible Join.
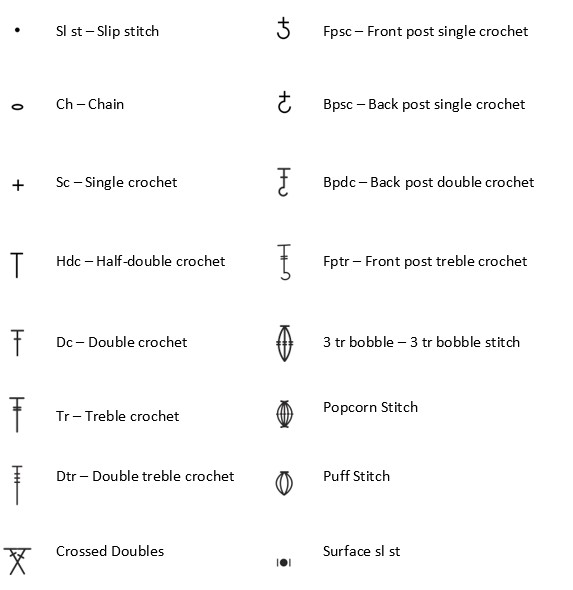
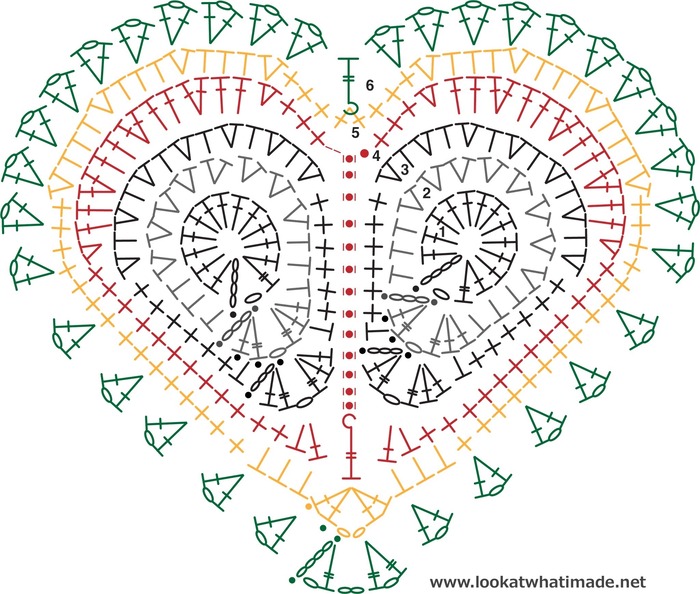
Chart Legend
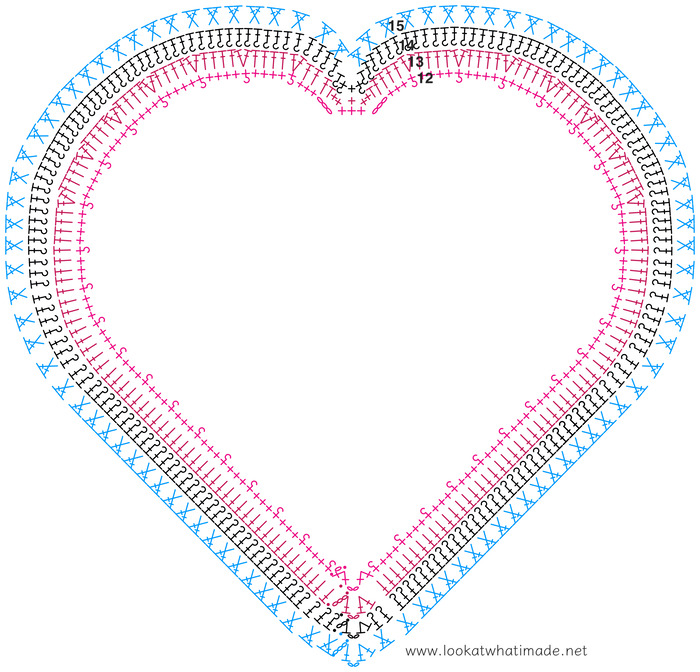
Charts by Masako Kawahara from Crochet_hmmm.
Notes
You may remove all stitch markers once you have worked into them or used them for locating yourself in the next round. Please keep the stitch markers from Round 15 in your work if you are going to continue growing your hearts into a mandala.
Instructions for Eve’s Heart
Step 1: Making the Teardrops
Make 2.
Round 1
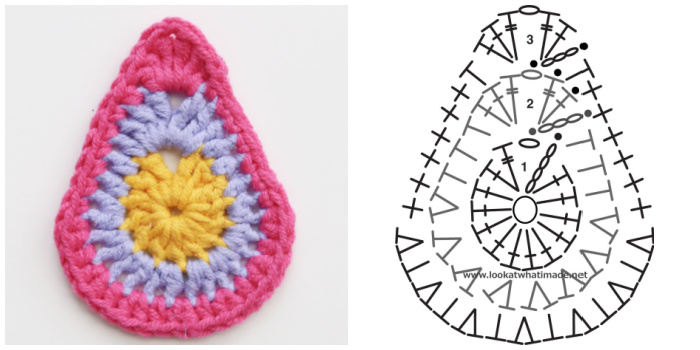
Into a magic ring: [ch 5 (counts as tr + ch-1), tr, 12 dc]. Join to the fourth ch of the beg ch-5 with a sl st. Fasten off if you are going to change colours for the next round.
Stitch Count: 12 dc and 2 tr – not including ch-1 sp
Round 2
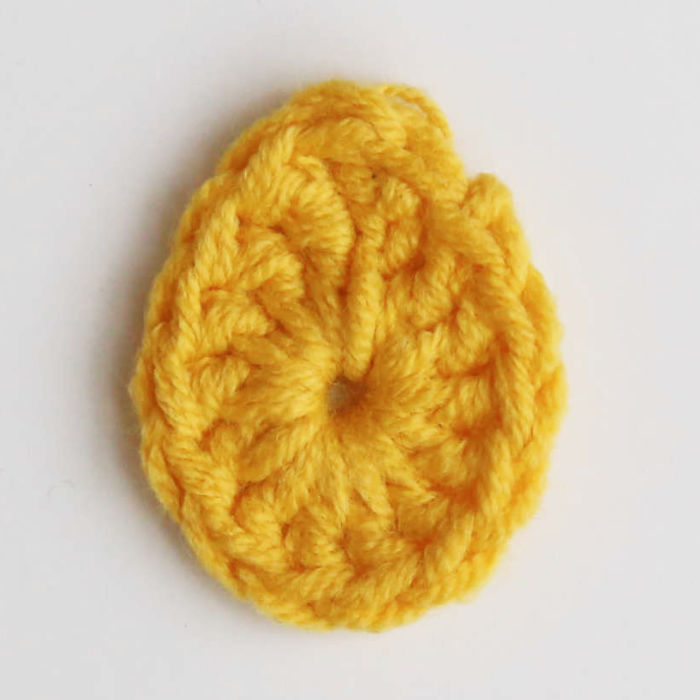
- If you are using the same colour, sl st in the next ch-1 sp. Ch 3 (counts as dc throughout).
- If you are using a new colour, join your yarn by making a standing dc in the ch-1 sp.
[Dc, tr, ch 1, tr, 2 dc] in the same ch-1 sp. Hdc in the next 3 sts. The first one will be hidden. Make 2 hdc in each of the next 8 sts. Hdc in the last 3 sts. Join to the top of the first dc with a sl st. Fasten off if you are going to change colours for the next round.
Stitch Count: 22 hdc, 4 dc and 2 tr – not including ch-1 sp
Round 3
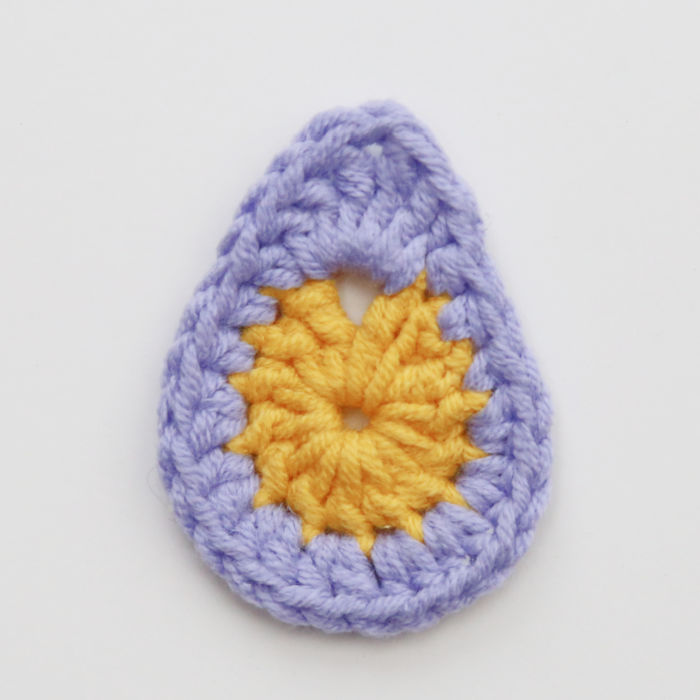
Mark the BLO of the following sts with a SM (See Photo at End of Round):
- On the first motif, mark the second hdc of the first increase and the chain of the ch-1 sp.
- On the second motif, mark the first hdc of the last increase and the chain of the ch-1 sp.
- If you are using the same colour, sl st in the next 2 sts and in the ch-1 sp. Ch 3.
- If you are using a new colour, join your yarn by making a standing dc in the ch-1 sp.
[Dc, tr, ch 1, tr, 2 dc] in the same ch-1 sp. Skip the first (hidden) st. Hdc in the next st, sc in the next 6 sts. The last sc should fall in the second hdc of the first hdc increase from the previous round. (Make 2 hdc in the next st, hdc in the next st) 6 times. Make 2 hdc in the next st, which should be the first hdc of the last hdc increase from the previous round. Sc in the next 6 sts, hdc in the last st. Join to the top of the beg ch-3 with a sl st. Fasten off and work away your ends.
Stitch Count: 12 sc, 22 hdc, 4 dc, and 2 tr – not including ch-1 sp
Step 2: Joining the Teardrops
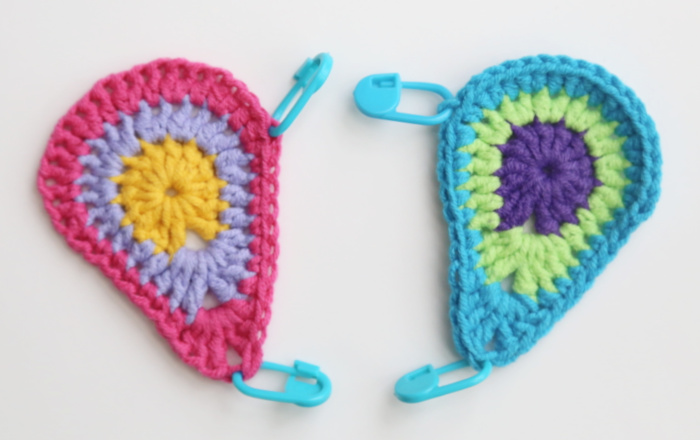
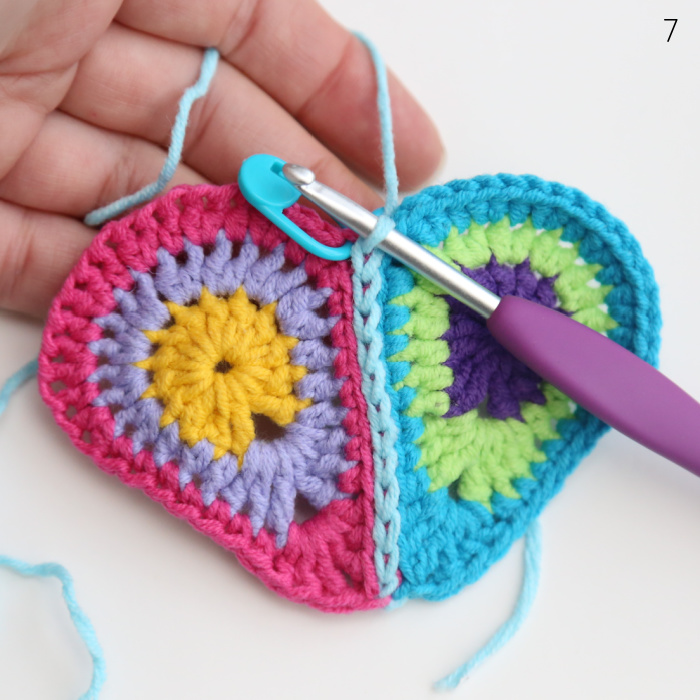
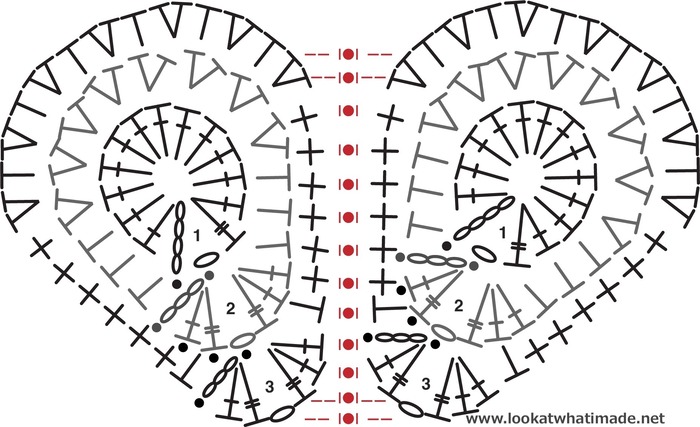
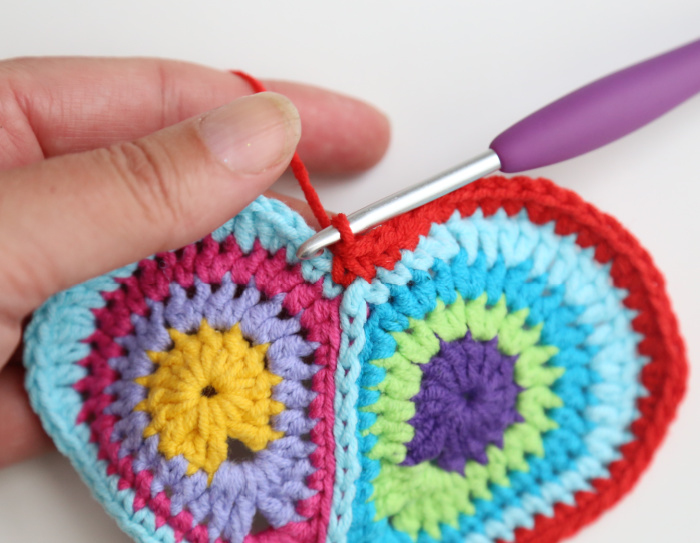
Place the two halves next to each other with their right sides facing you, and the two sets of stitch markers lined up (see Photo above).
When you place the motifs side by side like this, the v’s formed by the stitches of the last row/round of each square will be parallel to each other.
The 2 front loops will be farthest away from each other. The 2 back loops will be right next to each other. Working into these BLO, we will join the two halves of the heart using the flat zipper method.
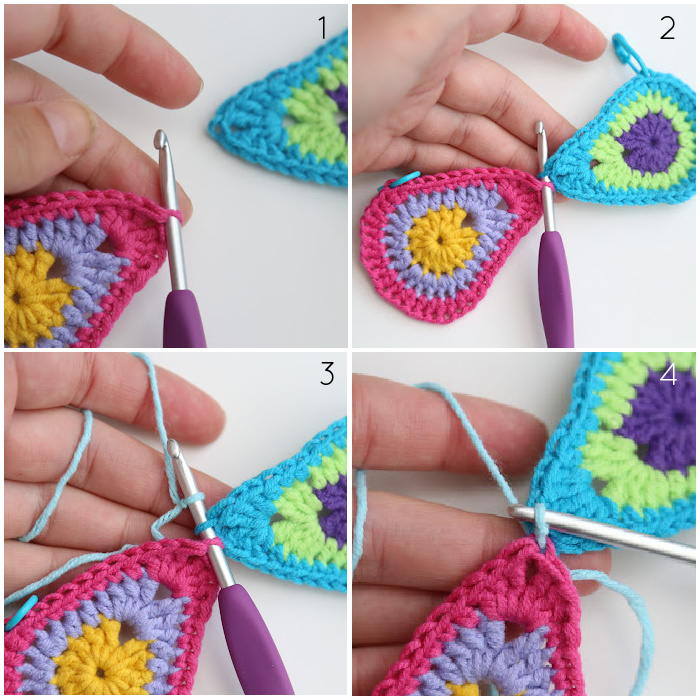
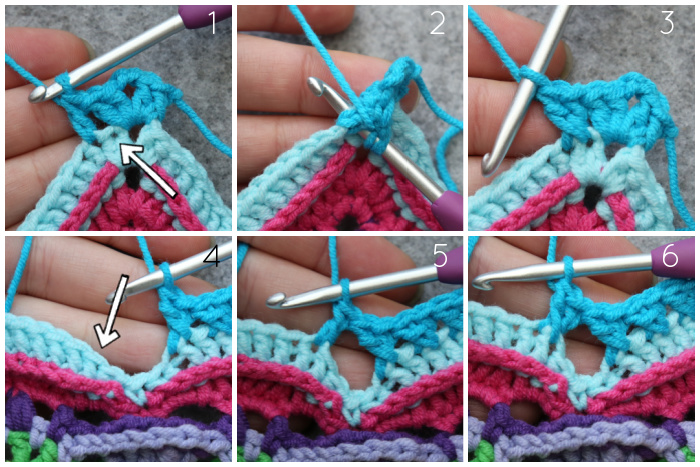
Starting with the motif to your left (right, if you are left-handed), insert your hook from front to back into the BLO of the corner ch {Photo 1}. Now insert your hook from front to back into the BLO of the corner ch of the other motif {Photo 2}. Join your yarn by placing a slip knot on your hook {Photo 3}. Pull the slip knot through both of the stitches (loops) on your hook {Photo 4}.
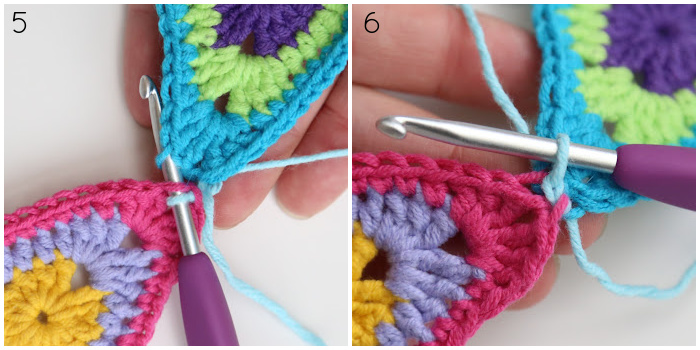
Insert your hook from front to back into the BLO of the next stitch of the motif on your left (right, if you are left-handed). Then insert your hook from front to back into the BLO of the next stitch of the other motif {Photo 5}. Grab your yarn, which will be at the back of your work, and pull through all three loops on your hook {Photo 6}.
This is your first surface sl st made. These surface sl sts will form your zipper join.
Remember to keep your tension loose. Slip stitches are not as elastic as other stitches, so if you work very tightly, your edges won’t have any “give”.
Make a surface sl st in the next 11 sts, working through both layers as above. The last surface sl st should fall in the marked sts. Do not cut your yarn. Remove SM.
Step 3: Growing the Heart
Round 4
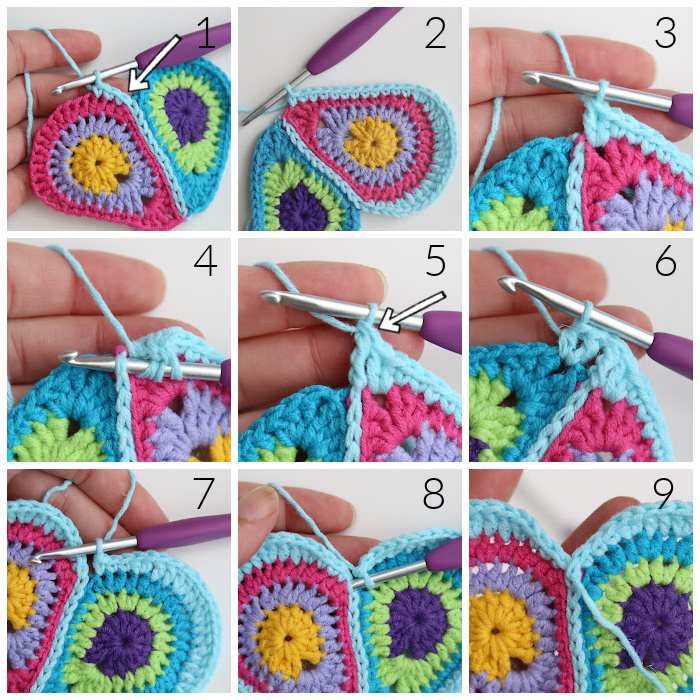
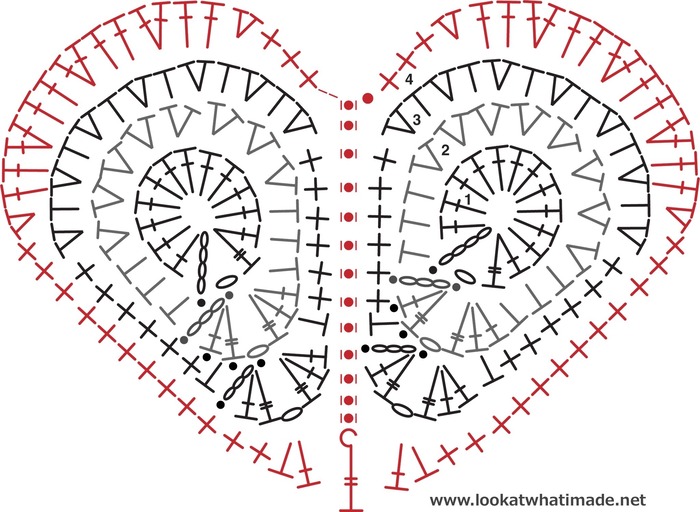
Working into the motif on your left (right, if you are left-handed), sc in the next 3 sts. Mark the first sc with a SM {Indicated with an arrow in Photo 1}.
Make 2 hdc in the next st. (Dc in the next 2 sts, make 2 dc in the next st) 3 times. Dc in the next 2 sts. Make 2 hdc in the next st. Sc in the next 12 sts {Photo 2}.
[Hdc, dc] in the next ch-1 sp {Photo 3}. FPtr into the first surface sl st. To do that, insert your hook from right to left (left to right, if you are left-handed) into the two loops of the surface slip stitch when making your tr {Photos 4 and 5}. Mark this tr with a SM.
[Dc, hdc] in the next ch-1 sp {Photo 6}. Sc in the next 12 sts, the first of which will be hidden. Make 2 hdc in the next st, dc in the next 2 sts. (Make 2 dc in the next st, dc in the next 2 sts) 3 times. Make 2 hdc in the next st, sc in the last 3 sts {Photo 7}.
Finish off by making a sl st in the last surface sl st {Photos 8 and 9}. Cut your yarn and pull the end through the middle of the stitch to the back of your work.
Stitch Count: 30 sc, 10 hdc, 30 dc, and 1 FPtr (13/11/23 – Corrected from 28 dc. Thank you to Lena Lindholm for picking up on this)
Round 5
Join your yarn by making a standing dc in the marked tr at the pointy end of the heart. [Dc, ch 2, 2 dc] in the same st.
Hdc in the next 3 sts. Sc in the next 15 sts. The last sc should fall in the dc before the second increase from the previous round. (Make 2 hdc in the next st, hdc in the next 3 sts) 3 times. Make 2 hdc in the next st. Sc in the next 3 sts.
Sc2tog, working into the last sc of the previous round and the first sc of the previous round, which will contain a SM.
Sc in the next 3 sts. (Make 2 hdc in the next st, hdc in the next 3 sts) 3 times. Make 2 hdc in the next st. Sc in the next 15 sts. Hdc in the last 3 sts.
Join to the first dc with a sl st. Fasten off if you are going to change colours for the next round.
Stitch Count: 37 sc, 40 hdc, 4 dc, and 1 ch-2 sp
Round 6
Mark the ch-1 sp of the first TrV with a SM if you are going to change colours in the next round.
- If you are using the same colour, sl st in the next st and in the ch-2 sp. Ch 5 (counts as tr + ch-1). Tr in the same ch-2 sp. This is your first TrV made.
- If you are using a new colour, join your yarn by making a standing tr in the ch-2 sp at the pointy end of the heart. [Ch 1, tr] in the same ch-2 sp. This is your first TrV made.
Ch 2. [Tr, ch 1, tr] in the same ch-2 sp. Skip the next 2 sts, the first of which will be hidden. Make a V-st in the next st. (Skip the next 2 sts, make a V-st in the next st) 5 times. (Skip the next st, make a V-st in the next st) 10 times.
Skip the next 2 sts. FPtr around the next st, which should be the sc2tog. Skip the next 3 sts.
Make a V-st in the next st, which will be the first hdc of the hdc increase from the previous round. (Skip the next st, make a V-st in the next st) 10 times. (Skip the next 2 sts, make a V-st in the next st) 5 times. Skip the last st. Join to the first tr with a sl st. Fasten off if you are going to change colours for the next round.
Stitch Count: 1 FPtr, 32 V-sts, 2 TrV sts, and 1 ch-2 corner sp
Round 7
This round will make your work curl up. Don’t worry about it.
- If you are using the same colour, sl st in the next ch-1 sp. Ch 2 (doesn’t count as a st). Make a Popcorn in the same ch-1 sp.
- If you are using a new colour, join your yarn by making a standing Popcorn in the marked ch-1 sp.
Ch 3. Mark this ch-3 sp with a SM if you are going to change colours in the next round. Make a Popcorn in the ch-2 corner sp. Ch 3, make a Popcorn in the ch-1 sp of the next TrV st. (Ch 3, make a Popcorn in the ch-1 sp of the next V-st) 15 times. Ch 3, sl st in the ch-1 sp of the next V-st. [FPdc, ch 1, FPdc] around the next FPtr. Sl st in the next V-st. (Ch 3, make a Popcorn in the ch-1 sp of the next V-st) 15 times. Ch 3 and join to the top of the first Popcorn with a sl st. Fasten off if you are going to change colours for the next round.
Stitch Count: 2 FPdc, 33 Popcorns, 1 ch-1 sp, and 34 ch-3 sps
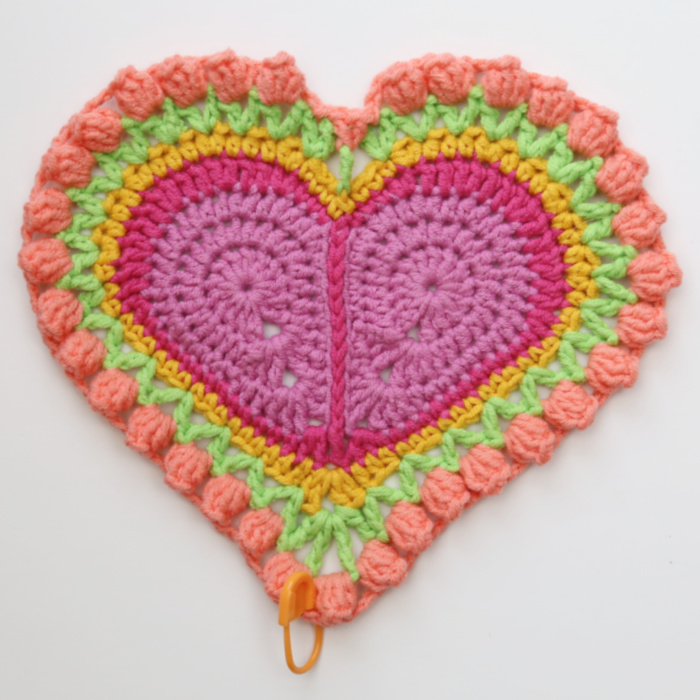
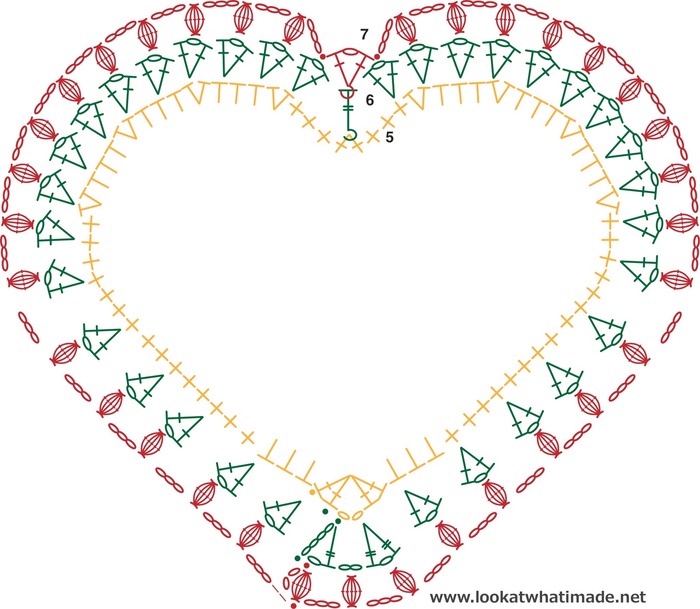
Round 8
- If you are using the same colour, sl st in the next ch-3 sp. Ch 1 (doesn’t count as a st throughout). [3 sc, hdc, dc] in the same ch-3 sp.
- If you are using a new colour, join your yarn by making a standing sc in the marked ch-3 sp. [2 sc, hdc, dc] in the same ch-3 sp.
Ch 2. [dc, hdc, 3 sc] in the next ch-3 sp. (FPsc around the next Popcorn, make 3 sc in the next ch-3 sp) 16 times. Ch 3, skip the two FPdc and the ch-1 sp. (Make 3 sc in the next ch-3 sp, FPsc around the next Popcorn) 16 times. Join to the first sc with a sl st. Fasten off if you are going to change colours for the next round.
Stitch Count: 102 sc, 32 FPsc, 2 hdc, 2 dc, 1 ch-2 sp, and 1 ch-3 sp
Mark the following sts with a SM:
- The third sc before the ch-3 sp
- The fourth st after the ch-3 sp, which will be the FPsc
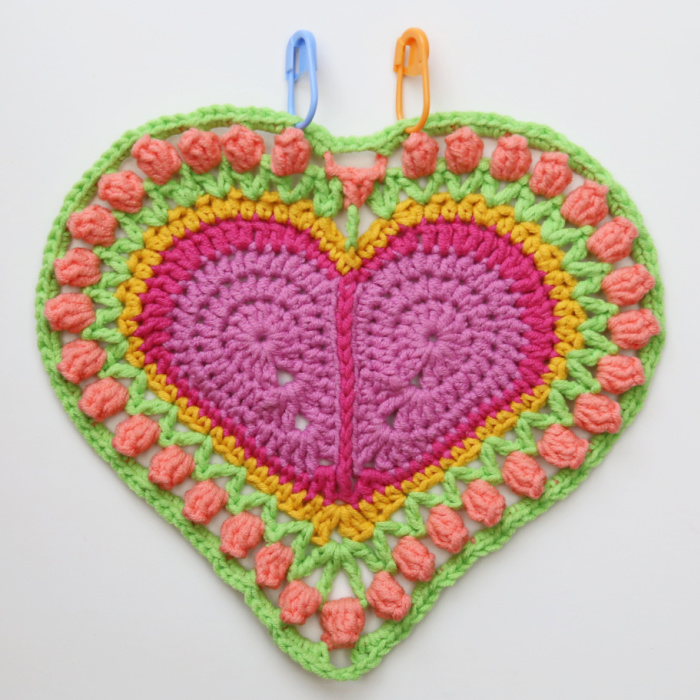
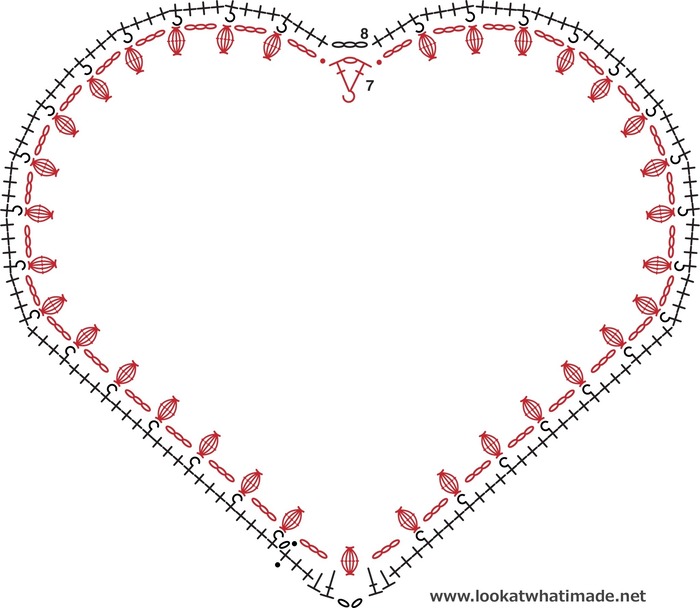
Round 9
- If you are using the same colour, sl st in the next 4 sts and the ch-2 sp. Ch 5 (counts as tr + ch-1). Tr in the same ch-2 sp.
- If you are using a new colour, join your yarn by making a standing tr in the ch-2 corner sp. Ch 1, tr in the same ch-2 sp.
Ch 2. Mark this ch-2 sp with a SM if you are going to change colours in the next round. [Tr, ch 1, tr] in the same ch-2 sp.
Ch 1, skip the next 2 sts, the first of which will be hidden. (Dc in the next st, ch 1, skip the next st) 18 times.
*Make a V-st in the next st, which should be the first sc made into a ch-3 sp. Ch 1, skip the next st. (Dc in the next st, ch 1, skip the next st) 3 times.* Repeat from * to * 2 more times.
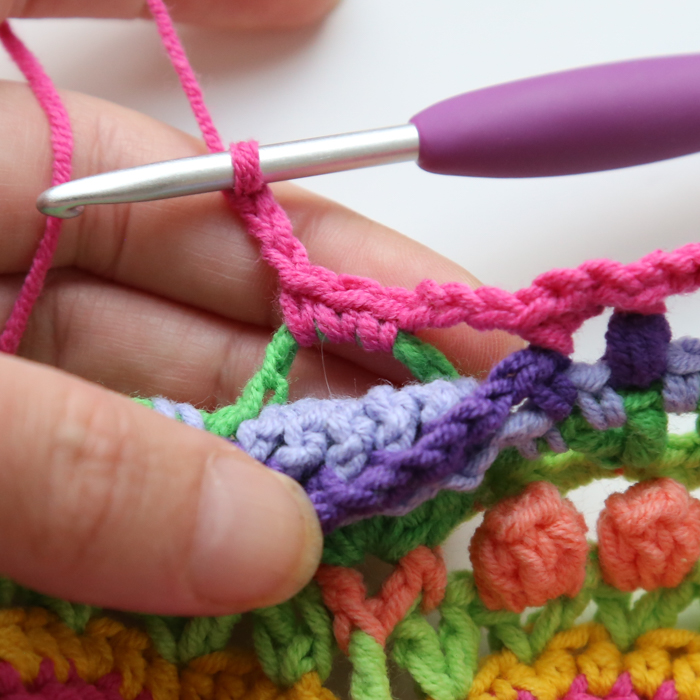
Make a V-st in the next st. Ch 1, skip the next 3 sts, sl st in the next st, which will be the first marked st from the previous round. There should now be 2 sc left before the ch-3 sp {Photo 1}.
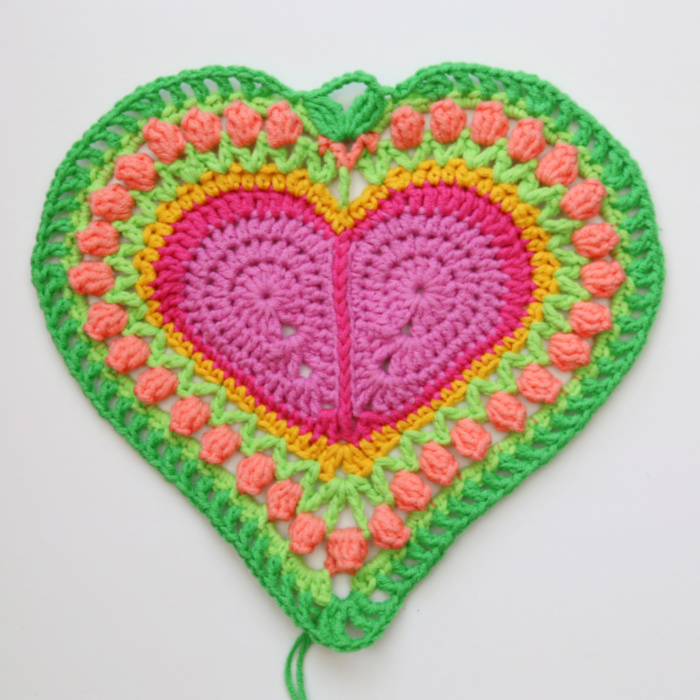
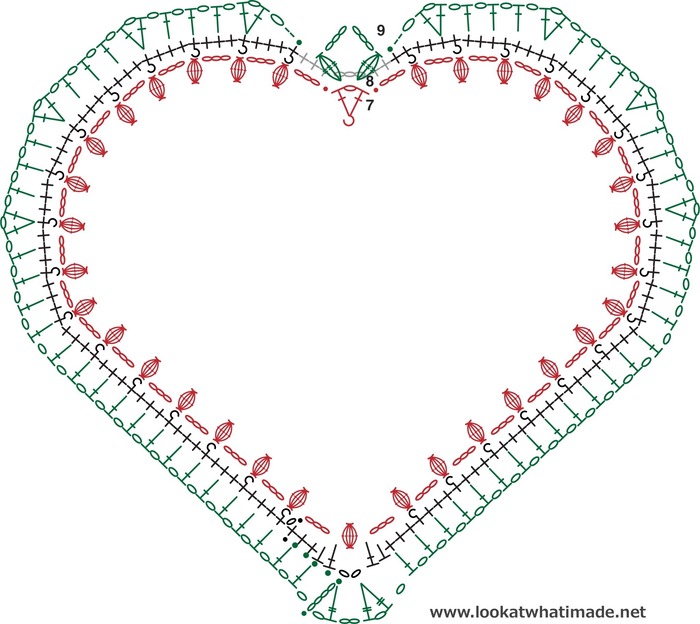
Working in front of the ch-3 sp: [3-tr Bobble, ch-6, 3-tr Bobble] in the ch-1 sp from Round 7 (between FPdc). Skip the first 3 sts of the next side and sl st in the fourth st, which will be the second marked st (FPsc) from the previous round {Photos 2 – 4}. Ch 1, skip the next 3 sts.
**Make a V-st in the next st, which should be a FPsc. Ch 1, skip the next st. (Dc in the next st, ch 1, skip the next st) 3 times.** Repeat from ** to ** 2 more times. Make a V-st in the next st, ch 1, skip the next st.
(Dc in the next st, ch 1, skip the next st) 18 times. The second dc and every second dc after that should fall in a FPsc, except for the last dc, which will fall in the last hdc. Join to the first tr with a sl st. Fasten off if you are going to change colours in the next round.
Photos 5 and 6 show what the top of your heart should look like from the front and the back.
Stitch Count: 70 dc, 4 tr, 2 3-tr Bobbles, 74 ch-1 sps, 1 ch-2 sp, and 1 ch-6 sp
Round 10
Apart from when you make the corner and the top, you will work only into the ch-1 sps from the previous round, skipping all other sts.
- If you are using the same colour, sl st in the next ch-1 sp, the next tr, and the ch-2 corner sp. Ch 1, sc in the same ch-2 sp.
- If you are using a new colour, join your yarn by making a standing sc in the (marked) ch-2 corner sp.
[Sc, ch 2, 2 sc] in the same sp. (Ch-1, sc in the next ch-1 sp) 37 times. The last sc should fall in the ch-1 sp before the sl st.
Working in front of the ch-6 sp from Round 9, make a dtr in the ch-3 sp from Round 8 (between and behind Leaves). You’ll have to dig a bit to find this ch-3 sp {Photo 1}. (Ch 1, dtr into the same ch-3 sp) 5 times {Photo 2}.
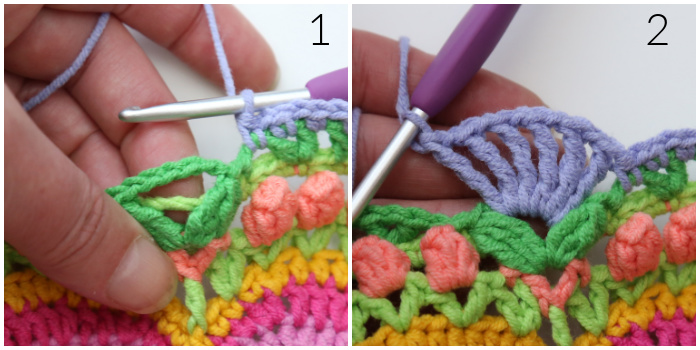
Sc in the next ch-1 sp, which should be the ch-1 sp before the first V-st of the next side. (Ch-1, sc in the next ch-1 sp) 36 times. Ch 1 and join to the first sc with a sl st. Fasten off if you are going to change colours for the next round.
Stitch Count: 78 sc, 6 dtr, 79 ch-1 sps, 1 ch-2 sp
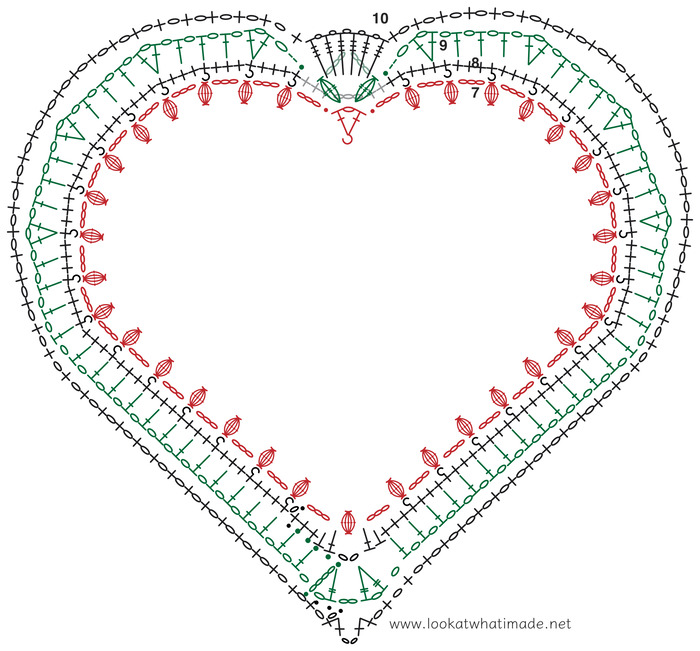
Round 11
Apart from when you make the corner and the top, you will work only into the ch-1 sps from the previous round, skipping all other sts.
Remember that the ch-1 that closes the Puff st is an extra ch and not included in the ch-2.
- If you are using the same colour, sl st in the next st and the ch-2 corner sp. Ch 1, make a Puff Stitch in the same ch-2 sp.
- If you are using a new colour, join your yarn by making a standing Puff Stitch in the ch-2 corner sp.
Ch 2, make a Puff Stitch in the same ch-2 corner sp. Mark this ch-2 sp with a SM if you are going to change colours in the next round. (Ch 2, skip the next ch-1 sp, make a Puff Stitch in the next ch-1 sp) 18 times. Ch 2, sc in the last ch-1 sp. (Ch 1, BPsc around the next dtr) 6 times. Ch 1, sc in the next ch-1 sp. Ch 2, make a Puff Stitch in the next ch-1 sp. (Ch 2, skip the next ch-1 sp, make a Puff Stitch in the next ch-1 sp) 17 times. Ch 2, join to the first Puff Stitch with a sl st. Fasten off if you are going to change colours for the next round.
Stitch Count: 2 sc, 6 BPsc, 38 Puff Stitches, 7 ch-1 sps, and 38 ch-2 sps (including ch-2 corner sp)
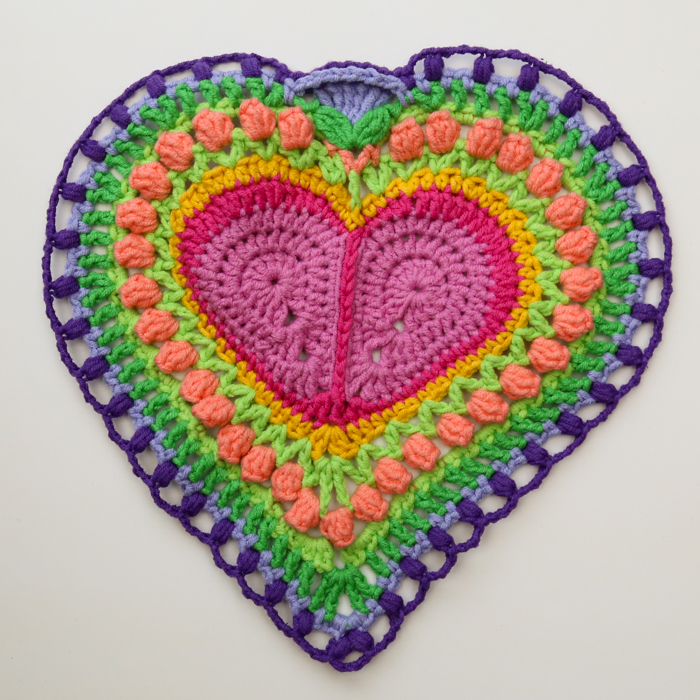
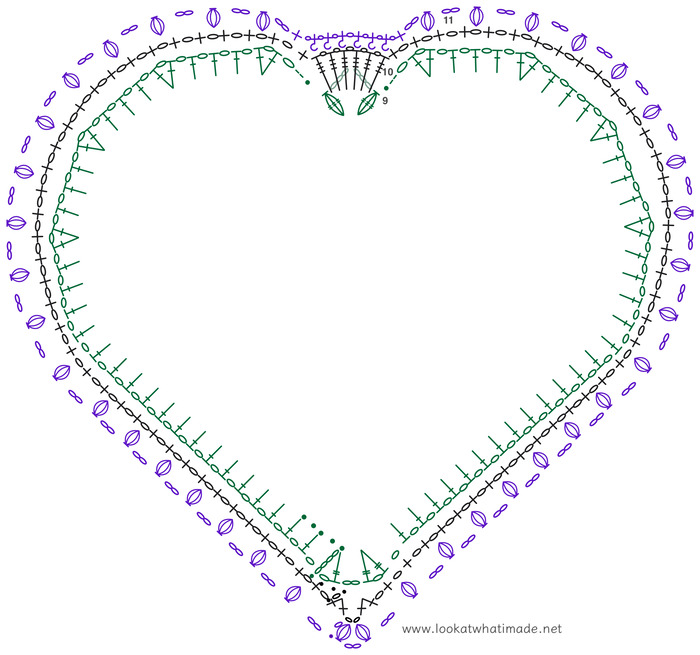
Round12
- If you are using the same colour, sl st in the ch-2 corner sp. Ch 1, sc in the same ch-2 sp.
- If you are using a new colour, join your yarn by making a standing sc in the (marked) ch-2 corner sp.
[Sc, ch 2, 2 sc] in the same ch-2 sp. (FPsc around the next Puff Stitch, make 3 sc in the next ch-2 sp) 11 times. (FPsc around the next Puff Stitch, make 4 sc in the next ch-2 sp) 7 times. FPsc around the last Puff Stitch, make 3 sc in the next ch-2 sp.
Ch 3, make 3 sc in the ch-6 sp from Round 9 (which you will find behind your work), ch 3.
Skip all the ch-1 sps, BPsc sts, and the first sc after the Flower. Make 3 sc in the next ch-2 sp, which should be before the first Puff Stitch.
(FPsc around the next Puff Stitch, make 4 sc in the next ch-2 sp) 7 times. (FPsc around the next Puff Stitch, make 3 sc in the next ch-2 sp) 11 times. FPsc around the last Puff Stitch. Join to the first sc with a sl st.
Stitch Count: 135 sc, 38 FPsc, 2 ch-3 sps, and 1 ch-2 sp
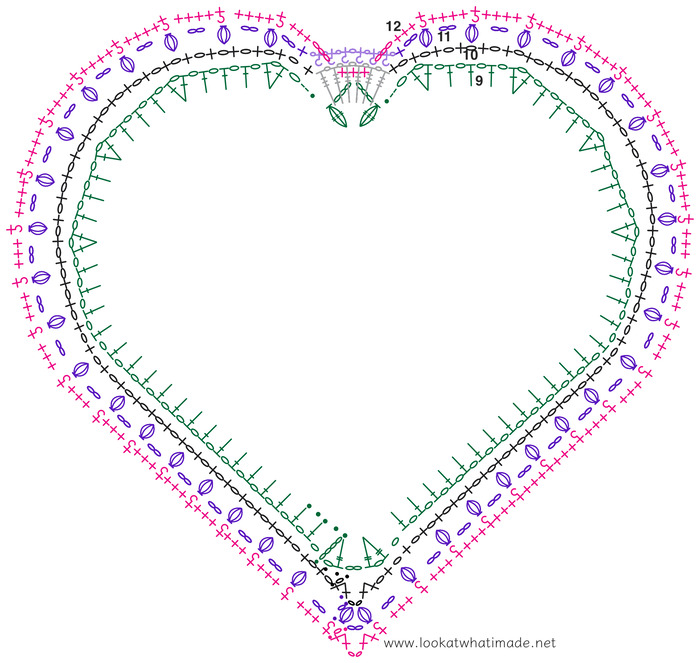
Round 13
This round will buckle. It intentionally has too many stitches in it so that we can avoid increasing in the next two rounds. It all works out in the end
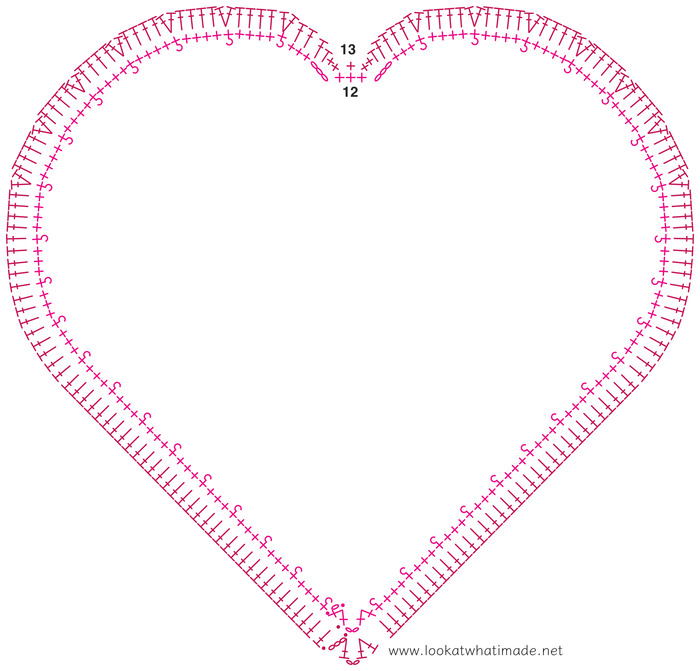
Sl st into the next sc and into the ch-2 corner sp. [Ch 3, dc, ch 2, 2 dc] in the same ch-2 sp. Skip the first (hidden) st. Dc in the next 50 sts. (Make 2 dc in the next st, which should be the FPsc. Dc in the next 4 sts) 6 times. Make 2 dc in the last FPsc, dc in the next 3 sts.
[Dc, hdc, 2 sc] in the next ch-3 sp. This should bring you to the 3 sc sts made into the ch-6 sp from Round 9. Skip the first sc, make a sc in the next sc (mark with a SM), skip the last sc. [2 sc, hdc, dc] in the next ch-3 sp.
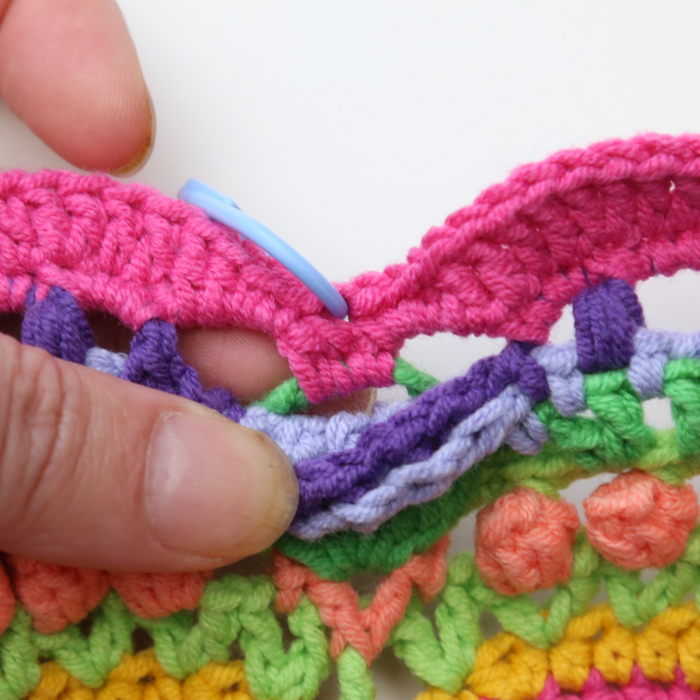
Skip the next st, dc in the next 2 sts. (Make 2 dc in the next st, which should be the FPsc. Dc in the next 4 sts) 6 times. Make 2 dc in the next st, which should be the FPsc. Dc in the next 51 sts. Join to the first dc with a sl st. Fasten off if you are going to change colours for the next round.
Stitch Count: 5 sc, 2 hdc, 188 dc, and 1 ch-2 corner sp.
Round 14
- If you are using the same colour, sl st in the next st and in the ch-2 corner sp. Ch 2 (counts as hdc).
- If you are using a new colour, join your yarn by making a standing hdc in the ch-2 corner sp.
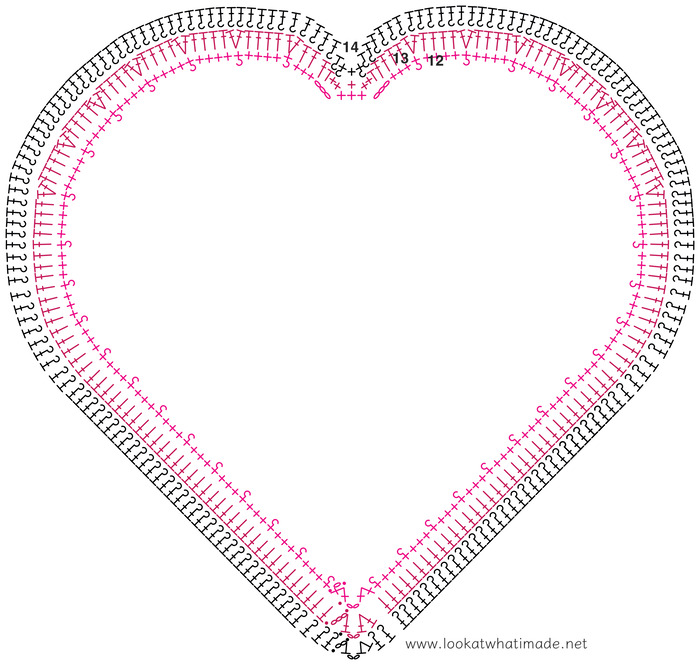
[Hdc, ch 2, 2 hdc] in the same ch-2 sp. BPdc in the next 94 sts. BPhdc in the next st, BPsc in the next st. There should now be one sc left before the marked st. Skip this sc and make a sc into the marked st. Skip the next sc. BPsc in the next sc, BPhdc in the next hdc. BPdc in the next 94 sts. Join the the first hdc with a sl st. Fasten off if you are going to change colours for the next round.
Stitch Count: 1 sc, 2 BPsc, 4 hdc, 2 BPhdc, 188 BPdc, and 1 ch-2 corner sp
Round 15
Mark the following sts with SM:
- First Side: last dc of 22nd Crossed Double
- Second Side: first dc of 27th Crossed Double
- If you are using the same colour, sl st in the next st and in the ch-2 corner sp. Ch 3.
- If you are using a new colour, join your yarn by making a standing dc in the ch-2 corner sp.
[Dc, ch 2, 2 dc] in the same ch-2 sp.
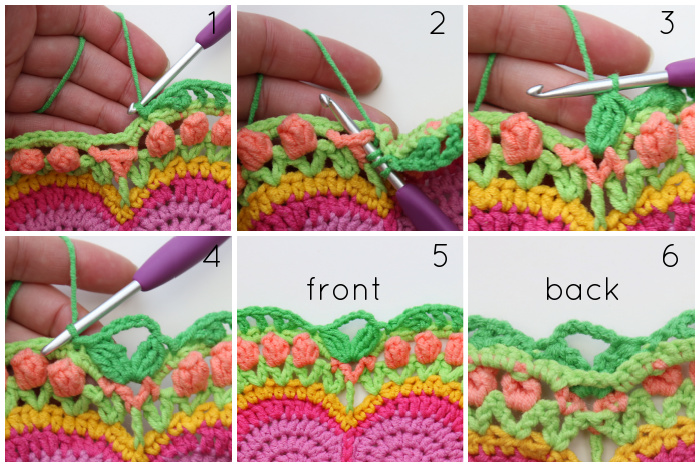
Skip the next 2 sts, the first of which will be hidden. Dc in the next st {Photo 1}. Dc in the last skipped st, working OVER the previous dc {Indicated with an arrow in Photo 1 and illustrated in Photos 2 and 3}. This is your first Crossed Double made.
(Skip the next st, dc in the next st. Dc in the skipped st, working OVER the previous dc) 47 times.
Skip the next 5 sts, the second of which will be the central sc from the previous round. Dc in the next st {Indicated with an arrow in Photo 4 and illustrated in Photo 5}. Dc in the last skipped st, working OVER the previous dc {Photo 6}. Take a moment to ensure that there are 4 skipped sts between the last Crossed Double of the first side and the first Crossed Double of the second side.
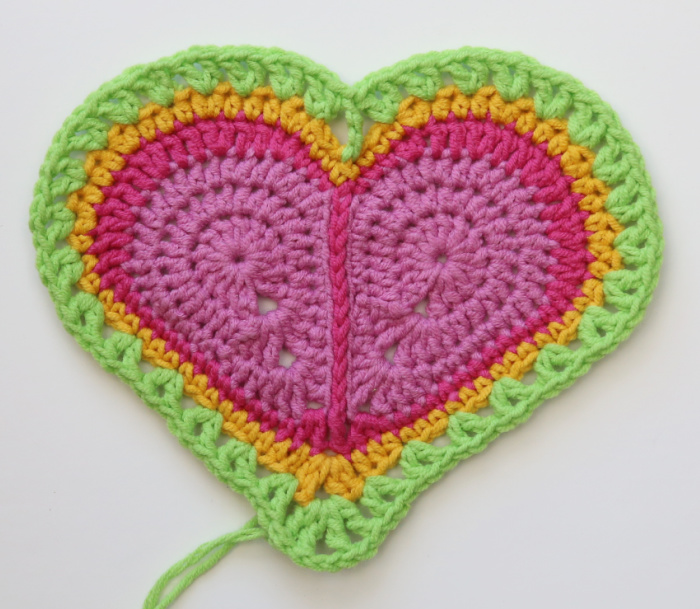
(Skip the next st, dc in the next st. Dc in the skipped st, working OVER the previous dc) 47 times. Join to the first dc with a sl st. Fasten off and work away your ends.
Stitch Count: 4 dc, 96 Crossed Doubles, and 1 ch-2 sp.
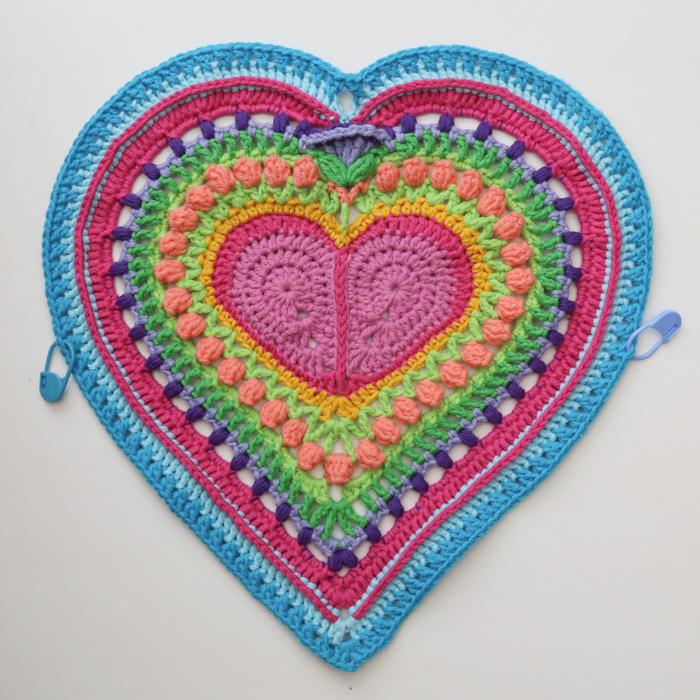
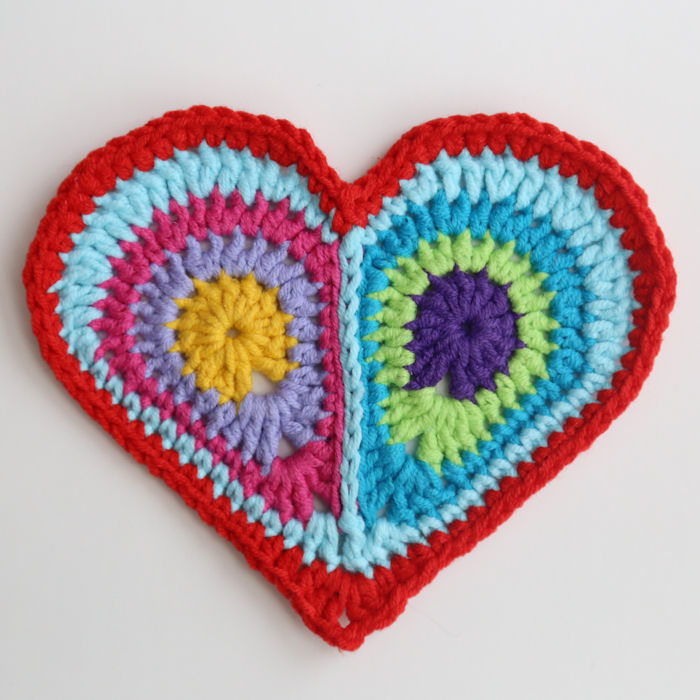
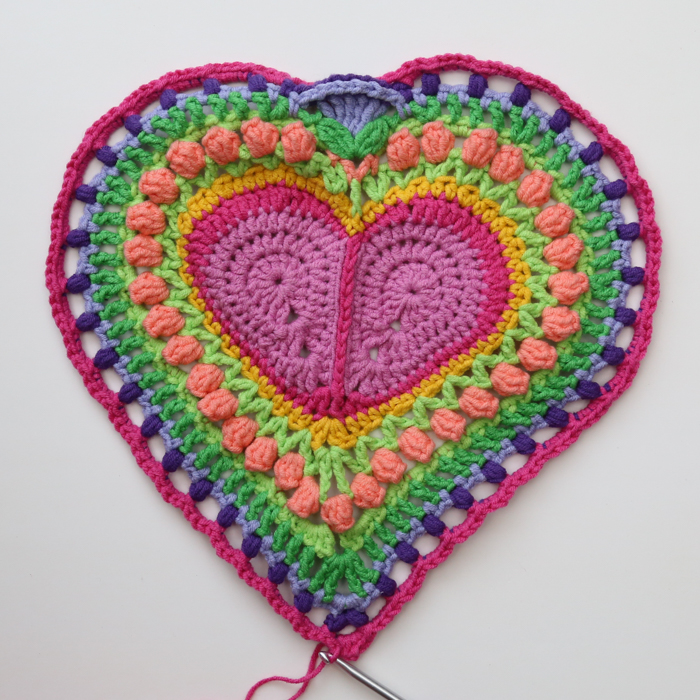
Brilliant! You’ve made your first heart. You will need to repeat this 3 more times so that you end up with 4 hearts in total.
Next week, we will join the four hearts to each other and start planting the Corner Flowers that will fill the space between them.
I hope you have enjoyed making these hearts! Please don’t forget to use #iCarryYourHeartCrochet if you share your work x

This blog post contains affiliate links. I only link to products I personally use or would use. All opinions are my own.


Odiete Mary says
Hi Lena
I didn’t get how to do it because of I don’t know how to do some of the terminologies
Jenny Lowman says
Hi Odiete,
Maybe you need some practice at the different stitches/terms before you try this pattern? Dedri has photo tutorials for many crochet stitches on the blog.
Susanna says
Hi Dedri! I’m planning on starting #icarryyourheart as soon as the shops open after Easter!
You suggest using Whirl, will the yarn‘s natural colour change allow me to make each heart in a different shade or will I need to cut the yarn to get to the next shade? Thanks in advance ❤️
Jenny Lowman says
Hi Susanna,
The colour changes will vary between each whirl cake. Some have long, soft transitions and some shorter. Some are tonal changes, and some more vibrant and noticeable like Jumpin Jellu for eg.
Lena Lindholm says
Also on round 6 something is wrong:
After making 10 times v stitch at the end of the round you write skip the next 2 sts for making the last v sts, only skip 1 st there
Dedri Uys says
Hi Lena, on the second half of the heart, it starts with ‘Skip 3 sts. Make a V-st in the next st’, followed by (Skip the next st, make a V-st in the next st) 10 times. This gives you 11 V’sts. After this, you will skip 2 between V-sts 5 times, followed by skip the last st. Perhaps this chart will help: https://drive.google.com/file/d/13mIftAqjgK5taY7YOghFOK-A5sJV1eES/view?usp=sharing
Lena Lindholm says
Hi again,
on round 4 its.
3x4dc=12
2 dc
1dc
1dc
2dc
3×4=12
Makes 30 dc
Jenny Lowman says
Ha, I do believe you are correct! I will mention it to Dedri. :)
Dedri Uys says
Thank you for picking up on this Lena. I have corrected it now and have mentioned you in the correction.
Lema Lindholm says
Hi, On round 4 its 30 dc and not 28? can you plz check it out
Jenny Lowman says
Hi! The count is 28 dc stitches in round 4. 3x4dc=12. +2dc=14. +1dc=15. +1dc=16. +3x4dc=28.
Ingrid says
I found part 1, could you please provide link for part 2 for the carry my heart mandala pattern.
Thank you
Dedri Uys says
You can find Part 2 HERE. The links for each of the 3 parts will be added to the information post as they become available.
Lyndall says
Hi, did you notice that you haven’t added a title for Round 7, cheers lyndall, great pattern
Dedri Uys says
I hadn’t. Thank you for pointing it out :)
Kay says
You are a gem, your patterns are beautiful and your heart is very kind to share your exquisite work with so many like minded people…Thank you