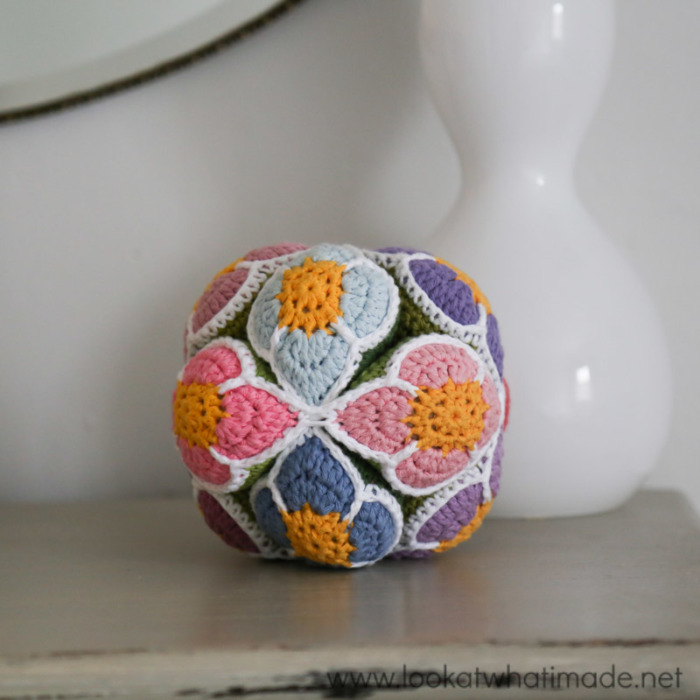
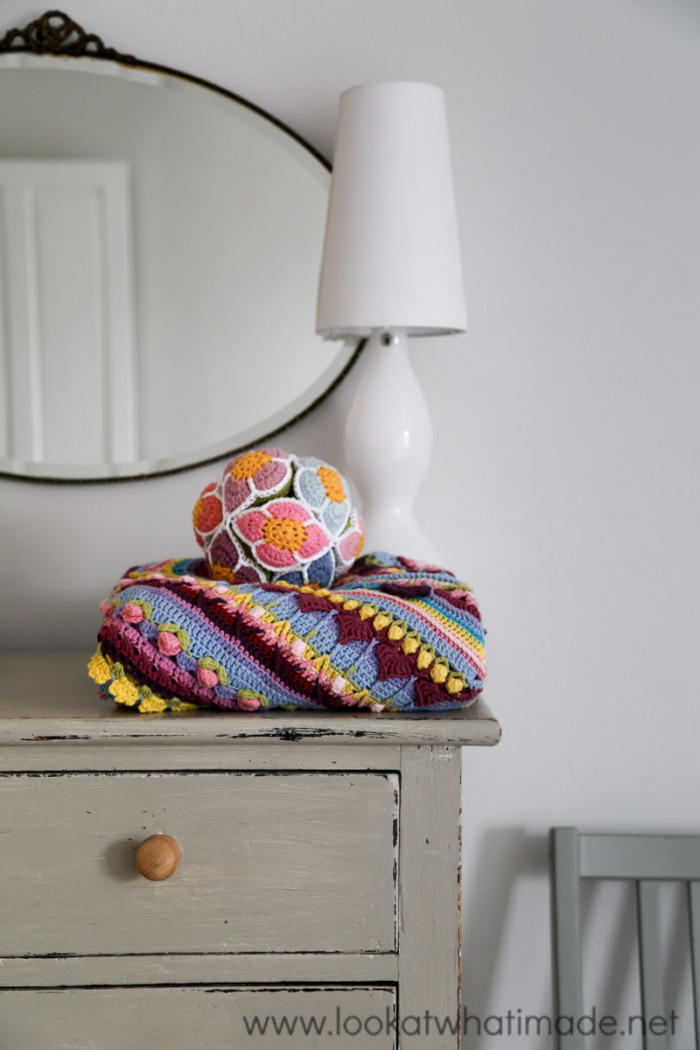
This crochet flower ball is based on the traditional Amish puzzle ball and as such comes apart into three segments that have to be assembled to form the ball. I wrote this pattern in 2011, but as it was one of my first patterns, it was sorely in need of a bit of tlc, so I have re-done it with clear photos and some better yarn.
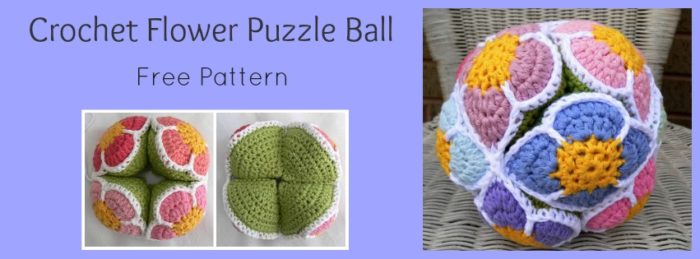
I remain obsessed with puzzle balls and their possibilities. If you have not seen my Amamani (Amigurumi Amish Puzzle Animals) yet, you can find them HERE. The animals also come apart into segments so that little hands can have fun building AND playing.
Materials
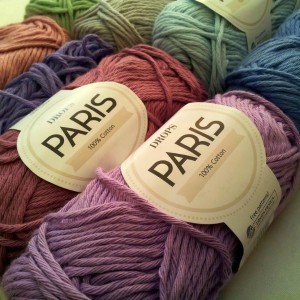
I have used Drops Paris Cotton and a 4 mm crochet hook (US G/6 UK 8) for my Crochet Flower Ball, but you can use any yarn and hook you fancy.
I do suggest NOT using a yarn that has a lot of stretch, as you will want to stuff the wedges quite tightly without them stretching too much.
You will need:
- 4 mm Clover Amour Crochet Hook
(US 6/G UK 8)
- Double knit yarn in green for the wedges – about 15 m/16 yards per wedge (there are 12 wedges)
- Double knit yarn in any colours you choose for the flowers – less than 2 m/2.2 yards for the center and about 7 m/7.5 yards for the petals per flower (there are 12 flowers)
- Double knit yarn in a contrasting colour for attaching the flowers to the wedges – about 35 m/38 yards
- A yarn needle for working away your yarn ends
- About twice as much stuffing as you think you will need
Abbreviations
US Terminology used. {US/UK Comparison Chart HERE}
| Ch | Chain |
| Dc | Double crochet (Flower Pattern) |
| Dc inc | Double crochet increase (Flower Pattern) |
| Fpdc | Front post double crochet |
| Hdc | Half double crochet (Flower Pattern) |
| Hdc inc | Half double crochet increase (Flower Pattern) |
| Sl st | Slip stitch |
| Sc | Single crochet |
| St/sts | Stitch/stitches |
| * | Repeat all instructions between asterisks the amount of times specified. |
Additional Notes
The initial ch st’s in each round are NOT counted as stitches.
Translations
- Czech Translation by Inka Lakatošová
- Dutch Translation by Elke Wellens from HetHaakBeest
- Japanese Translation by Masako Kawahara from Crochet Hmmm
Crochet Flower Ball Pattern
© Dedri Uys 2011. All Rights Reserved. Please see my Terms of Use.
Updated November 2013
Flowers
{Make 12}
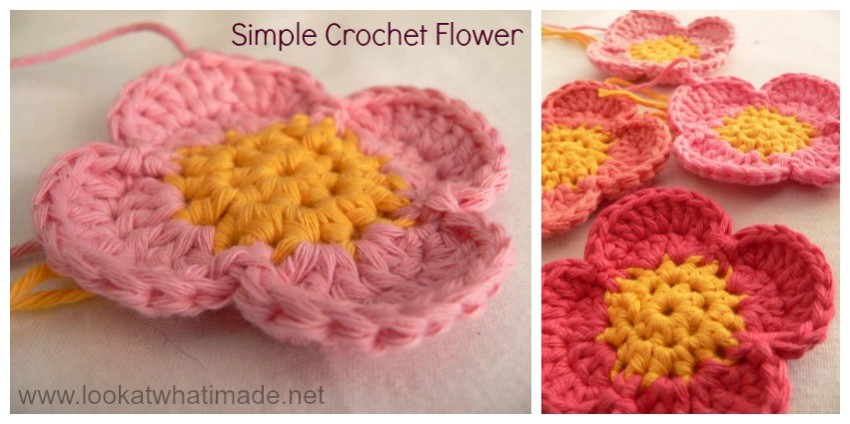
Make 12 flowers following this Simple Crochet Flower pattern. When you fasten off each flower, don’t work away your yarn ends. You can if you really really want to, but the ends will be hidden inside the wedges when you assemble them, so don’t bother.
Wedges
{Make 12}
- Ch 2. Make 4 sc in the second ch from the hook. Ch 1 and turn. {4}
- Sc inc in each of the 4 sts. Ch 1 and turn. {8}
- *Sc inc in the next st, sc in the next stitch* x 4. Ch 1 and turn. {12}
- *Sc inc in the next st, sc in the next 2 sts* x 4. Ch 1 and turn. {16}
- *Sc inc in the next st, sc in the next 3 sts* x 4. Ch 1 and turn. {20}
- *Sc inc in the next st, sc in the next 4 sts* x 4. Ch 1 and turn. {24}
- *Sc inc in the next st, sc in the next 5 sts* x 4. Ch 1 and turn. {28}
- *Sc inc in the next st, sc in the next 6 sts* x 4. Ch 1 and turn. {32}
- *Sc inc in the next st, sc in the next 7 sts* x 4. Ch 1 and turn. {36}
- *Sc inc in the next st, sc in the next 8 sts* x 4. Ch 1. {40}
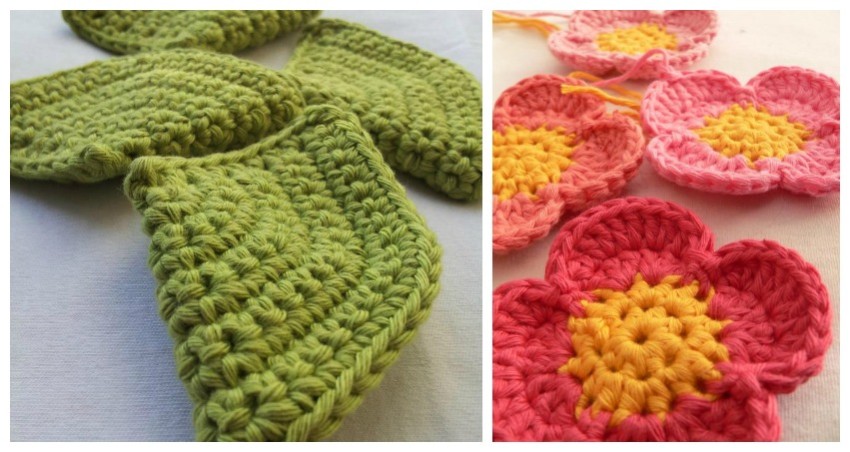
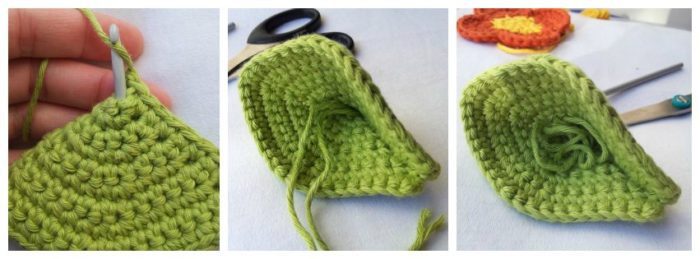
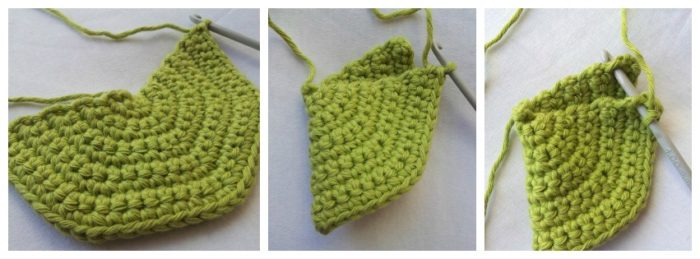
Fold the resulting half-circle (for lack of a better description) in half, with the side farthest away from the hook to the back. Place the initial tail of yarn INSIDE the folded wedge (not dangling out like in the photos below), to save yourself some working-away later on.
Insert your hook into the first row down the side of the wedge (through both layers) and make a sc. Make 8 more sc along this edge, working through both layers of each row. Ch 1 and fasten off. I have done it in yellow so that you can see it better, but you will obviously be doing it in the same colour as the wedge.
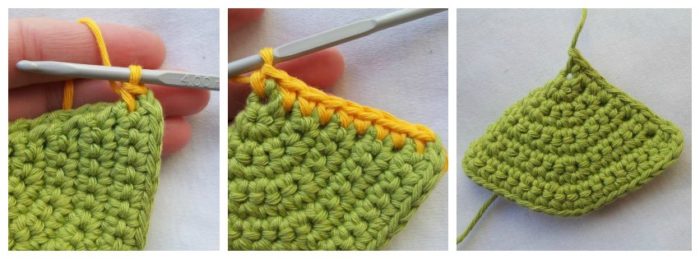
To get rid of that final yarn end, poke your crochet hook into the pointy end of the wedge from the inside of the wedge to the outside. Yarn over with the final end and pull it into the wedge. Use both yarn ends as part of the stuffing for your wedges later on.
Attaching the Flowers to the Wedges
Remember to place the yarn ends INSIDE the wedges as you crochet them shut.
You are going to be attaching the flowers to the wedges in strips of 4, which you will then join together to form your segments (or rings). If you are confused at this point, don’t worry. As you work, all will become apparent. If you are REALLY confused, scroll down and have a look at all the photos before you continue.
Take one of your flowers and place it over the opening of one of the wedges, making sure that the sc seam of the wedge is to your right (left if you are left-handed). You want the right side of the flower to be facing out and it should sit over the wedge like a lid.
Take the yarn you are going to use to attach the flowers to the wedges and make a slip knot. With this slipknot already on your hook, insert your hook into the st after the sl st join of the flower AND into the first st of the last round of the wedge. Make a sc through both layers.
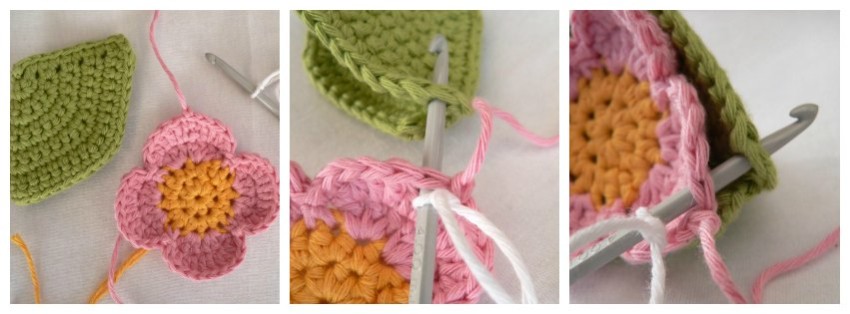
Make 4 more sc, working into each st of the flower AND the wedge. This will bring you to the 2 sl sts. Fpdc around the vertical post of the st 3 rounds below. In this case, it will be the yellow vertical post below the join of the petals.
Skip the 2 sl sts between petals and make 10 sc, working into the stitches of the next petal AND the next 10 sts of the wedge (through both layers). Fpdc around the vertical post as before and skip the 2 sl sts. Make 5 sc, working through the first 5 sts of the next petal AND the next 5 sts of the wedge. At this point ,you have attached half the flower to half the wedge.
Now you will attach the next flower in the same way.
*Starting in the st after the sl st on the next flower AND the first st of the next wedge, make a sc as before. Make 4 more sc through both layers. Fpdc around the yellow stitch below the join of the petals and skip the 2 sl sts at the join. Make 10 sc through the stitches of the next petal AND the next 10 sts of the wedge. Fpdc around the post of the st 3 rounds down (as before) and skip the 2 sl sts at the join of the petals. Make 5 sc, working through the first 5 sts of the next petal AND the next 5 sts of the wedge.* 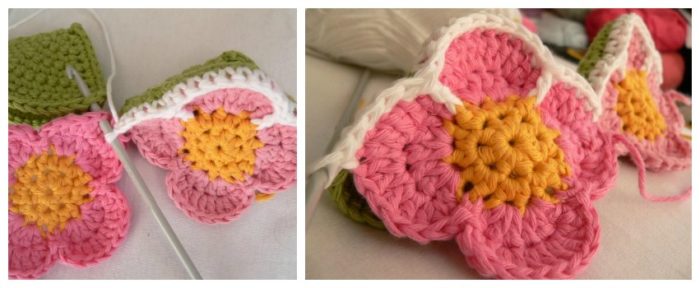
Attach the next 2 flowers and wedges in the same way, repeating the instructions between asterisks (*) above. You should end up with a strip of 4 flowers and wedges, each attached to the next on one side only.
You will now “close” the wedges, so continuing around the fourth wedge, repeat the instructions between asterisks above.
Remember to stuff your wedge thoroughly before closing it completely. If you use too little stuffing, your ball will be lifeless and slightly blah. If you use too much stuffing, you are going to struggle VERY much to assemble your ball. I over-stuffed this one a tiny bit, so I can’t see any of us taking it apart and building it very much. But the resulting ball is surprisingly heavy and the boys love it!
At the bottom of this pattern, you can find out about using stuffing bombs to prevent stuffing from poking out through the stitches.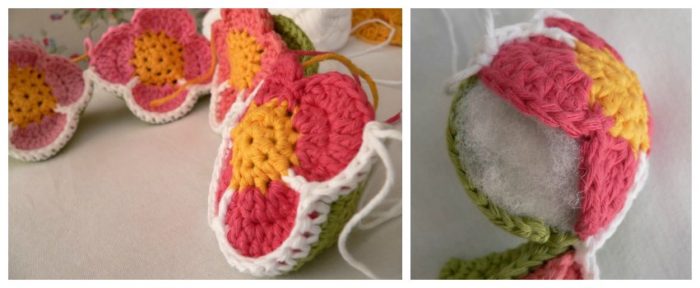
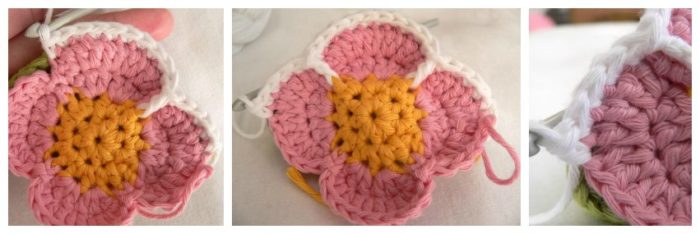
When you have finished working the stitch pattern between asterisks, you should have worked into each stitch of the last flower AND each stitch of the wedge, bringing you to the junction between flowers. Sl st into the first st of the flower (which already contains a sc) and then sl st into the first st of the next flower (which also already contains a sc) – indicated with arrows in the photo below. Keep your tension very tight when you are making these sl sts. You don’t want a gaping hole between flowers.
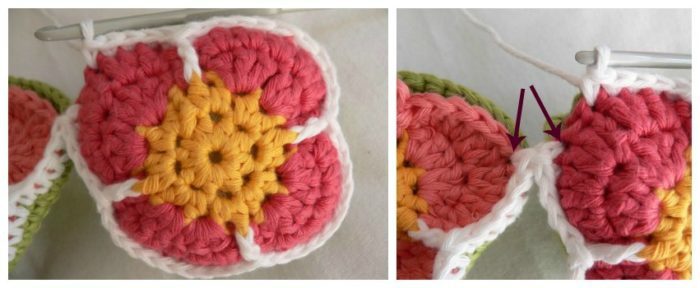
Now repeat the instructions between asterisks above for each remaining flower, starting in the next available stitch of the flower AND remembering to work through both layers. Remember to stuff as you go. Remember to sl st into the stitches on either side of the junction (as above) between flowers.
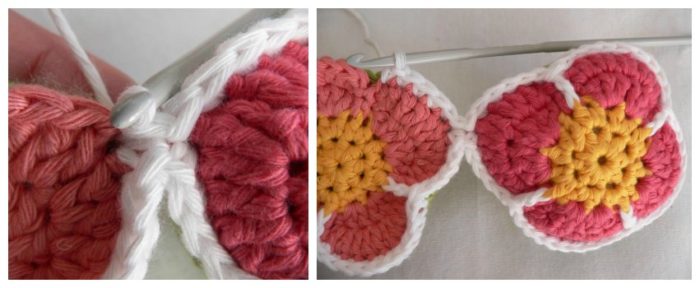
When you have closed all four wedges, sl st in the first st of the first flower (indicated with an arrow below).

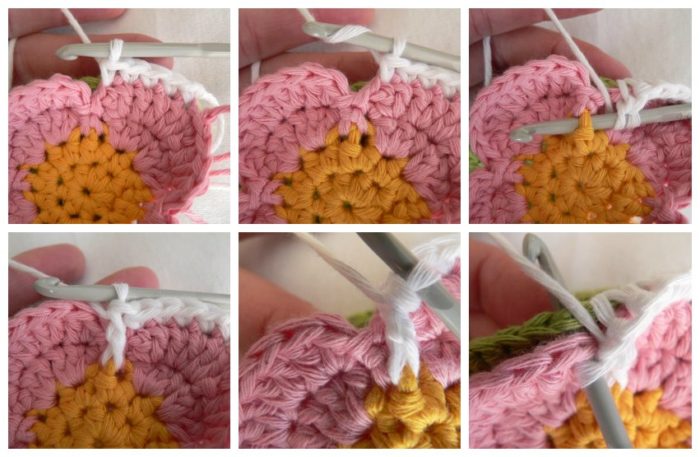
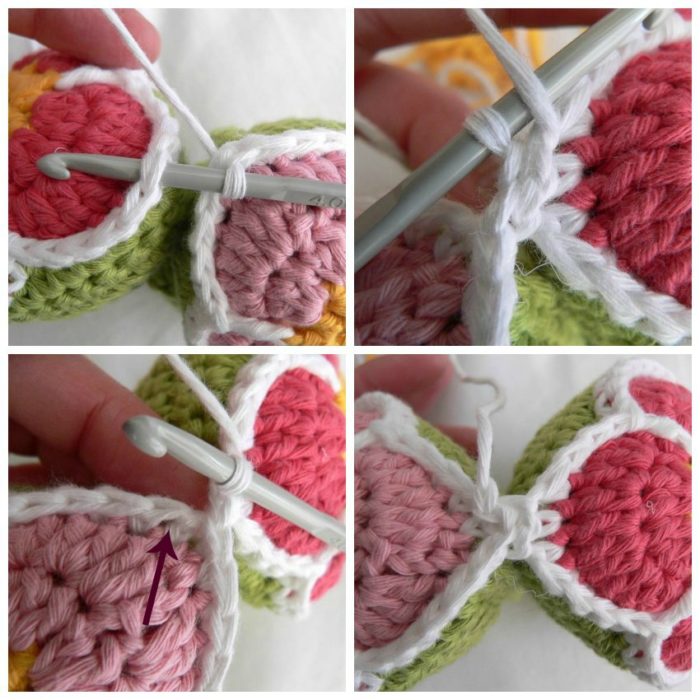
Bend the wedges into a ring so that you can attach the first and last flowers to each other. The first and last wedges should be touching each other. You will be joining the first and last flower to each other by making 2 sl sts into the middle of the third petal of the last flower (indicated with arrows in the photo below).
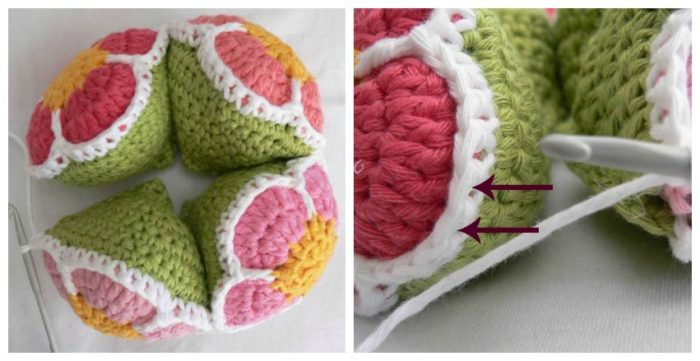
To do this, insert your hook into the 6th st of the third petal of the last flower and make a sl st (photo top left below). Now insert your hook into the 5th st of the last petal and make a sl st (photo top right below). Anchor the join by making a sl st into the next st of the FIRST flower (bottom two photos below). Fasten off and work away your ends.
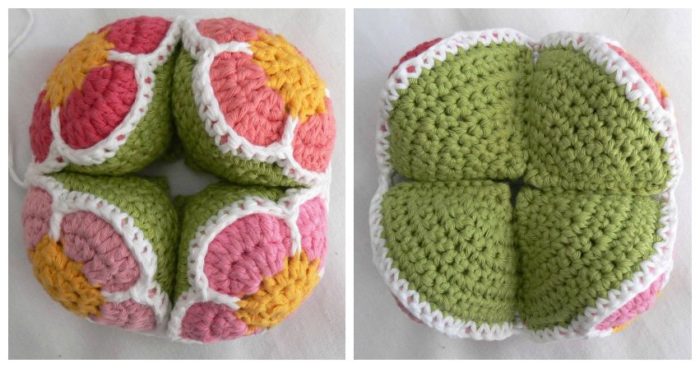
Congratulations! You have just completed one segment (or ring).
Now finish the other two segments in the same way, and build your ball.
You can find a hint for building the ball in my original Crochet Amish Puzzle Ball Pattern. Just remember that this ball takes a lot more elbow grease to assemble. Don’t be afraid to pull and stretch and squeeze to get the segments over each other. And once you are done building, it’s not just magically going to look perfect. You will need to poke and prod the wedges a little bit to make the ball nice and neat.
Stuffing Bombs
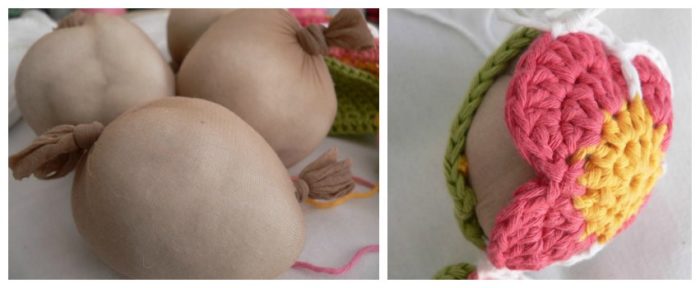
If you are worried about the stuffing poking out through the dc stitches, I’ve got a little hint for you.
Remember how granny used to tie moth-balls in pantyhose and hang them in the cupboard? Well, these stuffing bombs remind me of those mothballs.
Once you’ve stuffed your first flower as much as you think you will want (stuffing pressed down and slightly bulging out), remove the stuffing and weigh it. Then weigh out 11 more equal clumps of stuffing (7 g of manky old pillow stuffing in my case).
Cut the legs of a pair of pantyhose into segments (about 10 cm or 4″ each). Knot the resulting tubes on one end, moving the knot as close to the end as you can. Stretch the “tube” and place your stuffing inside. Knot the other side to close the little stuffing bomb and cut off any excess pantyhose. Now pop one of the stuffing bombs back into the wedge (more like squeeze it in) and continue closing it.
I hope you enjoy making (and playing with) your Crochet Flower Puzzle Ball. If you have any questions, please don’t hesitate to contact me so that I can help you.

This blog post contains affiliate links. I only link to products I personally use or would use. All opinions are my own.


Sally says
Is there any reason why the wedges can’t be made using continuous rounds rather than turning after each row. I have made them using both methods and can find no real difference. Am I missing something? I have made the dinosaur and love it but feel it would have been easier to use continuous rounds for the wedges.
Dedri Uys says
Hi Sally. You are welcome to make the wedges in a spiral, but I prefer them with a seam because they ‘interlock’ better. If you have a look at my star puzzle ball, you will find instructions for making the wedges in a spiral.
Stienie says
I simply love the colours you use!
Dedri Uys says
Thank you :)
Katherine says
I bought your book yesterday, and THEN googled “animal puzzle ball” and found your site. I love this pattern! I have a friend that is going through cancer treatment, and LOVES flowers.. I want to make this for her to celebrate her last treatment next week. I know I won’t have it finished by then, and I truly hope your hints that you have to kind of work with it to get it in shape are exaggerated :D
Thank you for the amazing patterns!
Jenny says
Please share pics of the finished ball with us :) prayers for your friend xx
Rita Silveira says
Thanks for sharing,God Bless You.
Ferris says
Thank you so much for this pattern . I made the ball as a gift and it is being well loved. I did add one thing and thought maybe some of your other readers could use it too. When making the stuffing bombs in one of them I added a small plastic contains with bells.in it as a rattle before I sewed the flowers shut. Just an idea. Thank you again for your time and energy bringing us these patterns. Ferris
Dedri Uys says
That’s a great idea :)
rose mari da silva says
Eu amei vou tentar fazer para meus netos eles adoram esses bichinhos.parabéns e obrigada.
Dedri Uys says
You are most welcome :)
Ce says
Dedri,
I happened upon your site last fall and was completely enamored with it: your photographs, your creativity, and your style of writing. I especially love how you captured the King Protea and made the mandala pattern. So far, I’ve only made the Amish Puzzle Ball. I’ll post pictures on that page. I’m excited to try this variation. Keep up the excellent work!
Many blessings,
Ce
Dedri Uys says
Thank you!
Susan E. says
A few months ago I found and bookmarked your patterns on my computer, but was frustrated that I didn’t have a way to download them so I didn’t have to always be online in order to use them. A few weeks ago I discovered that they are now downloadable. I just wanted to thank you for making them easier to access. Your tutorials are wonderful and your patterns are the best!
Dedri Uys says
You are welcome, Susan and thank you very much for your feedback.
May Soucy says
Have made several Puzzle Balls and bought your book, too. Made Dinosaur, Turtle, Elephant, and Giraffe. The only one that I had a problem with is the giraffe. The pattern as I read it ends up with the head and neck seeming to come up from one of the front legs! (Looks kind of weird!) Is there any way of re-doing the pattern so the neck and head comes up from BETWEEN the legs?
Dedri Uys says
May, I am sorry that you feel that way. You are welcome to try making the head come out between the legs. I have personally found that a) the giraffe turns out looking like a llama, and b) it topples over. I have had one woman make the horse with the neck coming out from between the legs, instead of from the front leg, so it is possible.
Frieda MorganStricker says
Love love love your book and patterns!!!!
Dedri Uys says
Thank you, Frieda :)
sharon says
I just made your puzzle ball love it the pattern is so easy to follow I just wanting for your book to arrive so I can make more sharon
Sherry says
Can you please tell me the Drops Paris Cotton green color name that you used in making the crochet flower ball. I’ve been looking at the color chart and can’t decide!
Thank you!
Dedri Uys says
Hi, I used Pistaccho for 8 of the wedges and Green for the other 4 (because I ran out of Pistaccho).
Carol Derbis says
THANK YOU! for this….I’m putting your book on my Christmas Wish List…can’t spend anything on me right now…but your patterns! WOW! I tell folks on other sites all the time to visit your site…esp those who say they need help…
‘go see Dedri’s tutorials and you’ll be crocheting like a pro”!
THANK YOU so much for your patterns and all of your sharing! you are awesome! and so very generous!
God bless you, Dedri
Dedri Uys says
Thank you, Carol. I hope you enjoy them!
manya says
you write “18/11/2013: The updated pattern for the Flower Amish Puzzle Ball can now be found here. The pattern includes plenty of clear photos and is written in US crochet […]” But nowhere do you give the link to that ball.
Dedri Uys says
The word “here” in that comment (on the other page) is the link to this page, which contains the pattern.
Karen Margrethe Ur-Rehman says
I loved your Amish Puzzle Ball and I love this one too. I have retired last year and have more time to knit and do crochet. I sometimes sell things I make – some for charity and some for myself. I remember you have given permission to amke and sell Amish Puzzle Ball. Is it the same with this Flower Puzzle Ball nd may be other patterns. I normally tell or give a note with the designer name to people.
Love from Denmark
Dedri Uys says
Karen, you can make and sell as many things as you like using any of my patterns :)
Tracey says
I love your work, your designs are great and instructions clear. I have just finished a puzzle ball for my granddaughter, but think I will embark on one of these flower balls in the new year. Or maybe the octopus or turtle, they are so much fun. Keep up the good work!
Dedri Uys says
Thank you, Tracey. I would love to see your puzzle ball…
Rhondda Mol says
Thank you for linking up at Link & Share Wednesday, Dedri :) I wish I had more time so I could hook all of your patterns :) I so love these puzzle balls! The little pumpkin is carried around and played with by the kids all the time now – they pretend to serve it as food ;)
Rhondda
http://oombawka.blogspot.ca/2013/11/oombawka-design-wednesday-link-party.html
Dedri Uys says
Very pleased that they like it, Rhondda. You can make an apple and an orange to go with your pumpkin :)
Carrie says
Ooooooo! This is so cute! I like how it has more color than the old one! Is this pattern any different than the other one, or is it the same with better pictures?
By the way I LOVE your yarn choice! It looks so soft. And the colors…
Thanks for the pattern!!!!!!!!!!!
Dedri Uys says
Thank you, Carrie. The pattern is pretty much the same as the old one, I’ve just made the attachment slightly easier and more simplified. But the old pattern will work, if you have it. It might just frustrate you.
The original was a bit blah, you’re right. I did include instructions for a multi-coloured ball in the first pattern, but my yarn choices were very limited. I can’t tell you how skint we were at the time (not to mention the fact that I was a bit clueless when I first started writing patterns). I’ve been meaning to re-do the pattern for ages and am pleased to be able to tick it off my list.
Nikki says
Wow! I love the revamp to your pattern. I’m a convert to your puzzle balls and puzzle ball animals (have you ever tried a teddy bear? I think it would be cute!), but never really liked the flower one. This updated pattern has changed my mind and after little Mr. Dino that I’m making for a coworker, I’m gonna sneak in a flower ball before my next big project (another giraffe for yet another colleague!). Thank you so much for sharing your creativity with us!
Dedri Uys says
Thank you Nikki. Glad you like the update. I should have done it ages ago! Feel free to share some photos on my facebook wall x
Joan says
This is wonderful. Thanks so much for the pattern. :-)