Did you know that the thistle represents determination and strength in Celtic cultures? It seemed like the perfect flower to include in my Crochet Wall Bouquet series.
This crochet thistle pattern is the second flower in the collection, designed to help you create your own textured crochet bouquet. While some of the flowers in this series are flat motifs, the thistle is three-dimensional, adding a lovely height and texture among the other flowers.

Every bouquet needs a bit of contrast, and the thistle provides exactly that. Among the softer petals of the other flowers, its spiky little crown adds texture and a hint of wildness. I like to think of it as the slightly stubborn member of the bouquet — not delicate, not overly showy, but quietly holding its ground.
Crochet Thistle Flower Pattern
This free crochet thistle pattern forms part of my Lucy Wall Bouquet crochet flower series. You can use it as an embellishment, add it to a crochet bouquet, or combine several flowers to create a textured wall hanging.
The pattern is presented as a written-only pattern, with charts by the talented Masako Kawahara from Crochethmmm. I’ve included one or two photos where necessary. If you have any problems with the instructions, please have a look at the Video Tutorials listed below.
For my bouquet, I chose to make 3 Thistles.
Resources
- Other Patterns in this Crochet Flower Series (as they become available)
- Video Tutorials:
- Instagram: #crochetThistleLAWIM
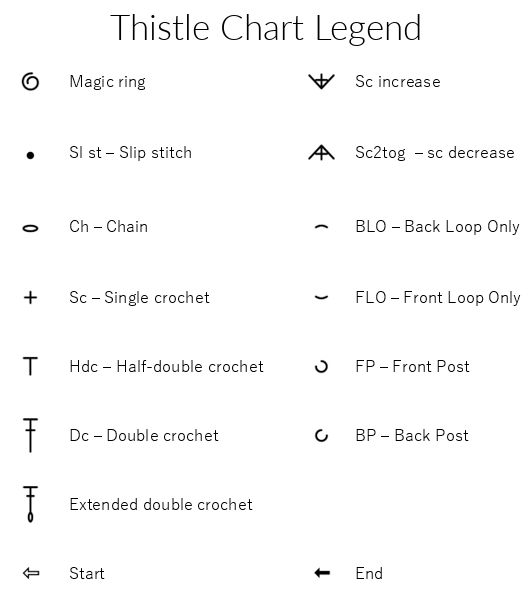
Abbreviations
US Terminology
- Beg – Beginning
- Ch – Chain
- Dc – Double crochet
- Hdc – Half-double crochet
- Sc – Single crochet
- Sl st – Slip stitch
- SM – Stitch marker
- St/sts – Stitch/stitches
- [] – Stitches to be worked into the same st/sp
- () – Repeat instructions between parentheses the number of times specified
Special Stitches
Back Loop Only/Front Loop Only
Sometimes you will want to work only into the front or back loop of a particular stitch. Working into one loop only means that you can come back in later rounds to work into the other loop.
Just like with chain stitches, the top of each stitch forms a ‘V’. This ‘V’ consists of a front loop and a back loop. The front loop will always be the one closest to you. The back loop will always be the one farthest away from you.
Back Loop Only
Back loop only stitches (BLO) are made by inserting your hook into the back loop only {Photo 1}, not through both loops, and completing the stitch as normal {Photo 2}. Working into the back loop like this creates a decorative ridge on the front of your work.
Front Loop Only
Front loop only stitches (FLO) are made by inserting your hook into the front loop only {Photo 3}, not through both loops, and completing the stitch as normal {Photo 4}. Working into the front loop like this will leave a ridge on the back of your work, formed by the unworked back loops.

Back Post Stitches
Back post stitches are a bit trickier than front post stitches, but once you get the hang of them, you will love them!
Identify the post of the stitch you want to work around. Insert your hook from the back to the front and then from the front to the back around the post of the stitch so that the post lies behind your hook {Photo 1}. Complete your stitch as normal {Photo 2}. You might find it easier to twist your work forward so that you can see what you are doing.

Sc2tog
Insert your hook into the indicated st/sp. Yarn over and pull up a loop. Insert your hook into the next st/sp. Yarn over and pull up a loop {3 loops on your hook}. Yarn over and pull through all 3 loops.
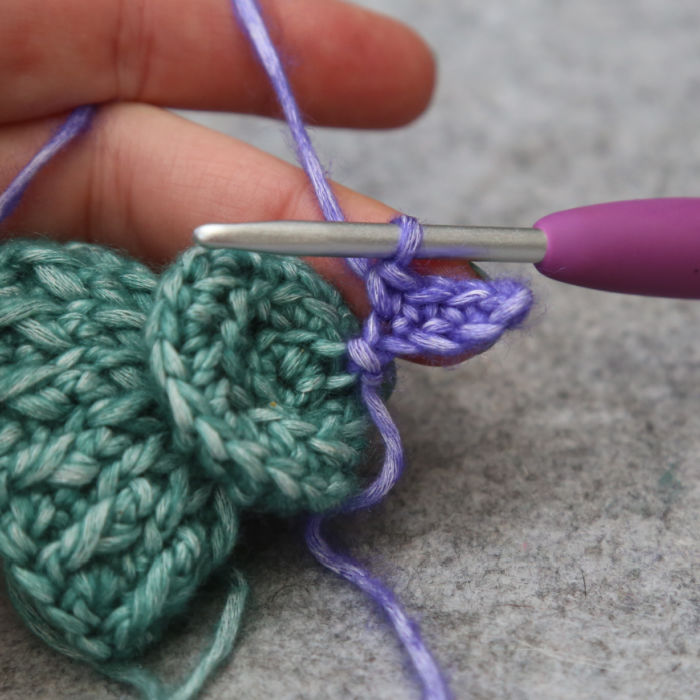
Extended FPdc
Yarn over and insert your hook from front to back and then from back to front around the post of the indicated st {Photo 1}. Yarn over and pull up a loop to the height of your work {Photo 2}. (Yarn over and pull through two loops) twice {Photo 3}.

Materials
- 4mm crochet hook (I use Clover Amour, available HERE on Amazon.com and HERE on Amazon.co.uk)
- Yarnsmiths Pebble Haze DK (50g/145m; 33% acrylic, 67% cotton) – available from Wool Warehouse HERE.
- Dark Green – 2C130 Olivine
- Dark Purple – 2C180 Lolite
Notes
Rounds 1 – 4 are worked in a spiral, and Rounds 5 – 11 are joined at the end with a sl st. Please see THIS POST if you need help with these techniques.
Instructions
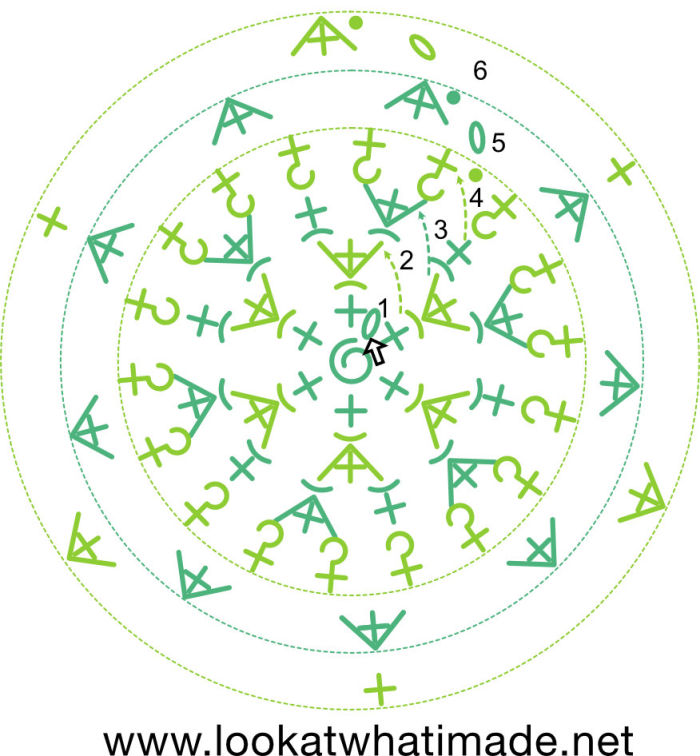
Round 1
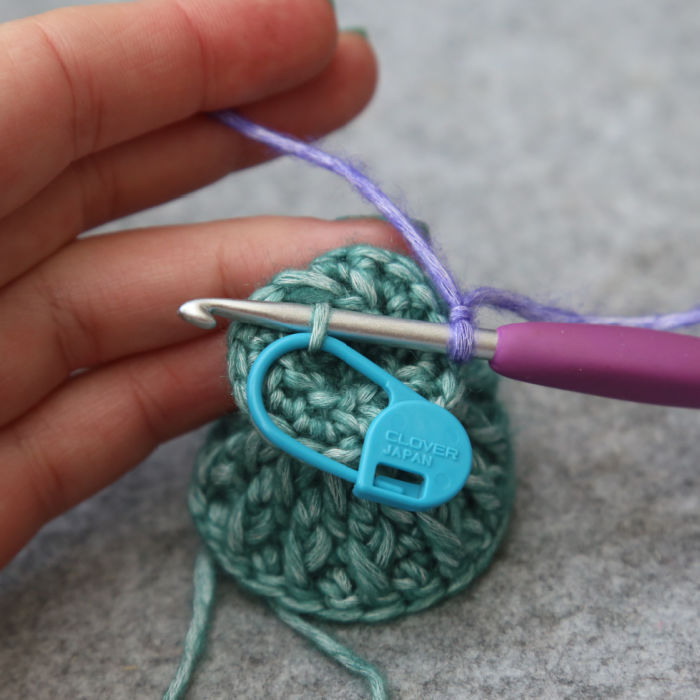
With Dark Green and working into a magic ring: Ch 1 (doesn’t count as a st throughout), 6 sc. Mark the FLO of the first sc with a SM. {6 sc}
Round 2
Before continuing, flick the initial yarn end to the front of your work. You will need it later.
Make 2 BLO sc in each of the 6 sc around. {12 BLO sc}
Round 3
(Make 2 BLO sc in the next st, BLO sc in the next st) 6 times. {18 BLO sc}
Round 4
BPsc around each st from the previous round. Sl st in both loops of the next st. {18 BPsc}
Round 5
Ch 1 (doesn’t count as a st throughout), sc2tog 9 times. Join to the top of the first sc2tog with a sl st. {9 sc}
Because you are decreasing in this round, the first 4 rounds will naturally bulge away from you so that round 1 is farthest away from you and the wrong side of your work is facing out. You will need to turn it inside out so that Round 1 is closest to you and the right side is facing out.
Round 6
Ch 1, (sc2tog, sc) 3 times. Join to the top of the first sc2tog with a sl st. {6 sc}
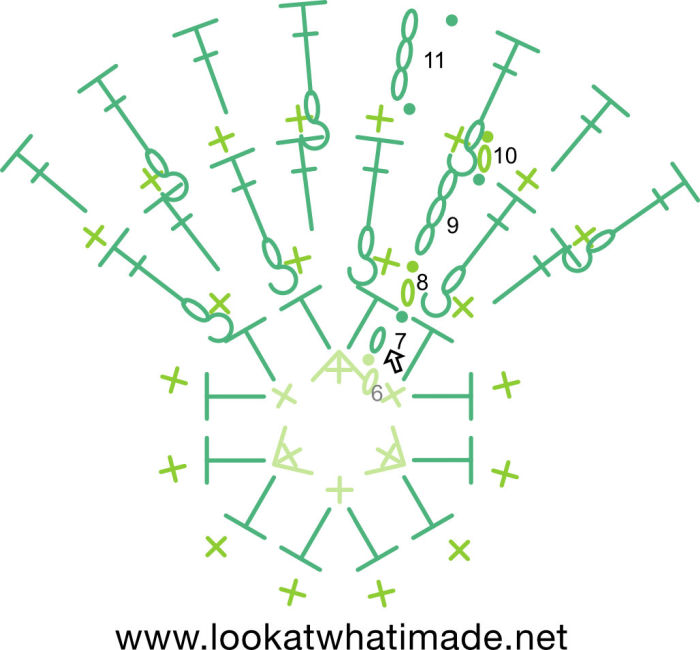
Round 7
Ch 1, make 2 hdc in each st around, placing a SM around the first hdc. Join to the top of the first hdc with a sl st. {12 hdc}
Round 8
Ch 1, sc in each st around. Join to the top of the first sc with a sl st. {12 sc}
Round 9
Ch 3 (counts as dc throughout), put a SM around this ch-3. Make an Extended FPdc around the first hdc of Round 7. (Dc in the next sc of Round 8, which will be slightly hidden behind the Extended FPdc, make an Extended FPdc around the next hdc of Round 7) 11 times. Join to the top of the beg ch-3 with a sl st. {12 dc and 12 Extended FPdc}
Round 10
Ch 1, sc in each st around. Join to the top of the first sc with a sl st. {24 sc}
Round 11
Sl st in the next st. Ch 3. (Make an Extended FPdc around the next dc of Round 9, skip the next st of Round 10, which will be hidden behind the Extended FPdc, dc in the next st of Round 10) 11 times. Make an Extended FPdc around the (marked) beg ch-3 from Round 9. Go ahead and remove the SM. Join to the top of the beg ch-3 of Round 10 with a sl st. Fasten off. {12 dc and 12 Extended FPdc}
At this point, you’ll have an odd shape, like a doorknob stuck to a tiny upside-down bowl {Photo 1}. Use the initial yarn end to sew the 6 sts in Round 1 to the 6 sts in Round 6 so that the top flattens out, working under the FLO so that you can use them when making your Petals {Photos 2 and 3}. It should look more like a saucer stuck on top of an upside-down bowl {Photo 4}.

Flower
Now you are ready to make the Flower bit. If you have trouble getting into the front loops in the first round, use the lip of your hook to pull them up a bit before working into them. Please see THIS POST if you need help identifying the lip of the hook.
Join your dark purple yarn by making a sl st in the marked FLO from Round 1. Remove the SM.
We will now make our first Petal as follows: ch 5, sc in the second ch from the hook. Sc in the next 3 ch sts.
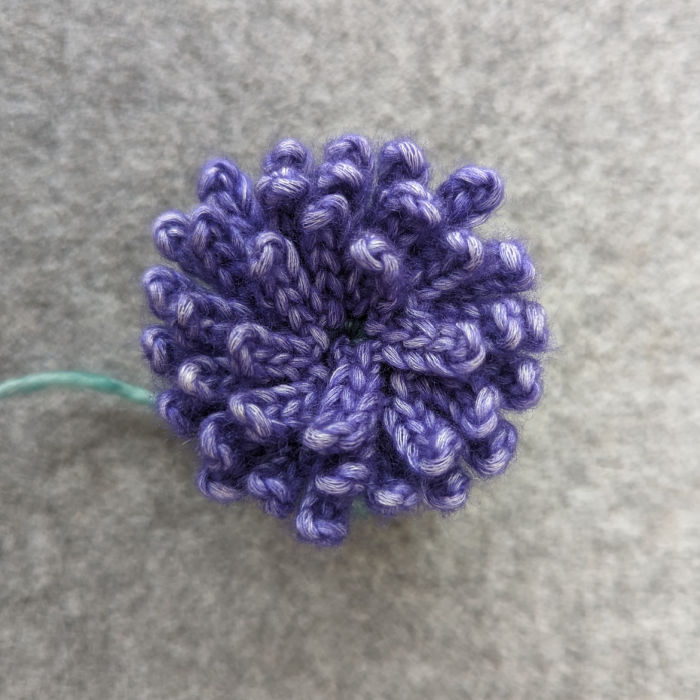
Brilliant. Now for the remaining eleventy billion Petals…
Working into each FLO of Rounds 1 – 3, and through both loops of Round 4 (all in a spiral): [Sl st in the next st. Ch 5, sc in the second ch from the hook. Sc in the next 3 sts] 34 times. Sl st in the last st. Fasten off and work away your ends. {35 Petals, but no one will know if you have one more or less}

If you are making these Thistles to create your own 3-D crochet wall bouquet, I suggest stuffing the bottoms with a little bit of stuffing before sewing them to the backing.
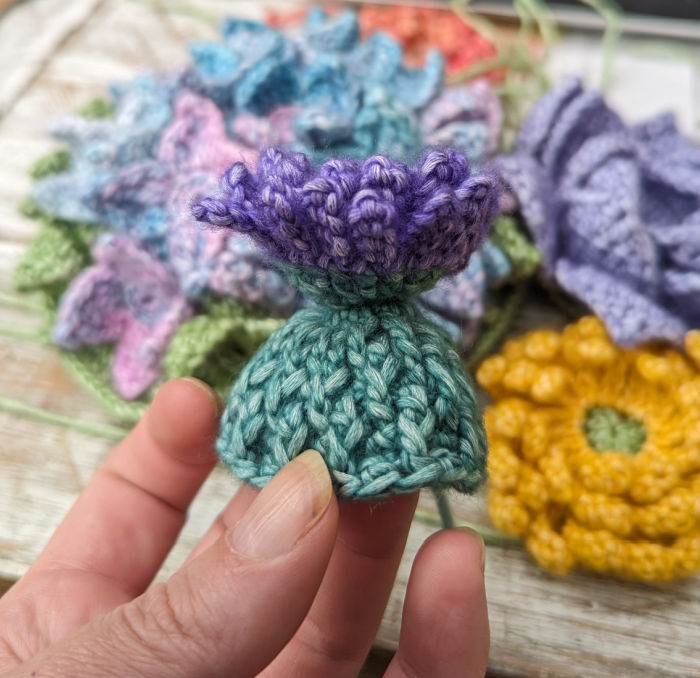
I love how the thistles add a slightly spiky texture to the bouquet. Every flower in this series has its own personality, and the thistle definitely brings a bit of attitude to the mix.
If you make one, I would love to see it! You can share your photos using #crochetThistleLAWIM.

This blog post contains affiliate links. I only link to products I personally use or would use. All opinions are my own.


PAULA GLEASON says
Any idea when a new pattern will come out? I have purchased all the yarn and am excited!
Jenny Lowman says
I believe there will be an update in a couple of weeks :)