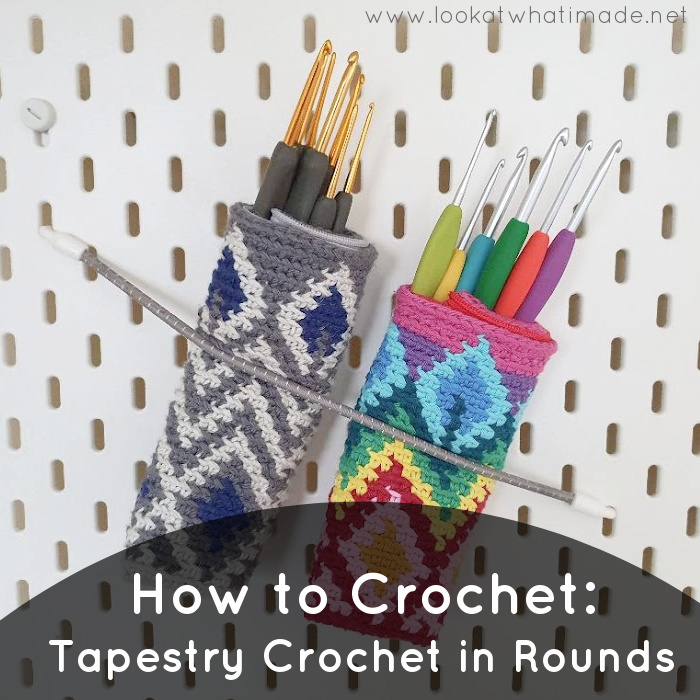
In this tutorial, I will walk you through the basics of using tapestry crochet in ROUNDS. This technique is used when creating circles, squares, or tubes (like the sides of a bag, a cowl, or fingerless mittens/wrist-warmers) where the right side of the work is always facing you. For the purposes of this tutorial, we will be focusing on rounds without any increases.
If you are looking for a different method, please see Alternative Methods/Tutorials under More Resources at the bottom of this post.
Index
- Abbreviations
- Reading a Tapestry Crochet Pattern
- Stitches/Techniques
- Changing Colours
- Yarn Ends/Unused Yarn
- Ending Each Round
- Starting Each Round
- More Resources
How to Crochet Tapestry Crochet in Rounds
Abbreviations
US Terminology
- BLO – Back loop only
- Ch – Chain
- Sc – Single crochet
- Sl st – Slip stitch
- St/sts – Stitch/stitches
Reading a Tapestry Crochet Pattern
Tapestry crochet patterns consist of two elements:
- Simple Written Instructions that tell you how to create the shape of your project.
- A Chart that tells you which stitches should be made in which colour.
Written Instructions
With tapestry crochet, your ‘fabric’ is created by repeating a single stitch – usually a US sc, but other stitches can be used too (see Stitches/Techniques below).
The complexity of the written instructions, therefore, will depend entirely on the amount of shaping required for your project.
- If you are making a simple tube, the instructions for each round will be the same and therefore very easy to memorise and execute without the need of the written pattern.
- If you are making a complicated amigurumi in tapestry crochet, on the other hand, your written instructions will be more complicated. In these cases, you will rely heavily on both the written instructions AND the colour chart – one to instruct your shaping and one to instruct your colour work.
Charts
If you were to write out each colour change in words, the pattern could become VERY wordy and hard to follow. It is, therefore, much easier to indicate colour changes by using a grid chart.
These charts vary in complexity, depending on the intricacies of the design. They usually consist of repeats (in this case a repeat of 10 stitches) that you will repeat all the way around your project.
TIP: I suggest reading Tapestry Crochet Charts in the direction of your work so that asymmetrical elements like text do not accidentally get flipped. If you are right-handed, you will follow the chart from right to left. If you are left-handed, you will follow the chart from left to right. I will remind you again that this is assuming you are always working in Rounds with the RS facing you.
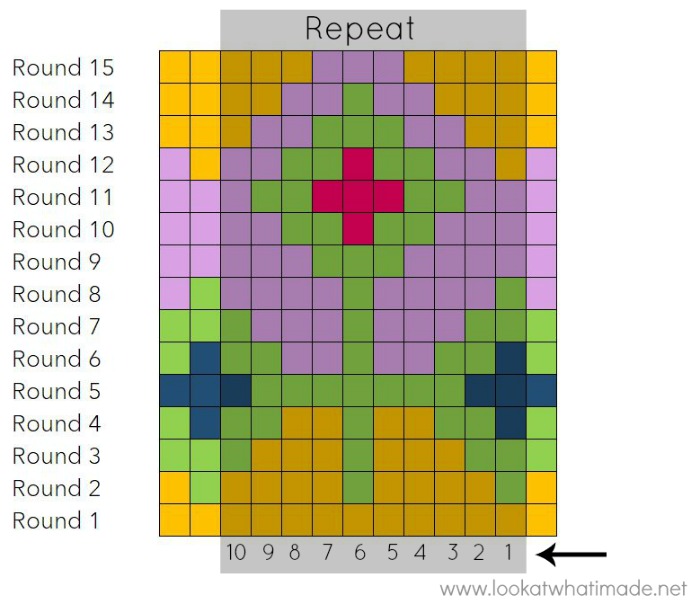
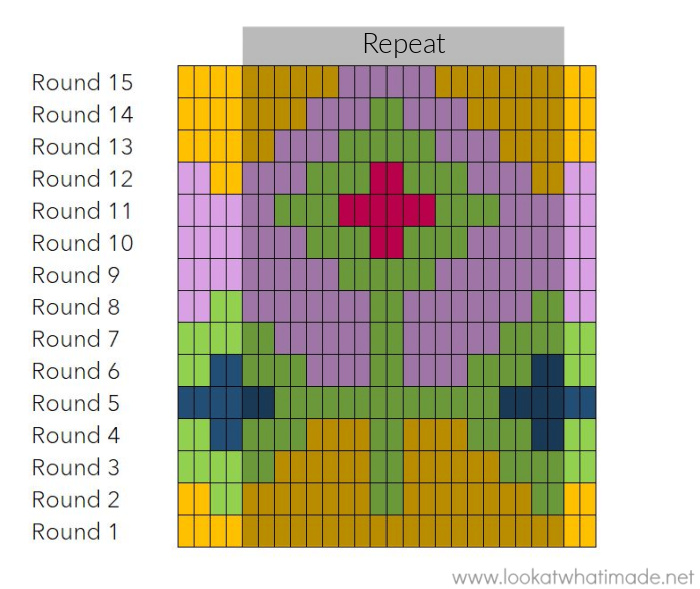
Example Chart: Frozen In Time
Each square in the chart represents one stitch (as indicated in the written pattern). The colour of the square tells you which colour yarn you should be using for that particular stitch. The chart will be accompanied by a key that will reference the relevant yarn colours.
In the example above:
- Round 1 will consist entirely of yellow stitches.
- In Round 2, each repeat will be: (1 green stitch, 4 yellow stitches, 1 green stitch, 4 yellow stitches)
If you need step-by-step help with following a colour chart, please see THIS TUTORIAL by Whistle and Ivy.
Once you understand how to translate a square grid chart into a Tapestry Crochet piece, you can apply this knowledge to any pixelated art. You can use images you find online (being mindful of trademark images) or you can create your own pixelated designs. I will add a link to that under More Resources below.
Alternative Method
There are instances in which a design cannot easily be illustrated using simple written instructions and a coloured grid chart.
An example of that is my Fancy Nancy Mandala, which marries tapestry crochet and overlay crochet. Due to the complexity of the pattern, it relies heavily on both written instructions (with colour changes written out) and a traditional crochet chart (with stitches illustrated in the relevant colours).

Example of Traditional Crochet Chart Illustrating Colour Changes
Stitches/Techniques
There are many different ways to create your tapestry crochet fabric. In this post, I will only be discussing two methods:
- US Single Crochet Through Back Loop Only
- US Single Crochet Through Both Loops
Once we have had a little chat about both methods, I will show you a comparison of the two.
If you need step-by-step help with making an Sc and a BLO Sc, please see THIS TUTORIAL by Planet June. It includes a video and a detailed comparison of the two methods.
Working Through Back Loops Only (US Sc/UK Dc)
This is by far my favourite Tapestry Crochet method and the one I will focus on in the following sections. Although my sample isn’t quite as neat as it could have been (my bad), this method does yield a very neat and fairly symmetrical finish.
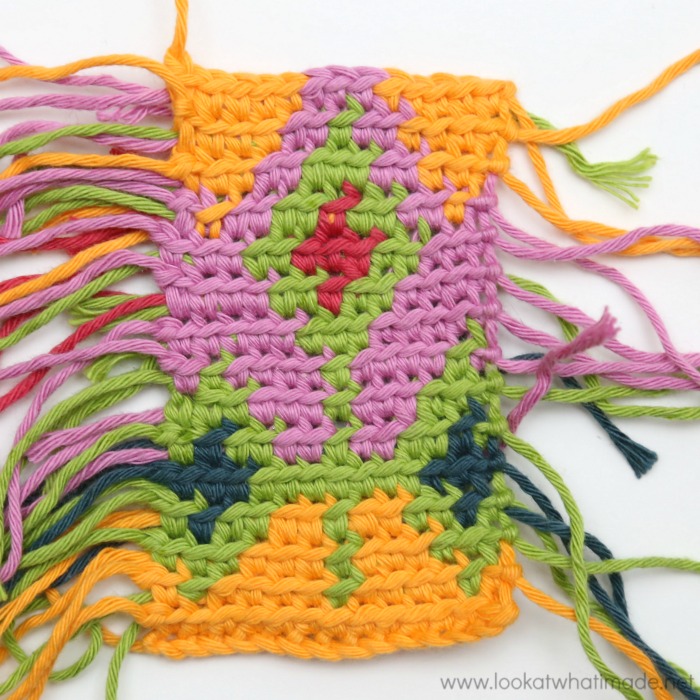
To work in the BLO, identify the two loops at the top of each st. Insert your hook into the back loop only, yarn over, and pull up a loop. Yarn over and pull through both loops.
Working into the back loop like this:
- Creates a decorative ridge on the front of your work
- Stacks the stitches on top of each other in a straighter line, ensuring a more symmetrical look to your Tapestry design.
- Creates ‘higher’ stitches, making your design look slightly stretched vertically
Working Through Both Loops (US Sc/UK Dc)
This method yields a denser fabric than working through the BLO. It also creates a less symmetrical finish.
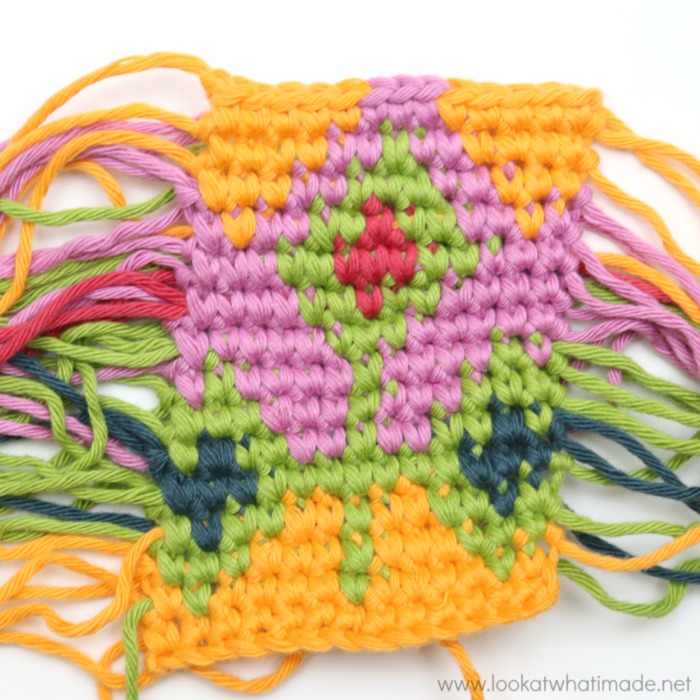
To make a US Sc, identify the two loops at the top of each st. Insert your hook through both loops, yarn over, and pull up a loop. Yarn over and pull through both loops.
Working into both loops like this:
- Creates a more dense fabric
- Leans to the right (right-handed) or left (left-handed) significantly, creating an asymmetrical slant to your design.
- Creates more compact stitches, ensuring that your design isn’t stretched vertically
Comparing the Two Methods
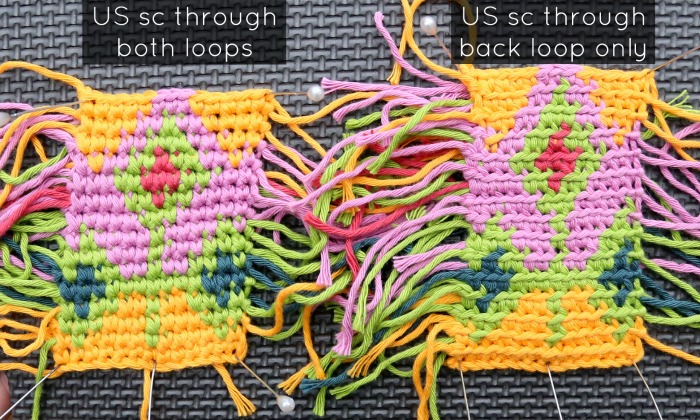
Below you can see both methods side by side. You will notice that the heights differ and that the BLO sample is ‘straighter’ than the Both Loops sample.
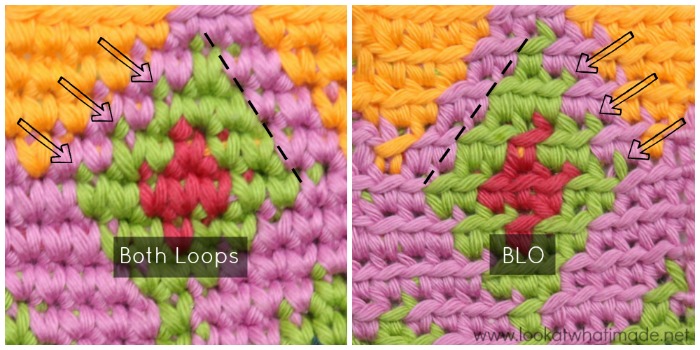
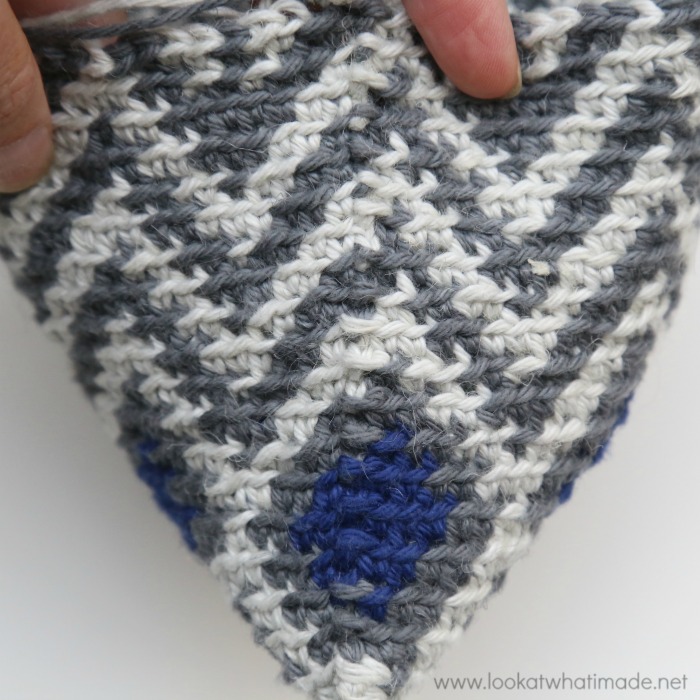
If you focus on the green diamonds below, you will see that the colour-change on one side of each diamond is neater than on the other side (dotted lines below). If you work through both loops, this will be the left-leaning colour changes (right, if you are left-handed). If you are working through BLO, this will be the right-leaning colour changes (left, if you are left-handed).
Conversely, there will be little ‘floats’ of colour (green, in this case) on the other side (indicated with arrows below).
More Techniques
Choosing which method to use depends largely on personal preference. If you are just starting out, I suggest starting with the BLO Sc. If you are more adventurous, have a look at the following techniques:
- The Waistcoat Stitch (Central Sc) creates a stockinette-type look that has even less height than single crocheting through both loops. It is very pretty and the most symmetrical of the methods. It is also an absolute PAIN to do (in my opinion, anyway).
- The Extended Single Crochet is as neat as the Waistcoat Stitch but leans significantly to the left (right, if you are left-handed) and the stitches are as high as when you use BLO Sc.
You can find photos and instructions for both techniques in THIS TUTORIAL by Interweave.
You can also use taller stitches, like hdc and dc, with great success. One gorgeous example of a pattern written specifically for Dc Tapestry Crochet is the Rozeta CAL by Tatsiana from Lilla Björn’s Crochet World.
Changing colours
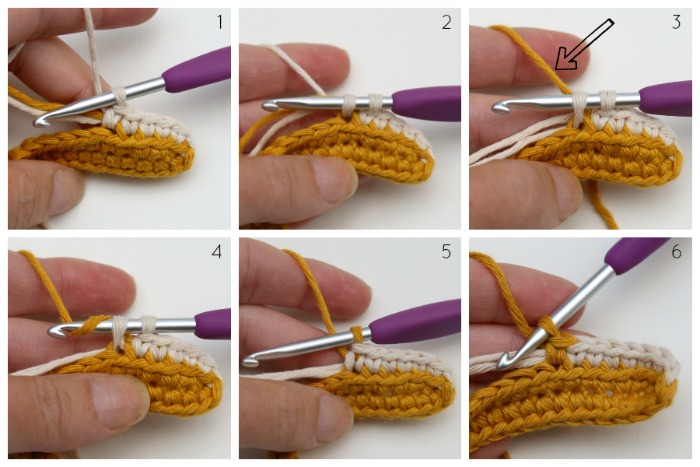
When changing colours, you will do so on the last yarn-over of the last stitch before the colour change.
Photo 1 shows the second-to-last st before the colour change completed. Notice that you are working OVER the unused yarn and ends (see Yarn Ends/Unused Yarn below).
To make the st before the colour-change, insert your hook into the BLO, yarn over, and pull up a loop {Photo 2}. Drop the current colour and pick up the colour you will use for the next st {arrow in Photo 3}. Yarn over {Photo 4} and pull through both loops {Photo 5}.
Photo 6 shows the next st completed in the new colour. You will notice that the ‘top’ of the stitch is the same colour as the ‘legs’.
THIS POST by Sara Dudek shows you the difference between changing colours on the last yarn-over before the colour-change and completing a stitch with the same colour before changing colour.
Yarn Ends/Unused Yarn
When making your stitches, you will be working over your yarn ends and the unused colours for that round.
If you need help with working OVER your yarn vs working In Front Of your yarn, you can see THIS TUTORIAL by Sol from A Crochet Journey. Planet June also has an excellent comparison tutorial for the different types of colour work.
When you work OVER your unused yarn, you will notice that it has a tendency to bunch up on the wrong side of your work, forming little loops (arrows in the first photo below). I suggest tugging gently on the unused yarn before the next colour change to ensure that your work is neat on both sides. If you tug too much, you will affect the tension of your work, so be gentle!
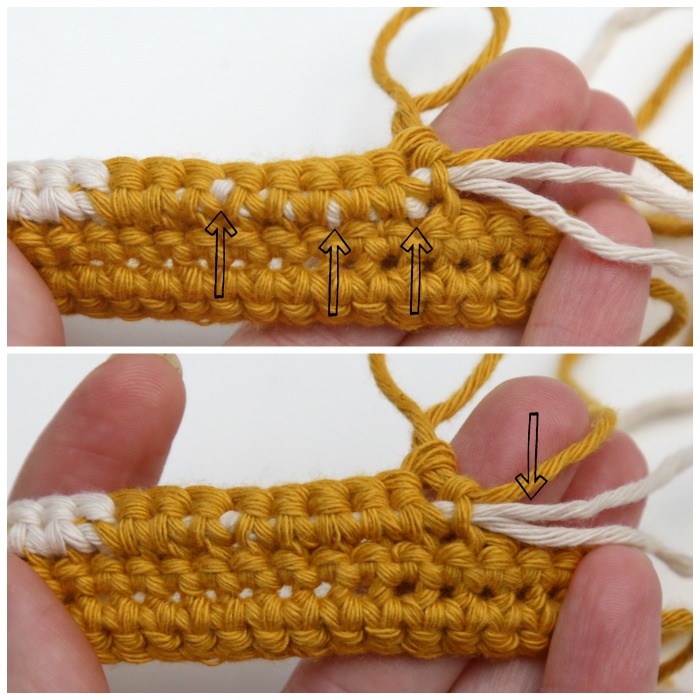
When a colour is no longer needed, you will cut the yarn. If you have worked over the yarn for a few stitches, you could simply cut the yarn, but I prefer to work my ends away back and forth so that I can be sure they won’t work themselves loose and make the inside look untidy. I usually do that at the end of the project.
Ending Each Round
Again, these instructions are specifically for working in the round with the right side always facing you and each round joined with a sl st. With this method, slip stitches are made through both loops. They will form a visible ridge in your work, but I do not think it is particularly obvious unless you are looking for it.
TIP: The Circle Join by Sandy Marie is a great alternative joining method.
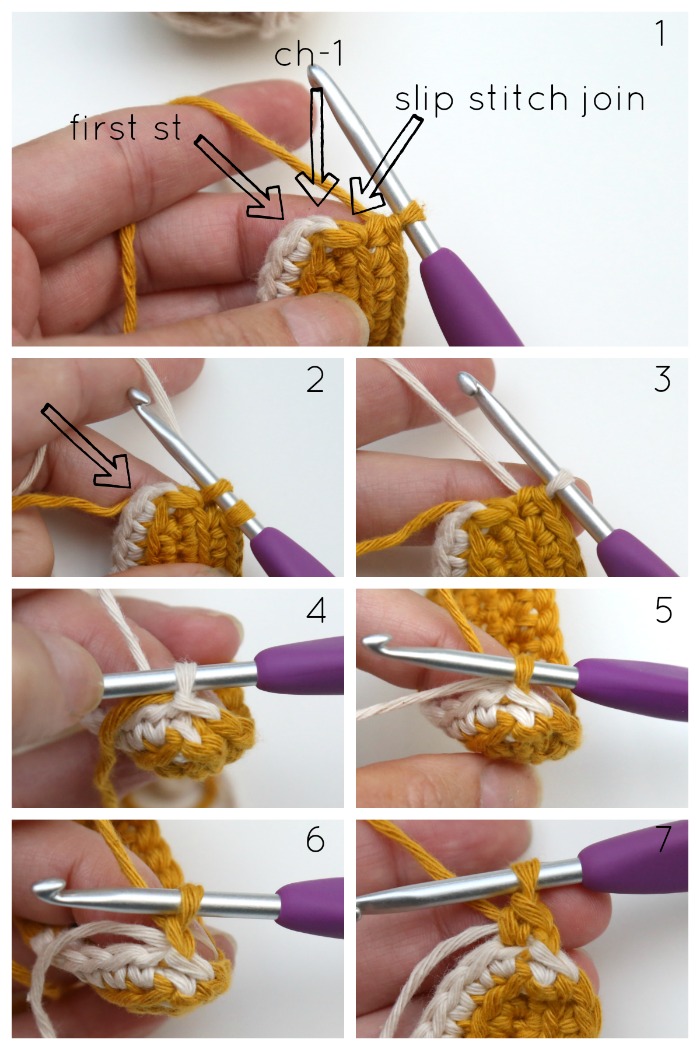
When you get to the end of each round, you will notice that it looks like there are 2 sts left before the first st sc of the next round. These two stitches are the sl st join and the initial ch-1 of the next round {indicated with arrows in Photo 1 below}. Neither of these stitches counts as a stitch and you will ignore both of them, joining directly into the first sc of the round with a sl st.
Completing the Last St of the Round
Before completing the last st of the round, check if the first st of the round is the same colour as the last st. If it is not, change colour on the last yarn-over of the last st {Photos 2 and 3}.
Making the Slip Stitch in the Correct Colour
You are now ready to make your slip stitch. Before you do, though, you need to check ahead on the chart to see what colour the first st of the next round will be.
- If it is the same colour as the yarn already on your hook, continue to join to the first sc with a sl st {Photos 3 and 4}.
- If it is a different colour, insert your hook into both loops of the first sc, yarn over with the new colour, and pull through both loops to create your slip stitch in the correct colour {Photo 5}. Photos 6 and 7 show the ch-1 and the first st of the next round completed in the new colour.
Starting Each Round
Make Sure that the loop on your hook is the same colour as the first st of the round – see Making the Slip Stitch in the Correct Colour above.
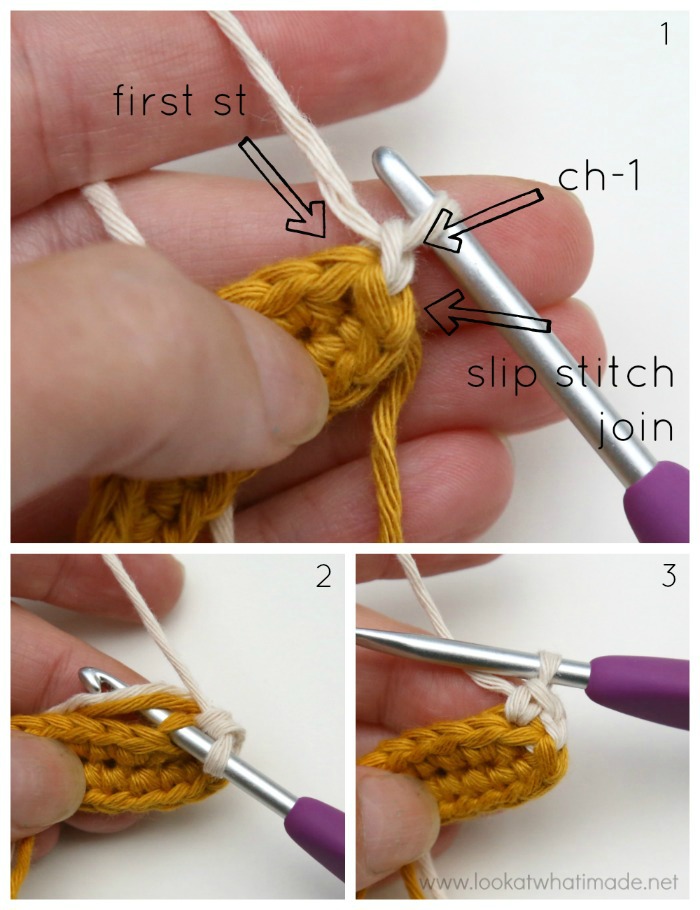
When you have joined to the first st with a sl st through both loops (in the correct colour), you will start each round with a ch-1 to give you some height. This stitch does not count as a stitch and we will ignore it as mentioned above. It is important that you are able to correctly identify the sl st, ch-1, and first sc so that you do not accidentally add stitches to each round {Photo 1}.
When you make the first sc of the round, make sure that you work into the BLO of the first sc (which already contains the sl st through both loops) AND that you work over your yarn ends {Photos 2 and 3}. I often forget to work over them when making the first st of the round, which makes the wrong side of the project untidy.
And with that, I think we have covered all the basics and then some. Now we can move on to all the glorious extras I have found while learning this method. I had so many questions along the way, and when I have questions, I always assume that someone else will have those same questions. So I compiled the links below in the hope that it will save you a few hours of Googling :)
More Tapestry Crochet Resources
Alternative Methods/Tutorials
Circles/Mandalas (Right Side Always Facing)
If you want to apply these techniques to a flat circle and want specific help with that (especially chart-reading, increases, and avoiding a ‘colour jump’ at the start of a spiral round), THIS TUTORIAL by José Visser from Atelier Sopra is full of great tips.
Working in Rows (Right Side/Wrong Side Facing)
If you are looking for a tutorial for using tapestry crochet to create a rectangle or square in ROWS, I recommend THIS TUTORIAL by Tatsiana from Lilla Björn’s Crochet World.
Designing Your Own Tapestry Crochet Pattern
Meghan Makes Do has a brilliant tutorial that tells you how to create a square grid chart and how to design your own tapestry crochet piece.
When following this tutorial, note that she is working in rows, which means that working through both loops for each row will give you a very symmetrical look. If you want to apply your design to something worked in the round, you will need to refer to the Stitches/Techniques above to get the look you want.
When using taller stitches, keep in mind that they will be significantly higher than they are wide, so using them in conjunction with a square grid chart (as pictured above) will yield a very stretched design. If you want to use taller stitches (like a US dc) for a square grid design, I suggest creating a chart where each ‘square’ consists of two or three stitches/columns.
Frozen in Time Chart (featured) translated to US Dc with 2 stitches per ‘square’.
And there you have it! Everything I have learned about tapestry crochet.
If you have any tips that will help other people – especially those attempting tapestry crochet for the first time – please share them in the comments below.

This blog post contains affiliate links. I only link to products I personally use or would use. All opinions are my own.


Sanna Rosengren says
Thank you for this comprehensive tutorial! While using the back loop only technique, I discovered that I can avoid the ‘floats’ by crocheting any stitches that constitute an increase in the working color to the LEFT from the previous round (i.e. into a different color below) into both loops instead of just the back loop. By keeping all other stitches back loop only, the work is still staying straight. I assume I am not the first one to notice this.. but I have been very pleased with the discovery, it makes the work very neat!
Daniela says
Have you tried the combination of blo and yarn under? That’s my favorite to do tapestry. Even under both loops and yarn under gives a better finish.
Dedri Uys says
Hi Daniela,
I have seen people use the crossed single crochet in the back loop only, but haven’t really experimented with it myself. I was hoping to do a swatch to see the difference. I think it is also known as a block stitch?