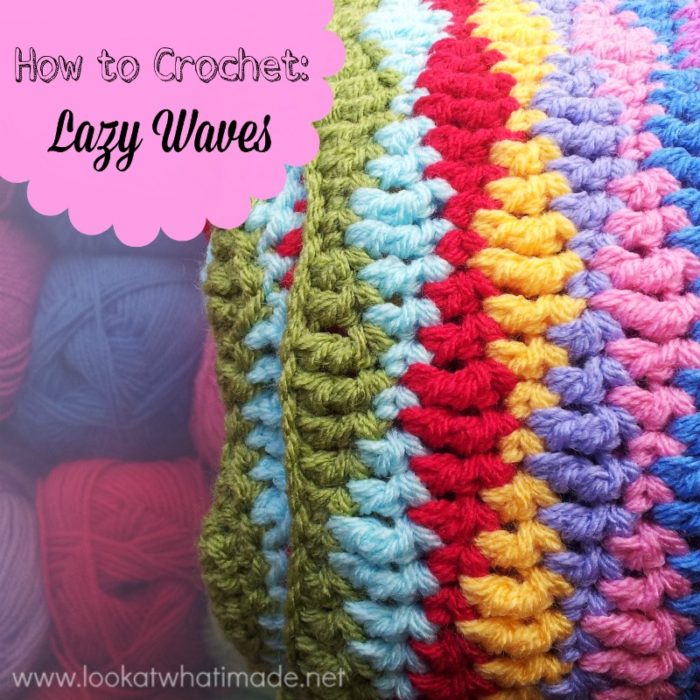
I just love these Crochet Lazy Waves. They work up quickly and the pattern is simple without being monotonous. I will be posting the pattern for my Lazy Waves Blanket in the next couple of days. In the meantime, have fun!
Update: The pattern for the Lazy Waves Blanket can now be found HERE.
There are plenty of wave patterns around. In some the waves are formed by working 2 rows in mirror image so that each “wave” is formed by 2 of the same stitches on top of each other (so sc on sc, dc on dc, etc.). The following 2 rows will then form the next wave repeat, and so on. Some waves are formed by making waves in one row and then single crochets in the next row.
Both these methods have a distinct advantage. In the first one you can just carry your yarn up the side because you will always finish a wave repeat on the same side. In the second your waves will always be right side facing, while the single crochets will be wrong-side facing.
This tutorial will show you how to make waves by repeating one row over and over again. Each row forms a complete set of waves…which is why I call it Lazy Waves.
Although this tutorial is specifically written for changing colours at the end of each row, I have also included instructions for working into the front/back loop only to add some definition when working in a single colour.
There are two teeny tiny annoyances:
- If you change colours for every row, you are going to end up with a butt-load of tails to work away/crochet away, which means that this is not the type of stitch you want to make a multi-coloured dishcloth with!! Solution? The No Needle Needed method for crocheting away yarn tails.
- Every second row of waves will be wrong-side facing. I did try a few different ways to keep each row right-side facing, but the edge goes all skew and frankly…Face? Bovvered? (For my non-British friends who might not know The Catherine Tate Show: in 2006, this catchphrase was named Word of the Year and entered the Oxford English Dictionary.)
Your work won’t have a clear “front” and “back” unless you work those tails away very sloppily.
Lazy Waves Tutorial
Abbreviations
US Terminology Used (see this comparative chart for US/UK conversion)
- Ch/chs – Chain/chains
- Dc – Double crochet
- Sc – Single crochet
- St/sts – Stitch/stitches
- Tr – Treble crochet
- * – Repeat instructions between asterisks the number of times specified
Notes
You can use any yarn and hook you fancy. You can make as many or as few starting chains as your little heart desires.
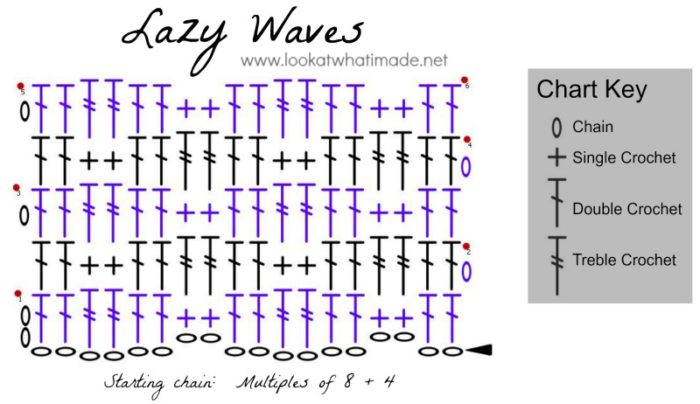
Starting Chain: Multiples of 8 + 4 starting chains
Will give you: Multiples of 8 + 2 stitches
Crochet Lazy Waves Chart
Instructions
For this example I am going to use 20 chs (2 repeats of 8 + 4), which will give me 18 sts.
To start: Ch 20 (Photo 1).
Row 1
Working into the top loop only of each ch st: dc in the third chain from the hook (indicated with an arrow in Photo 2 and illustrated in Photo 3). Dc in the next ch (Photo 4).
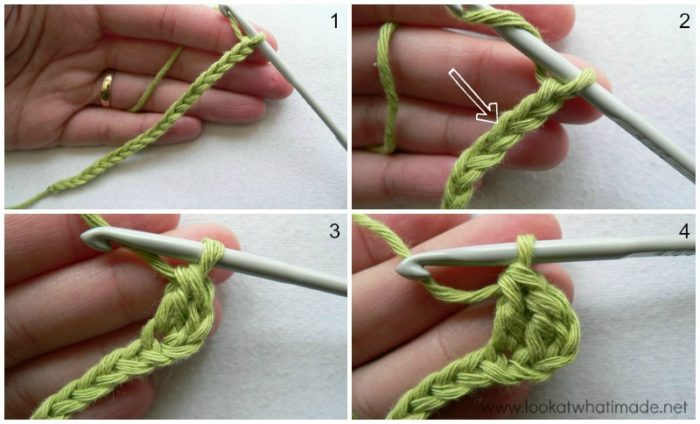
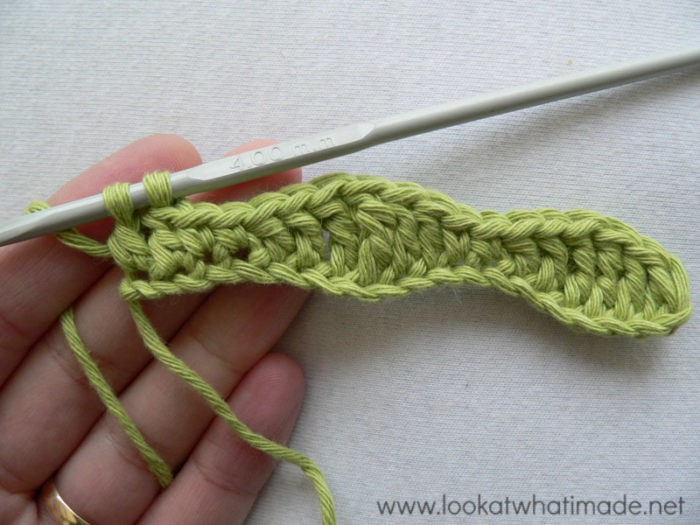
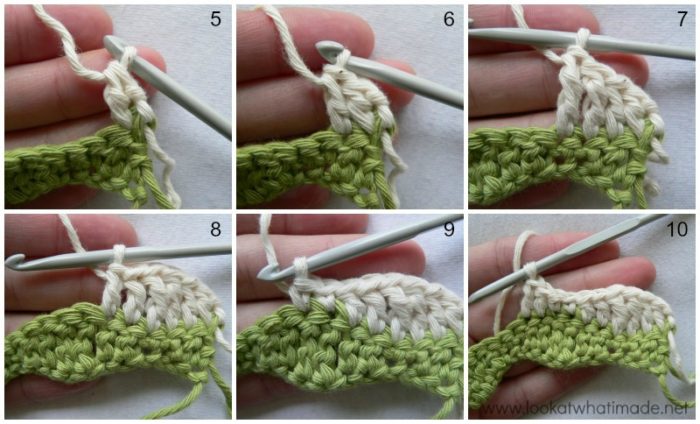
*Tr in the next 2 chs (Photo 5). Dc in the next 2 chs (Photo 6). Sc in the next 2 chs (Photo 7). Dc in the next 2 chs (Photo 8)*.
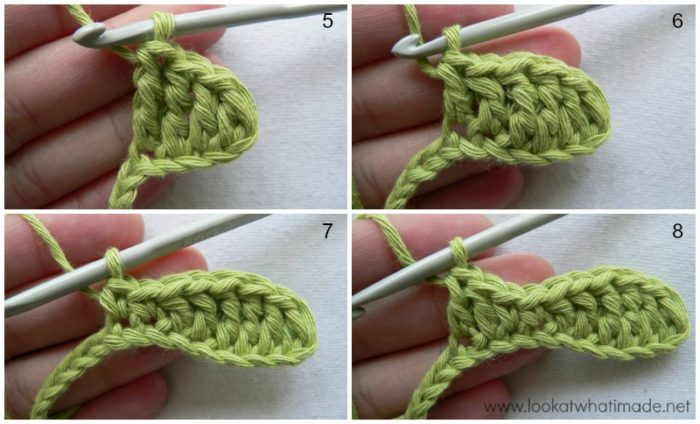
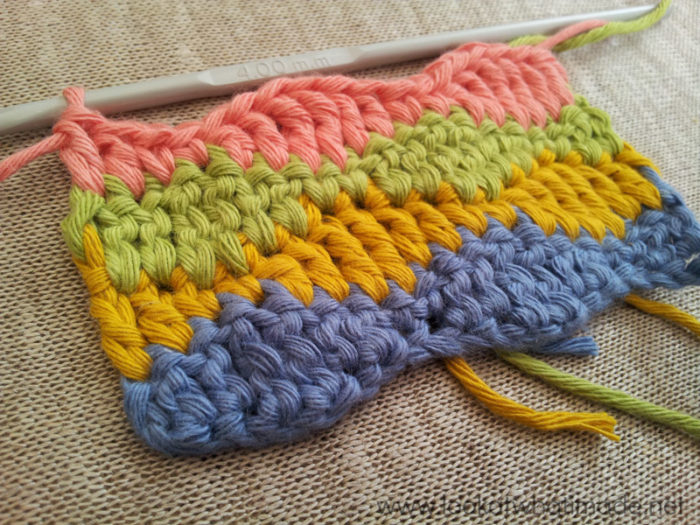
Repeat from * to * once. The last st of the repeat should fall in the last foundation ch st (see Photo below).
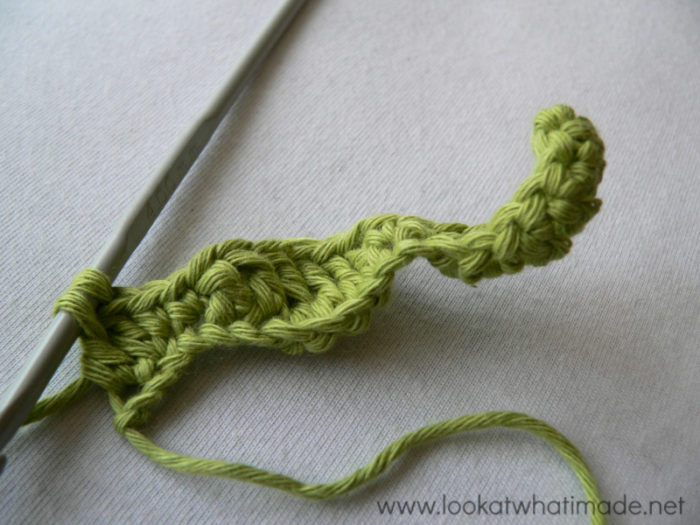
If your first row goes all curly like this, don’ worry about it. It’ll sort itself you :)
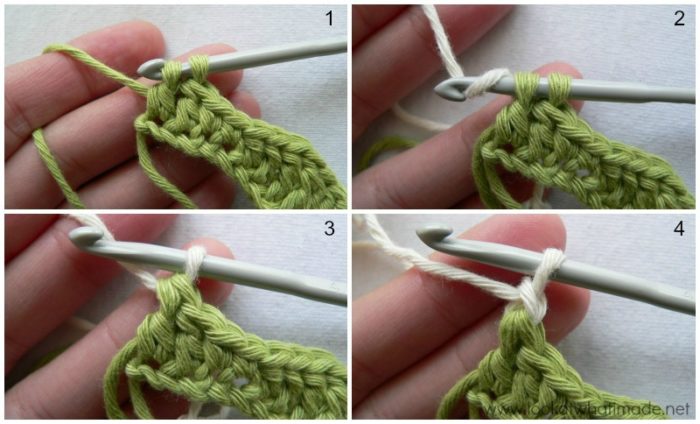
Change colour on the last yarn-over of the last dc (Photos 1 – 3 below). Ch 1 and turn (Photo 4). This ch st does not count as a st.
Stitch Count: 18 st’s {4 sc, 10 dc, and 4 tr}
Row 2
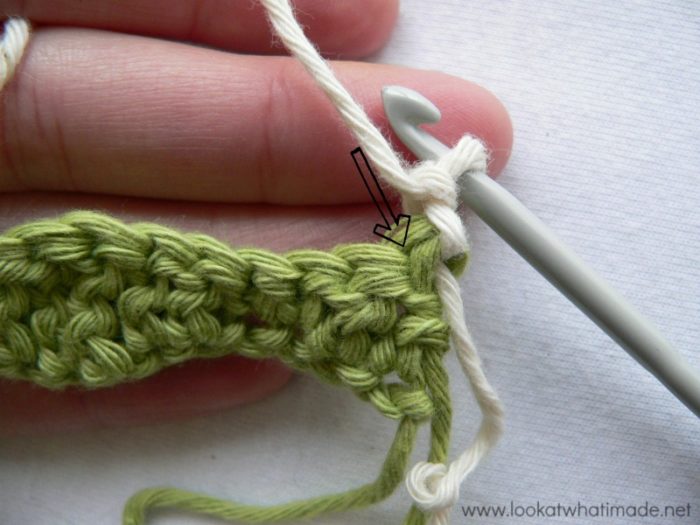
Remember what I said about the turning ch not counting as a stitch? So you will make your first st in the stitch at the base of the turning chain (see arrow below), not in the next stitch as you normally would when working rows in dc.
Dc in the same st as the turning chain (Photo 5). Dc in the next dc (Photo 6). *Tr in the next 2 sc’s (Photo 7), dc in the next 2 dc’s (Photo 8), sc in the next 2 tr’s (Photo 9), dc in the next 2 dc’s (Photo 10)*.
Repeat from * to * once. The last st of the repeat should fall in the last dc, not in the turning chain (which doesn’t count as a stitch). Change colour on the last yarn-over of the last dc. Ch 1 and turn. This ch st does not count as a st.
Stitch Count: 18 st’s {4 sc, 10 dc, and 4 tr}
Subsequent Rows
Repeat Row 2… It’s that simple.
Remember to have a look at my friend Jo’s No Needle Needed tutorial for crocheting away your yarn tails. It’s brilliant. No sewing whatsoever!
Working in the Front/Back Loops Only
If you want to use only one colour, you are going to need a little something to help define the stitches. This “little something” takes the form of front/back loop only stitches. Working in the front/back loops like this means that your blanket/project will have an obvious “front” and “back”.
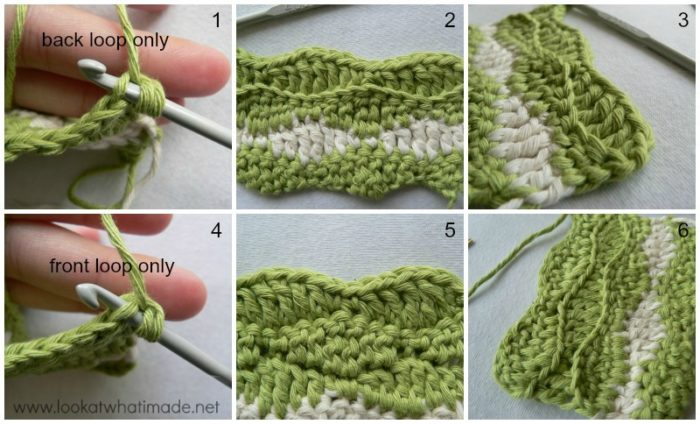
Simply make one row by working into the back loop only of every stitch across (Photo 1). This will form a ridge at the base of the stitches (formed by the unworked front loops of the previous row) – see Photos 2 and 3 below.
When you turn your work around, you want the ridge to be on the same side as the previous ridge, which is now facing away from you. So make the next row by working into the front loop only of every stitch across (Photo 4). Your work will look pretty unassuming at this point. Although you can sort of see the waves (Photo 5), the magic happens when you turn your work around again to work the next row. You will now have another ridge on the right side of your work (Photo 6).
Continue in this way, working into the back loop only for one row, and the front loop only for the next row, until your piece is the desired length.
Related Patterns
- Waves of Jewel Throw by Sara Sach uses the same 8-stitch repeat (with a different row start and end). I really like her broad bands of colour broken up by skinny bands of contrasting colour.
- Lazy Waves Blanket (a pattern by yours truly)
- Summer Waves Placemat and Coaster by Moogly – these waves are created over two rows, but the principle remains the same

This blog post contains affiliate links. I only link to products I personally use or would use. All opinions are my own.


Tina says
Thank you for this pattern, it is the easiest and best version I have found.
Dedri Uys says
Thank you Tina :)
Jenny Lowman says
I may be biased a tiny bit, but I have to agree with you, Tina!
Andrea says
I am having trouble with this pattern, I am a new crocheter. The waves don’t seem to be lining up properly, (the triple crochet isn’t where the previous row was single, etc.) and it seems like I am a stitch or two off. I am wondering what I am doing wrong. Thanks!
Dedri Uys says
Hi Andrea.
Can you use the contact tab at the top of this page to send me an email? We can then exchange photos so that I can better help you.
Dedri
Ida May says
Thank you for what I g this wonderful pattern and very clear tutorial. The variations on the pattern was a great plus. Awesome job. As a person returning to this hobby, your advice is terrific.
Jenny says
Hi Ida May. This is one of my favourite Dedri patterns too! Enjoy.
BW
Jenny
Mary ann says
I am trying to make this pattern but it is buckling up on me,almost as though it needs more stitches.Your sample was nice and flat.any suggestions?
Dedri Uys says
Hi. Have you got a photo so that I can better help you? Mine definitely didn’t buckle, so I’m thinking it’s something simple that’s not been explained as well as it could be.
Rose says
The pattern says to go through front Loops for the first round doesn’t specify for second round it looks like you go through both is that correct
Dedri Uys says
The entire pattern is worked through both loops. Only the first row is worked through one loop only of the initial beginning chain.
Beth says
Using just the front loop or just then back loop on each row consistently will give the blakes a nice defined edge between each row. If you turn your work at the end of each row you’ll have to alternate front and back loop to keep the edge on the same side of the work. Either way will make a beautiful blanket.
Dedri Uys says
That’s a great suggestion, Beth. I found that doing that on this blanket (especially because of the weight), made the stitches stretch a bit too much for my liking, but if you incorporate the third loop when making the back loop stitches, it will stop this stretchiness from happening.
Sandra says
Love this pattern. Thank you for explaining it so well! The finished result is lovely!
Debby says
Thank you for a wonderful pattern!x
Shari says
Thank you for such a great tutorial. Your pictures were super helpful also.
Jenny says
I have to say I adore Dedri’s tutorials too. So helpful in every way! :)
Louise Crosbie says
Hello Dedri (sounds like a SA name, could I be right?). Thanks so much for sharing this pattern which I will be using for cushion covers.
I always prefer a chart rather than the written-out pattern. I teach crochet and always draw the patterns by hand, but would love more professional looking charts like yours. Is this some kind of software you can buy?
Dedri Uys says
Hi Louise. I am indeed from SA (now in the UK).
I use Stitch works software for my charts,
D3
LouiseCrosbie says
Thank you Dedri, I will look into it.
Sarah Barker says
I’ve never worked a pattern where I didn’t count a turning chain as a stitch and then skipped that stitch (except for sc). What effect, if any, does it have on the edge of the blanket? Does it give it a corresponding wave? Thank you for your help! I love the blanket and really appreciate the effort and time it takes to write out all the directions, with photos, etc, in order to share it with all of us.
Dedri Uys says
Hi Sarah. You aren’t skipping any stitches. The turning ch does not count as a stitch and doesn’t replace a stitch. The first dc will fall in the first stitch. Making a non-counting turning ch like this (in this specific design) gives the blanket a clean, straight edge without any bulges or gaps. Usually, though, making non-counting turning chains (when using stitches higher than a Sc) will cause a bulge.
Fafi says
Thank you very much for this simple yet beautiful pattern. I am going to begin it right now. I ve been all through the different sites searching to an easy yet colourful pattern to begin an afghan. I found some ,but their patterns were not as clear and well put as yours. I learned crochet from French magazines and I was happy to c that u used the drawn pattern coz it makes much easier to go through from beginning to end. I signed up to your newsletter, waiting for to see more interesting projects from your side.
Thank you very much and may God less you.
Fafi
Dedri Uys says
It’s good to hear from you, Fafi. I hope you enjoy the blanket and am very pleased that you find the instructions clear. Have a great day,
Dedri
Eily Bergin says
Thank you for that wonderful tutorial. I am going to make a scarf with that beautiful pattern. :)
Dedri Uys says
You are welcome, Eily. I’d love to see your finished scarf!
Nysia says
Love your tutorials!!!!! but just thought I should let you know that http://www.ravelry.com/patterns/library/no-needle-needed-tutorialweaving-tail-ends this link is broken.
Dedri Uys says
Thank you for the heads-up. I have fixed it now :)