In this post, I will take you through the special stitches and techniques that you will be using during the Charlotte’s Universe CAL 2021. The photo tutorials below will help familiarise you with the skills needed to complete the crochet-along.
Please note that it is not essential for you to read through the photo tutorials below. Every step of the pattern will be explained thoroughly as Esther from It’s All in a Nutshell takes you through the weekly video tutorials.
I would suggest bookmarking or saving this post to PDF (print-friendly button below this post) so that you can refer to it later if you need to.
Resources
Translations
- Dutch Translation by Dianne Baan
- German Translation – by Sabi Bulla and Silke Schippa-Witte
- Hebrew Translation by Michal Ben-Hur, Iris Fait, Tami Sultan Nudelman, Tali Shchori, and Sarit Grinberg
- Japanese Information and Links by Masako Kawahara
- Swedish Information and Links by Åza Karlsson and Ulrika Larsson
Index
Abbreviations
US Terminology (US/UK Conversion Chart HERE)
- Beg – Beginning
- BLO – Back loop only
- BP – Back post (insert your hook from back to front around the post of the indicated stitch and complete the stitch as normal)
- Ch – Chain
- Dc – Double crochet
- Dc2tog – Double crochet 2 together (see Special Stitches)
- Dtr – Double treble crochet
- FP – Front post (insert your hook from front to back around the post of the indicated stitch and complete the stitch as normal)
- Hdc – Half-double crochet
- RS – Right side
- Sc – Single crochet
- Sl st – Slip stitch
- SM – Stitch marker
- Sp/sps – Space/spaces
- St/sts – Stitch/stitches
- Tr – Treble crochet
- WS – Wrong side
Punctuation
* An asterisk indicates pattern repeats. You will need to repeat all the instructions between asterisks the amount of times specified. This is a hard-core repeat and will consist of multiple instructions.
Parentheses () indicate repeats. You will need to repeat the instructions between parentheses the amount of times specified. This is a lower level repeat. Parentheses are also used to indicate a group of stitches to be worked into the same stitch/space.
Square Brackets [] are used to indicate a group of stitches to be worked in the same stitch/space when using parentheses would be too confusing.
Curly Brackets {} are used to indicate additional information and photo references.
Special Stitches
3-dc Cluster Stitch (Cluster)
This stitch is also known as a dc3tog (double crochet 3 together).
- Yarn over and insert your hook into the indicated st. Yarn over and draw up a loop {3 loops on hook}. Yarn over and pull through 2 loops {2 loops on hook}.
- Yarn over and insert your hook into the next st. Yarn over and draw up a loop {4 loops on hook}. Yarn over and pull through 2 loops {3 loops on hook}.
- Yarn over and insert your hook into the next st. Yarn over and draw up a loop {5 loops on hook}. Yarn over and pull through 2 loops {4 loops on hook}.
- Yarn over and pull through all 4 loops on your hook.
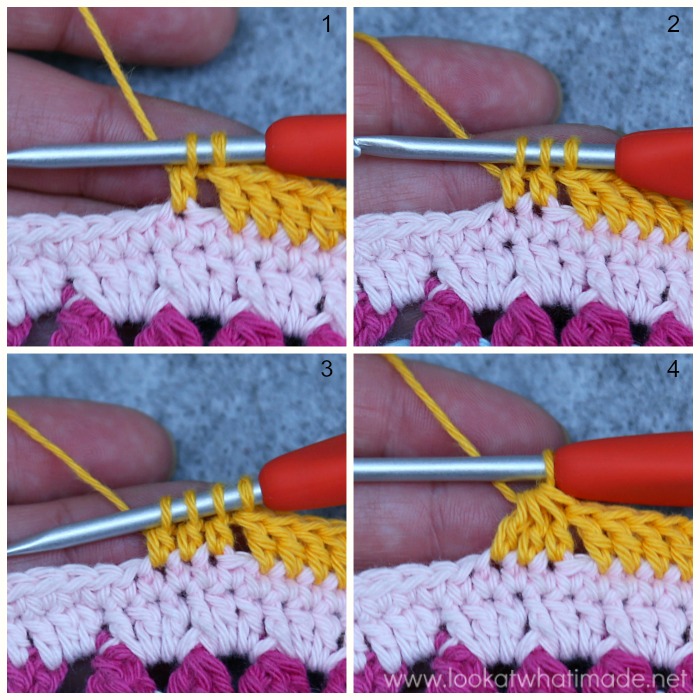
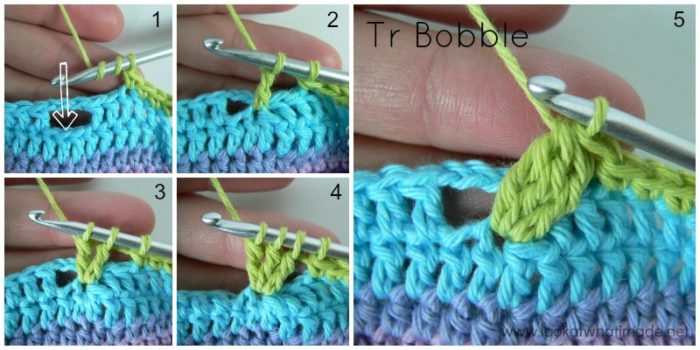
3-tr Bobble
- Yarn over twice and insert your hook into the indicated st/sp.
- Yarn over and pull up a loop. (Yarn over and pull through 2 loops) twice {2 loops on hook}.
- Yarn over twice and insert your hook into the same st/sp. Yarn over and pull up a loop {5 loops on hook}. (Yarn over and pull through 2 loops) twice {3 loops on hook}.
- Yarn over twice and insert your hook into the same st/sp. Yarn over and pull up a loop {6 loops on hook}. (Yarn over and pull through 2 loops) twice {4 loops on hook}.
- Yarn over and pull through all 4 loops on your hook.
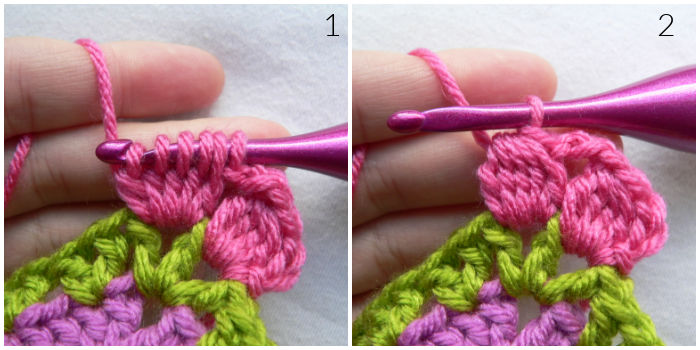
5-tr Bobble
This stitch is the same as the 3-tr Bobble, but made with 5 partial tr instead of 3.
- Yarn over twice and insert your hook into the indicated st/sp. Yarn over and pull up a loop. (Yarn over and pull through 2 loops) twice {2 loops on hook}. *Yarn over twice and insert your hook into the same st/sp. Yarn over and pull up a loop. (Yarn over and pull through 2 loops) twice*. Repeat from * to * 3 more times. You should now have 6 loops on your hook.
- Yarn over and pull through all 6 loops.
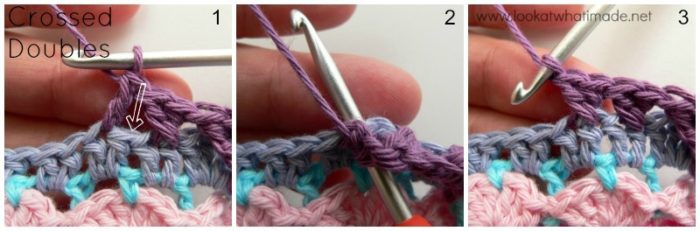
Crossed Doubles
- Skip the next st and make a dc in the next st.
- Working over the last dc made, make a dc in the skipped stitch.
Dc2tog
- Yarn over and insert your hook into the indicated st/sp. Yarn over and draw up a loop {3 loops on hook}. Yarn over and pull through 2 loops {2 loops on hook}.
- Yarn over and insert your hook into the next st/sp. Yarn over and draw up a loop {4 loops on hook}. Yarn over and pull through 2 loops {3 loops on hook}.
- Yarn over and pull through all 3 loops on your hook.
When making FPdc2tog, the technique will be the same, but you will be inserting your hook around the post, not into the tops of the stitches.
Hdc2tog
Yarn over and insert your hook into the indicated st/sp. Yarn over and pull up a loop. Yarn over and insert your hook into the next indicated st/sp. Yarn over and pull up a loop. Yarn over and pull through all 5 loops.
Similar to the dc2tog above.
Partial 2-tr Bobble
Yarn over twice and insert your hook into the indicated st/sp. Yarn over and pull up a loop. (Yarn over and pull through 2 loops) twice. Yarn over twice and insert your hook into the same st/sp. Yarn over and pull up a loop. (Yarn over and pull through 2 loops) twice.
Partial 3-tr Bobble
Yarn over twice and insert your hook into the indicated st/sp. Yarn over and pull up a loop. (Yarn over and pull through 2 loops) twice. *Yarn over twice and insert your hook into the same st/sp. Yarn over and pull up a loop. (Yarn over and pull through 2 loops) twice.* Repeat from * to * once.
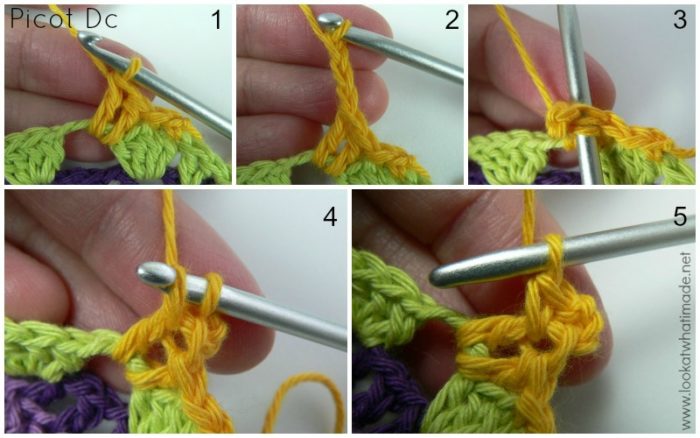
Picot Dc
- Make a dc.
- Ch 3.
- Complete the Picot by making a sc in the top of the dc just made.
- To do this, insert your hook into both loops of the dc from the side…
- and complete a sc.
Popcorn Stitch
- Make 5 dc in the indicated st/sp.
- Remove your hook from the last dc and insert it into the first dc of the 5-dc group. Grab the last st with your hook.
- Pull the last st through the first st to complete the Popcorn.
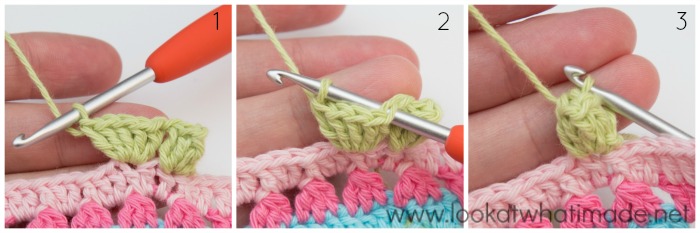
When working into the Popcorn in subsequent rounds, it is important to note that the top of the Popcorn will be the first dc of the 5-dc group that forms the Popcorn.
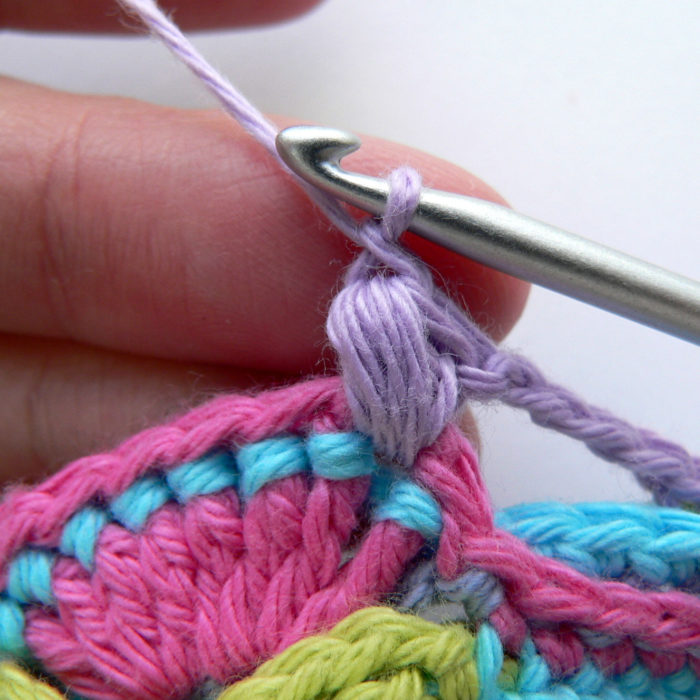
Puff Stitch
Yarn over and insert your hook into the specified stitch/space. Yarn over again and pull up a long loop. (Yarn over and insert your hook into the same stitch/space. Yarn over again and pull up a long loop) 3 more Yarn over and pull through all 9 loops on your hook. Ch 1 to close the Puff Stitch.
You can find the photo tutorial HERE.
Roses
See the tutorial at the start of Round 93.
Split 2-tr Bobble
See the tutorial at the start of Row 113.
Split 3-tr Bobble
See the tutorial at the start of Rounds 41 and 101.
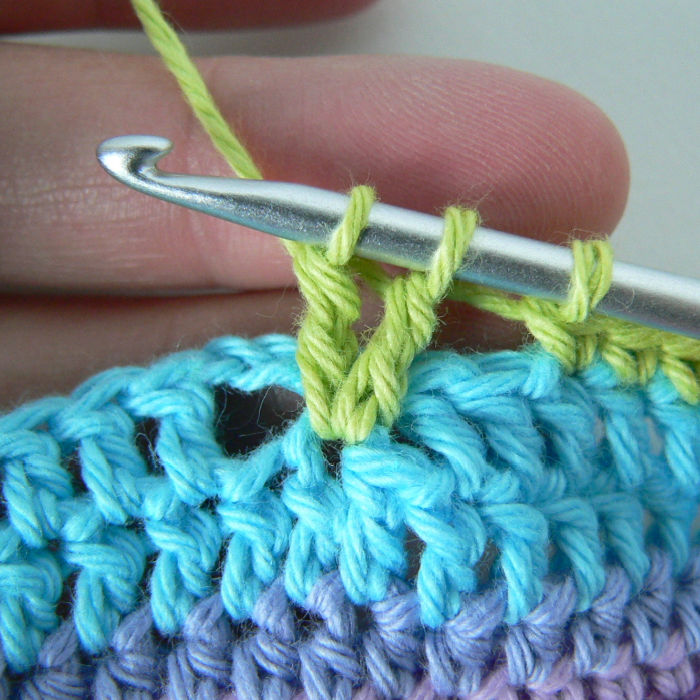
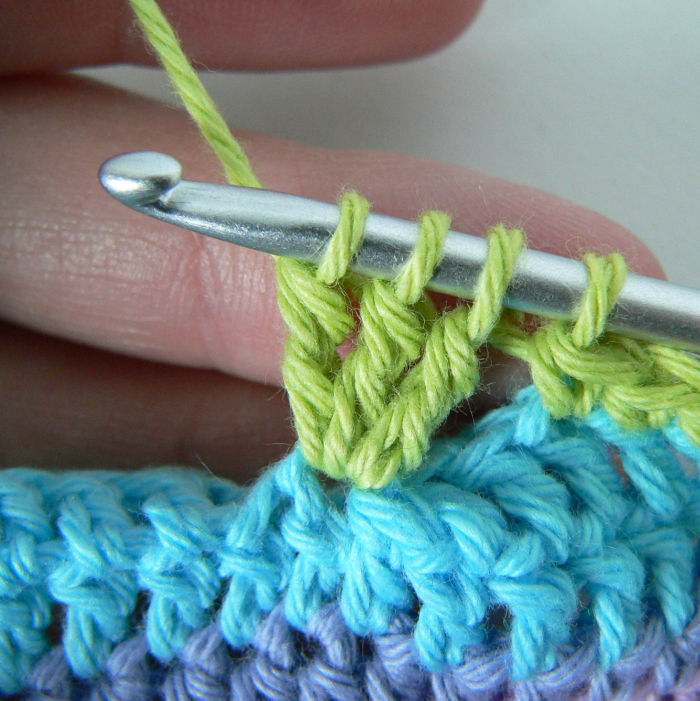
V-stitch
(Dc, ch 1, dc) in the indicated st/sp.
Techniques
Gauge
Gauge is incredibly important when you are making an item ‘to size’. Usually, matching gauge in a blanket isn’t essential if you don’t mind how big (or small) it will turn out or how much yarn you will use. When you are using yarn supplied as part of a kit, though, it becomes VERY important as the yardages for the kits have been calculated with a specific gauge in mind. A small increase in gauge size can cause an exponential increase in yarn needed.
If you are concerned about yarn usage, my first suggestion is that you make a gauge square up to the end of Part 1 while you wait for the CAL to start. Measure this part to see if it is the same size as what we got at the end of Part 1. You will find the Gauge Information in the Information Post HERE. The end of Part 1 is also a good place to check that you aren’t making your chains a lot tighter than the rest of your work. There is a note about that at the end of Part 1.
My second suggestion is that you check again at the end of Part 3. If you are on gauge (or slightly under), you’ll be fine as far as the suggested yarn yardage goes. If you are over, you may wish to re-start with a smaller hook (or buy more yarn). It is also a good idea to familiarise yourself with the Golden Loop Method (also known as ‘Yankers, Lifters, and Riders’). I am a rider, just in case you wanted to know :)
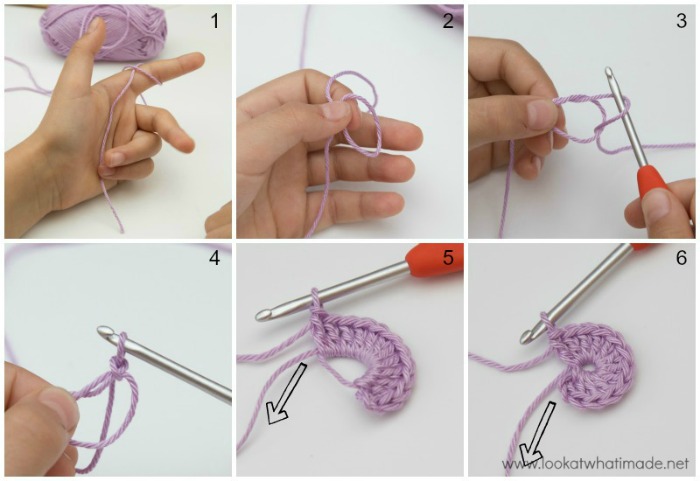
Magic Ring
Magic rings are great because they do not leave a hole in the middle of your project. When using this method it is extremely important that you work your initial yarn end away very well. If it comes undone your whole project might unravel (see Working Away Yarn Ends below).
- Place the end of the yarn in your left palm (right if you are left-handed) and hold it in place with your pinkie and ring finger. Wrap the yarn clockwise around your forefinger so that the working yarn crosses over the yarn end and forms a loop.
- Remove the loop from your finger and hold it by pinching the point where the two strands of yarn overlap.
- Insert your hook into the loop, catch the working yarn end with your hook, and pull it through the loop.
- Yarn over and make a chain stitch. This chain secures your working yarn.
- Following the pattern, work the remainder of the round into the magic ring, remembering to work over the initial yarn end as well.
- When the round is complete, close the hole by pulling on the initial yarn end. Remember to work your yarn end away very well!
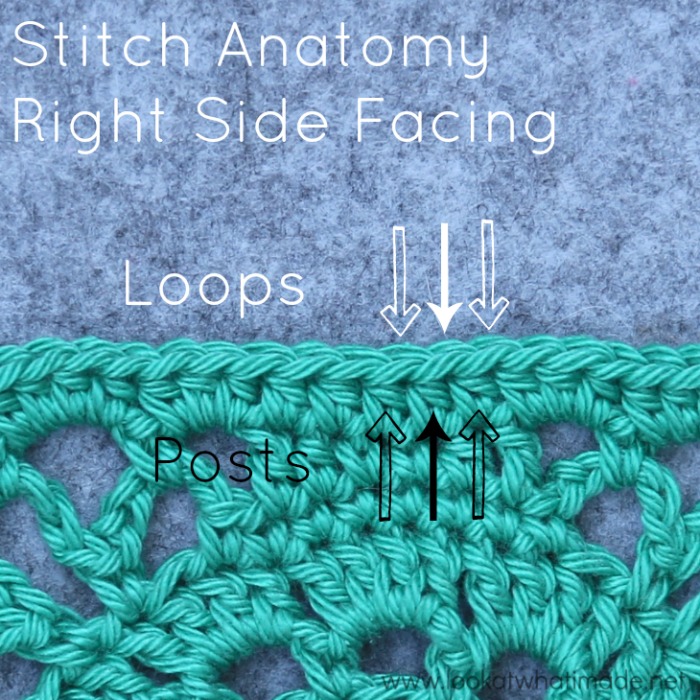
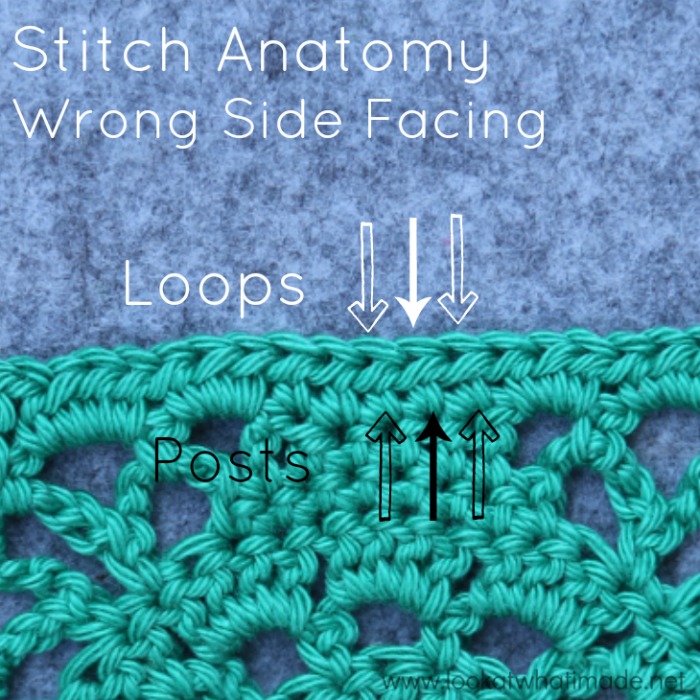
Stitch Anatomy
Stitches consist of posts (the bits that go into the stitches of the previous round) and loops (the horizontal ‘V’s formed by the tops of the stitches). Before you start with this pattern, it is vitally important that you know which ‘loops’ belong to which stitch or ‘post’, and vice versa.
When working with the right side (RS) of the last round facing you, the loops for each stitch can be found to the right of the post for that stitch (left if you are left-handed).
When working with the wrong side (WS) of the last round facing you, the loops for each stitch can be found to the left of the post for that stitch (right if you are left-handed).
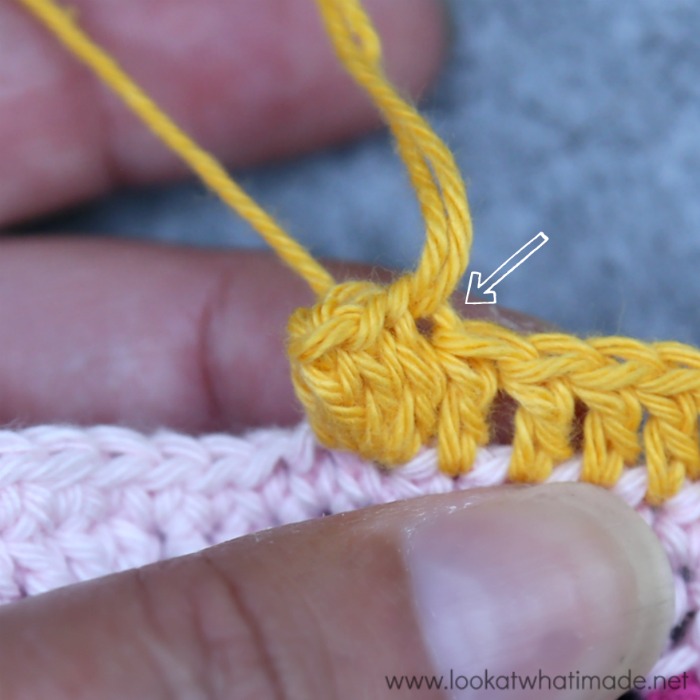
Corners and the Elusive Hidden Stitch
When working in the round, your corners will be formed by working a number of stitches into the corner stitch/space of the previous round. When you’ve made more than one stitch into that corner space (or any other chain space), the loops for the first stitch after the corner (or chain space) can sometimes be hidden.
If you miss this first stitch, your stitch count will be out every single time, no matter how many times you frog and re-do. Sometimes the first stitch after a chain space is NOT hidden, but clearly visible. Even so, I will refer to it as a ‘hidden stitch’, just to remind you to pause and check that you are not accidentally skipping it.
Sometimes you will need to push the stitches out of the way to get into that first stitch. It is worth noting that an hdc directly after any chain space is the most tricky stitch to get into. It is ALSO worth noting that the hidden stitch won’t be nearly as hidden if the WS is facing you.

Using Stitch Markers
Occasionally, I will tell you to mark specific stitches with a SM. This will either be to help you count (in which case you can remove the marker after you have counted your stitches), or to help you identify a stitch in later rounds (in which case you should leave the SM until it has served its purpose). To mark a stitch, insert your SM through both loops of the indicated stitch (or into the indicated space). If you need help identifying which loops belong to which stitch, see Stitch Anatomy above.
If you do not have stitch markers (or you don’t have enough), you can use a piece of scrap yarn to mark your work. I often do!

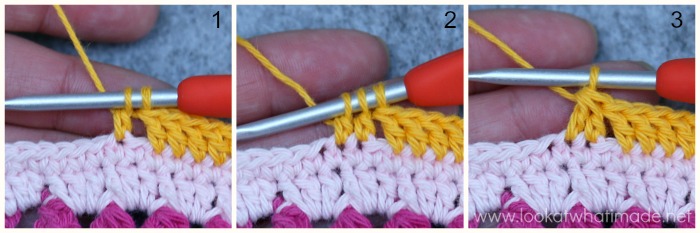
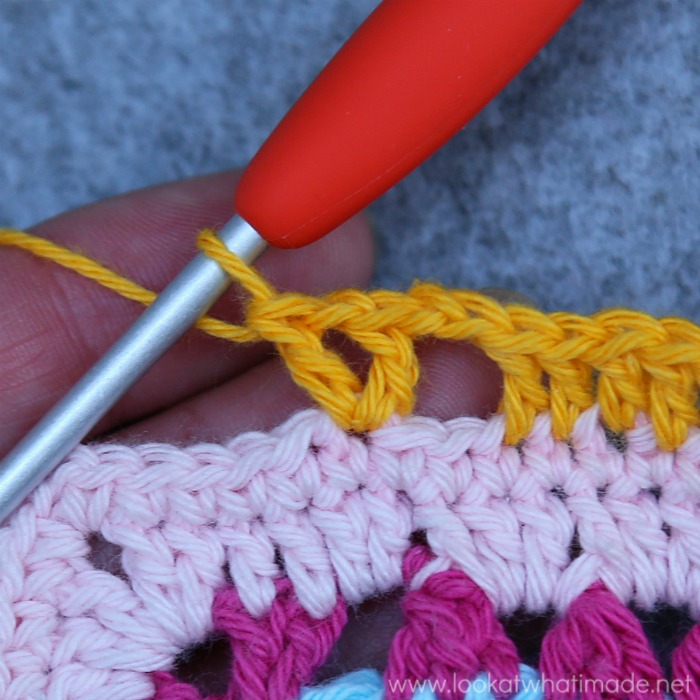
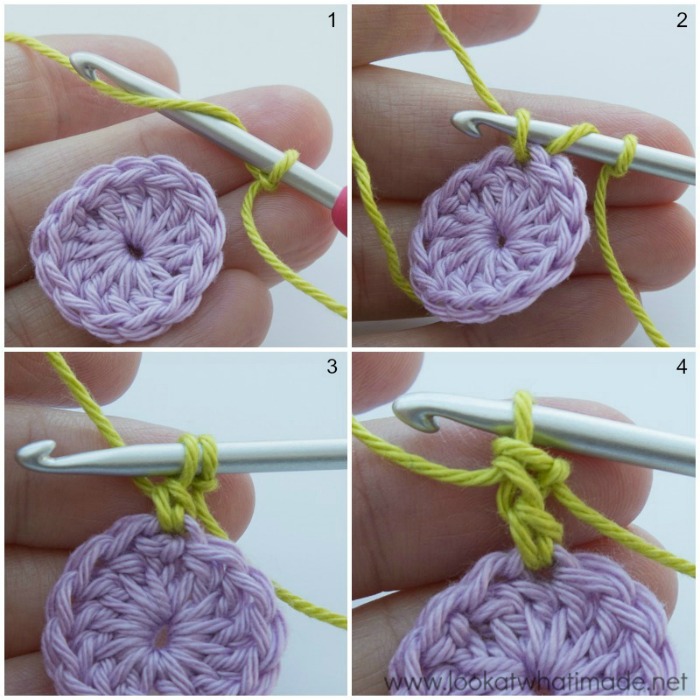
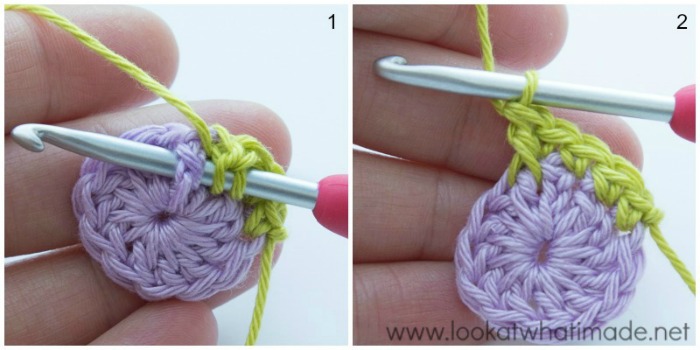
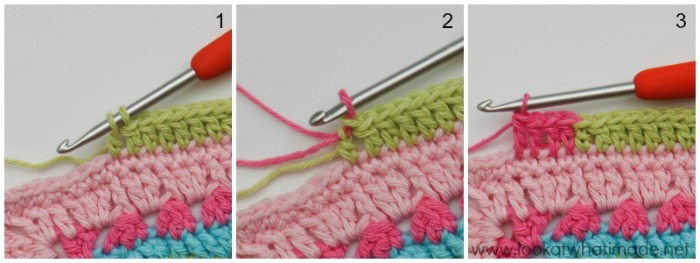
Standing Stitches
Standing stitches are used to start the round when using a new colour (or starting in a different place from where you finished the previous round). They are exactly the same as regular stitches, except that they are made ‘in air’, without being attached to a previous stitch. With a sl knot already on your hook, and holding the knot in place with your index finger, make your stitch as normal.
As an example, I will show you how to do a standing double crochet.
- With a sl knot already on your hook, yarn over.
- Insert your hook into the indicated st/sp. Press the slip knot against your hook with your right index finger (left, if you are left-handed) to prevent it from spinning around your hook when you yarn over. Yarn over again and pull up a loop {3 loops on hook}.
- Yarn over and pull through 2 loops {2 loops on hook}.
- Yarn over and pull through both remaining loops.
Post Stitches
Front Post Stitches
- Identify the post of the stitch you want to work around. Insert your hook from the front to the back and then from the back to the front around the post of the stitch so that the post lies on top of your hook.
- Complete your stitch as normal.
Back Post Stitches
Back post stitches are a bit trickier than front post stitches, but once you get the hang of them you will love them!
- Identify the post of the stitch you want to work around. Insert your hook from the back to the front and then from the front to the back around the post of the stitch so that the post lies behind your hook.
- Complete your stitch as normal.
You might find it easier to twist your work forward so that you can see what you are doing.

Omitting
At the end of some rounds, you will see an instruction telling you to omit the last corner/st(s)/side of the last repeat. This means that your last repeat should stop before the indicated corner/st(s)/side because you will already have made that corner/st(s)/side before the repeat started.
Changing Colours
You can use this method to join a new colour (or a new ball of yarn) in the middle of a round. If you want to make certain elements of the pattern in a different colour, for example, this is how you would switch between colours in a round.
- You will need to change your colour on the last yarn-over of the last stitch before the colour change. In other words, stop when you have 2 loops left on your hook.
- Let go of the old colour/yarn and pick up the new colour/yarn. Draw the new colour/yarn through both loops to complete the stitch.
- Continue as normal.
Joining at the End of a Round/Row
- To join your round with a sl st, identify the st you need to join to.
- Insert your hook into the indicated st/sp…
- …and make a sl st. If you are instructed to join to the top of the beg chain, make sure that you don’t accidentally insert your hook into the top of the first st after the beg chain.
Alternatively, you can use the Invisible Join. You can ONLY use the invisible join if you are fastening off at the end of a round/swapping colours for the next round.
Fastening Off
If you are using a sl st join, cut your yarn about 10cm/4” away from your work (after completing the sl st) and pull the yarn all the way through the st. Work away your yarn ends (see Working Away Yarn Ends below).
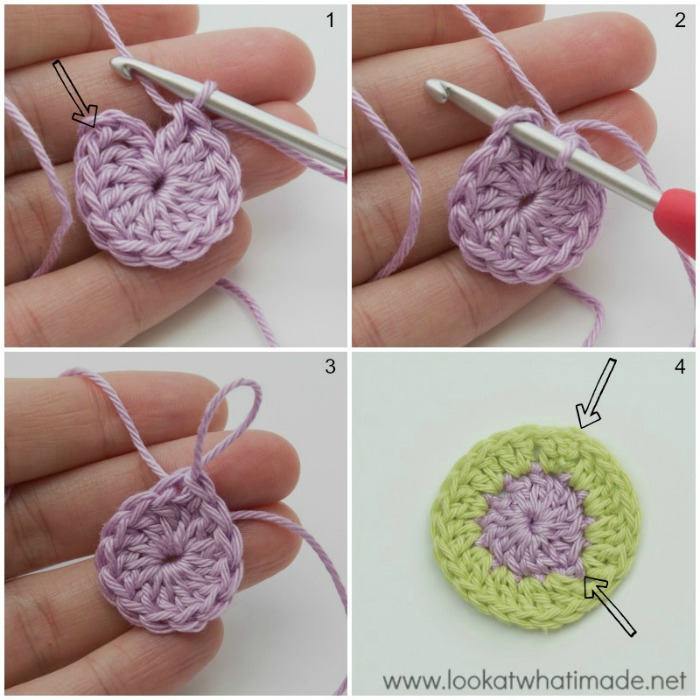
Working Away Yarn Ends
Unfortunately, your project is never complete until you have gotten rid of all the “loose ends”. A pattern will usually tell you to work away your yarn ends when you are done, but I suggest working your ends away as you go. To do that you will need a blunt tapestry needle and a pair of scissors.
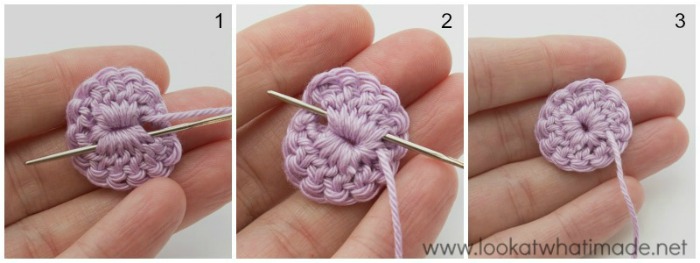
Thread the tapestry needle with the yarn end. Working on the wrong side of the fabric, thread your needle through at least 2.5cm/1” of stitches. Please note that the wrong side of your project is not necessarily the wrong side of the last row/round made! If you are working away your initial yarn end, thread it through at least half of the stitches made into the magic ring {Photo 1}.
Pull the yarn through all the way. Working in the opposite direction and skipping the first stitch, insert your needle back into the same stitches again. Skipping the first stitch is essential because it gives the yarn something to grip on to {Photo 2}. Pull the yarn through again. You can repeat this one more time if you want to make absolutely sure that your yarn ends won’t work themselves loose {Photo 3}.
Cut the yarn close to your work, being careful not to accidentally cut one of your stitches. If you have done this neatly, your tails won’t be visible on the front of your work.
Blocking
This particular blanket needs a very light blocking at most.
If you are going to use foam squares to block on, consider buying these Interlocking Foam Exercise Mats. They are similar to these Knitter’s Pride Lace Blocking Mats but cheaper. You will also need some of these Clover Fork Blocking Pins
(although regular non-rust pins will work as well).
I hope that this post has answered some of the questions you might have and that you will thoroughly enjoy joining us on this journey.

This blog post contains affiliate links. I only link to products I personally use or would use. All opinions are my own.


Bonnie says
Good morning everyone
I have a question. Why I am unable to download this beautiful pattern
I have tried but, when I tried to download all I get is blank white screen
I have tried at least 4 times to download this pattern with no luck.
I can’t wait to start this pattern
Jenny Lowman says
Hi Bonnie. Have you tried the Print Friendly option below Dedri’s signature at the end of each pattern part?
Ida says
Will you be selling a pattern for Charlottes’s Universe when the CAL is finished?
Jenny Lowman says
Hi Aida. Charlotte’s Universe will remain free for all on the blog. No plans for a printed version as yet.
Luanne says
I am soooo excited to start Charlotte. Ive had the reminder on my phone, on my calendar & in my notes. I just printed the stitch techniques. Hook is ready!!
Jenny Lowman says
Hope you are well under way now!
Amelia says
Thank you for the downloadable/printable stitch/technique glossary.
I am looking forward to the 1st! The schedule has been in my planner since I received the announcement email. {Doing a happy dance!}
Jenny Lowman says
We hope you enjoy Charlotte’s new adventures as much as we have here at Team LAWIM, Amelia!
BW
Jenny
Mary Simpson says
Thank you for allowing this as a downloadable file. I’m looking forward to the CAL.
Jenny Lowman says
It’s all so exciting, Mary! We can’t wait for it to all begin in earnest!
BW
Jenny
Theresa Contreras says
I find this very helpful. I see what I have been doing wrong. Thank you for the clear illustrations.
Jenny Lowman says
We hope you can fix any errors without too much trouble, Theresa!
BW
Jenny