I have decided to kill 3 birds with one stone by walking you through the first few rows of the head for my Crochet Rhinosaur.
When people struggle with one of my Amamani patterns, you can bet your bottom dollar the issue will be one of these:
- Not using a running stitch marker
- Not joining in the round correctly (and by this I DO NOT mean that my way is the only correct way – in fact there are four ways to work in the round, but we will discuss that in another post. I simply mean that they are not joining in the round the way I WANT them to for these patterns. And you’d be amazed at the difference this can make to the outcome of a design!)
- Misunderstanding the short rows
I hope that this post will shed some light on these issues and that you can use what you learn in all your future crochet endeavours.
I have now also done a post dedicated solely to working in the round and running stitch markers, so if you are NOT interested in learning about crochet short rows, but have landed here because you want to know more about working in the round (either in a spiral or joining at the end of each round) OR running stitch markers, please see my post How to Crochet in the Round: Spiral vs Joining.
Please note: although I am using the instructions for the Rhinosaur head in this tutorial, I am ONLY using the first 13 rows/rounds, not all 16. So whatever you end up with at the end of this tutorial will NOT be the completed Rhinosaur head. For that, I’m afraid, you’re still going to have to buy the pattern…or wing it…
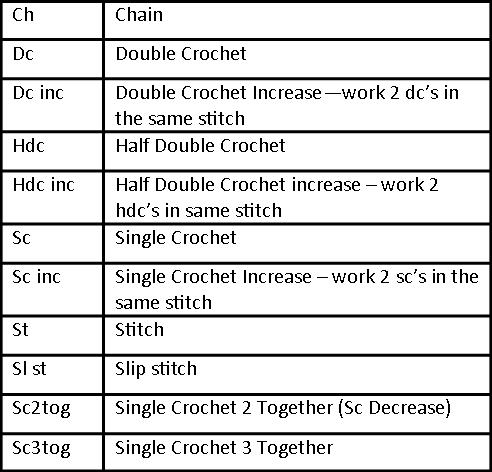
Abbreviations
Crochet Tutorial:
Running Stitch Markers, Joining in the Round and Short Rows
All of my Amamani patterns will feature the following note (unless the pattern doesn’t require joining in the round). Have a little read through and see if you can make sense of it. Don’t worry if you can’t. All will be explained.
The initial ch-1’s in each round/row are NOT counted as a stitch.
{For the purposes of this pattern, when joining in the round, please do not make your first st in the same st as the joining st. This means that your last st will be worked into the back end of the sl st join, which is quite tight, but that is how I learned to crochet (and design)…If you do make your first st in the same st as the sl st join, your head will come out slightly wonky!}
The instructions for the head start with this additional note:
When working the short rows you will notice a “step” where the previous short row started. I refer to these as a visual reminder that you are still on the right track. I also advise you to use a st marker to mark the first st’s of each round.
Although the sl st’s at the end of the short rows are counted as st’s, they are not included in the st counts in parenthesis.
Right. Now that we’ve covered all the notes, let’s get started.
{Partial} Rhinosaur Head Walk-through
1. Start with a magic ring: Ch 1 and make 6 sc’s into the ring. Join to the first st with a sl st. (Alternative way to start the head: ch 4 and join with a sl st. Ch 1 and work 6 sc’s into the resulting ring and join to the first st with a sl st.)


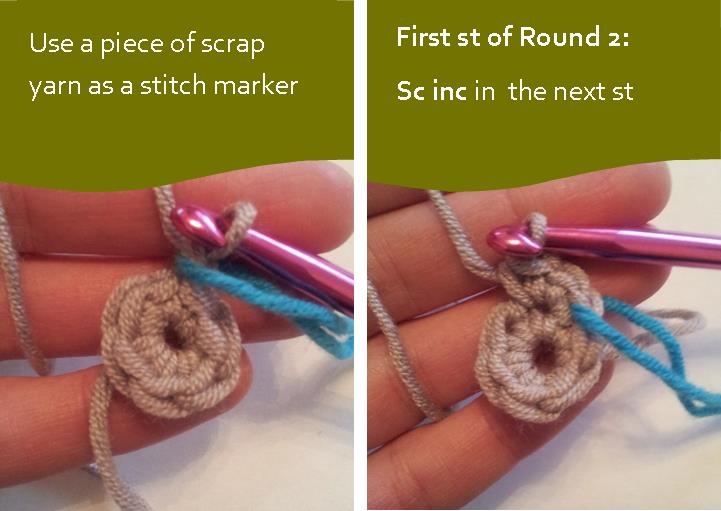
2. Ch 1. Place a piece of scrap yarn over your work. This piece of yarn will become your running stitch marker and will mark the beginning of each round.
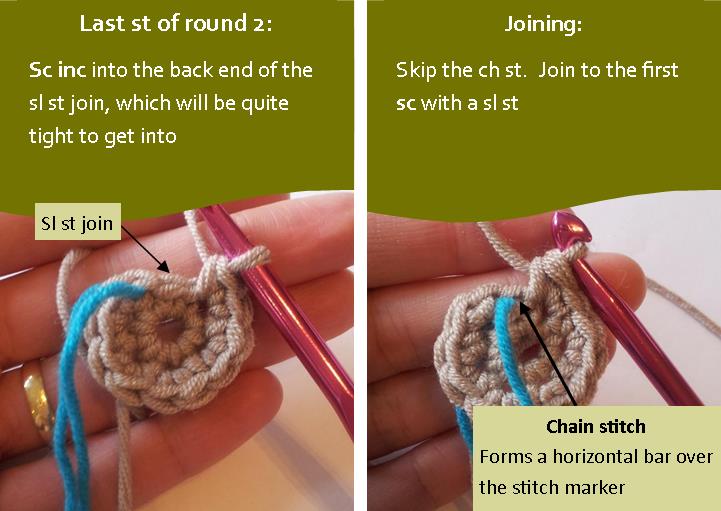
Sc inc in each of the 6 st’s around. (Here you need to remember that your first sc increase should be made in the NEXT st, NOT the same st as the sl st join. This will mean that your last sc increase will be made into the back end of the sl st join, which will be quite tight to get into.) Join to the first st with a sl st. Do not join to the ch-1 as it isn’t counted as a st. If you find it hard to distinguish between the ch st and the first sc, take a look at the photo on the right below. The ch st will form a little horizontal bar over the st marker. SKIP the ch st and join to the next st, which will be the first sc of Round 2. (12)
3. Ch 1. Flick the piece of scrap yarn to the back of your work before continuing. *Sc inc, sc* x 6. Join to the first st with a sl st. (18)
4. Ch 1. 18 x sc. Join to the first st with a sl st. (18)
5-7. Repeat round 4. (18) Remember to keep flicking the stitch marker back and forth at the beginning of every round to mark the first st.
By now you should have a pretty good understanding of how to join in the round when making an Amamani. A good visual reminder that you are joining to the right st in every round is that the running stitch marker (or vertical stitch marker) will move forward slightly on every round (so to your left). If it is going straight up (or even leaning to your right), you are doing something wrong.

Take a deep breath, because we are going to tackle the short rows now.
Crochet Short Rows
Short rows are widely used in knitting, but have yet to gain popularity in crochet circles. I don’t know why they aren’t used more, because they offer a limitless range of shaping options – once you get used to using them.
The name is derived from the fact that short rows do not start and stop at the beginning or end of a row/round. Rather they are worked backwards and forwards across a defined number of stitches, allowing you to either create height and shape OR to turn the direction of your crochet work by 90 degrees (I will touch on this later).
The main problem with short rows is that you have to be VERY clear about where they start and where they end, because a miscalculation or a missed stitch can cause your whole item to come out wonky. (In this pattern it isn’t so bad, but if you are making the horse or the giraffe, it can be detrimental!) To that end you need some sort of landmark to refer to. I use the “step” formed by the beginning of the previous short row for this purpose. It is the point in the crochet work where an angle is formed by the turn at the beginning of the previous short row.
So let’s continue:
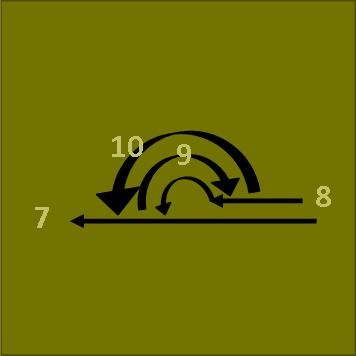
8. Short row: Ch 1. 9 x sc, sl st in the next st and turn. (9)

9. Short row: (worked around the INSIDE of the head) sc in 2nd st ( so skip the sl st). 2 x sc inc, sc, sl st. Turn (6) At this point there is no “step” yet as you have only worked into 5 of the 9 st’s of row 8. For this reason it is VERY important that you check your stitches thoroughly before continuing.

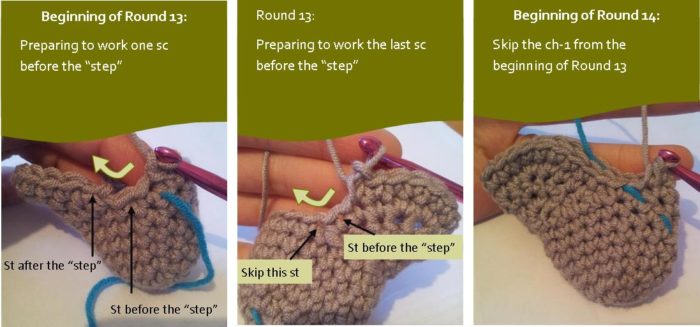
10. Short row: (worked around the outside) sc in the 2nd st (again, make sure that you skip only the sl st). 4 x sc inc, then sc in the next st. This should bring you to the “step” at the beginning of row 9, formed by skipping the sl st (see photo below). You will notice that this st has a little horizontal loop of yarn around it’s base. It is also at a slight angle to the next st. You will now work the next st into the first “open” st of round 7, NOT the st at the base of the step (which already contains a sl st from the end of row 8). This applies to all short rows.
So, working into the next open st of round 7, make a sc. Sl st in the next st and turn. (11) If you do not end up at the step where indicated, count your stitches/check your previous rows very carefully as this can indicate one of 2 things:
A) you didn’t skip the sl st OR you skipped the sl st AND the first st
B) you missed a st on the pattern/didn’t make an increase when you should have.

11. Short row: (worked around the inside) sc in 2nd st. 2 x sc inc, 5 x sc, 2 x sc inc. Sc in the next st. This brings you to the “step” at the beginning of row 10. Sc in the next st of row 8. Sl st in the next st and turn. (16)

12. Short row: (worked around the outside) sc in the 2nd st and next 2 st’s. 2 x sc inc, 6 x sc, 2 x sc inc, 3 x sc. This will bring you to the “step” at the beginning of round 11. 6 x sc in round 7. Sl st to the first st (sc) of round 8 to join. Do not turn. (26)

At this point in the head I realized I had made a mistake somewhere. I thought it would be an ideal time to teach you a bit of trouble shooting, so here goes:
When you get to the “step” in the instructions for Row 12 above, you should have 6 st’s left unworked in round 7. I had only 5 st’s left…
…what to do, what to do…
I could have fudged it, but it was such a perfect teaching opportunity…and be encouraged. I’ve made hundreds of heads and I still miss a stitch sometimes. THAT is why the stitch marker is so important. If I hadn’t used the running stitch marker, I might have convinced myself that everything was fine and just carried on, only to get into trouble later on. Again, on this particular design it wouldn’t be the end of the world, but with the horse and the giraffe it would cause a lot of grief later on.
Trouble shooting
 So why did I have only 5 stitches left?
(Please, when checking your work for errors, start with the last row and the most obvious possibilities, then work your way back. Don’t just frog everything and start again, because you might just continue to make the same mistake.
A) Is Row 12 correct so far? Yes, I double checked the stitches and they match the pattern exactly.
B) Did I accidentally skip the first open stitch when coming off the step? Nope
C) Did I make a mistake in one of my previous short rows? Nope. I ended up at the “step” every time I was meant to, indicating NOT ONLY that my stitches were correct but also that I skipped where I should have and didn’t skip where I shouldn’t have. Plus my stitch counts tallied.
D) Did I make the correct amount of sc’s in the first short row (Row 8)? Yes.
E) Did I remember to ch-1 at the beginning of Row 8? Yes.
Hmmmm. I know I’m a stitch short and the only way that that could have happened is if I either didn’t sc into each st on any one of rounds 4-7 or if I forgot to start with a ch-1 and then subsequently joined to the second sc instead of the first sc on the next round.
So…
F) Did I forget to ch-1 at the beginning of Row 7? YES. Problem solved. And it’s the work of mere minutes to get back to the “step” in Row 12.

13. Ch 1. Sc x 1. This should bring you to the “step”. 20 x sc. This should bring you to the step on the other side. Skip 1. *sc, sc2tog* x 2. Don’t join, just continue working around. (25)
Although I haven’t included the instructions for Round 14, I have included a picture from the beginning of Round 14 to illustrate the importance of the running stitch marker (some more!!). If you don’t use a stitch marker, it becomes very difficult to distinguish between the first st of a round, the slip stitch and the ch st…especially if, like in this case, the next round is worked in a spiral (continuously), and not joined in the round.
Man alive, but my brain is tired now!
I hope this makes sense. If it doesn’t, or you still can’t quite get the head right, give me a shout and I’ll help you out to the best of my ability!
Remember to subscribe to my newsletter if you would like to be kept in the loop. You can also like my Facebook page or follow me on Bloglovin or Google+.
Happy Hooking!




Mary Ann Manconi says
Dear Dedri,
I love your baby elephant and I am trying (for 2 weeks now) to learn the stitching. I finally learned to crochet in the round with slip stitch joins. But now I am having a horrible time with short rows. I have the correct number of stitches, but when I get to the steps, I am always short a stitch. For example:
(where you say: sc in 2nd st (skip the sl st). 2 x sc inc, sc, sl st) I get that. Then I turn and work the outside with sc in the 2nd stitch, 4 x sc inc, sc in the next st. This is were I get lost. There is no last stitch! I am at the step! UNLESS: Is that last sc suppose to be done after the step? I’m thinking it was suppose to be done before the step. Oh My! I really want to make this baby elephant because it is the most adorable elephant out there. I had my first grand baby this past December and I bought her this beautiful book about an elephant and his blanket. Any help you can give me I will greatly appreciate it.
Dedri Uys says
Hi Mary Ann. Can I check that we are talking about the same short row here?
11. Short Row: Skip the sl st. Sc inc in the next st. 2 x sc, sc inc. This will bring you to the “step” at the beginning of Short Row 10 (see photo below). Sl st in the next st of Round 9 and TURN. (6)
This short row has: skip sl st, sc inc, sc, sc, sc inc = 6 stitches. Above you mention sc, sc inc, sc inc, sc, which still gives you 6 sts, but I just want to check that this is the row you are talking about. If it is, then in the next short row, you should work into these 6 sts as follows: Sc inc, sc, sc, sc, sc, sc inc. This will bring you to the “step” at the beginning of Short Row 11.
I suspect that, when you skip the sl st, you ALSO skip the first sc of the previous short row. Try this and see if it will help:
Place a stitch marker in the first and last sc of short row 11 before you turn. Then work into the 6 stitches of short row 11, starting in the marked stitch and ending in the other marked stitch.
Please let me know how you go :)
Dedri
Ruth says
Thank you for this excellent tutorial. I think I’ll be coming back to it again and again!
Dedri Uys says
I’m glad you found it useful :)
Dana says
Hi, hi. I was following the tutorial very well for the short rows, until we got to row 10. It says:
You will now work the next st into the first “open” st of round 7, NOT the st at the base of the step.
From the picture, it looks like you worked into the sl st – the angle stitch. I’m not sure where to put the sc in the “open” st. Do you have a picture that could show that step please?
Do love the look of short rows, figuring out where to put the stitches is really the problem. Any help appreciated. Cheers.
Dedri Uys says
Hi. I am so pleased that you are experimenting with short rows.
If you have a look at the photo for round 10 that says : “The step at the beginning of Row 9”, you will see an arrow pointing to the st at the base of the step, which already contains a sl st. Do not work into that stitch. Work into the stitch to the left of it (on the photo). If you look at the next photo that shows that sc completed, can you see the hole at the bottom of that sc (created by making that sc into the st on the previous round)? Just to the right of that hole is another hole with no st in it. THAT is the skipped st that contained the sl st. I hope that makes sense.
Maybe the photo tutorial for Colin the Crocodile will make more sense? Photo 23, in particular, shows the first open/unworked st after the step.
Bernie Devlin says
THANK YOU SO MUCH FOR THE TUTORIALS!!
I’m learning to crochet and cudnt find good understandable instructions anywhere.
Dedri Uys says
You’re welcome. Good luck with learning this new skill :)
Sandy summers says
Do you have a clearer tutorial on the elephant head security blanket that is yellow an white. I just can’t seem to get from the trunk to the head. This is between steps 12-15. On your instructions you say see tutorial but it’s for a different animal.
Sandy
Dedri Uys says
Hi Sandy.
The elephant head has step-by-step photos. The link for the tutorial is only to help you understand the short rows if you have a problem with them. If you use the contact me tab in my website menu to email me, we can talk through the pattern step by step.
Stephanie E says
Your directions and pictures are very helpful but I definitely need some more guidance on the short rows! Is there any chance of a video of this?? I need a verbal walk thru/demonstration – that’s the best way I learn and desperately want to learn this technique!!
Thank you in advance!!
Dedri Uys says
Hi Stephanie. Unfortunately I am not going to be doing any more video tutorials for the foreseeable future, but maybe this photo tutorial by Kat Goldkin will make more sense to you. http://www.slugsontherefrigerator.com/blog/how-to-crochet-short-rows
Carrie says
This post was so helpful! If I hadn’t read it before making Meimei I probably would have been so confused. It was also EXTREMELY helpful because I got a request for a polar bear Amish ball. I hope it turns out good (and I get it done before Christmas!). I’m having a little trouble on the legs. I think I’ll be able to figure them out eventually. Wish me luck and thanks for getting me on the path of making Amish puzzle balls!
Dedri Uys says
Thank you :) What about the legs are confusing you? Maybe I can clear it up a bit?
Carrie says
I’m so sorry I didn’t get back to you. Holidays = Supper Busy :)
If I just made a tube for the legs, when I attached them they would stick out at different angles and not stand up. I was trying to make a triangular sort of piece to put above the tube to rap around the segment a little. Does that make sense? Sorry, I’m describing as well as I can. What I’m having trouble on is how much to increase on each row for the triangle. The tube and the triangle would be worked from top down (so I would start with the triangle tip) and they would make a regular pentagon. I think that’s what you did for your lion but I don’t know ’cause I’ve never made any but you free patterns. Yet :D
If you could help that would be great!, if you can’t I understand.
Carrie says
Sorry, when I said lion I meant Brill your amish lion
Dedri Uys says
I guessed that :) I’ve replied to your comment about the wreath and have answered you there. Could you please get back to me on that? TA
maria says
ek vergeet jys afrikaans< jy ken seker Bloemfontein. Ek geniet jou web baie, as ek soek na oplossings. Ek wil net weet HOE tel ek van waar af tel ek as ek in rondtes hekel. my hoedjies werk altyd met 'n punt en my steke vanaf die derde ry werk net NIE reg nie. Sterkte daar ver anderkant die waters
Dedri Uys says
Ag dankie, man :) Ek skiet vir jou ‘n emailtjie dan kyk ons of ons die ding kan uitsorteer x