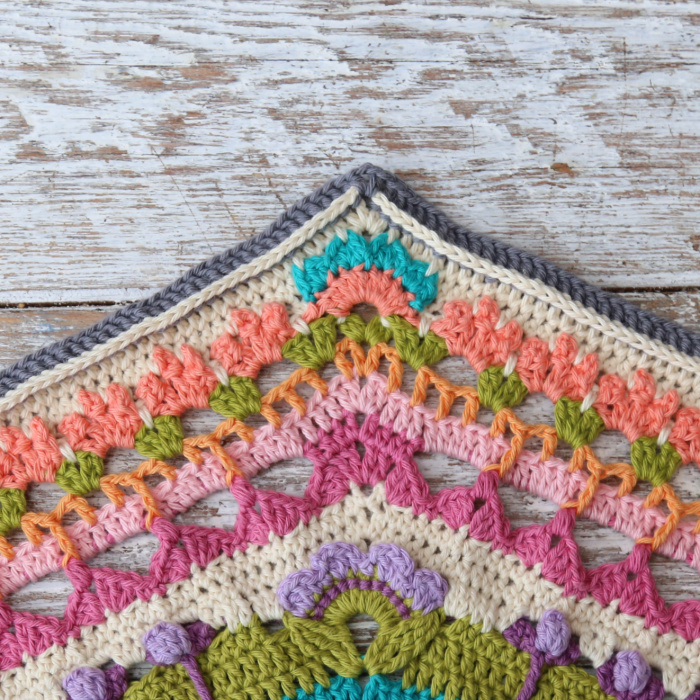
Welcome to Part 7 of Universe in Bloom! In this part, we will continue planting flowers and introduce a bit more solidity to help everything settle into place.
Resources
>>Universe in Bloom Information Post<<
- Universe in Bloom on Ravelry
- PDFs – these contain a condensed version of the pattern below, and can be found on the Scheepjes Website:
- English PDFs (US and UK Terms)
- Dutch PDF
Video Playlists
- English US Terminology
- Dutch
Abbreviations, Special Stitches, Chart Legend
The photo tutorial below uses US Terminology. Please see the Special Stitches and Techniques Post HERE for Photo Tutorials and Chart Legend.
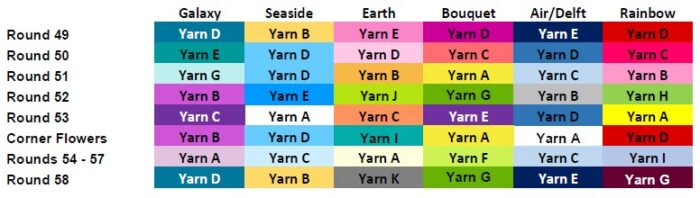
Colours Per Round
Errata
Thank you to Cristina Rodriquez for pointing out that one of my photos for Round 57 was wrong. Cristina has kindly allowed me to use her photo to update that collage and final photo. Thank you so much, Cristina! You’ve saved me hours of re-making!!
Instructions
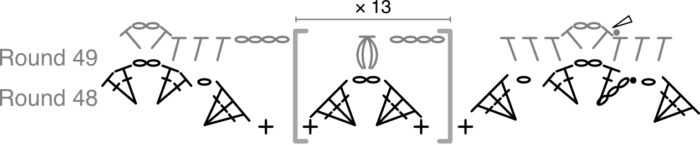
Round 49
When making the ch-4 sps in this round, try to keep your tension relaxed. This round should pull in slightly, but not much. Remember that your Puff stitches are closed with a ch st.
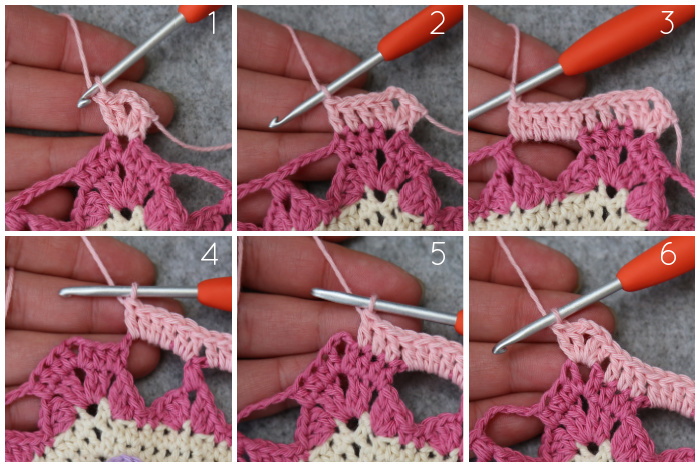
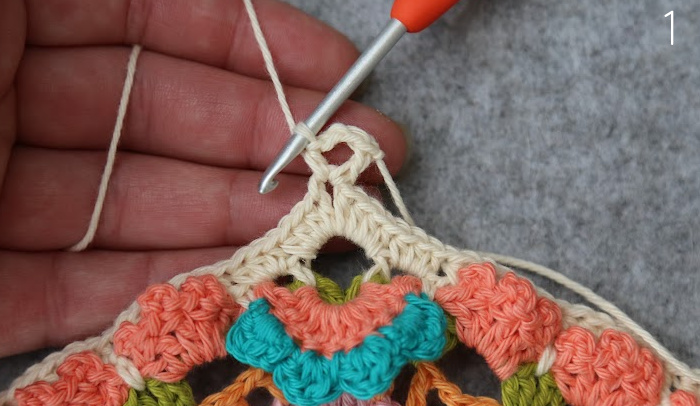
Join your yarn by making a standing hdc in any ch-2 corner sp. Ch 2, hdc in the same ch-2 corner sp {Photo 1}. This is your first corner made.
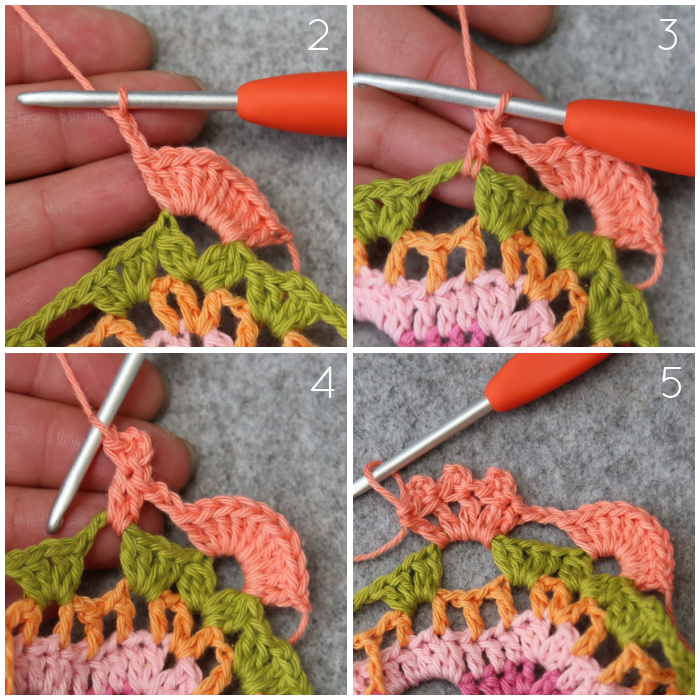
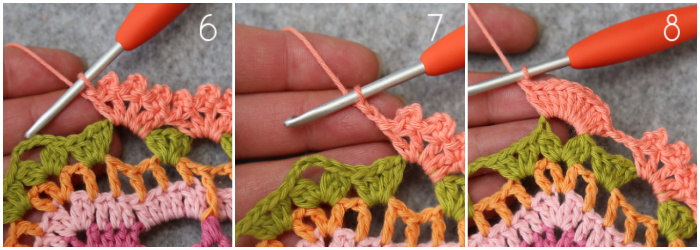
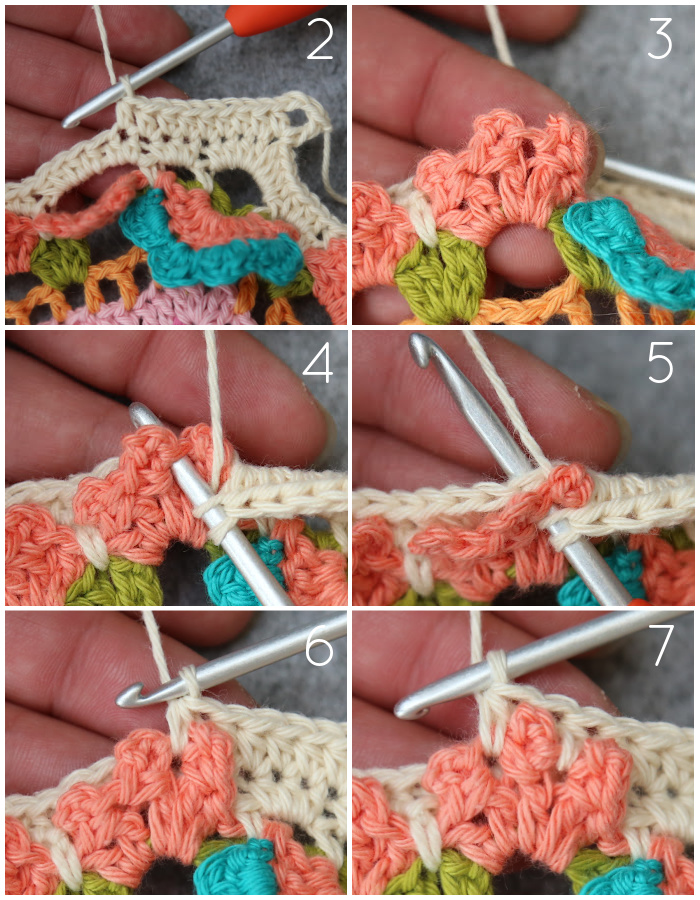
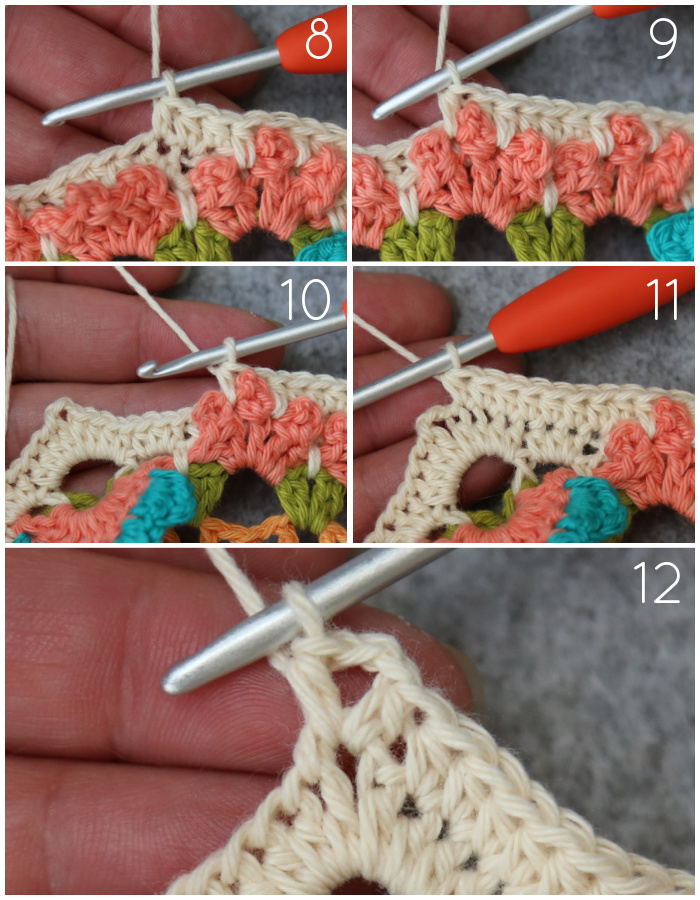
*Hdc in the first 2 sts, hdc in the next ch-1 sp {Photos 2 and 3}. (Ch 4 {Photo 4}, make a Puff st in the ch-2 sp of the next Scallop {Photo 5}) 13 times {Photo 6}. Ch 4, hdc in the last ch-1 sp, hdc in the last 2 sts {Photos 7 and 8}. [Hdc, ch 2, hdc] in the next ch-2 sp {Photo 9}.*
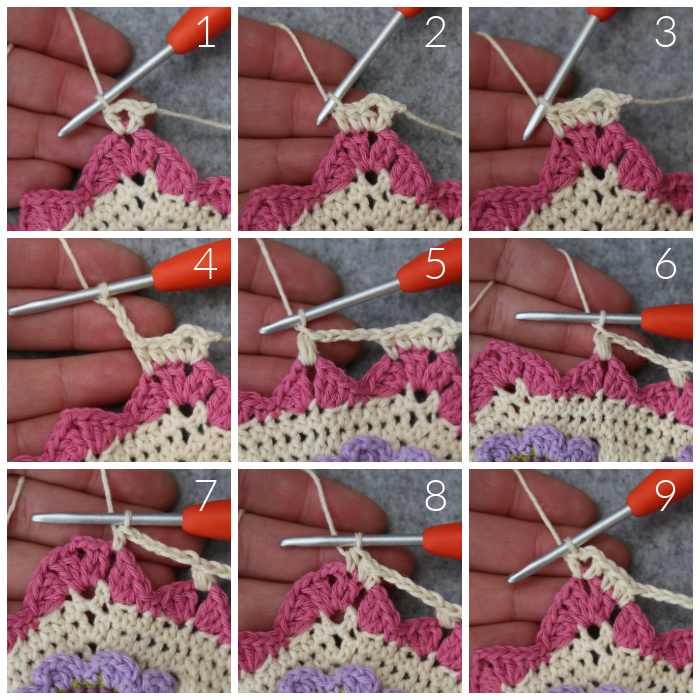
Rep from * to * 7 more times, omitting the last corner on the last repeat. Join to the top of the first hdc with a sl st. Fasten off and work away your ends.
Stitch Count per Side: 8 hdc, 13 Puff stitches, and 14 ch-4 sps, not including ch-2 corner sps.

Round 50
Join your yarn by making a standing dc in any ch-2 corner sp. [Dc, ch 2, 2 dc] in the same ch-2 corner sp {Photo 1}. This is your first corner made.
*Skip the first (hidden) st, dc in the next 3 sts {Photo 2}. (Make 6 dc in the next ch-4 sp) 14 times {Photos 3 and 4}. Skip the next st, dc in the last 3 sts {Photo 5}. [2 dc, ch 2, 2 dc] in the next ch-2 corner sp {Photo 6}.*
Rep from * to * 7 more times, omitting the last corner on the last repeat. Join to the top of the first dc with a sl st. Fasten off and work away your ends.
Stitch Count per Side: 94 dc, not including ch-2 corner sps.

Round 51
Join your yarn by making a standing dc in any ch-2 corner sp. [Ch 1, dc] in the same ch-2 corner sp {Photo 1}. This is your first corner made.
*Ch 1, dc in the first st {Photo 2}. (Ch 1, skip the next st, dc in the next st) 4 times {Photo 3}. This last dc should fall in the 4th dc of the first 6-dc group made into a ch-4 sp.

(Ch 1, skip the last 2 dc of the 6-dc group, make a FPtr around the Puff st from Round 49 {Photos 4 and 5}. Ch 1, skip the first dc of the next 6-dc group, dc in the next dc. Ch 1, skip the next dc, dc in the next dc {Photo 6}) 13 times {Photo 7}. There should now be 7 sts left.
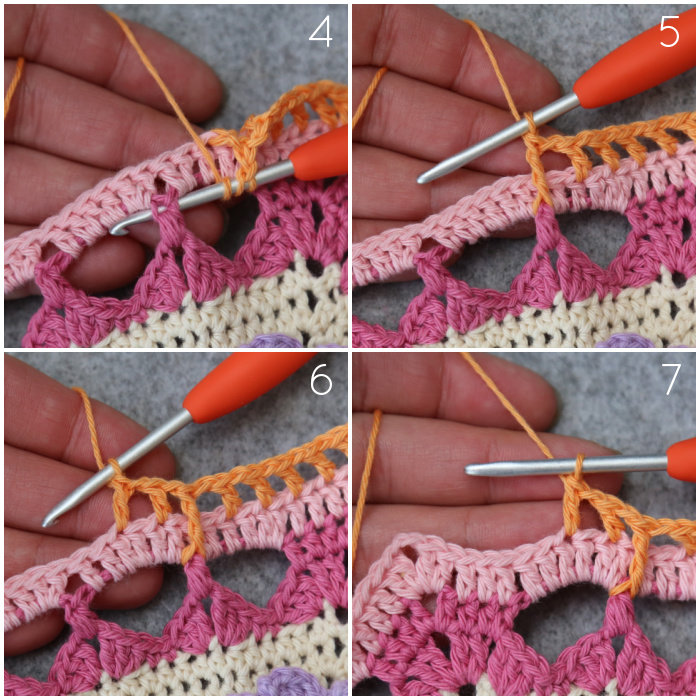
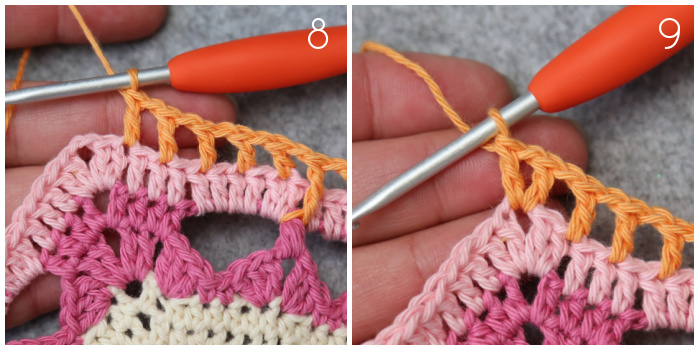
(Ch 1, skip the next st, dc in the next st) 3 times {Photo 8}. Ch 1, skip the last st. [Dc, ch 1, dc] in the next ch-2 corner sp {Photo 9}.*
Rep from * to * 7 more times, omitting the last corner on the last repeat. Join to the top of the first dc with a sl st. Fasten off and work away your ends.
Stitch Count per Side: 36 dc, 13 FPtr, and 48 ch-1 sps, not including ch-1 corner sps.

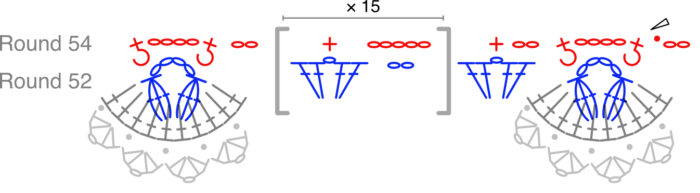
Round 52
In this round, you will work only into the indicated ch-1 sps, skipping all other sts and ch-1 sps.
Join your yarn by making a standing 3-dc Bobble in the ch-1 corner sp. Mark this 3-dc Bobble with a SM so that you can identify it in Round 54. Ch 4, make a 3-dc Bobble in the same ch-1 sp. This is your first corner made {Photo 1}.
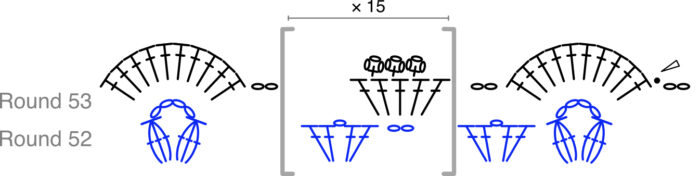
*Skip the next ch-1 sp. [2 dc, ch 1, 2 dc] in the next ch-1 sp {Photo 2}. (Ch 2, skip the next two ch-1 sps, [2 dc, ch 1, 2 dc] in the next ch-1 sp {Photo 3}) 15 times {Photo 4}. Skip the last ch-1 sp before the corner ch-1 sp. [3-dc Bobble, ch 4, 3-dc Bobble] in the ch-1 corner sp {Photo 5}.*
Rep from * to * 7 more times, omitting the last corner on the last repeat. Join to the top of the first 3-dc Bobble with a sl st. Fasten off and work away your ends.
Stitch Count per Side: 64 dc, 2 3-dc Bobbles, 16 ch-1 sps, and 15 ch-2 sps, not including ch-4 corner sps.

Round 53
In this round, you will skip all the ch-1 sps.
Join your yarn by making a standing dc in any ch-4 corner sp. Make 9 dc in the same ch-4 sp. This is your first corner made {Photo 1}.
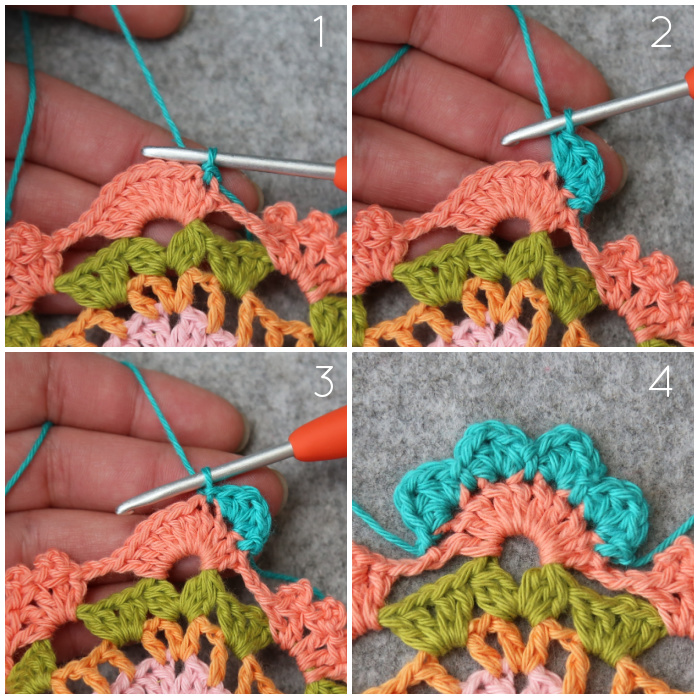
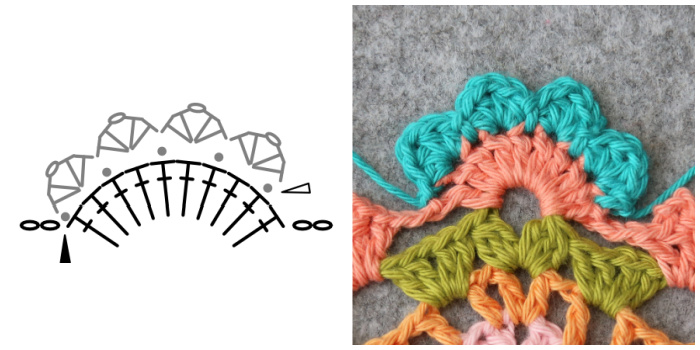
*Ch 2 {Photo 2}. Dc in the next ch-2 sp {Photo 3}. Make 3 Picot dc in the same ch-2 sp, and then make a dc in the same ch-2 sp {Photos 4 and 5}. This is your first ‘Flower’ made.
([Dc, 3 Picot dc, dc] in the next ch-2 sp) 14 times {Photo 6}. You should now have 15 Flowers. Ch 2 {Photo 7}, make 10 dc in the next ch-4 corner sp {Photo 8}.*
Rep from * to * 7 more times, omitting the last corner on the last repeat. Join to the top of the first dc with a sl st. Fasten off and work away your ends.
Stitch Count per Side: 30 dc, 45 Picot dc, and 2 ch-2 sps, not including 10 corner dc sts.
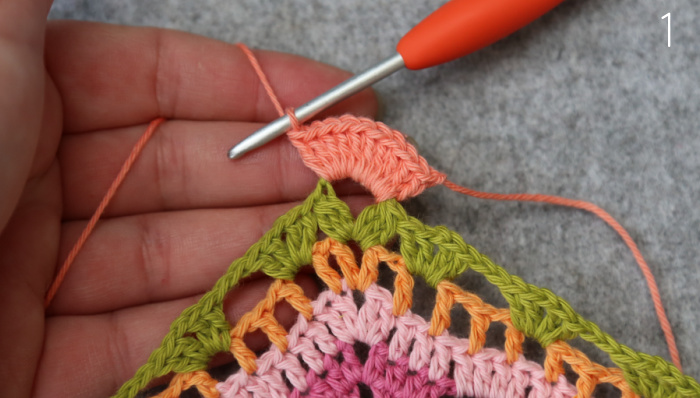
Corner Flowers
Before we continue, we are going to add some corner flowers.
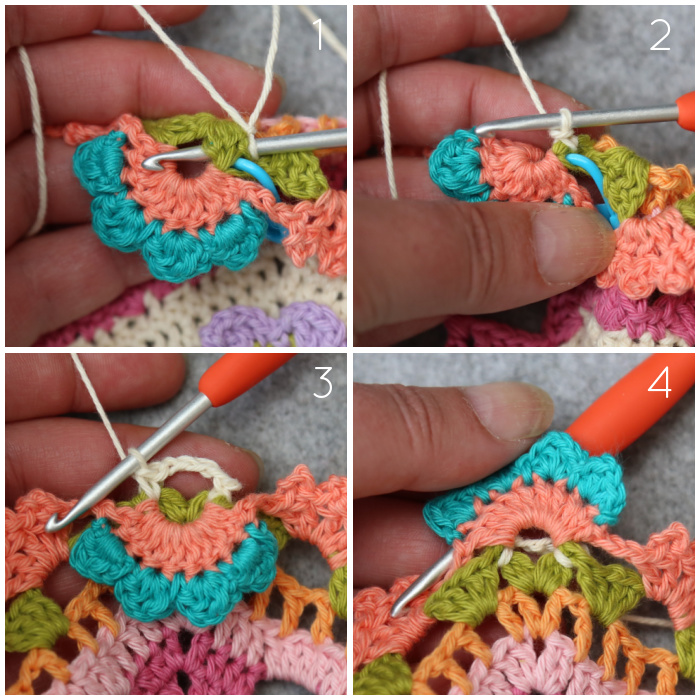
Join your yarn by making a sl st in the second dc of any 10-dc corner {Photo 1}. ([2 hdc, ch 1, 2 hdc] in the next st {Photo 2}, sl st in the next st {Photo 3}) 4 times {Photo 4}. Fasten off and work away your ends.
Stitch Count: 4 Petals (each containing 4 hdc and 1 ch-1 sp)
Repeat this for each of the remaining 7 corners.
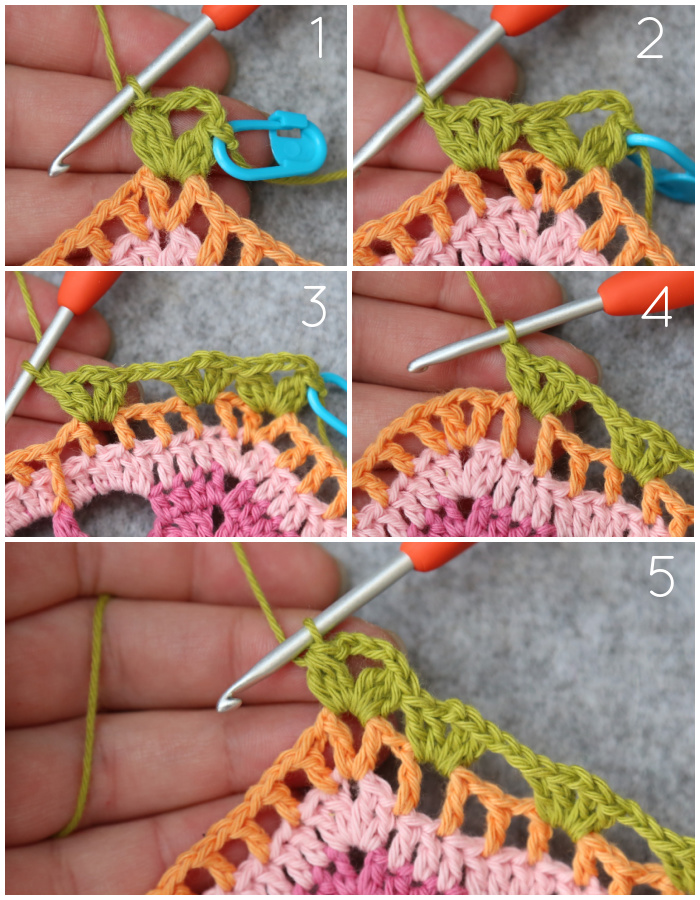
Round 54
In this round, you will work only into Round 52, working OVER Round 53 where indicated.
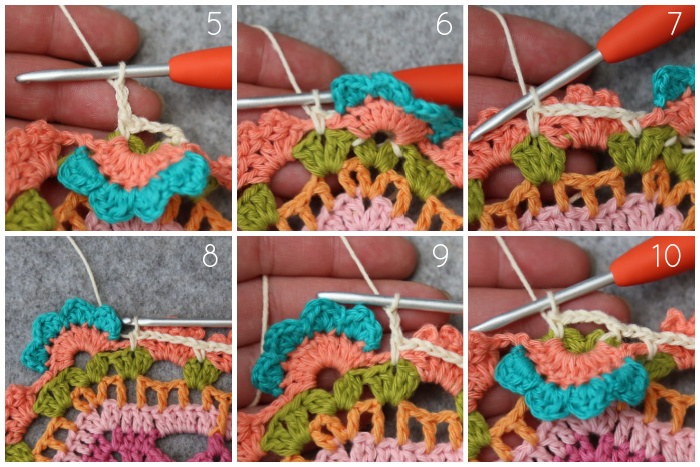
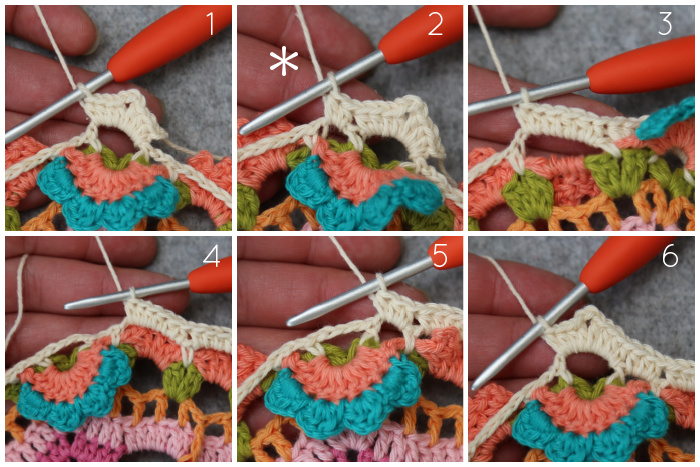
Join your yarn by making a standing BPsc around the marked 3-dc Bobble from Round 52 {Photos 1 and 2}. Remove the SM. Ch 4, BPsc around the next 3-dc Bobble {Photos 3 and 4}. This is your first corner made.
*Ch 2 {Photo 5}, make a sc in the next ch-1 sp of Round 52, working OVER the ch-2 sp from Round 53 {Photo 6}. (Ch 5, make a sc in the next ch-1 sp of Round 52, working OVER Round 53) 15 times {Photos 7 and 8}. Ch 2 {Photo 9}, BPsc around the next 3-dc Bobble from Round 52, ch 4, BPsc around the next 3-dc Bobble from Round 52 {Photo 10}.*
Rep from * to * 7 more times, omitting the last corner on the last repeat. Join to the top of the first BPsc with a sl st.
Stitch Count per Side: 16 sc, 2 BPsc, 2 ch-2 sps, and 15 ch-5 sps, not including ch-4 corner sps.

Round 55
Note about Photo 2 below: I got snap-happy and took this photo before I’d made all 3 of the hdc’s in the ch-2 sp. I have decided to include it to illustrate where to find the ch-2 sp, but please be mindful that there should be 3 hdc in that space.
Sl st in the next ch-4 sp. Ch 2, [3 hdc, ch 2, 4 hdc] in the same ch-4 sp. This is your first corner made {Photo 1}.
*Make 3 hdc in the next ch-2 sp {Photo 2 shows 2 of the 3 hdc made}. (Make 6 hdc in the next ch-5 sp) 15 times {Photos 3 and 4}. Make 3 hdc in the next ch-2 sp {Photo 5}. [4 hdc, ch 2, 4 hdc] in the next ch-4 corner sp {Photo 6}.*
Rep from * to * 7 more times, omitting the last corner on the last repeat. Join to the top of the beg ch-2 with a sl st.
Stitch Count per Side: 104 hdc, not including ch-2 corner sps.

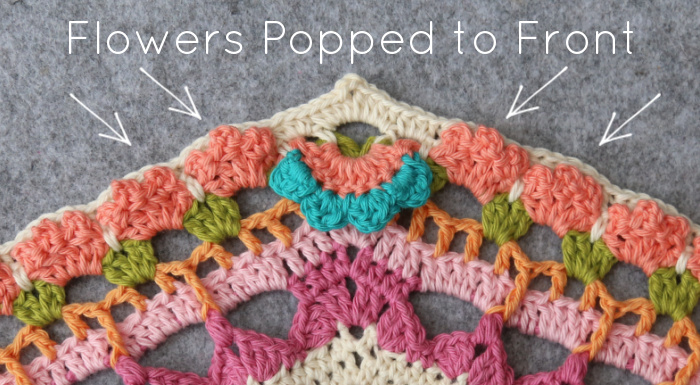
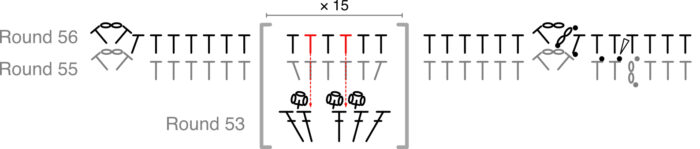
Round 56
Before starting this round, make sure that you have popped ALL the Flowers to the front of your work. We will be ‘catching’ the Flowers as we go.
Sl st in the next 3 sts and the ch-2 corner sp. Ch 4 (counts as hdc + ch-2), hdc in the same ch-2 sp. This is your first corner made {Photo 1}.
*Skip the first st, which will be tricky to get into anyway. Hdc in the next 8 sts {Photo 1}. Make an hdc in the dc from Round 53 between the first and second Picot AND the next st, which will be the third hdc made into the ch-5 sp (here and throughout). This is your first ‘catching hdc’ {Photos 3 – 6}. Hdc in the next st. Make a catching hdc in the dc from Round 53 between the second and third Picot AND the next st, which should be the fifth hdc made into the ch-5 sp (here and throughout) – Photo 7.
Please check these landmarks on every repeat. It is very easy to skip an hdc in this round accidentally.
(Hdc in the next 3 sts {Photo 8}, make a catching hdc in the dc from Round 53 between the first and second Picot, hdc in the next st, make a catching hdc in the dc from Round 53 between the second and third Picot) 14 times {Photos 9 and 10}. Hdc in the last 8 sts {Photo 11}. [Hdc, ch 2, hdc] in the next ch-2 corner sp {Photo 12}.*
Rep from * to * 7 more times, omitting the last corner on the last repeat. Join to the second ch of the beg ch-4 with a sl st.
Stitch Count per Side: 75 hdc and 30 ‘catching hdc’, not including ch-2 corner sps.
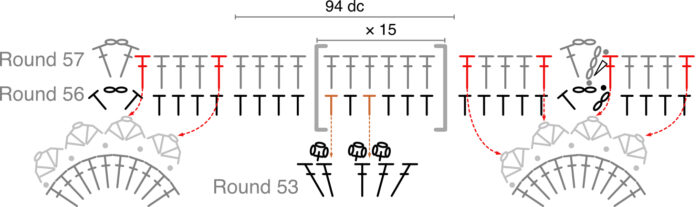
Round 57
Sl st in the next ch-2 sp. Ch 5, dc in the same ch-2 sp. This is your first corner made {Photo 1}.

*Skip the first st, which will be tricky to get into anyway. Catch the third Petal of the Corner Flower by making a dc in the ch-1 sp of the third Petal AND the next st of Round 56 together (here and throughout) – Photos 2 and 3. Dc in the next 3 sts {Photo 4}. Catch the fourth Petal of the Corner Flower by making a dc in the ch-1 sp of the fourth Petal AND the next st of Round 56 {Photo 5}.
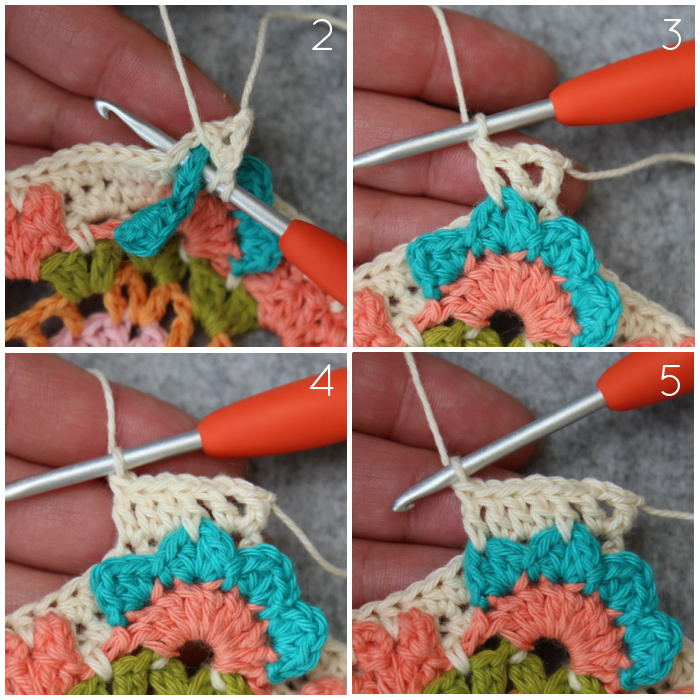
Dc in the next 94 sts (see Tester’s Tip below) – Photo 6. There should now be 5 sts left.

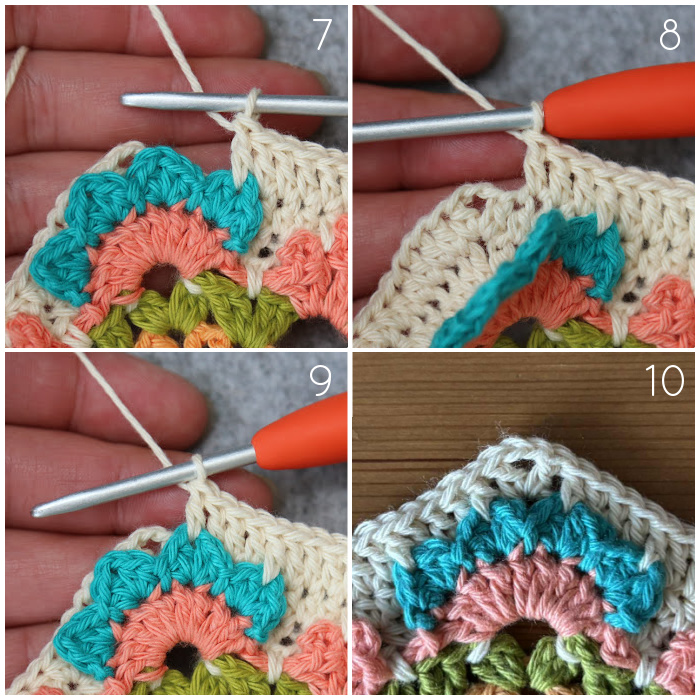
Dc in the ch-1 sp of the first Petal of the Corner Flower AND the next st {Photo 7}. Dc in the next 3 sts {Photo 8}. Dc in the ch-1 sp of the second Petal of the Corner Flower AND the next (last) st {Photo 9}. [Dc, ch 2, dc] in the next ch-2 corner sp {Photo 10}.*
Rep from * to * 7 more times, omitting the last corner on the last repeat. Join to the third ch of the beg ch-5 with a sl st. Fasten off and work away your ends.
Stitch Count per Side: 106 dc, not including ch-2 corner sps.
Tester’s Tip: When making these 94 sts, you may find it easier to work in sets of 6 sts (the 4th and 6th of which will fall in a ‘catching dc) until 9 sts remain (15 repeats). Dc in the next 4 sts. This equals 94 sts – Susanne van der Wal
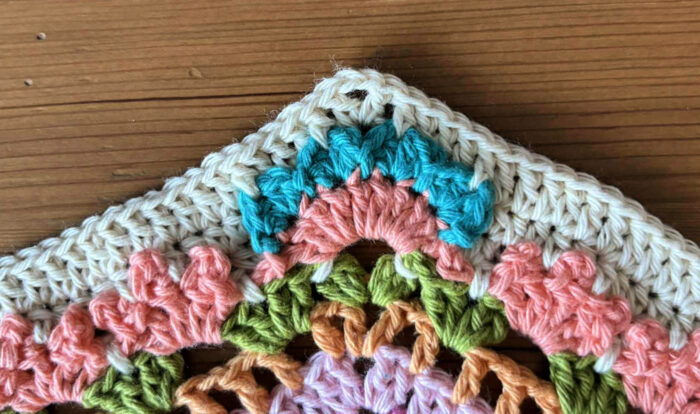
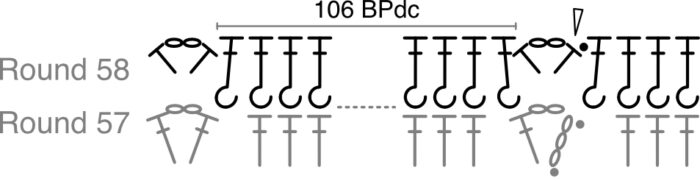
Round 58
Join your yarn by making a standing hdc in any ch-2 corner sp around. [Ch 2, hdc] in the same ch-2 sp. This is your first corner made.
*BPdc in the next 106 sts. [Hdc, ch 2, hdc] in the next ch-2 corner sp.*
Rep from * to * 7 more times, omitting the last corner on the last repeat. Join to the first hdc with a sl st. Fasten off and work away your ends – this is not necessary if you are going to use the same colour for the next round (Seaside Colourway, I’m looking at you…)
Stitch Count per Side: 2 hdc and 106 BPdc, not including ch-2 corner sps.
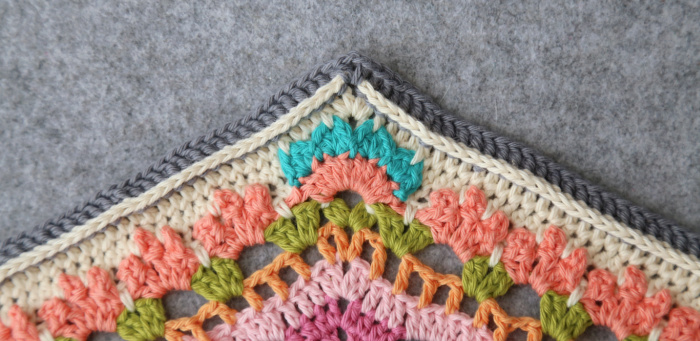
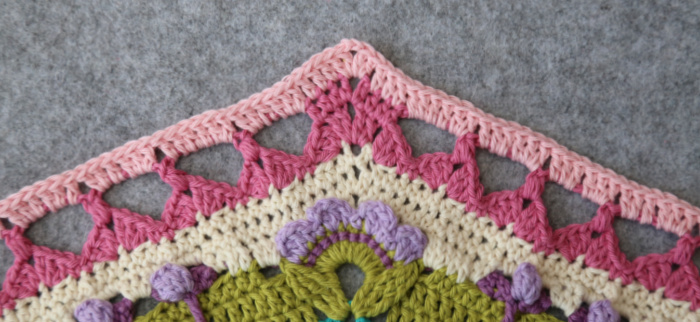
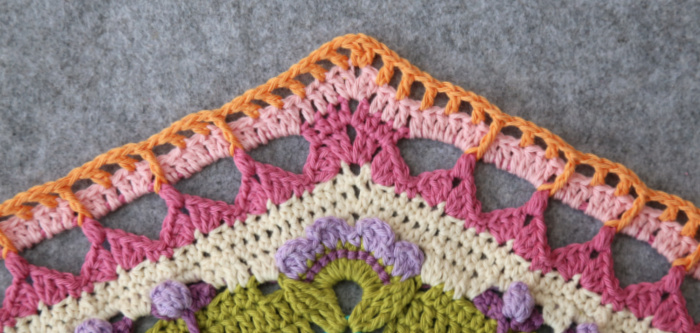
Phew… how did that go for you? This part should have straightened out the wobbliness of the last part, yielding a neat octagon. You may need to tug on your work a little bit to stretch it and help all those stitches relax into place.
Next week, we will start creating our Pineapple lace rainbow :)

This blog post contains affiliate links. I only link to products I personally use or would use. All opinions are my own.


