You will be pleased to know that things get easier from this point on! And may I just say that I LOVE all the beautiful photos you have shared so far. It makes me so happy to see all the Part 1 and Heart House bits laid out in such creative ways.
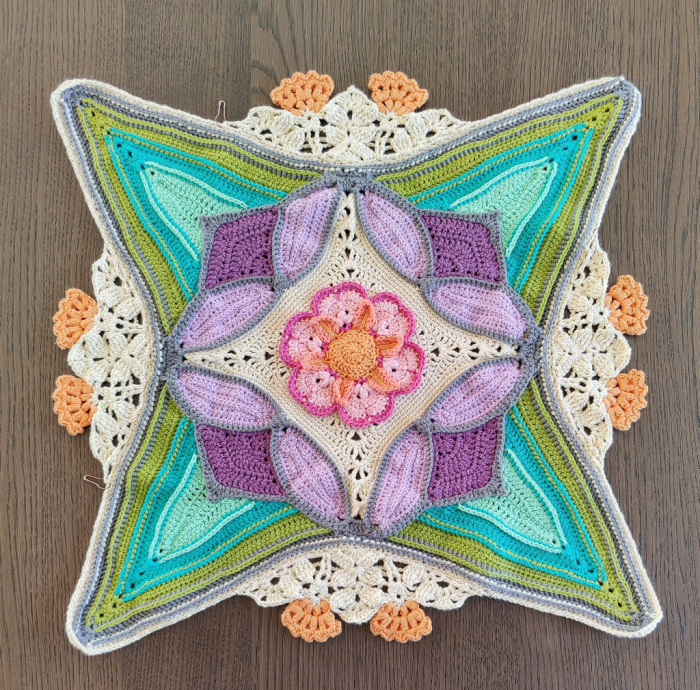
Photo Credit: Ruth Lambert
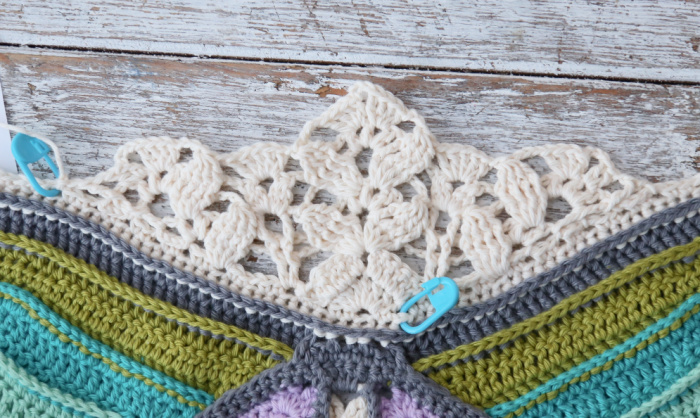
In Parts 3 and 4 of Universe in Bloom, we will create a lacy circle. A meadow, if you will, in which our central flower takes centre stage.
Resources
>>Universe in Bloom Information Post<<
- Universe in Bloom on Ravelry
- PDFs – these contain a condensed version of the pattern below, and can be found on the Scheepjes Website:
- English PDFs (US and UK Terms)
- Dutch PDF
Video Playlists
- English US Terminology
- Dutch
Abbreviations, Special Stitches, Chart Legend
The photo tutorial below uses US Terminology. Please see the Special Stitches and Techniques Post HERE for Photo Tutorials and Chart Legend.
Colours Per Round

Instructions
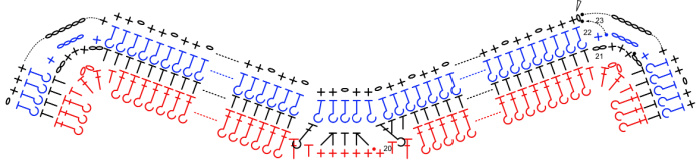
Round 21 – Framing Round
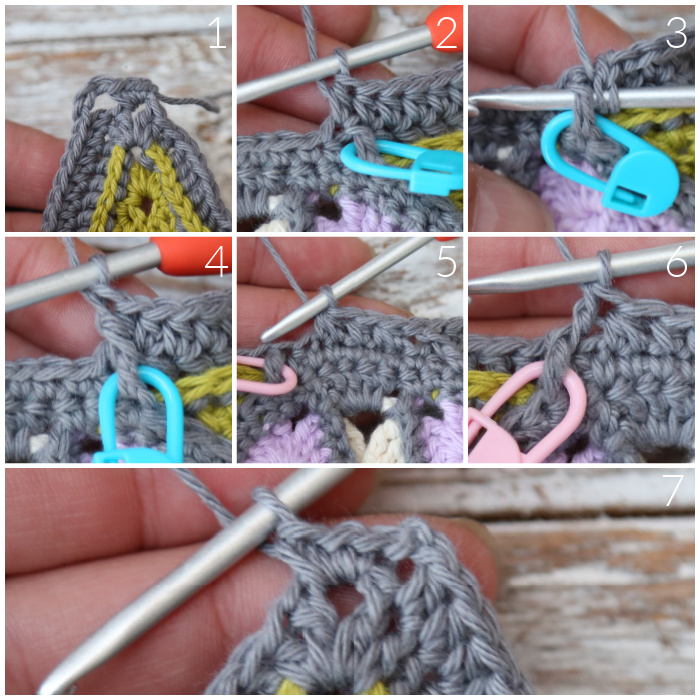
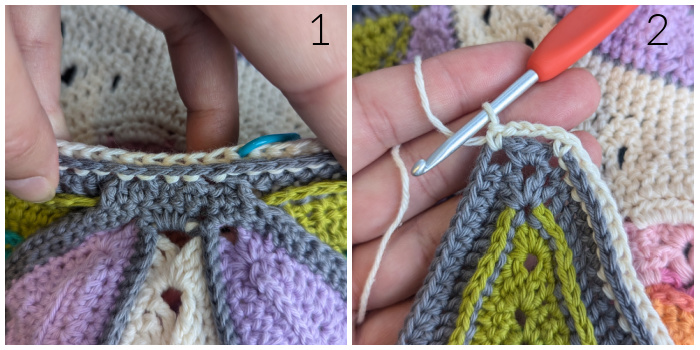
Join your yarn by making a standing sc in any ch-2 corner sp. Make 2 sc in the same sp {Photo 1}.
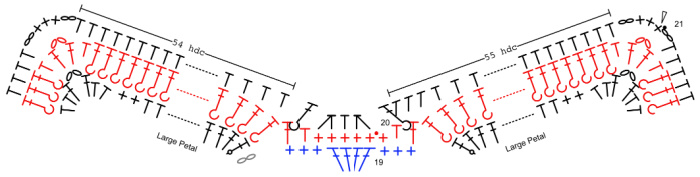
*Ch 2, skip the first dc, hdc in the next 55 sts. The 55th hdc should fall in the hdc after the marked dc {Photo 2}. Make a FPdc around the marked dc {Photos 3 and 4}. Remove the SM. Skip the next sc. Hdc2tog over the next 2 sc, hdc in the next sc, hdc2tog over the next 2 sc {Photo 5}. Skip the next hdc, make a FPdc around the next (marked) dc {Photo 6} and remove the SM. Hdc in the next 54 sts, the first of which will be the first BPdc. Ch 2, make 3 sc in the next ch-2 sp {Photo 7}.*
Rep from * to * 3 more times, omitting the last 3 sc on the last repeat. Join to the first sc with a sl st. Fasten off and work away your ends.
Stitch Count per Side: 110 hdc, 2 hdc2tog, 2 FPdc, and 2 ch-2 sps, not including 3 corner sc sts.
Round 22
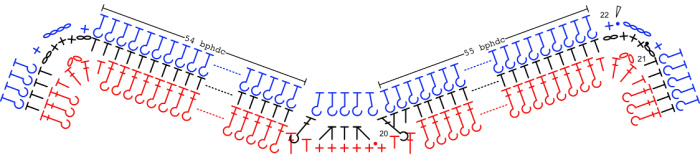
In this round, you will be making 114 BPhdc along each side. I have broken the instructions up to give you landmarks.
Join your yarn by making a standing sc in the ch-2 sp to the left of any 3 corner sc sts (to the right, if you are left-handed).
*BPhdc around the next 55 hdc. Mark the last st with a SM. BPhdc around the next 5 sts, which will be FPdc, hdc2tog, hdc, hdc2tog, FPdc {Photo 1}. BPhdc around the next 54 sts. Sc in the next ch-2 sp. Ch 4, sc in the next ch-2 sp {Photo 2}.*
Rep from * to * 3 more times, omitting the last sc on the last repeat. Join to the first sc with a sl st.
Stitch Count per Side: 2 sc and 114 BPhdc, not including ch-4 corner sps.
Round 23
Sl st into the next st, which will be the first BPhdc. Ch 1, sc in the same st. Sc in the next 2 sts {Photo 1}.
*(Ch 1, skip the next st, sc in the next 2 sts {Photo 2}) 36 times. The 18th ch-1 sp should fall over the marked stitch from the previous round {Photo 3}. There should now be 4 sts left {Photo 4}. Ch 1, skip the next st, sc in the last 3 sts {Photo 5}. Ch 6 {Photo 6}.** Skip the next ch-4 sp and the first sc after the ch-4 sp. Sc in the next 3 sts {Photo 7}.*
Rep from * to * twice, and from * to ** once. Join to the first sc with a sl st. Fasten off and work away your ends.
Stitch Count per Side: 78 sc and 37 ch-1 sps, not including ch-6 corner sps.

Leaves Part 1
The next bit of the pattern is lacy, with a fair few ch sps and a lot of things being skipped. In the interest of using less words (and sparing your brain), I won’t mention every st/sp to be skipped, only the ones where not doing so may cause confusion.
When working into Round 23, we will be working only into the ch-1 sps, except when making sl sts to get to the next ch-1 sp.
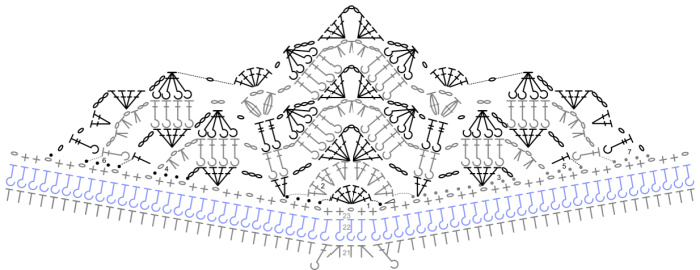
The chart for Rows 1 – 7 is at the bottom of Row 7.
Row 1
With RS facing and a slip knot already on your hook, join your yarn by making a sl st in the ch-1 sp above the SM in the middle of any side. Leave this SM in place until you have finished Row 7… just in case!
Skip the next 2 sts, make 6 dc in the next ch-1 sp. Skip the next 2 sts, sl st in the next ch-1 sp.
Sl st in the next 2 sts, sl st in the next ch-1 sp. TURN.
Stitch Count: 6 dc
Row 2
With WS facing, make 2 dc in each of the 6 dc, placing a SM between the 6th and 7th dc. Skip the next 2 sts of Round 23, sl st in the next ch-1 sp.
(Sl st in the next 2 sts, sl st in the next ch-1 sp) 3 times. TURN.
Stitch Count: 12 dc
Row 3
With RS facing, ch 2, make 4 dc in the next ch-1 sp of Round 23. Ch 3, skip the next ch-1 sp of Round 23, make 2 dc in the next ch-1 sp, which abuts the 12 dc from Row 2.
Ch 3, skip the next 6 dc, [4 dc, ch 3, 4 dc] between the (marked) sixth and seventh dc. Remove the SM. Ch 3, skip the next 6 dc, make 2 dc in the next ch-1 sp of Round 23, which will already contain the last sl st of Row 1.
Ch 3, skip the next ch-1 sp of Round 23, make 4 dc in the next ch-1 sp. Ch 2, skip the next 2 sts of Round 23, sl st in the next ch-1 sp.
Sl st in the next 2 sts, sl st in the next ch-1 sp. TURN.
Stitch Count: 20 dc, 2 ch-2 sps, and 5 ch-3 sps
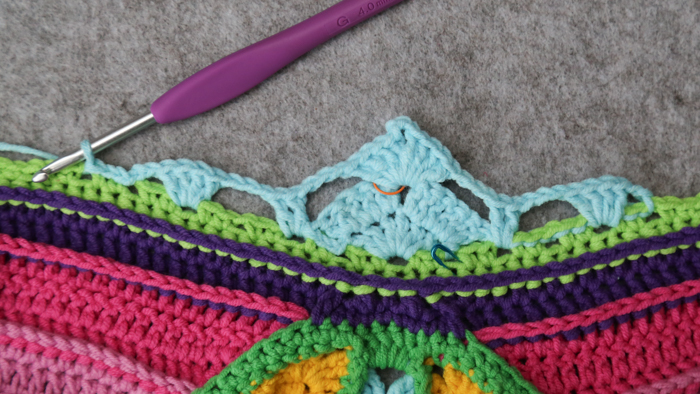
Stop and check that you’ve done this correctly. This is where I mess up most!
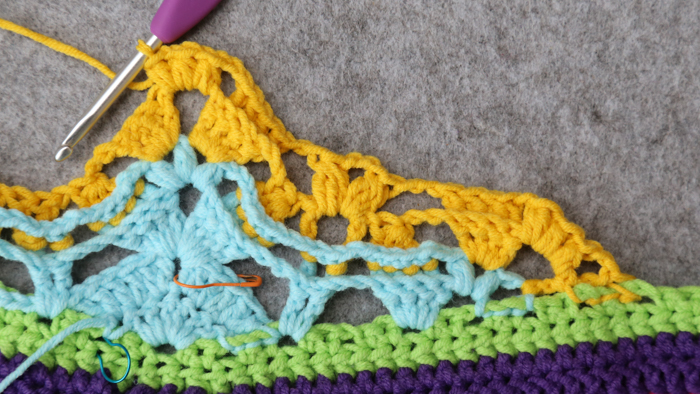
Row 4
With WS facing, [ch 1, hdc2tog, ch 1, hdc2tog] in the first ch-2 sp. These will look like small Puff stitches.
Ch 2, BPdc around each of the next 4 dc. Ch 2, BPdc around each of the next 2 dc.
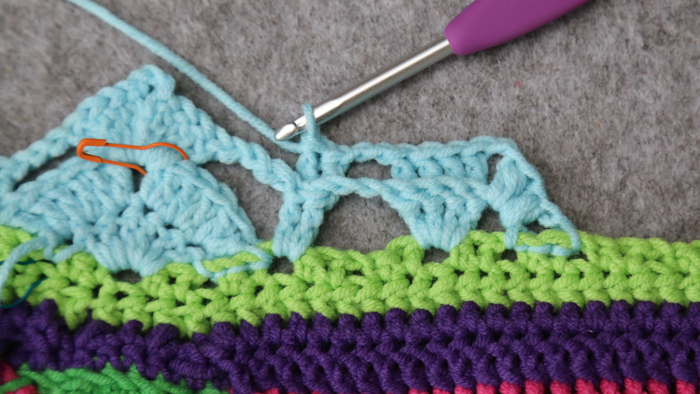
Ch 2, BPdc around each of the next 4 dc. Ch 2, [hdc2tog, ch 1, hdc2tog, ch 1, hdc2tog] in the next ch-3 sp. Ch 2, BPdc around each of the next 4 dc.

Ch 2, BPdc around each of the next 2 dc. Ch 2, BPdc around each of the next 4 dc. Ch 2, [hdc2tog, ch 1, hdc2tog, ch 1] in the next ch-2 sp. Skip the next 2 sts of Round 23, sl st in the next ch-1 sp.
Sl st in the next 2 sts, sl st in the next ch-1 sp. TURN.
Stitch Count: 7 hdc2tog, 20 BPdc, 6 ch-1 sps, and 8 ch-2 sps
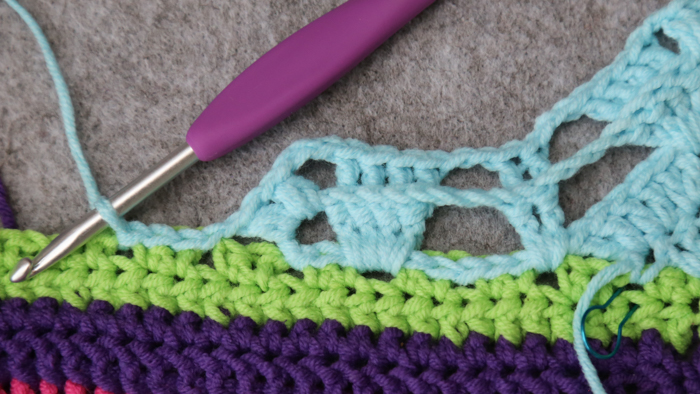
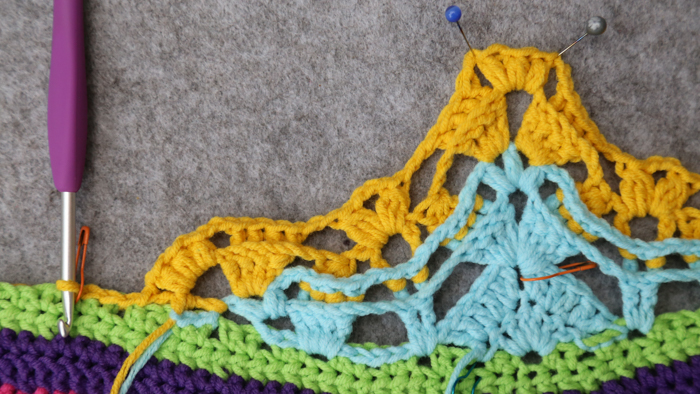
Row 5
With RS facing, make a dc in the first ch-1 sp of Row 4 (before the first hdc2tog). Ch 3, make 4 dc in the next ch-1 sp (between the first and second hdc2tog).
*Ch 3, make a FPdc4tog over the next 4 BPdc. Ch 1, FPtr around each of the next 2 BPdc. Ch 1, make a FPdc4tog over the next 4 BPdc, ch 3.* Skip the next ch-2 sp, make 4 dc in the next ch-1 sp, ch 3, make 4 dc in the next ch-1 sp.
Rep from * to * once. Skip the next ch-2 sp, make 4 dc in the next ch-1 sp, ch 3, make 1 dc in the last ch-1 sp (after the last hdc2tog).
Skip the next 2 sts of Round 23, sl st in the next ch-1 sp. Sl st in the next 2 sts, sl st in the next ch-1 sp. TURN.
Stitch Count: 18 dc, 4 FPtr, 4 FPdc4tog, 4 ch-1 sps, and 7 ch-3 sps
Row 6
With WS facing, make a BPdc around the first dc. Ch 2, [hdc2tog, ch 1, hdc2tog, ch 1, hdc2tog] in the next ch-3 sp. Ch 2, BPdc around each of the next 4 dc.
*Ch 2, skip the next FPdc4tog, [3-dc Bobble, ch 2, 3-dc Bobble] between the two FPtr. Ch 2. Skip the next FPdc4tog, BPdc around each of the next 4 dc. Ch 2, [hdc2tog, ch 1, hdc2tog, ch 1, hdc2tog] in the next ch-3 sp.*
Ch 2, BPdc around each of the next 4 dc.
Rep from * to * once. Ch 2, make a BPdc around the last dc.
Skip the next 2 sts of Round 23, sl st in the next ch-1 sp. Sl st in the next 2 sts, sl st in the next ch-1 sp. Mark this ch-1 sp with a SM so that you can find it easily in Row 8. TURN.
Stitch Count: 9 hdc2tog, 4 3-dc Bobbles, 18 BPdc, 6 ch-1 sps, and 12 ch-2 sps
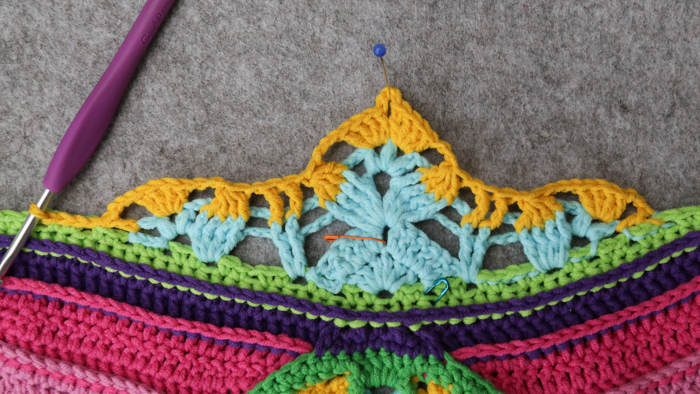
Row 7
With RS facing, ch 1, make a FPtr around the next BPdc, ch 1. Skip the next ch-2 sp, make 2 dc in the next ch-1 sp.
*Ch 3, make 4 dc in the next ch-1 sp. Ch 3, make a FPdc4tog over the next 4 BPdc. Ch 1, skip the next ch-2 sp, make 5 dc in the next ch-2 sp. Ch 1, FPdc4tog over the next 4 BPdc. Ch 3, skip the next ch-2 sp, make 4 dc in the next ch-1 sp.*
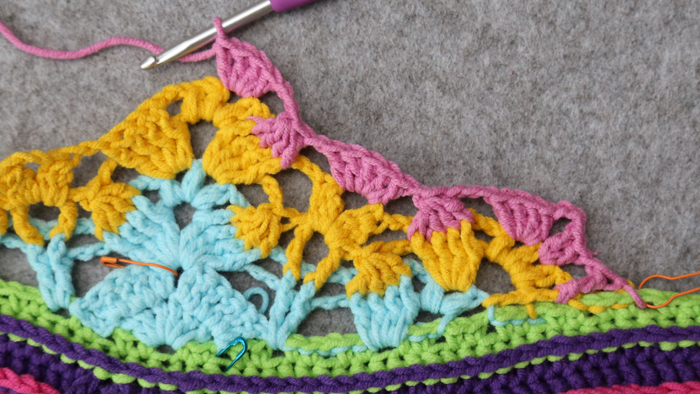
Rep from * to * once. Ch 3, make 2 dc in the next ch-1 sp. Ch 1, make a FPtr around the next BPdc, ch 1.
Skip the next 2 sts of Round 23, sl st in the next ch-1 sp. Mark this ch-1 sp with a SM so that you can find it easily in Row 8. Fasten off (preferably with a cheeky ch-1 knot before cutting your yarn).
If you want to make Part 3 and 4 on each side, instead of doing Part 3 on all four sides first and THEN Part 4 on all four sides, you don’t have to cut your yarn at this point. You can just pull up a long loop and put a SM in it for later.

Stitch Count: 30 dc, 2 FPtr, 4 FPdc4tog, 8 ch-1 sps, and 7 ch-3 sps
Before you continue with the Flowers, check that you have 9 unworked ch-1 sps remaining (from Row 23) on either side of the Row 1 – 7 Part. Once you have checked this, you can remove the SM from Row 1. I’m serious! Check it and avoid lots of frogging later!!
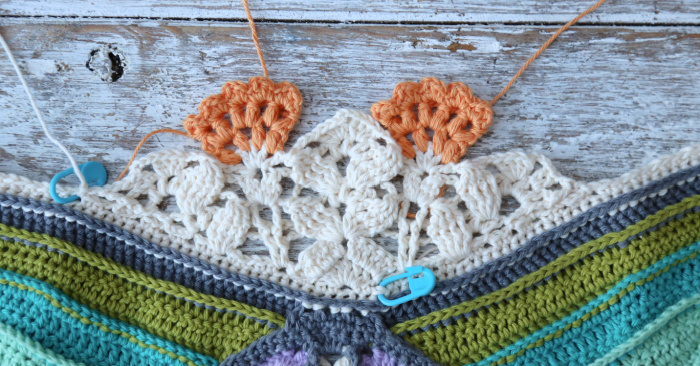
Flowers
You will need to make two of these Flowers before continuing with Row 8, one in each of the 5-dc groups from Row 7.
Flower Row 1
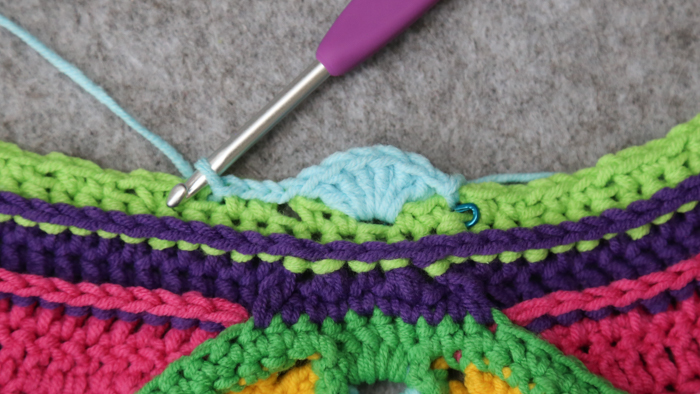
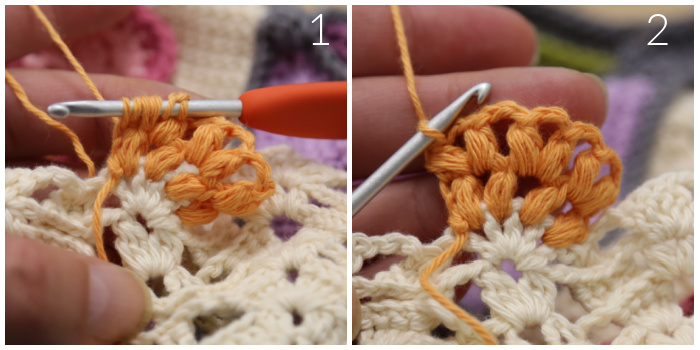
With RS facing and a slip knot already on your hook, join your yarn by making a sl st between the first and second dc of one of the two 5-dc groups in Row 7. Ch 1 (doesn’t count as a st). Make a Puff st between the first and second dc, remembering that the Puff st is closed with a ch. Ch 1. (Make a Puff st between the next 2 dc, ch 1) 3 times. TURN.
Stitch Count: 4 Puff stitches and 3 ch-1 sps, not counting the last turning ch-1.

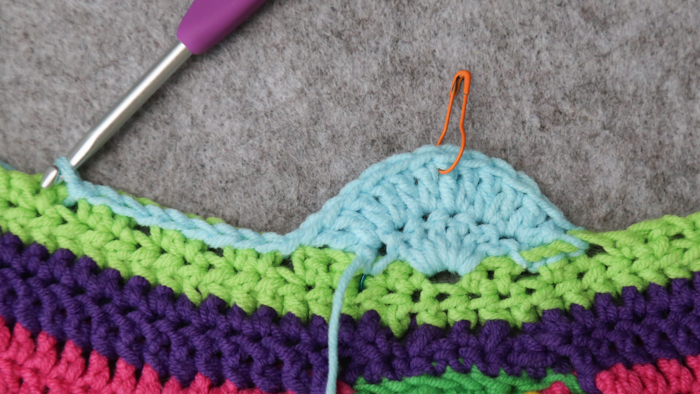
Flower Row 2
With WS facing, ([Puff st, ch 1, Puff st, ch 1] into the next ch-1 sp) 3 times, placing the last leg of the last Puff st in the side of the first Puff st from Row 1 for neatness. TURN.
Stitch Count: 6 Puff stitches and 5 ch-1 sps, not counting the last turning ch-1.
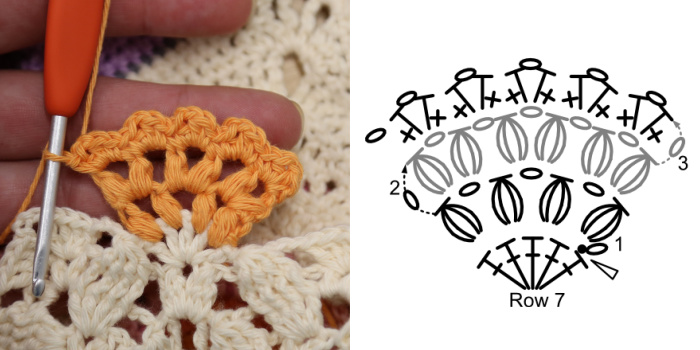
Flower Row 3
With RS facing, [sc, hdc, ch 1, hdc, sc] in each of the 5 ch-1 sps. I’m going to call these Small Scallops. Ch 1 and TURN.
Stitch Count: 5 Small Scallops, not counting the last turning ch-1.
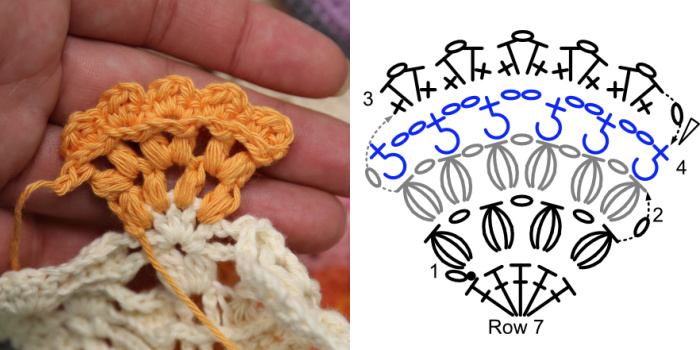
Flower Row 4
With WS facing, FPsc around the first Puff st of Flower Row 2. (Ch 2, FPsc around the next Puff st of Flower Row 2) 5 times. Fasten off.
Stitch Count: 6 FPsc and 5 ch-2 sps
Once you have made a Flower in each of the 2 5-dc groups from Row 7, you can either continue with Part 4 to complete this side (if you are following along later when Part 4 has already been released), or you can repeat Leaves Part 1 and the Flowers for each of the remaining three sides so that you are ready to start Part 4.

This blog post contains affiliate links. I only link to products I personally use or would use. All opinions are my own.


