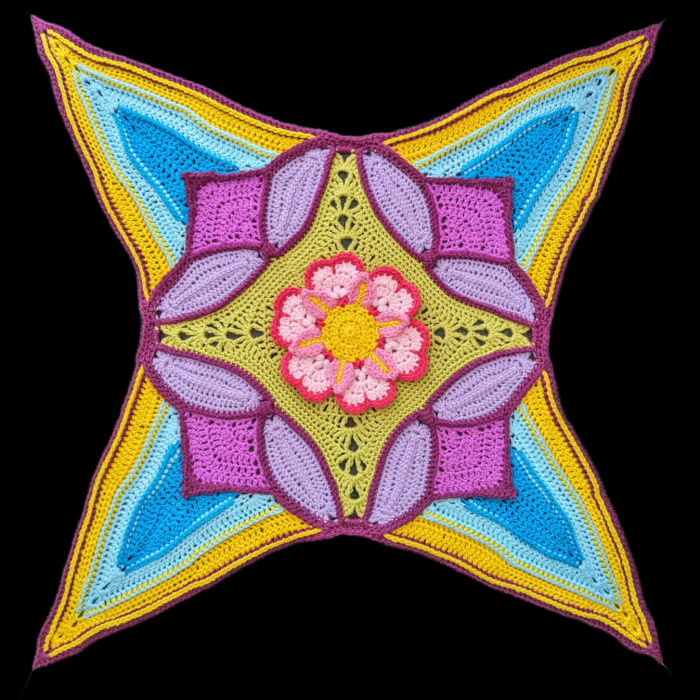
In Part 2, we will be joining the Petals to the Main Motif before making BIG Petals. I spent hours and hours approaching the construction of these Petals from different angles. Once I had landed on a technique and look I was happy with, I spent more hours trying to make the execution of these rows (specifically the beginning and ends) as easy as possible. Some of my testers found this to be the trickiest part of the whole pattern, while others sailed through it.
Every pattern has a Marmite part. I guess this is it.
In this part, the video will be your best friend!
Resources
>>Universe in Bloom Information Post<<
- Universe in Bloom on Ravelry
- PDFs – these contain a condensed version of the pattern below, and can be found on the Scheepjes Website:
- English PDFs (US and UK Terms)
- Dutch PDF
Video Playlists
- English US Terminology
- Dutch
Abbreviations, Special Stitches, Chart Legend
The photo tutorial below uses US Terminology. Please see the Special Stitches and Techniques Post HERE for Photo Tutorials and Chart Legend.
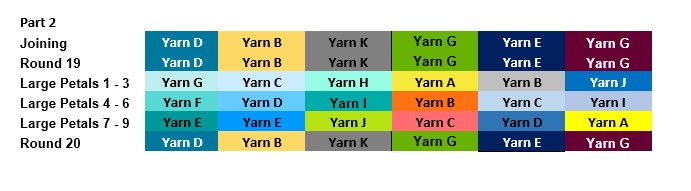
Colours Per Round
Instructions
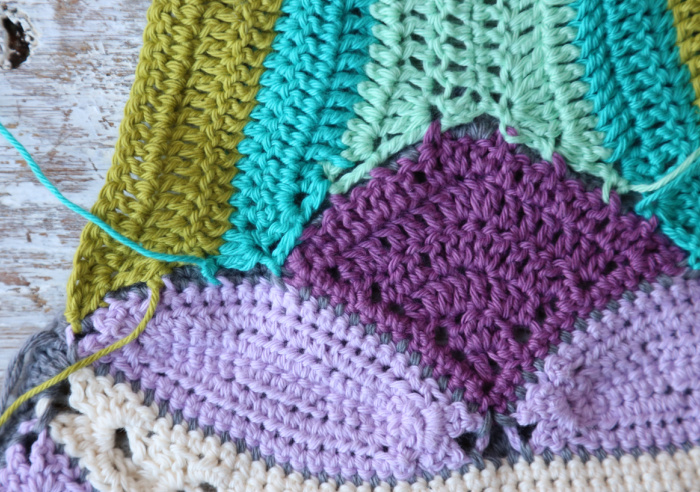
Joining the Petals to the Main Motif
Joining Small Petals
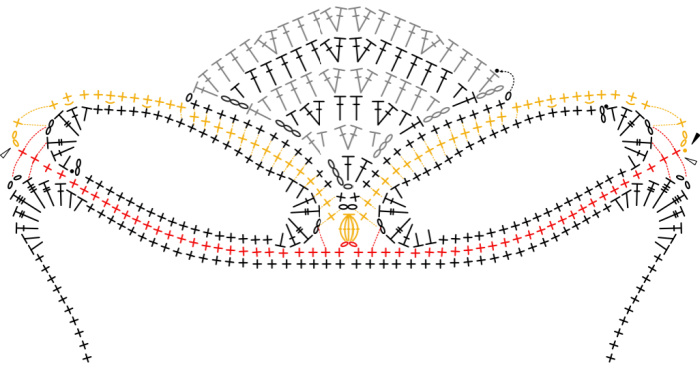
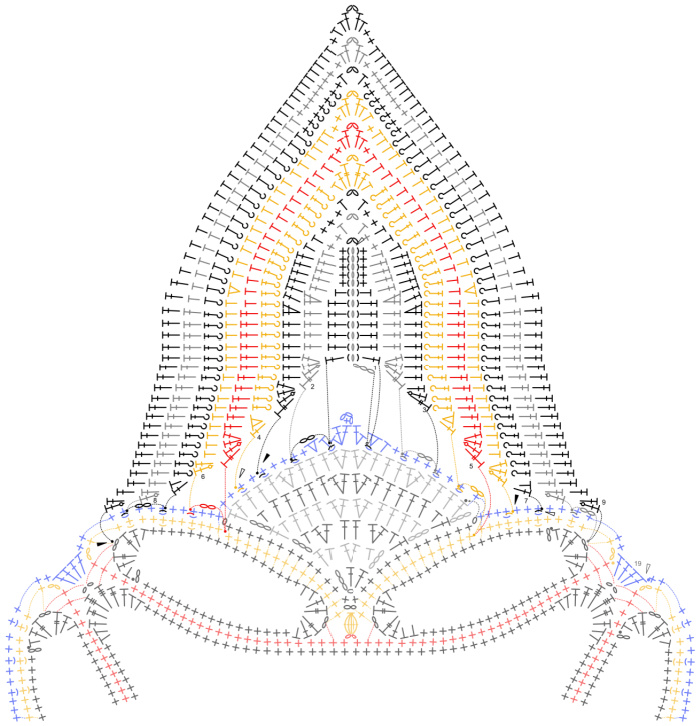
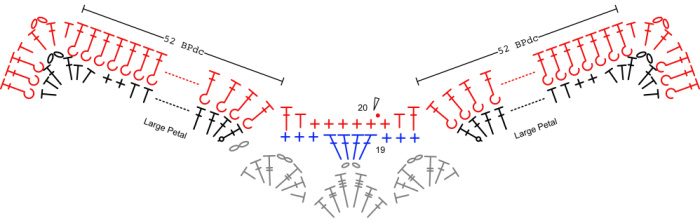
(Red symbols on Chart below)
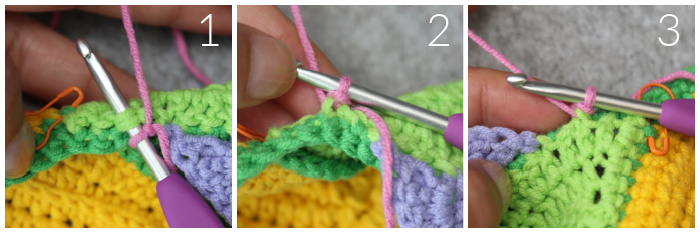
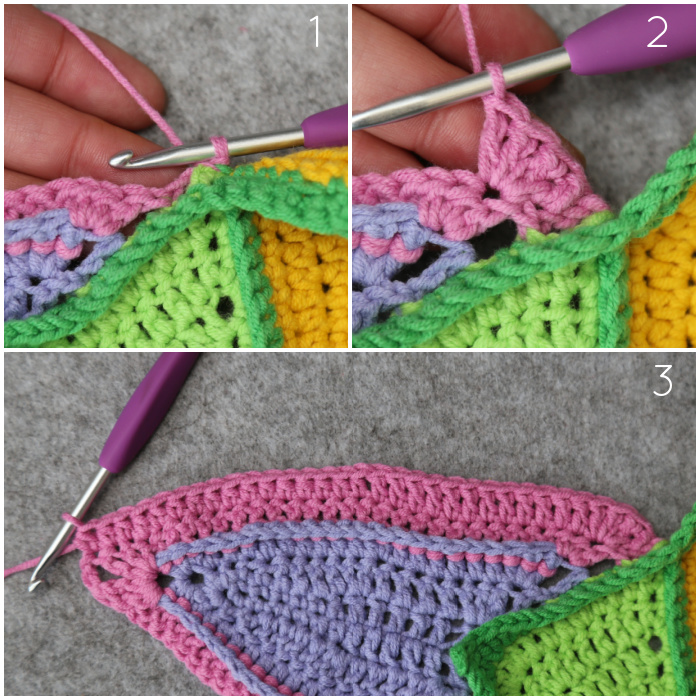
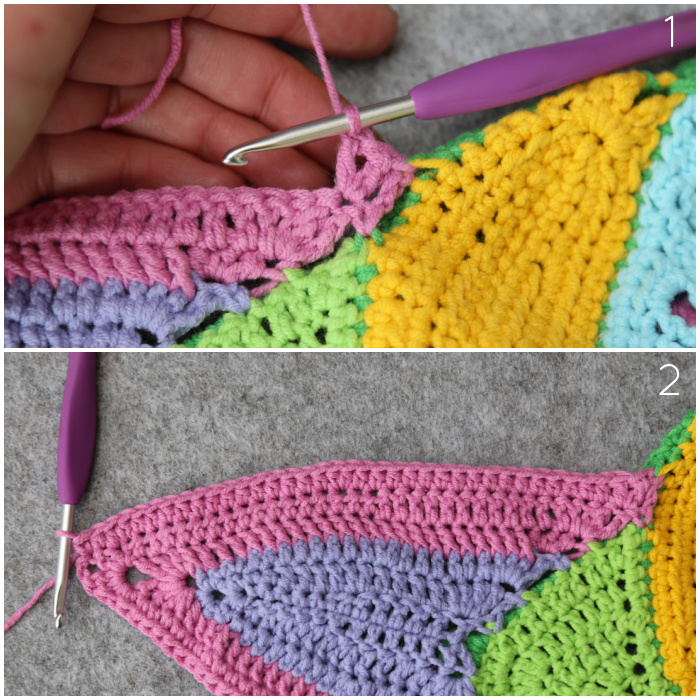
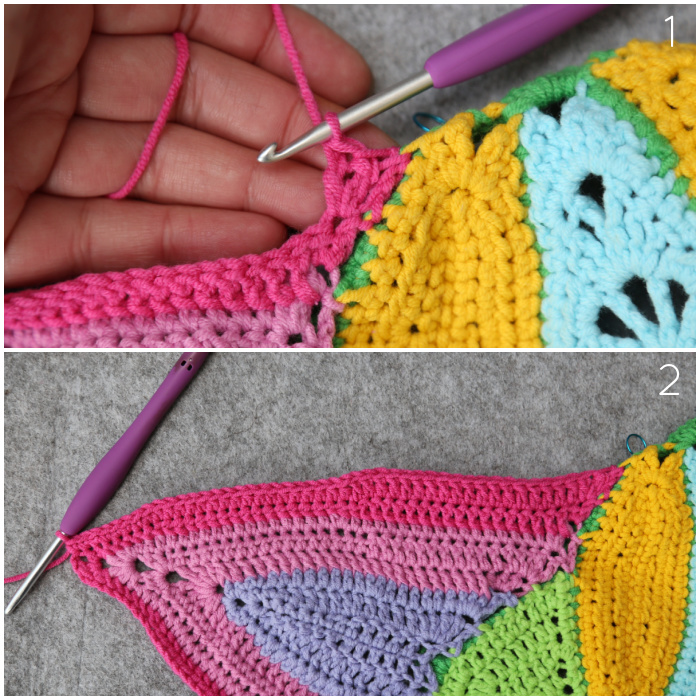
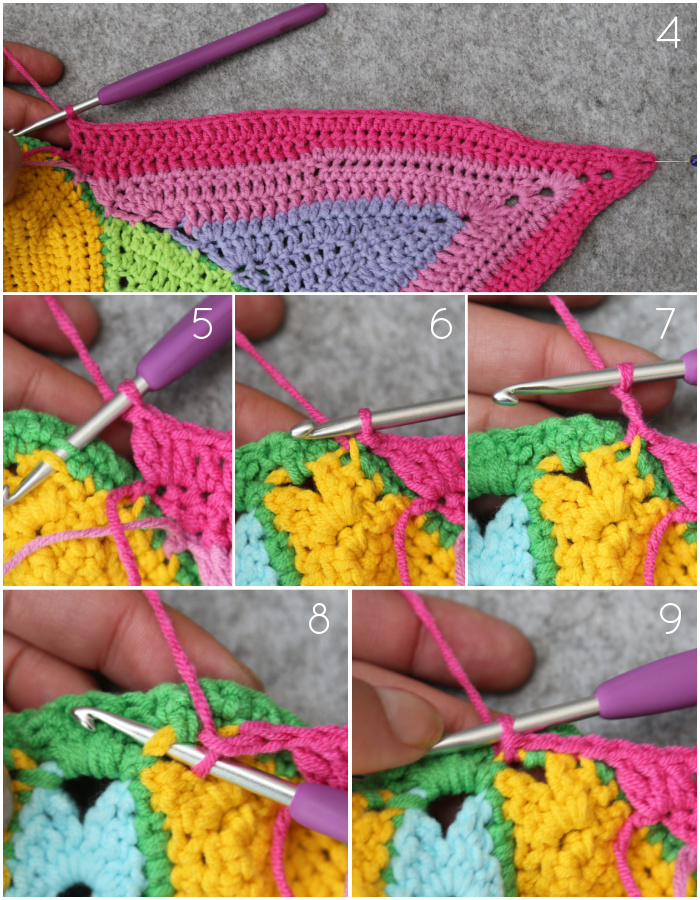
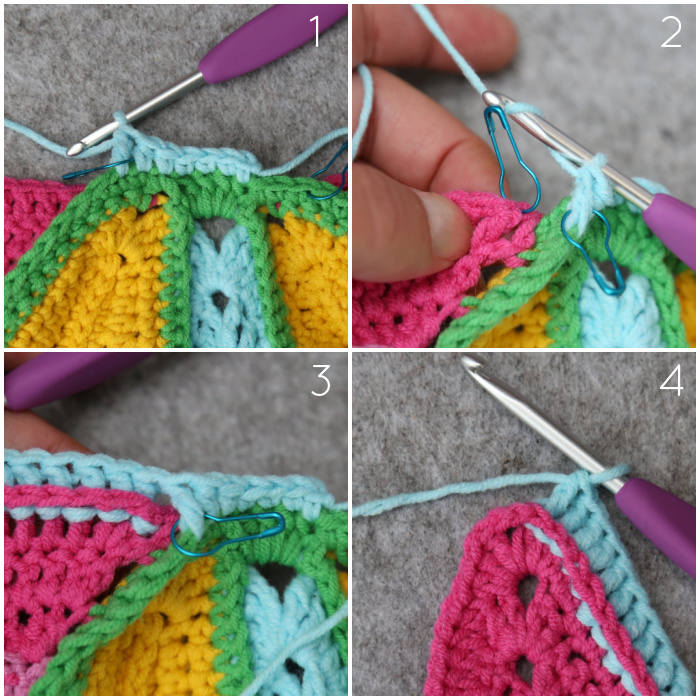
Starting on any side, place one Small Petal behind the Main Motif, with WS facing each other and ch-2 corner sps lined up {Photo 1}. Join your yarn by making a standing sc in both ch-2 sps on the right (left, if you are left-handed). Working through both layers, sc in the next 24 sts. Sc in the next st of the Main Motif and the next ch-2 sp of the Small Petal {Photo 2}.
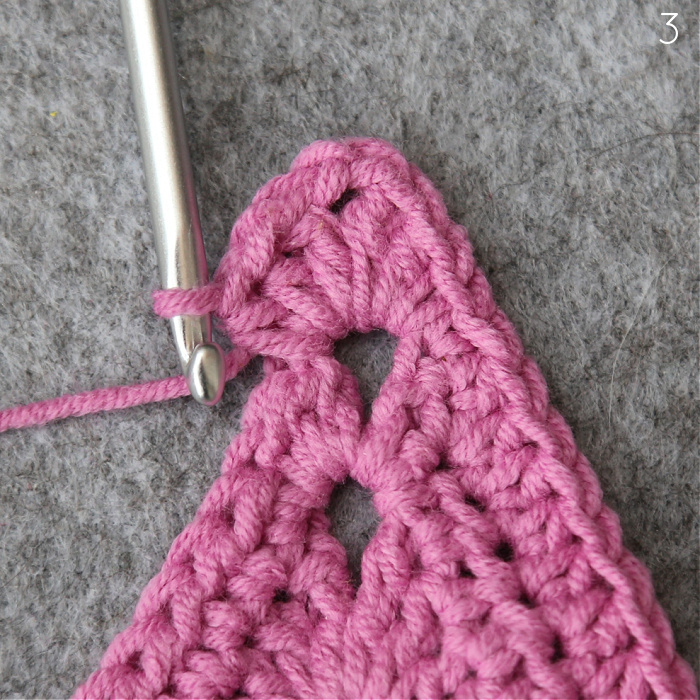
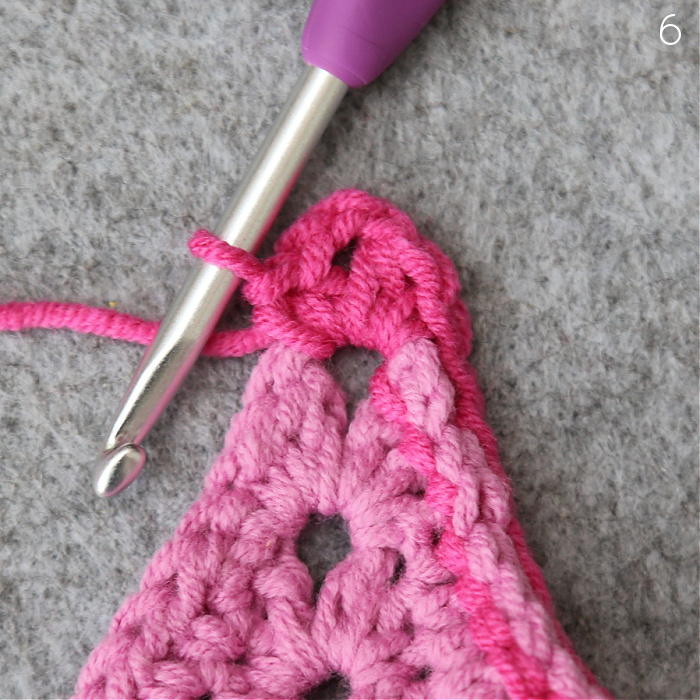
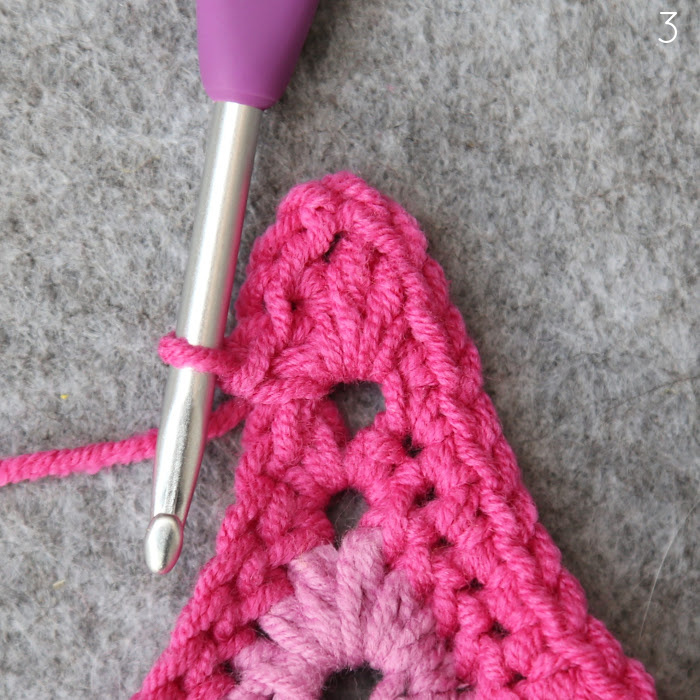
Working only into the Main Motif, sc in the next st, ch 2, sc in the next st. Mark the ch-2 sp with a SM {Photo 3}.
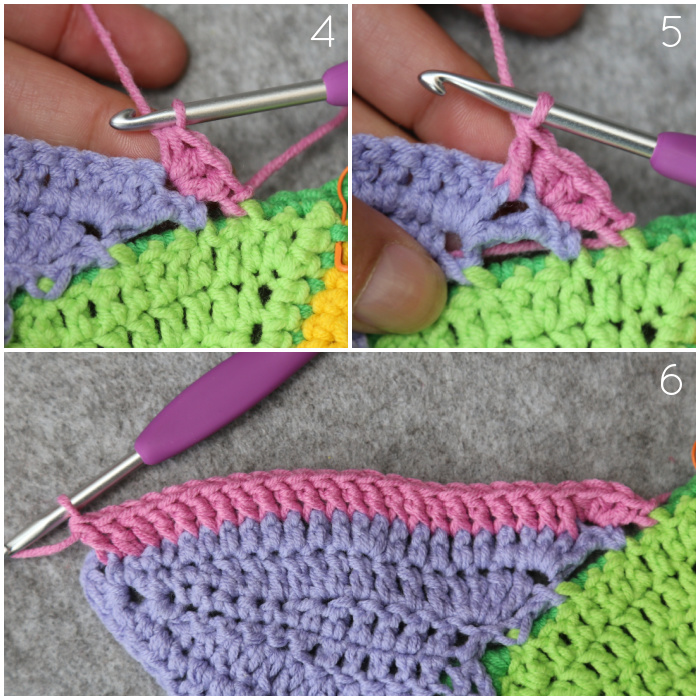
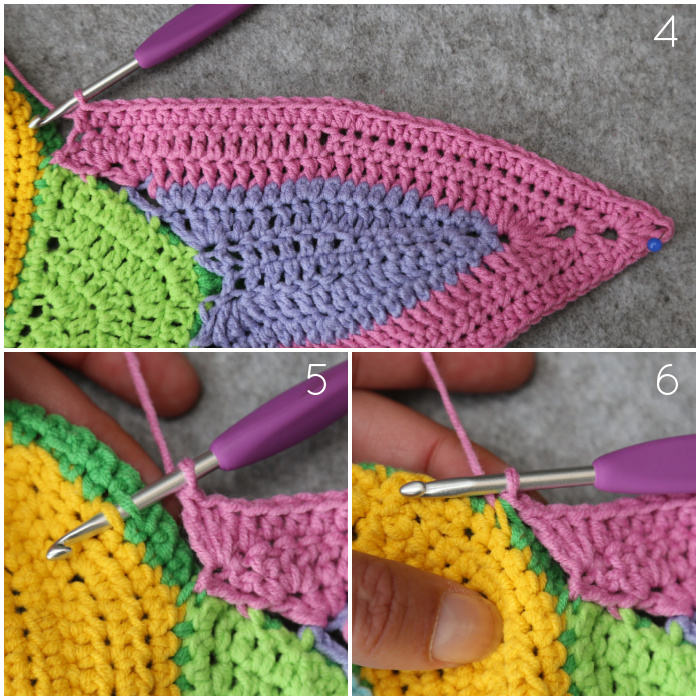
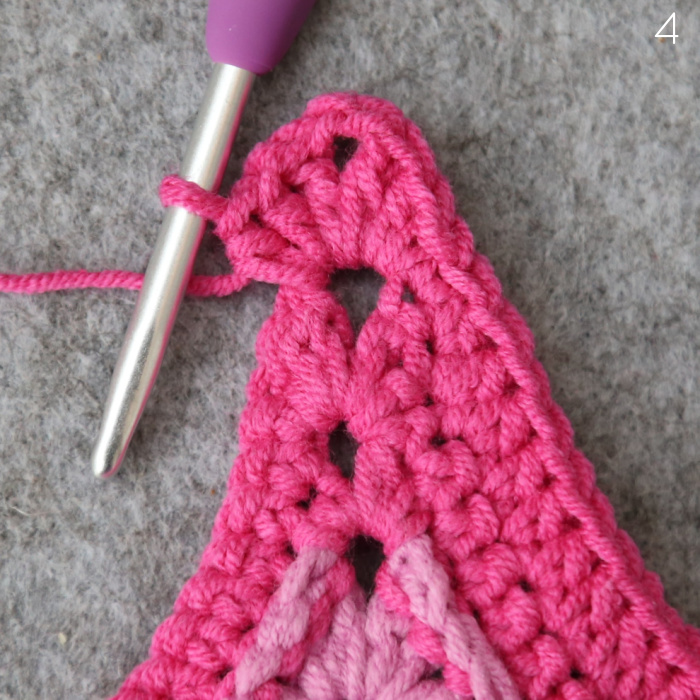
Place the next Small Petal behind the Main Motif as before, with WS facing each other and ch-2 corner sps lined up {Photo 4}. Working through both layers, sc in the next st of the Main Motif and the ch-2 sp of the Small Petal. Sc in the next 24 sts. Sc in both of the ch-2 sps.
Stitch Count: 54 sc and 1 ch-2 sp
Joining Central Petals
(Yellow symbols on Chart below)
Ch 2, turn your work. With WS of Small Petal facing you, sc in the ch-2 sp. Sc in the next st, make a BLO sc in the next st. (Sc in the next 2 sts, make a BLO sc in the next st) twice. Sc in the next 3 sts, marking the last sc with a SM.
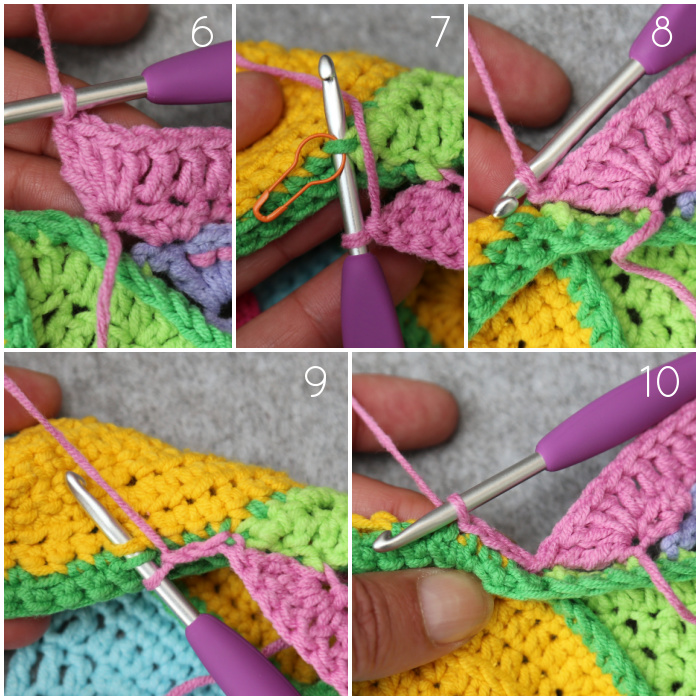
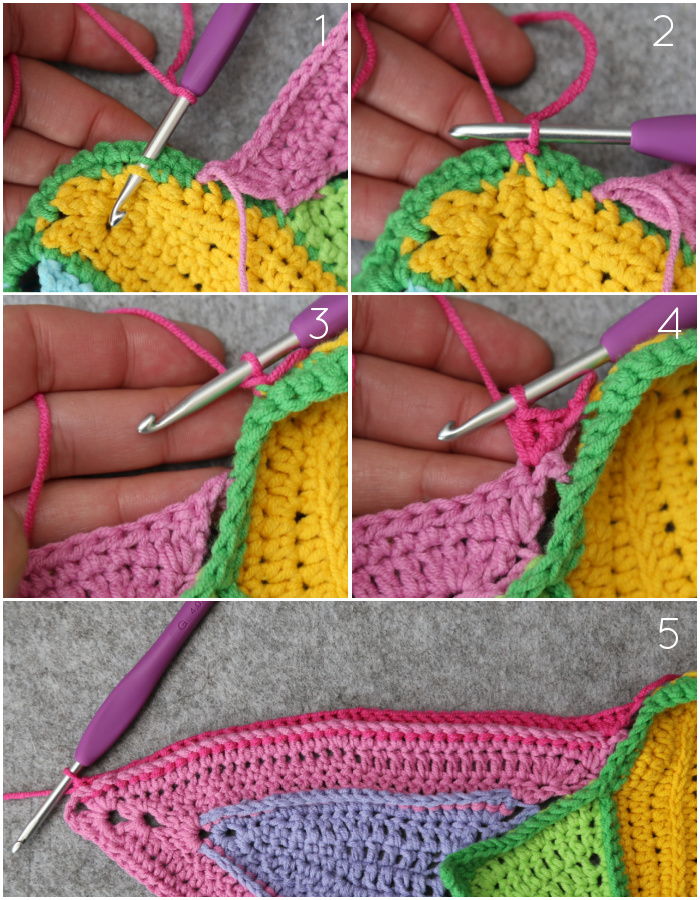
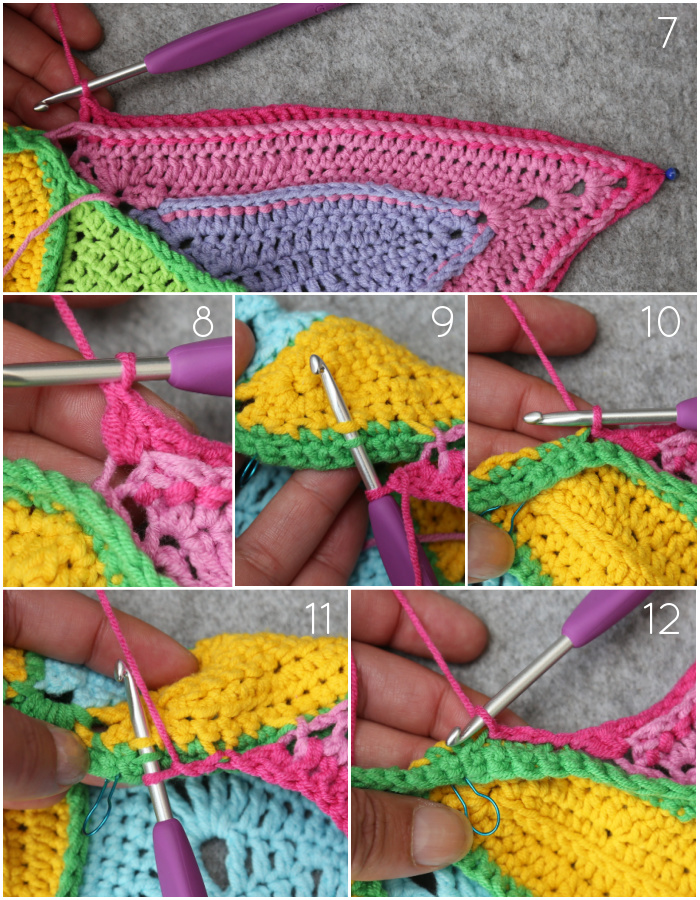
Place a Central Petal in front of your work, with the RS facing you, the initial yarn end pointing to the left (right, if left-handed), and the rounded end closest to you {Photo 1}.
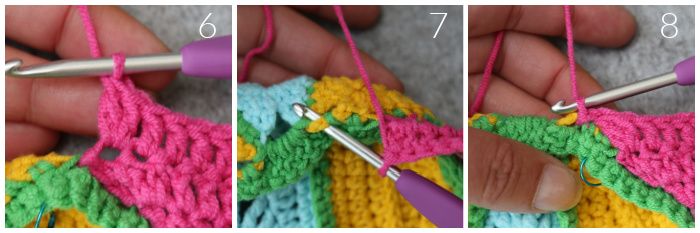
Working through both layers, sc in the marked sc of the Central Petal and the next st of the Small Petal and remove the SM. Sc in the next 12 sts, working through both layers. Sc in the next ch-2 sp of the Central Petal and the ch-2 sp of the Small Petal {Photo 2}.
Working into the marked ch-2 sp of the join, make a 5-dc Bobble and remove the SM {Photo 3}.
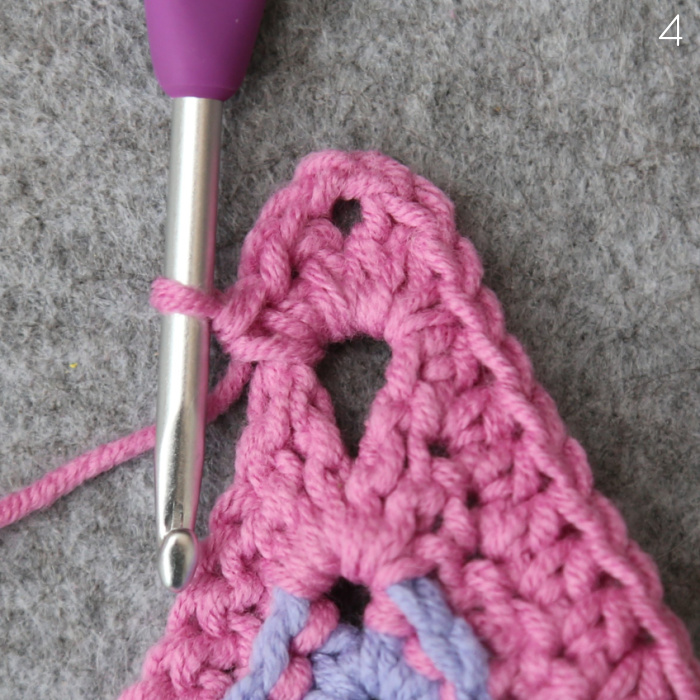
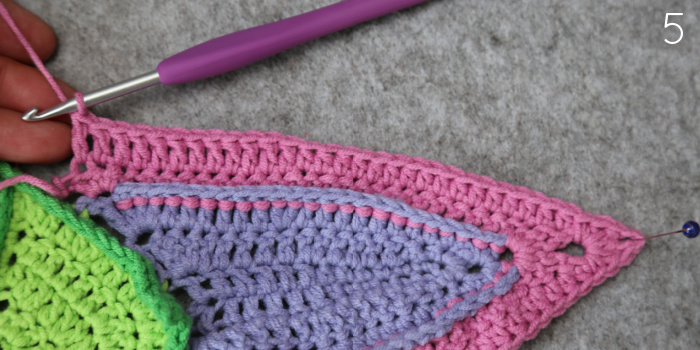
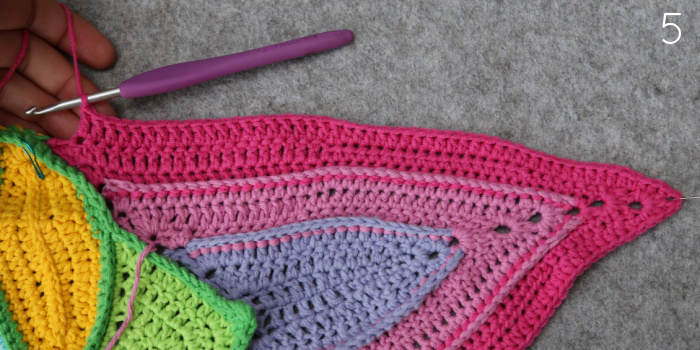
Fold the Central Petal on to the next Small Petal, with WS facing each other and RS of the Central Petal facing you. Working through both layers, sc into the ch-2 sp of the Central Petal and the ch-2 sp of the Small Petal, sc in the next 13 sts {Photo 4}. Before continuing, mark the first and last joining sts made into the Central Petal (on the WS) with a SM. These will form little vertical lines {Photo 5}.
Working into the Small Petal only, sc in the next 3 sts, make a BLO sc in the next st. (Sc in the next 2 sts, make a BLO sc in the next st) twice. Sc in the last st, sc in the next ch-2 sp. Ch 2, join to the first sc with a sl st. Fasten off and work away your ends.
Stitch Count: 46 sc, 6 BLO sc, 1 5-dc Bobble, and 2 ch-2 sps

Repeat these instructions for each side of the Main Motif.
Round 19 – Framing Round
When making the Large Petals later on, you will be instructed to work into the unworked BLO/FLO combo’s when working into the Small Petals, and the unworked BLO and third loop when working into the Central Petals. These sts will form little equation marks on the back of your work.
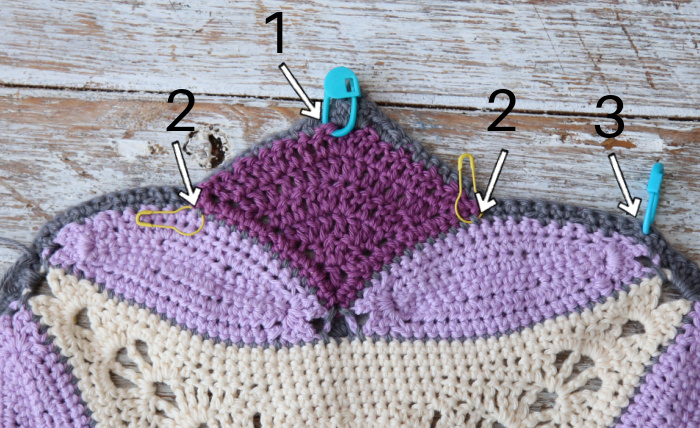
If you are going to have trouble identifying them, please mark them with stitch markers as follows, using stitch markers you can distinguish from the ones where I specifically tell you to mark something:
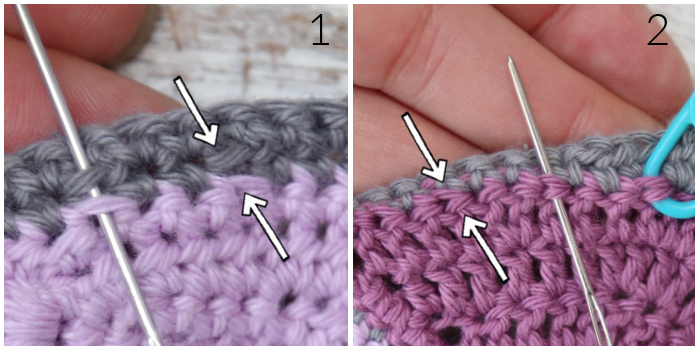
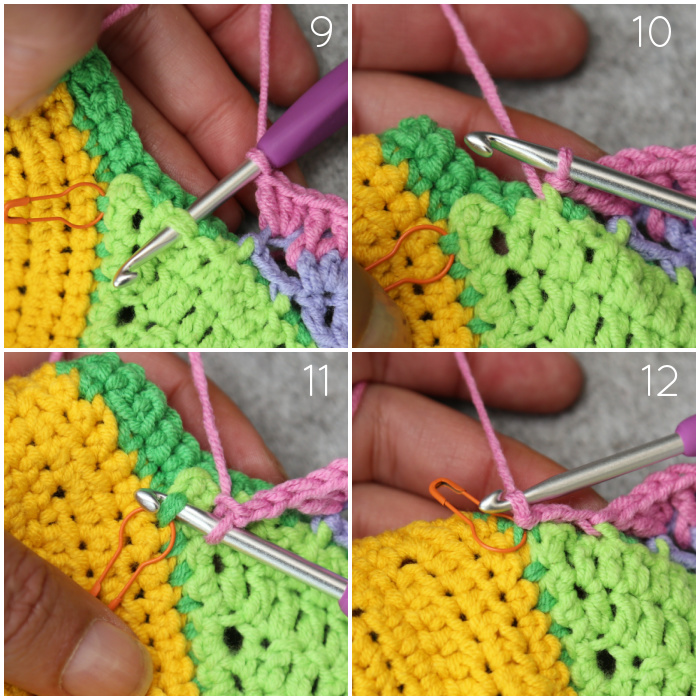
- When making the FLO sts into the Small Petals, mark the unworked BLO and the unworked FLO from the Joining Round with a SM {Photo 1}.
- When making the FLO sts into the Central Petals, mark the unworked BLO and the third loop with a SM {Photo 2}.
Join your yarn by making a standing dc in any ch-2 sp from Round 18. Make 3 dc in the same ch-2 sp.
*Sc in the next ch-2 sp of the Joining Round. (Sc in the next 2 sts, make a FLO sc in the next st) 3 times. Sc in the next 3 sts.
Working into the Central Petal:
Sc in the first actual dc of the Central Petal, which should contain a sl st. Make a FLO sc in the next st. (Sc in the next st, FLO sc in the next st, sc in the next st) twice.
Hdc in the next st. Make 2 FLO hdc in the next st, which should be the first dc of the first dc increase. Mark the BLO and the third loop of the stitch you just worked into with a SM.
[Hdc, dc] in the next st. [Picot dc, dc, hdc] in the next st.
Make a FLO hdc in the next st. Make 2 hdc in the next st.
(Sc in the next st, FLO sc in the next st, sc in the next st) twice. Make a FLO sc in the next st, sc in the last 2 sts of the Central Petal.
Sc in the next (marked) st above the Small Petal and remove the SM. Sc in the next 2 sts. (Make a FLO sc in the next st, sc in the next 2 sts) 3 times. Sc in the next ch-2 sp. Mark the third to last sc with a SM.
Make 4 dc in the ch-2 sp from Round 18.*
Rep from * to * 3 more times, omitting the last 4 dc on the last repeat. Join to the first dc with a sl st. Fasten off and work away your ends.
Stitch Count per Side: 31 sc, 12 FLO sc, 5 hdc, 3 FLO hdc, 2 dc, and 1 Picot dc, not including 4 corner dc sts.
Fun fact: The third to last anything is called the antepenultimate. I didn’t know that until I designed this round
Before you continue, check that you have 4 stitch markers on each side (not counting however many you chose to add for the BLO/FLO and BLO/third loop combos). The photo below shows the back of your work with the 4 sts marked as follows:
- BLO/third loop combo specified above (behind your work)
- First and last joining sts from the Central Petals (behind your work)
- Antepenultimate stitch before the 4-dc corner
Large Petals
Make 4
Notes
- You will make these Large Petals by working into the central motif you have created so far, working in rows with RS and WS facing in turns.
- Round 19 will curl over when you make these Petals. We will tack it down later
- The first Large Petal will require a lot of concentration. The other three will go much quicker.
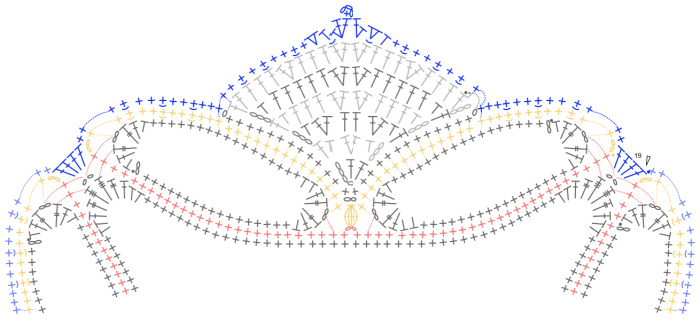
Large Petals Chart is at the end of Row 9.
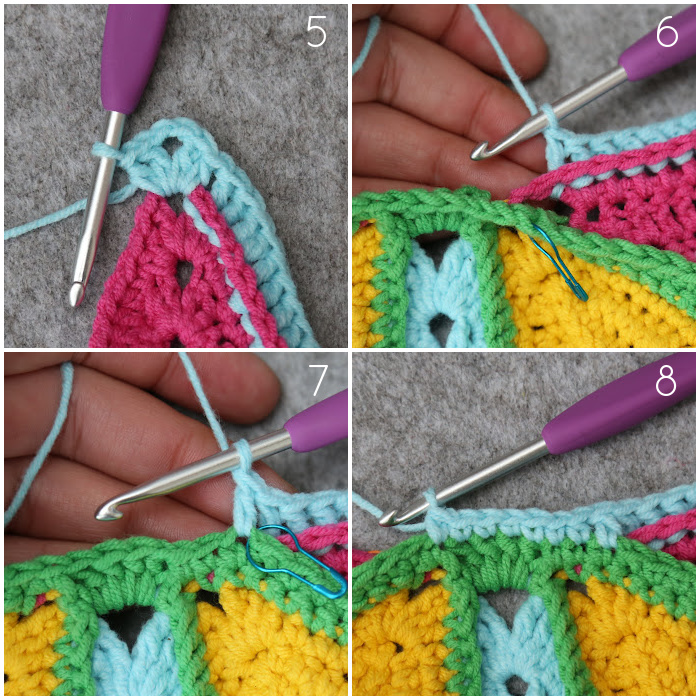
Row 1
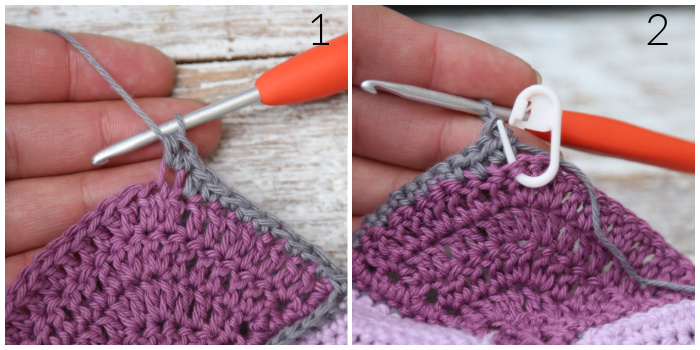
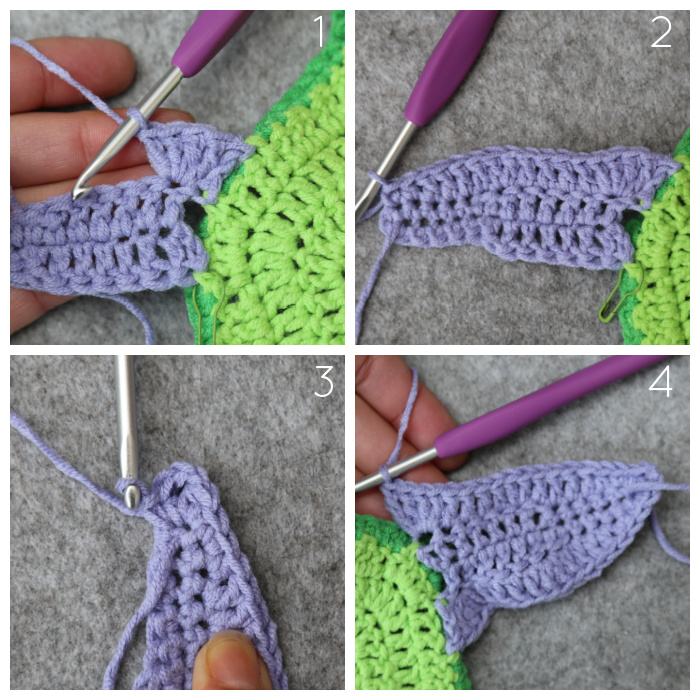
Ch 15, mark the fourth ch from the hook with a SM {Photo 1}. Pull up a long loop and remove your hook. Place your central motif with the RS facing you and flip the top over so that you can see the back of your work. Working into any Central Petal around, insert your hook into the marked BLO and third loop from top to bottom {Photo 2} and pull the long loop through the st to anchor your work {Photo 3}. You can remove this SM now because we won’t be using it again. I chose to keep it in place until I’d finished the Large Petals – just in case I needed to frog back.
Dc in the top loop only of the marked ch {Photo 4} and remove this SM as well.
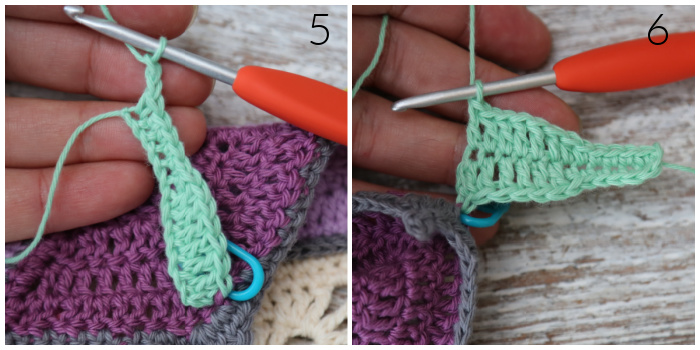
Working into the top loop only of each rem ch st: dc in the next 5 sts, hdc in the next st, sc in the next 5 sts. Ch 2 (counts as your corner) – see Photo 5. Working down the other side of the foundation ch and into both rem loops of each ch st: sc in the first 5 sts, hdc in the next st, dc in the last 6 sts {Photo 6}.
Insert your hook from top to bottom into the next BLO and third loop of the Central Petal and make a sl st. Ch 2 (doesn’t count as a st here and throughout this part), insert your hook from top to bottom into the next BLO and third loop of the Central Petal and make a sl st.
Turn your work.
Stitch Counts: 10 sc, 2 hdc, 12 dc, and 1 ch-2 corner sp, not including sl sts and the ch-2 to get to the next starting point – here and throughout this part.
Row 2
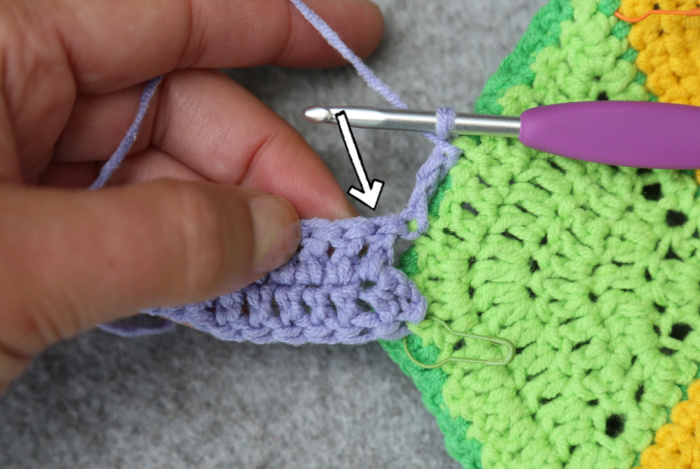
Before you continue, take a look at your work. The top of the first st (and all the stitches) will be after the post for the stitch, not before, because the back of the previous row is facing you (see arrow in Photo). Please see Stitch Anatomy in the Special Stiches and Techniques section if you need more help with this.
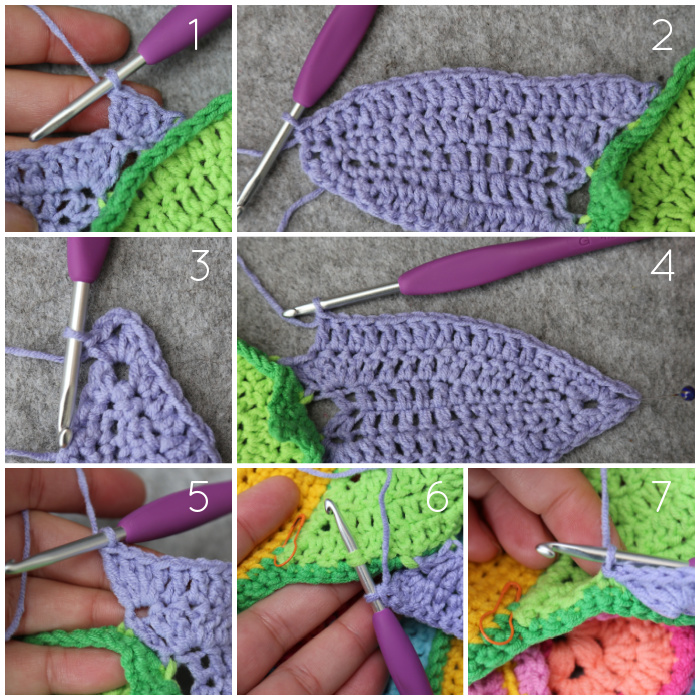
With WS facing, [tr, edc, 2 dc] in the last st of the previous row {Photo 1}. It doesn’t matter if your first stitch is a bit loose (here and throughout this part). We will hide them when we tack down Round 19 later.
Dc in the next 4 sts, make 2 dc in the next st, dc in the next 4 sts. Hdc in the next st, sc in the last st before the ch-2 corner sp, which will be a bit tricky to get into, here and throughout this part {Photo 2}.
[Sc, hdc, ch 2, hdc, sc] in the next ch-2 sp {Photo 3}.
Sc in the next st, hdc in the next st. Dc in the next 4 sts, make 2 dc in the next st, dc in the next 4 sts. [2 dc, edc, tr] in the last st {Photo 4}.
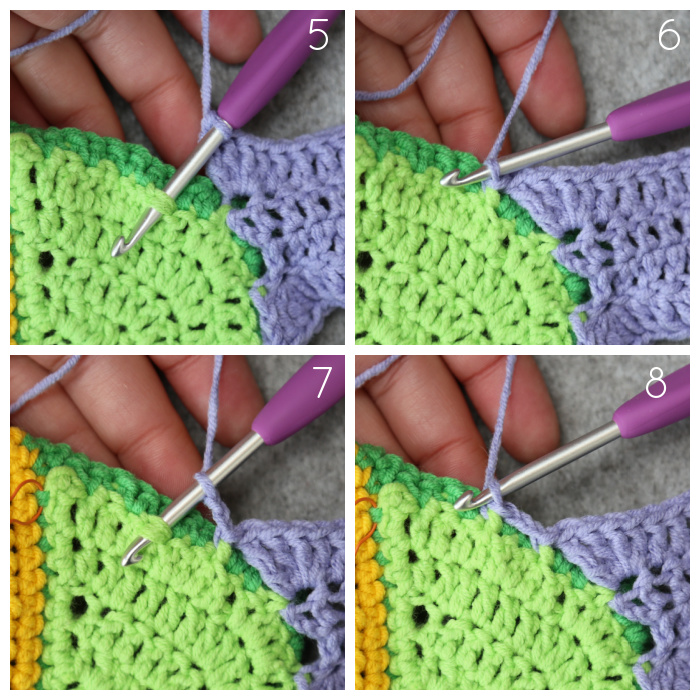
Insert your hook from top to bottom into the next BLO and third loop of the Central Petal and make a sl st {Photos 5 and 6}. Ch 2, insert your hook from top to bottom into the next BLO and third loop of the Central Petal and make a sl st {Photos 7 and 8}. Turn your work.
Stitch Count: 4 sc, 4 hdc, 24 dc, 2 edc, 2 tr, and 1 ch-2 corner sp.
Row 3
This round is asymmetric.
With RS facing, [tr, edc, dc] in the last st of the previous row {Photo 1}. Dc in the next 6 sts, make 2 dc in the next st, dc in the next 6 sts. Hdc in the next 3 sts, sc in the last st {Photo 2}.
[Sc, hdc, ch 2, hdc, sc] in the next ch-2 sp {Photo 3}.
Sc in the next 2 sts, hdc in the next 2 sts. Dc in the next 6 sts, make 2 dc in the next st, dc in the next 6 sts. [2 dc, edc, tr] in the last st {Photos 4 and 5}.
Insert your hook from top to bottom into the next BLO and third loop of the Central Petal and make a sl st {Photos 6 and 7}. Fasten off.
Stitch Count: 5 sc, 7 hdc, 31 dc, 2 edc, 2 tr, and 1 ch-2 corner sp.
Row 4
With RS still facing, join your yarn for Row 4 as follows: With a slip knot already on your hook, insert your hook from top to bottom into the next BLO and third loop of the Central Petal and make a sl st {Photos 1 and 2}. Pull this sl st tight and turn your work {Photo 3}.
With WS facing, [dc, 2 hdc] in the last st of the previous row {Photo 4}. FPdc around the next 23 sts {Photos 5 and 6}.
[Hdc, dc, tr, ch 2, tr, dc, hdc] in the ch-2 corner sp {Photo 7}.

FPdc around the next 23 sts {Photo 8}. [2 hdc, dc] in the last st, which will already contain a FPdc {Photo 9}.
Insert your hook from top to bottom into the next BLO and third loop of the Central Petal and make a sl st {Photo 10}. Ch 2, make a sl st in the marked st of the Joining Round {Photos 11 and 12}. Remove the SM and turn your work.
Stitch Count: 6 hdc, 4 dc, 46 FPdc, 2 tr, and 1 ch-2 corner sp.
Row 5
With RS facing, [tr, edc, 2 dc] in the last st of the previous row {Photo 2}. Dc in the next 12 sts, hdc in the next 16 sts {Photo 3}.
[Sc, hdc, dc, ch 2, dc, hdc, sc] in the next ch-2 sp {Photo 4}.
Hdc in the next 16 sts, dc in the next 12 sts {Photo 5}. [2 dc, edc, tr] in the last st {Photo 6}.
Make a sl st in the marked st of the Joining Round {Photos 7 and 8}. Remove the SM. Ch 2, insert your hook from top to bottom into the next BLO/FLO combo on the Small Petal and make a sl st {Photos 9 and 10}. Turn your work.
Stitch Count: 2 sc, 34 hdc, 30 dc, 2 edc, 2 tr, and 1 ch-2 corner sp.
Row 6
This round is asymmetric.
With WS facing, [edc, dc] in the last st of the previous row {Photo 1}. Hdc in the next 16 sts, make 2 hdc in the next st, hdc in the next 16 sts, sc in the last st {Photo 2}.
[Sc, hdc, dc, ch 2, dc, 2 hdc] in the ch-2 corner sp {Photo 3}.
Sc in the next st, hdc in the next 16 sts, make 2 hdc in the next st, hdc in the next 16 sts {Photo 4}. [2 dc, edc] in the last st.
Insert your hook from top to bottom into the next BLO/FLO combo on the Small Petal and make a sl st {Photos 5 and 6}. Fasten off.
Stitch Count: 3 sc, 71 hdc, 5 dc, 2 edc, and 1 ch-2 corner sp.
Row 7
With WS still facing, join your yarn for Row 7 as follows: With a slip knot already on your hook, insert your hook from top to bottom into the next BLO/FLO combo on the Small Petal and make a sl st {Photos 1 and 2}. Pull this sl st tight and turn your work {Photo 3}.
With RS facing, [dc, hdc] in the last st of the previous row {Photo 4}. BPdc around the next 17 sts, BPhdc around the next 17 sts, BPsc around the next 6 sts {Photo 5}.
[Sc, hdc, ch 2, hdc, sc] in the ch-2 corner sp {Photo 6}.
BPsc around the next 6 sts, BPhdc around the next 17 sts, BPdc around the next 17 sts {Photo 17}. [Hdc, dc] in the last st, which will already contain a BPdc {Photo 8}.
Insert your hook from top to bottom into the next BLO/FLO combo on the Small Petal and make a sl st {Photos 9 and 10}. Ch 2, insert your hook from top to bottom into the next BLO/FLO combo on the Small Petal and make a sl st {Photos 11 and 12}. Turn your work.
Stitch Count: 2 sc, 4 hdc, 2 dc, 12 BPsc, 34 BPhdc, 34 BPdc, and 1 ch-2 corner sp.
Row 8
With WS facing, [edc, dc] in the last st of the previous row {Photo 1}. Dc in the next 18 sts, hdc in the next 18 sts, sc in the last 7 sts {Photo 2}.
[Sc, hdc, dc, ch 2, dc, hdc, sc] in the ch-2 corner sp {Photo 3}.
Sc in the next 7 sts, hdc in the next 18 sts, dc in the next 18 sts {Photo 4}. [Dc, edc] in the last st.
Insert your hook from top to bottom into the next BLO/FLO combo on the Small Petal and make a sl st {Photos 5 and 6}. Ch 2, insert your hook into the next ch-2 sp of the Small Petal, which will already contain sts from the Joining Round, and make a sl st {Photos 7 – 9}. Turn your work.
Stitch Count: 16 sc, 38 hdc, 40 dc, 2 edc, and 1 ch-2 corner sp.
Row 9
This row is asymmetric.
With RS facing, [edc, dc] in the last st of the previous row {Photo 2}. If you wish to, you can mark the first st with a SM so that you can identify it in the next round. Dc in the next 21 sts, hdc in the next 25 sts, sc in the last st {Photo 3}.

[Sc, hdc, dc, ch 2, dc, 2 hdc] in the ch-2 corner sp {Photo 4}.
Sc in the next st, hdc in the next 25 sts, dc in the next 21 sts {Photo 5}.
[Dc, edc] in the last st {Photo 6}. Make a sl st in the ch-2 sp of the Small Petal, working behind the joining sts {Photos 7 and 8}. Fasten off and work away your ends.
Stitch Count: 3 sc, 53 hdc, 46 dc, 2 edc, and 1 ch-2 corner sp.
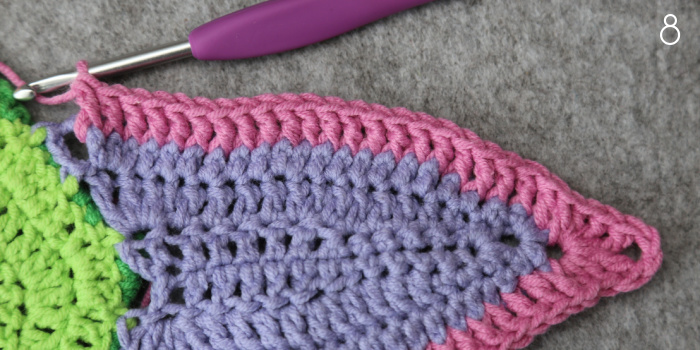
Here is a close-up of the back of your work:
Your Lage Petal will look a bit wonky. Don’t worry about it!
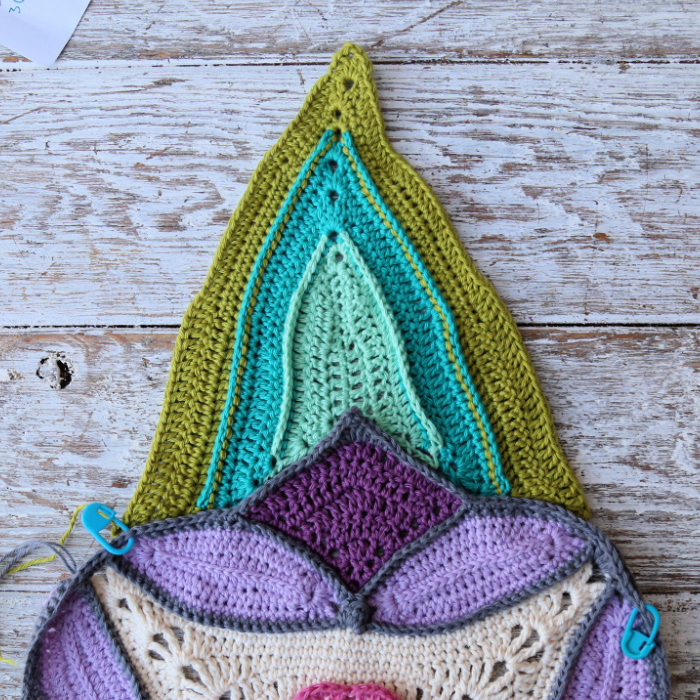
Once you have made a Large Petal into each of the 4 sides, continue with Round 20 below.
Round 20 – Framing Round
Join your yarn by making a standing sc in the first dc of any 4-dc group from Round 19. Sc in the next 4 sts.
*Hdc in the next st, dc in the next st. Place a SM around the post of this dc {Photo 1}. Working into Row 9 of the Large Petal, BPdc around the next 52 sts, making sure you don’t accidentally work around the ch-2 at the start of the round – Photo 2 shows the marked st to start around.
[Hdc, dc, ch 2, dc, hdc] in the next ch-2 sp {Photo 5}. BPdc around the next 52 sts {Photo 6}.
Working into Round 19, dc in the next (marked) st {Photo 7}. Remove the SM and place it around the post of the dc you just made. Hdc in the next st, sc in the next 6 sts, the second of which will be the first dc of a 4-dc group {Photo 8}.*
Rep from * to * 3 more times, omitting the last 5 sc on the last repeat. Join to the first sc with a sl st. Fasten off and work away your ends.
Stitch Count per Side: 6 sc, 4 hdc, 4 dc, and 104 BPdc, not including ch-2 corner sps.
Tacking Down Round 19
- Galaxy – Yarn D
- Seaside – Yarn B
- Earth – Yarn K
- Bouquet – Yarn G
- Air/Delft – Yarn E
- Rainbow – Yarn G
Please grab a cuppa and don’t get stressed about the many words that follow!!!
I cannot tell you how much time I spent doing and undoing Part 2 to find the neatest and most convenient way to make these Large Petals. In the end, my best solution means that you will have to do some sewing! I know!! It’s not that bad, though. It is actually quite meditative once you get into the swing of it.
Can you use surface slip stitches instead? Absolutely! But it will be much more tedious. I tried it.
Round 19 sticks up a little bit and you can see the gaps created at the start and end of the Large Petal rows (I’ll refer to these as LP rows from here on).
What we want to do is to sew Round 19 down onto the Petals, working OVER the first/last sts/chs of each Large Petal Row. I prefer to use the back stitch for this as it is secure and hardly noticeable on the finished piece (if done in the same colour as Round 19). You will work into every stitch of Round 19 (except the first one) and whatever loops you can catch on the LP rows.
Sometimes you will only work into Round 19, like when working over a gap in the Large Petals.
This is one of those things that is easy to do but tricky to explain, so I will walk you through making the first 9 stitches. Once you’ve done those, you should have a feel for making back stitches and what is expected, so you can continue on your own.
Basically, this is a ‘just wing it’ part.
Instructions
I prefer working with about 1m/40” of yarn, swapping a new length in when needed.
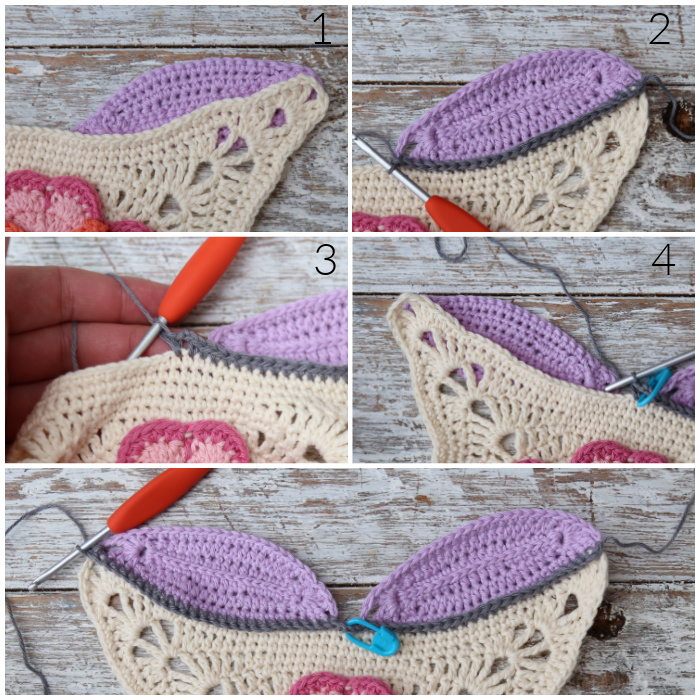
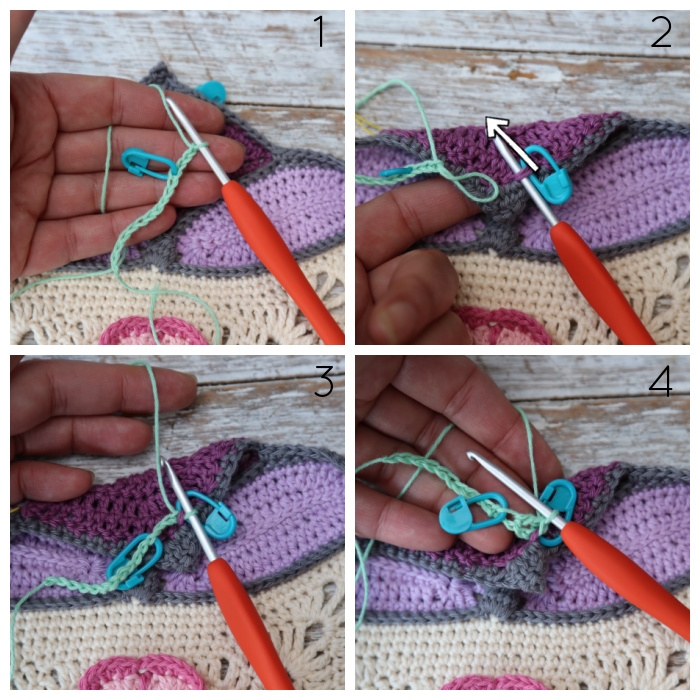
First Stitch: With your needle already threaded, insert your needle from back to front into the second ‘hole’ up the Centre of the Large Petal {Photo 1}. Then insert it from back to front into the ch-3 sp at the top of the Central Petal {Photo 2} and pull your yarn through. Insert your needle from front to back into the second st and into the space between the last and second-last st of LP Row 1 {Photo 3} and pull your yarn all the way through {Photo 4}.
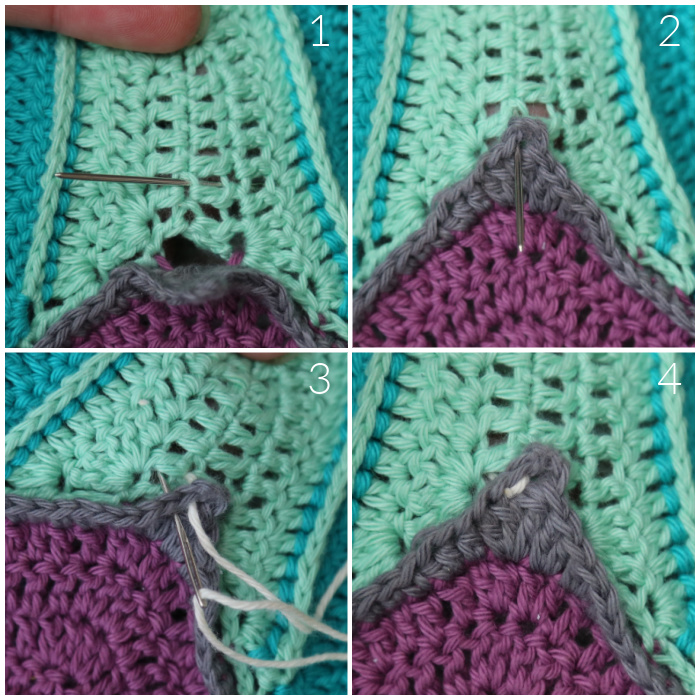
Insert your needle from back to front into the top of the last st of Large Petal Row 1 and through the next st of Round 19 {Photo 5} and pull through {Photo 6}.
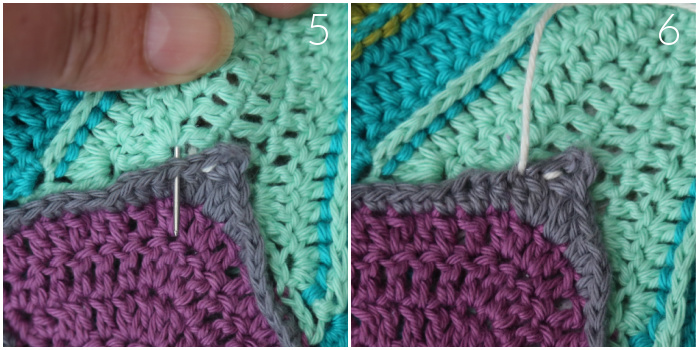
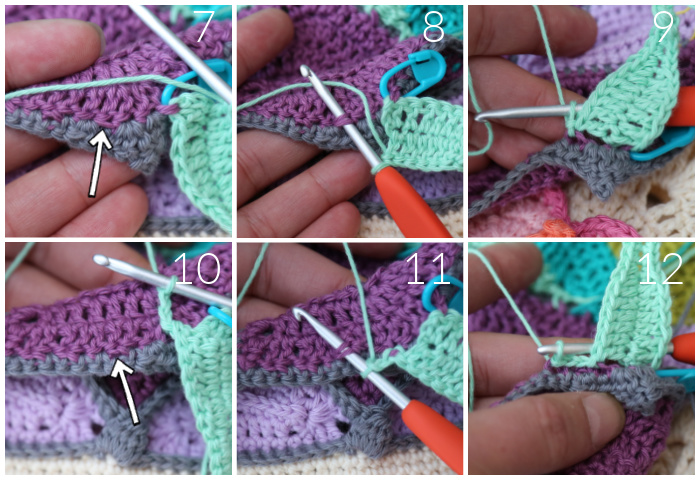
Second stitch: Insert your needle from front to back into the previous st of Round 19 {indicated with a white arrow in Photo 7} and in the space between the last and second-last st of LP Row 1. Then insert it from back to front into the top of the last st of LP Row 1 {Photo 8} and in the next st of Round 19 {indicated with a yellow arrow in Photo 7 and illustrated in Photo 9} and pull through {Photo 10}.
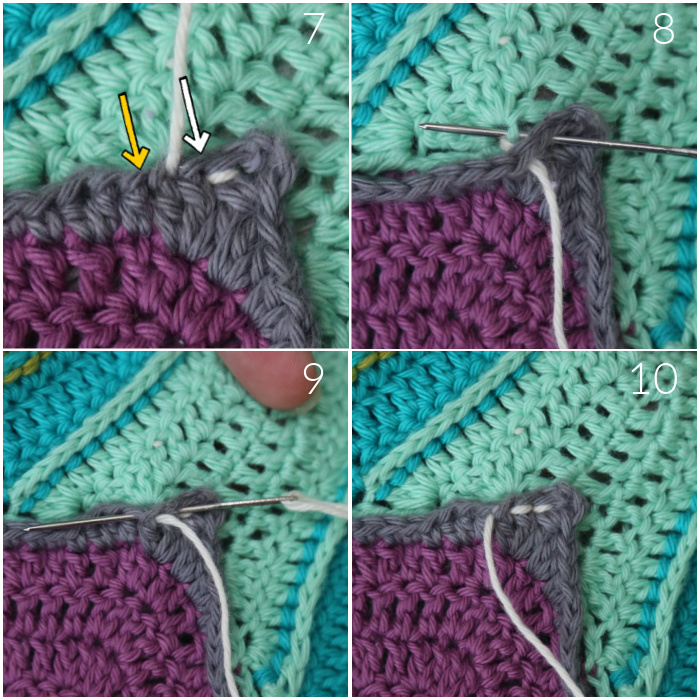
Third stitch: Insert your needle from front to back into the previous st of Round 19 and the last st of LP Row 1. Then insert it from back to front between the ch-2 and first st of LP Row 2 {Photo 11} and into the next st of Round 19 {Photo 12}. Pull through {Photo 13}.
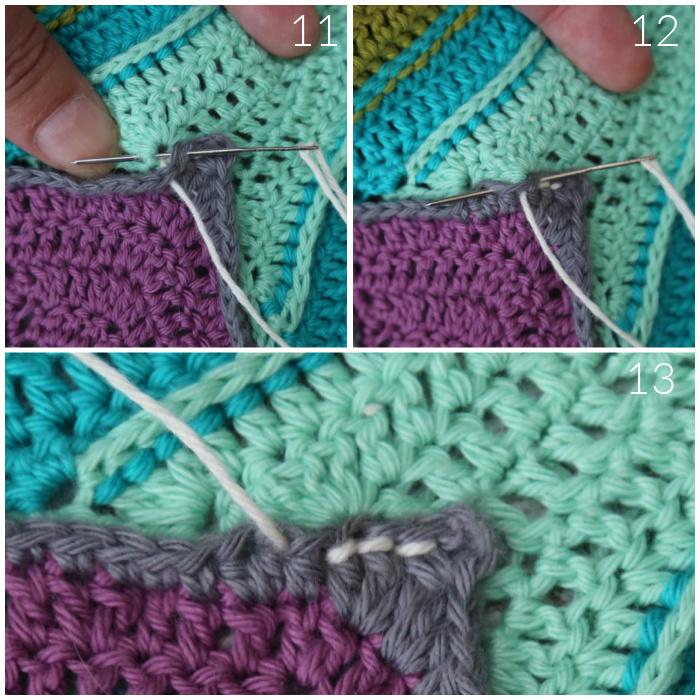
Look at that pretty little dotted line (which won’t be visible because you won’t be using a contrast colour)!
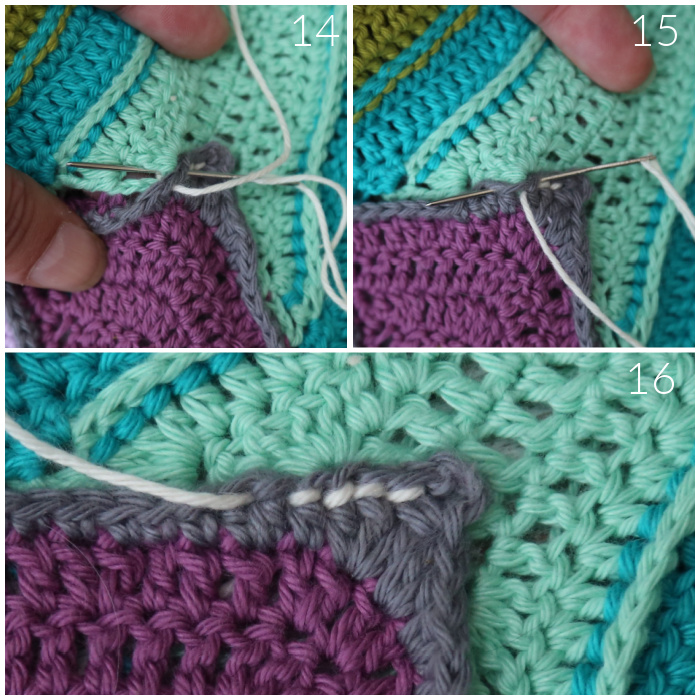
Fourth stitch: Insert your needle from front to back into the previous st of Round 19 and the last st of LP Row 1. Then insert it from back to front between the ch-2 and first st of LP Row 2 {Photo 14} and into the next st of Round 19 {Photo 15}. Pull through {Photo 16}. You will notice that here you have worked around the same st/sp on the back twice. Sometimes that will happen to make your stitches align.
Fifth stitch: Insert your needle from front to back into the previous st of Round 19 from back to front into the next st of Round 19 and pull through. Sometimes, if there is nothing to ‘grab’ onto on the back piece of fabric, you will work through Round 19 only (like this).
Sixth stitch: Insert your needle from front to back into the previous st of Round 19 and between the ch-2 and the first st of LP Row 2. Then insert it from back to front into the top of the first st of LP Row 2 and into the next st of Round 19 and pull through.
Seventh stitch: Insert your needle from front to back into the previous st of Round 19 and the first st of LP Row 2. Then insert it from back to front between the last 2 sts of LP Row 3 and the next st of Round 19. Pull through.
Eight stitch: Insert your needle from front to back into the previous st of Round 19 from back to front into the next st of Round 19 and pull through.
Ninth stitch: Insert your needle from front to back into the previous st of Round 19 and between the last and second-last st of LP Row 3. Then insert it from back to front into the last st of LP Row 3 {Photo 17} and into the next st of Round 19 and pull through.

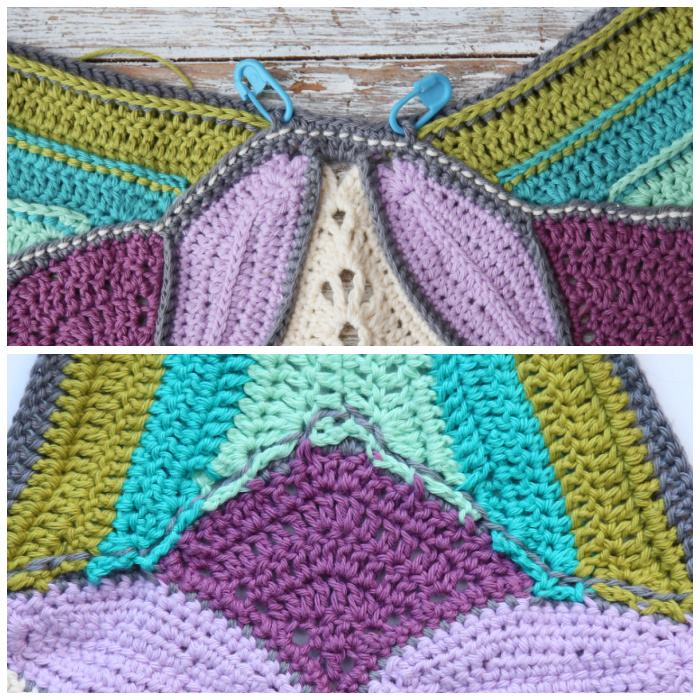
Continue like this, catching whatever loops you can on the back piece of fabric while making your stitches. The only thing to aim for in terms of neatness is to ensure that you attach the ch-3 at the top of each Central Petal to the second ch/hole in the middle of the Large Petal {Photos 1 – 4 above}.
This is what the stitches should look like from the front and the back.
Phew! How did you find that? Take a moment to pat yourself on the back. It just gets easier from here!

This blog post contains affiliate links. I only link to products I personally use or would use. All opinions are my own.


Sharon Lanskey says
Hi Dedri
I can’t see photos 14. 15 and 16 that you refer to in the “Tacking Down”?
Thanks
Jenny Lowman says
Hi Sharon.
Have a look at the official Scheepjes PDF. The photos are there, so here’s the link
Part 2