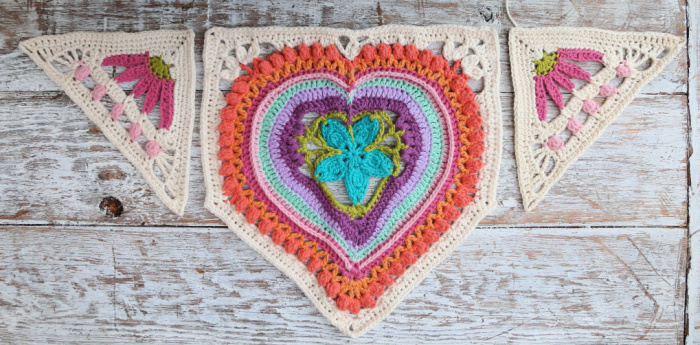
Welcome to Part 10 of the Universe in Bloom CAL. In this part, we will make 8 dainty triangles. You will be attaching these Triangles to the side of the Heart Houses to form four Giant Triangles. These will form the corners of your blanket. If you have not yet completed all four Heart Houses, now is a good time to do so because we will need them in the next part.

Resources
>>Universe in Bloom Information Post<<
- Universe in Bloom on Ravelry
- PDFs – these contain a condensed version of the pattern below, and can be found on the Scheepjes Website:
- English PDFs (US and UK Terms)
- Dutch PDF
Video Playlists
- English US Terminology
- Dutch
Abbreviations, Special Stitches, Chart Legend
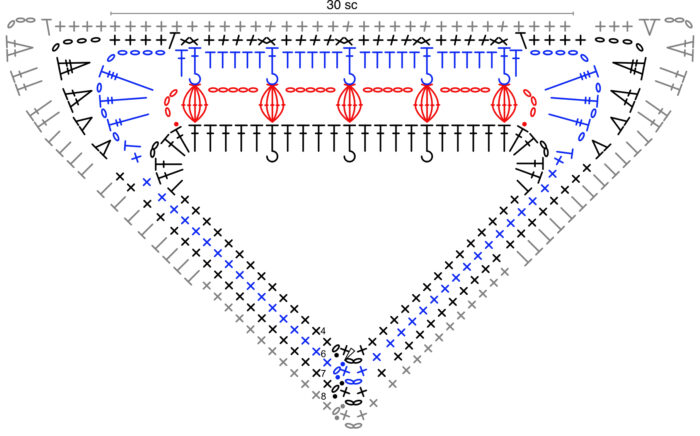
The photo tutorial below uses US Terminology. Please see the Special Stitches and Techniques Post HERE for Photo Tutorials and Chart Legend.
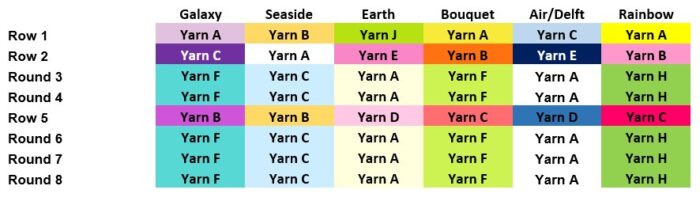
Colours Per Round
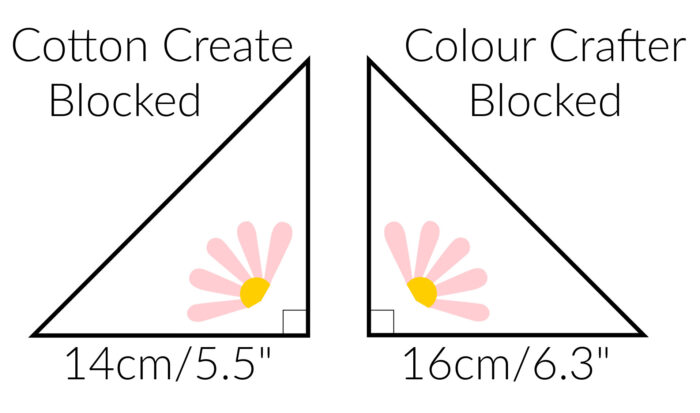
Gauge
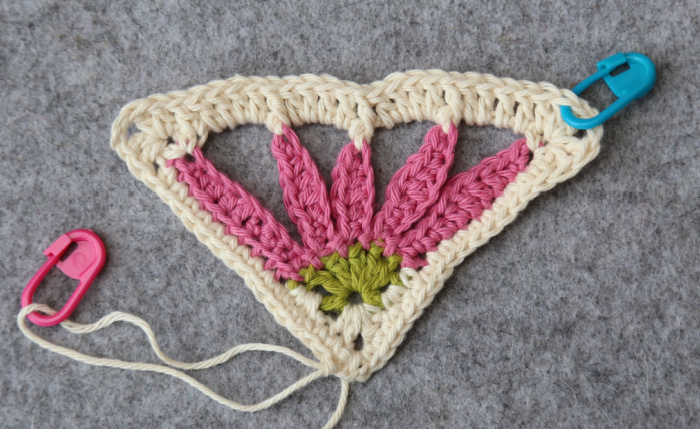
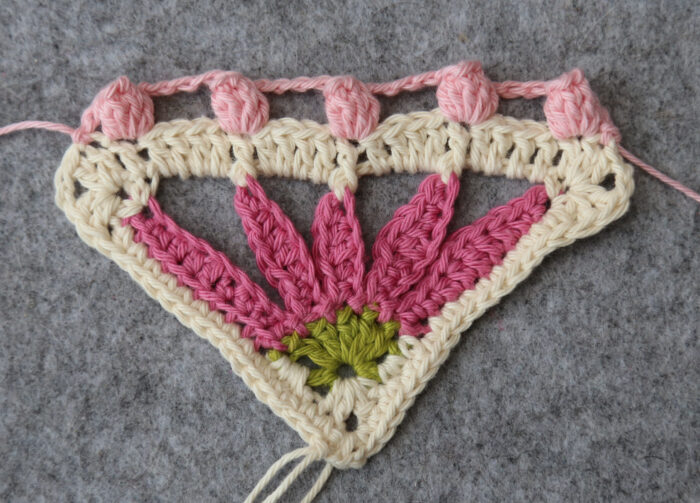
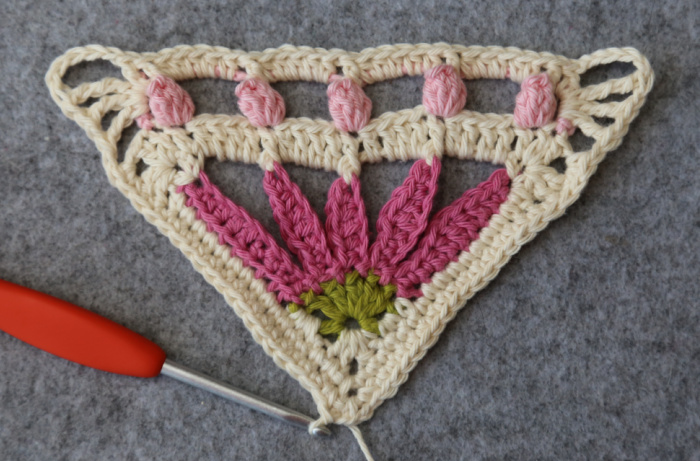
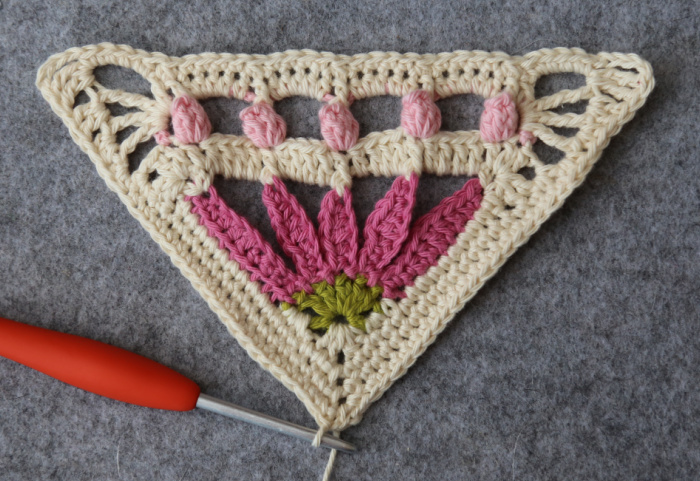
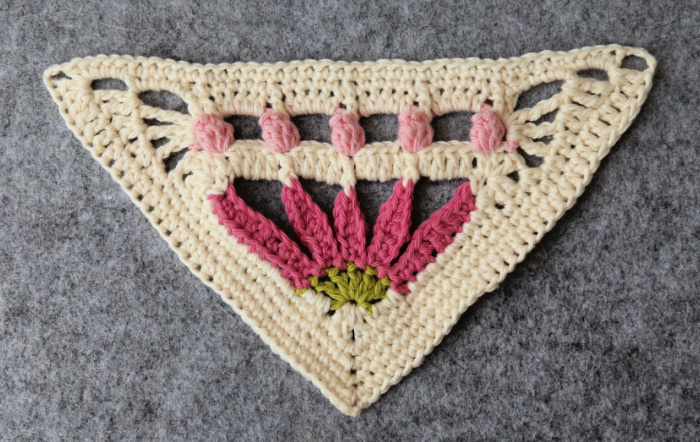
Triangles/Wings
You will need to make 8 of these triangles.
For this part, I suggest working your ends away when you have finished making each triangle.
These triangles will be a bit wobbly when done. Don’t worry about it, they just need a bit of a stretch/block.
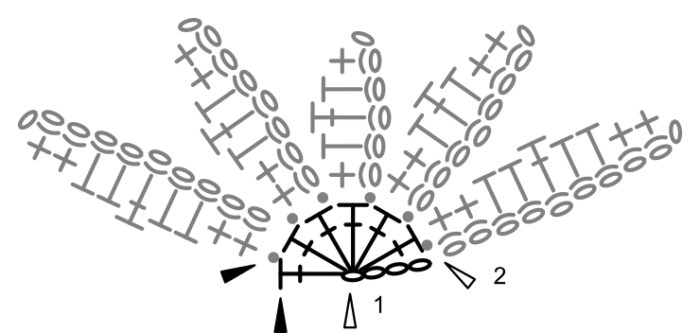
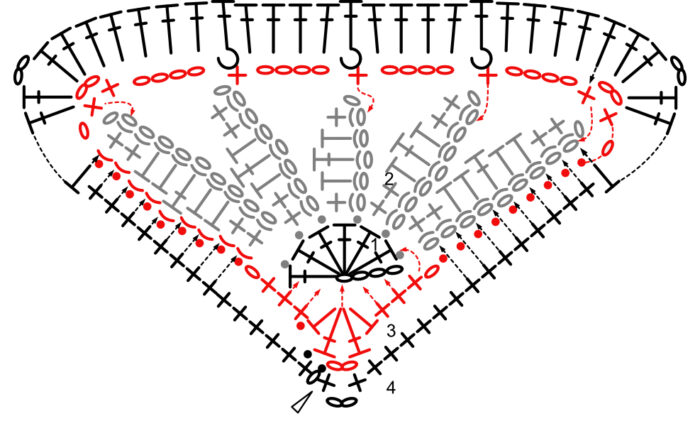
Row 1
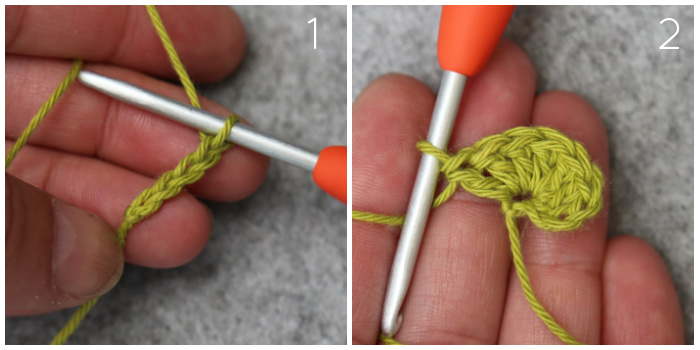
Ch 4, make 6 dc in the fourth ch from the hook, fasten off. The beg ch-3 counts as a ch-3 sp for this row, NOT a dc.
Stitch Count: 6 dc and 1 ch-3 sp
Row 2
When working into the ch sts in this row, work into the top loop only with the RS of the ch facing you.
With RS facing, skip the beg ch-3 and join your yarn by making a sl st in the next dc.
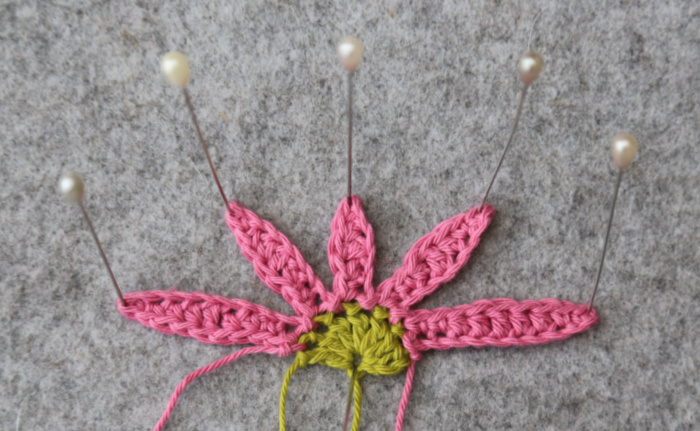
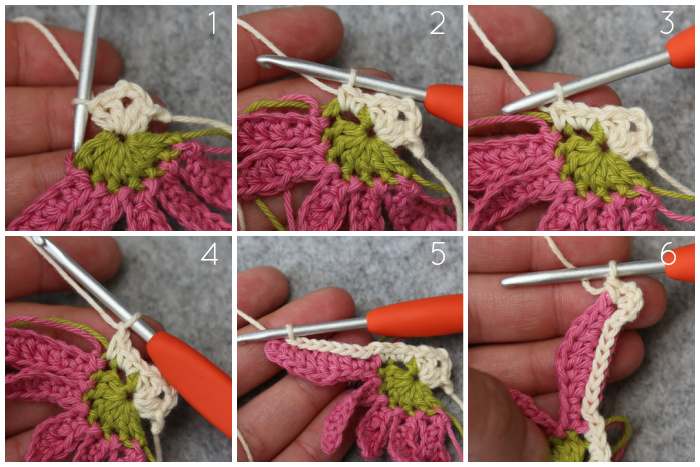
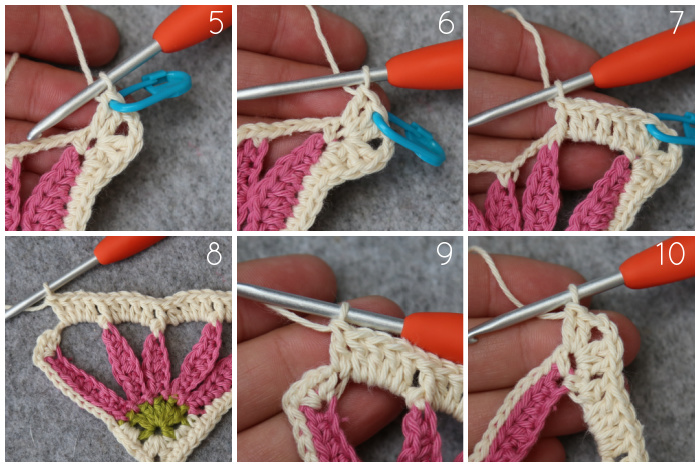
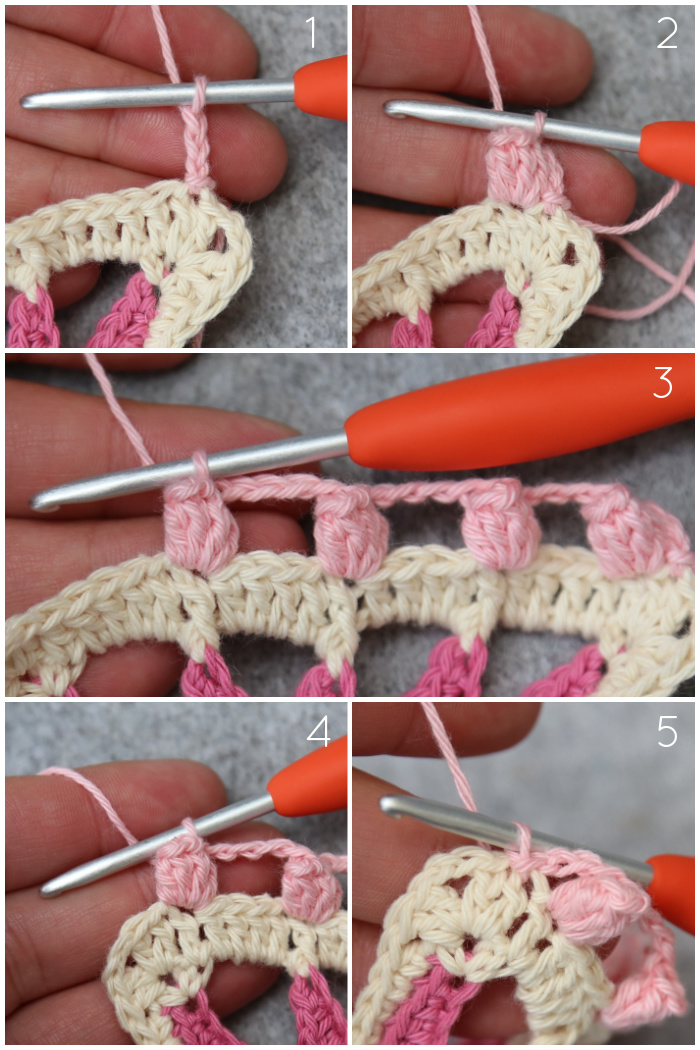
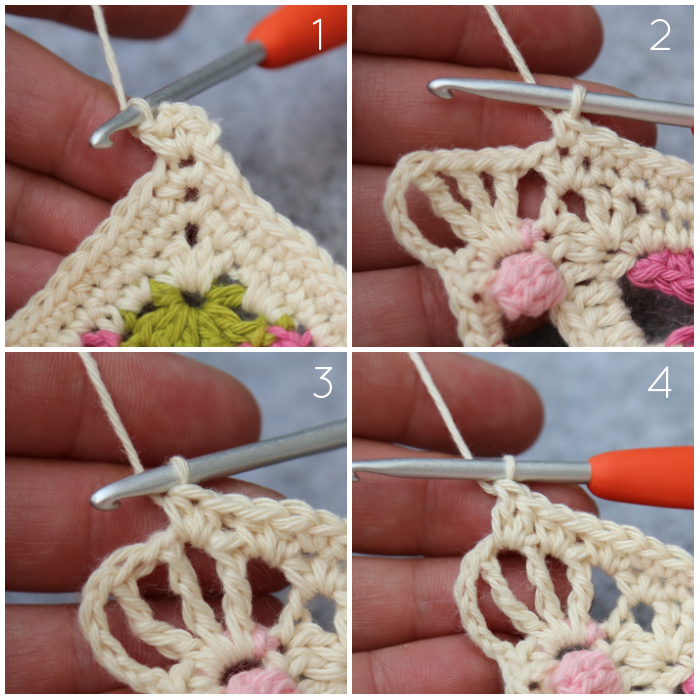
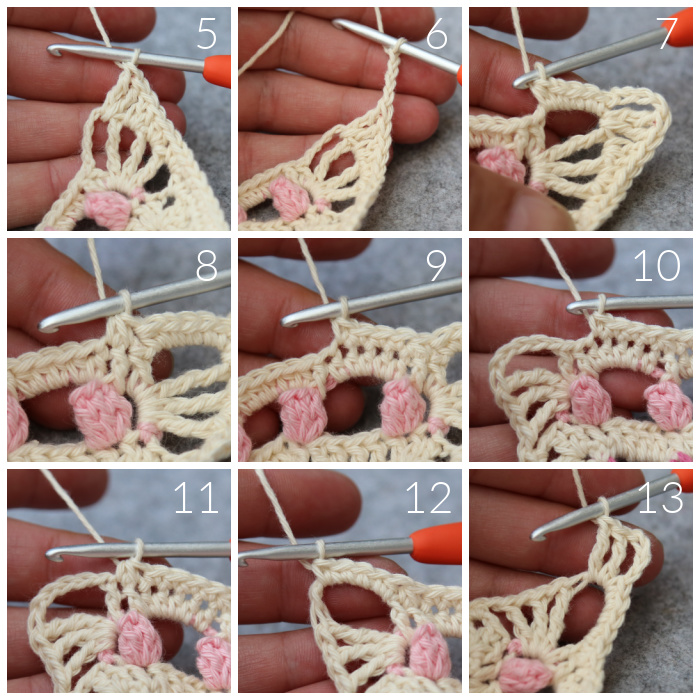
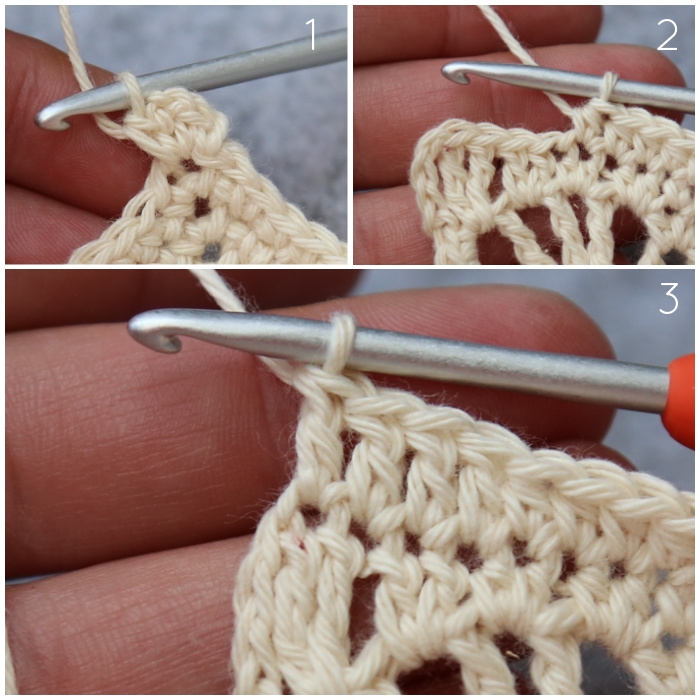
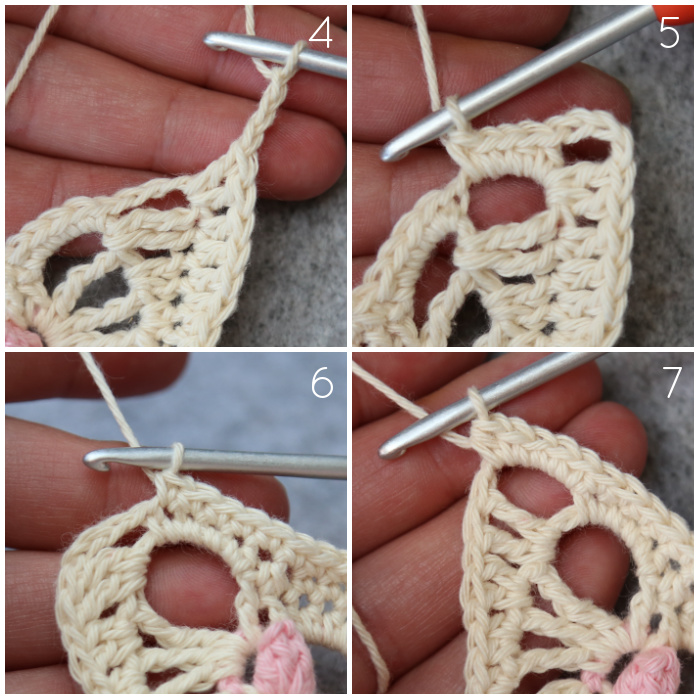
Petal 1: Ch 10 {Photo 1}, sc in the second ch from the hook and the next ch {Photo 2}. Hdc in the next 2 ch, dc in the next ch {Photo 3}, hdc in the next 2 ch {Photo 4}, sc in the last 2 ch {Photo 5}. Sl st in the next dc of Row 1 {Photo 6}. {9 sts}
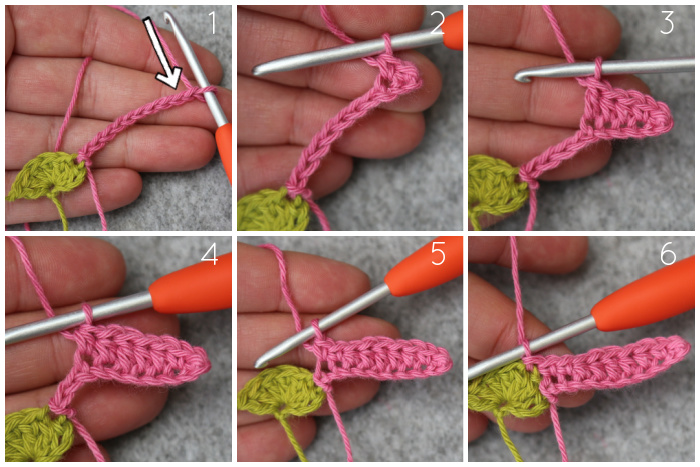
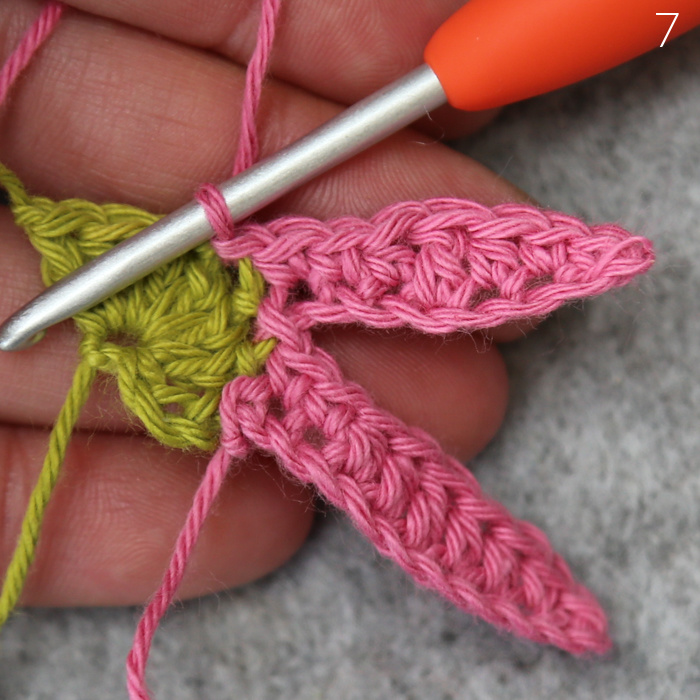
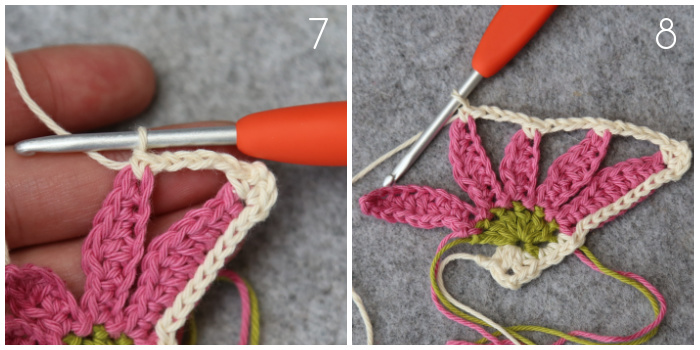
Petal 2: Ch 8, sc in the second ch from the hook and the next ch. Hdc in the next ch, dc in the next ch, hdc in the next ch, sc in the last 2 ch. Sl st in the next dc of Row 1 {Photo 7}. {7 sts}
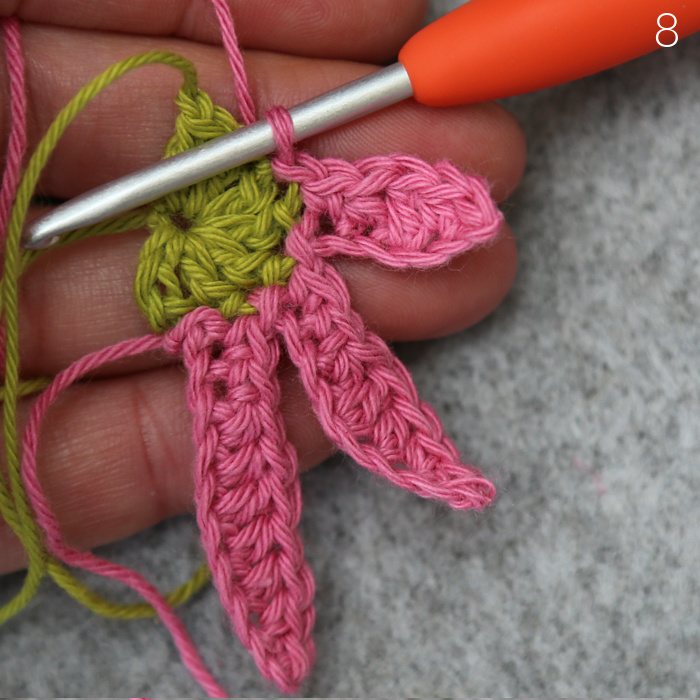
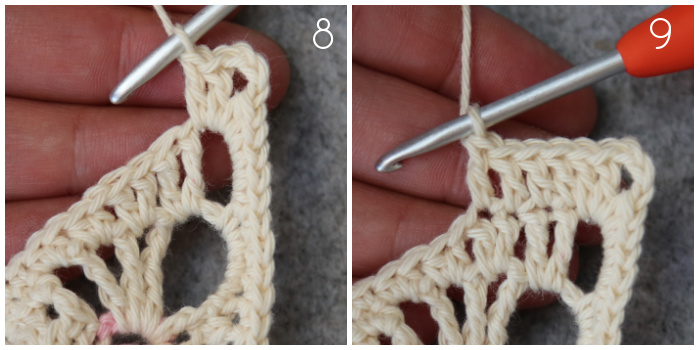
Petal 3: Ch 6, sc in the second ch from the hook. Hdc in the next ch, dc in the next ch, hdc in the next ch, sc in the last ch. Sl st in the next dc of Row 1 {Photo 8}. {5 sts}
Petal 4: As Petal 2.
Petal 5: As Petal 1. Fasten off.
Stitch Count: 18 sc, 14 hdc, and 5 dc
Round 3
When working into the ch sts in this row, work into both remaining loops.
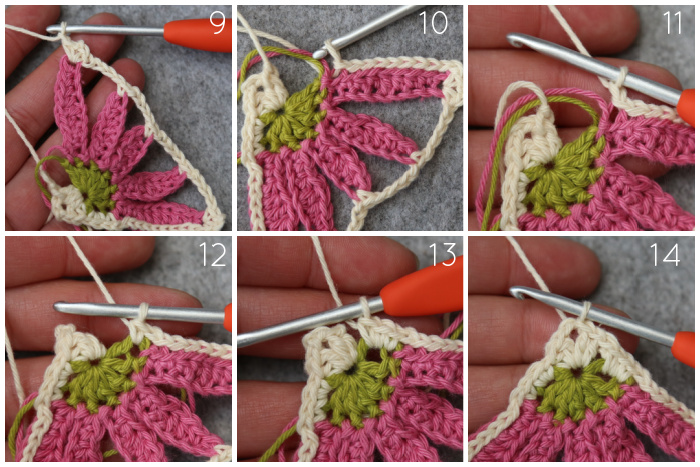
With RS facing, join your yarn by making a standing hdc in the first ch of Row 1, which contains the 6 dc from Row 1. [Dc, ch 2, dc, hdc] in the same ch {Photo 1}. Make 2 sc into the ch-3 sp from Row 1 {Photo 2}, sc in the first dc of Row 1 {Photo 3}. Ch 1, sl st in the next 8 ch of Row 2 {Photos 4 and 5}. [Sl st, ch 1, sc, ch 2, sc] in the next ch {Photo 6}.
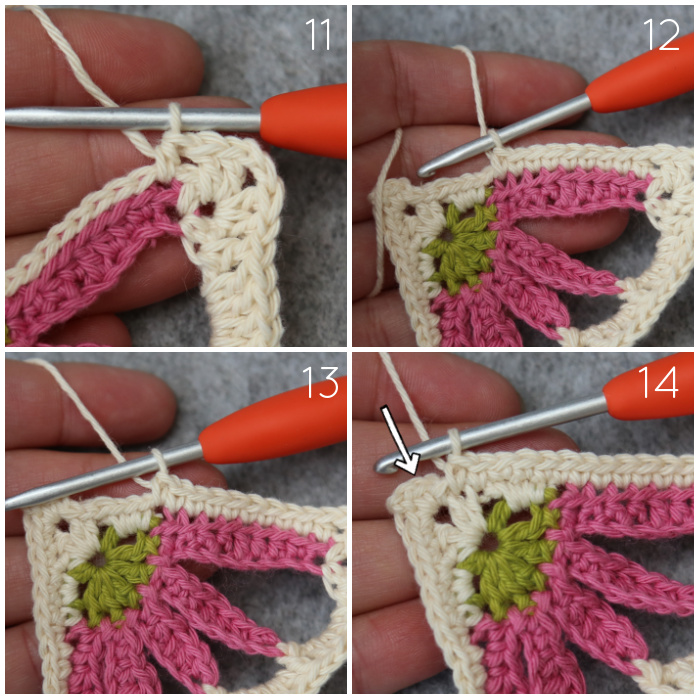
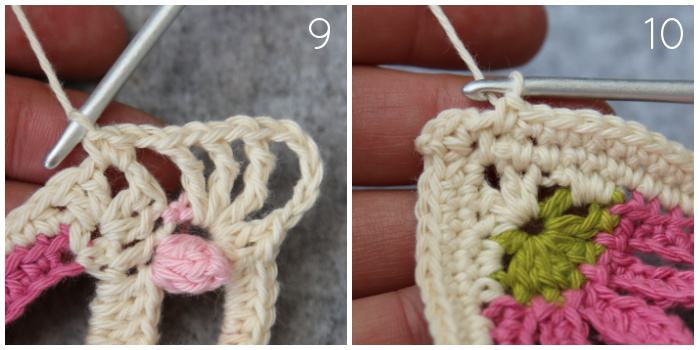
(Ch 4, sc in the ch that contains the first sc of the next Petal) 3 times {Photos 7 and 8}.
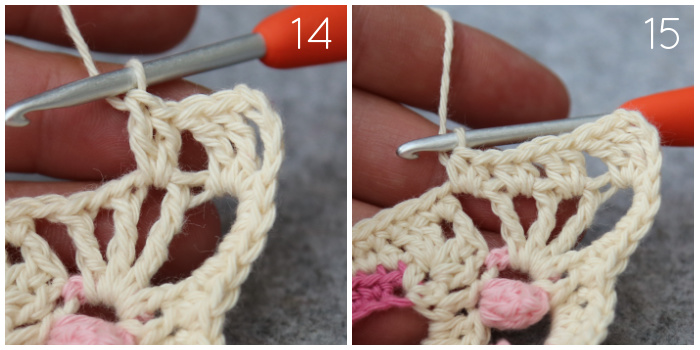
Ch 4, [sc, ch 2, sc, ch 1] in the ch that contains the first sc of the last Petal {Photo 9}. Sl st in the BLO of the next 9 sts of the last Petal from Row 2 {Photo 10}. Ch 1, sc in the top of the last dc from Row 1 {Photos 11 and 12}. Make 2 sc, working into the side of the same dc {Photo 13}. Join to the first hdc with a sl st {Photo 14}.
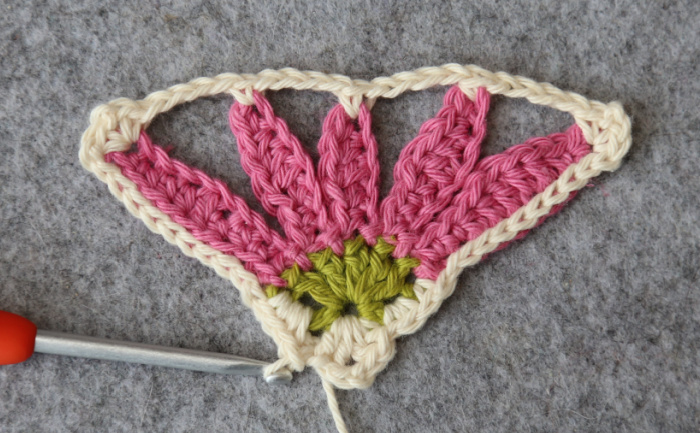
Stitch Count: 13 sc, 2 hdc, 2 dc, and 4 ch-4 sps, not including sl sts and ch-2 corner sps.

Round 4
Sl st in the next st and in the ch-2 corner sp. [Ch 1, sc, ch 2, sc] in the ch-2 corner sp {Photo 1}. Sc in the next 5 sts, sc in the next ch-1 sp {Photo 2}. Sc in the next 8 ch of Row 2, working OVER the sl sts from Round 3 {Photo 3}. Hdc in the last ch of Row 2, working OVER the sl st from Round 3 {Photo 4}. Skip the last sc of Row 3 {Indicated with an arrow in Photo 4}.

[2 dc, ch 2, 2 dc] in the ch-2 corner sp, marking the last dc with a SM {Photo 5}. Dc in the next sc {Photo 6}. (Make 4 dc in the next ch-4 sp, FPdc around the next sc {Photo 7}) 3 times {Photo 8}. Make 4 dc in the last ch-4 sp, dc in the next sc {Photo 9}. [2 dc, ch 2, 2 dc] in the ch-2 corner sp {Photo 10}.
Skip the first (hidden) st, hdc into the next BLO of Row 2, working OVER the sl st from Round 3 {Photo 11}. Sc in the next 8 BLO of Row 2, working OVER the sl sts from Round 3 {Photo 12}. Sc in the next ch-1 sp {Photo 13}, sc in the last 5 sts {Photo 14}. Join to the first sc with a sl st {Indicated with an arrow in Photo 14}.
Pull up a long loop and place a SM in this loop so that you can pick it up again in Round 6.
Stitch Count: 30 sc,2 hdc, 26 dc, and 3 FPdc, not including ch-2 corner sps.
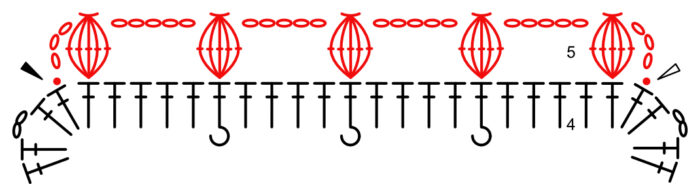
Row 5
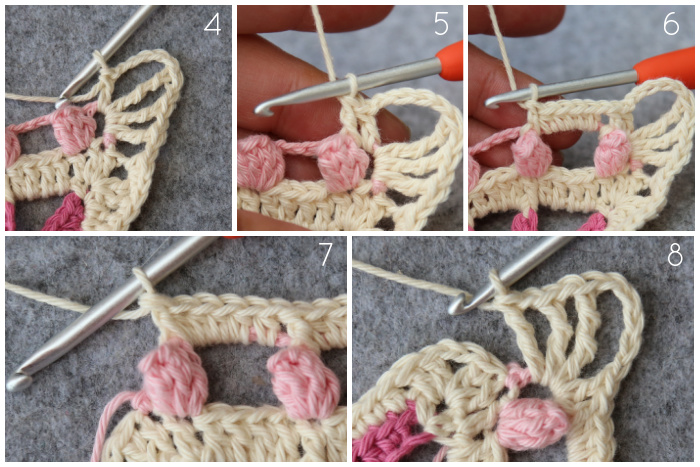
With RS facing, join your yarn by making a sl st in the marked st from the previous round. Ch 3 {Photo 1}, make a Popcorn in the next st {Photo 2}. (Ch 5, skip the next 4 sts, make a Popcorn in the next FPdc) 3 times {Photo 3}. Ch 5, skip the next 4 sts, make a Popcorn in the next st {Photo 4}. Ch 3, sl st in the next st and fasten off {Photo 5}. There should be 1 st left unworked before the ch-2 corner sp.
Stitch Count: 5 Popcorns and 4 ch-5 sps, not including first and last ch-3 sp.
Round 6
With RS facing, pick up the long loop from Round 6 and remove the SM. Sl st in the next ch-2 sp. [Ch 1, sc, ch 2, sc] in the ch-2 corner sp {Photo 1}. Skip the first (hidden) st, sc in the next 17 sts {Photo 2}, [sc, hdc] in the next ch-2 corner sp {Photo 3}.

Working into the next ch-3 sp of Row 5: [ch 1, tr, ch 1, tr, ch 1, dtr, ch 5, dc] {Photo 4}. FPdc around the next Popcorn {Photo 5}. (Make 5 hdc in the next ch-5 sp, FPdc around the next Popcorn {Photo 6}) 4 times {Photo 7}. [Dc, ch 5, dtr, ch 1, tr, ch 1, tr] in the next ch-3 sp of Row 5. {Photo 8}
Ch 1, [hdc, sc] in the next ch-2 sp {Photo 9}. Skip the first (hidden) st, sc in the next 17 sts {Photo 10}. Join to the first sc with a sl st.
Stitch Count: 38 sc, 22 hdc, 2 dc, 4 tr, 2 dtr, 5 FPdc, 6 ch-1 sps, 1 ch-2 sp, and 2 ch-5 sps
Round 7
Sl st in the next ch-2 sp. [Ch 1, sc, ch 2, sc] in the same ch-2 sp {Photo 1}. Skip the first st, sc in the next 19 sts {Photo 2}. (Make 2 hdc in the next ch-1 sp) twice{Photo 3}. Make 2 dc in the last ch-1 sp {Photo 4}.
[2 tr, ch 4, 4 sc, hdc] in the ch-5 sp {Photos 5 – 7}. Skip the first st. (Sc2tog over the next FPdc and the next hdc {Photo 8}, sc in the next 4 sts {Photo 9}) 4 times {Photo 10}. Sc2tog over the last FPdc and the next dc {Photo 11}. [Hdc, 4 sc, ch 4, 2 tr] in the next ch-5 sp {Photos 12 and 13}.
Make 2 dc in the next ch-1 sp {Photo 14}. (Make 2 hdc in the next ch-1 sp) twice {Photo 15}. Skip the next st, which will be tricky to get into anyway, sc in the next 19 sts. Join to the first sc with a sl st.
Stitch Counts:
- Long Side (counting from ch-4 sp to ch-4 sp): 24 sc, 5 sc2tog, and 2 hdc, not including ch-4 sps.
- Per Short Side (counting from ch-2 sp to ch-4 sp): 20 sc, 4 hdc, 2 dc, and 2 tr, not including ch sps.
Round 8
Sl st in the next ch-2 sp. [Ch 1, sc, ch 2, sc] in the same ch-2 sp {Photo 1}. Sc in the next 12 sts {Photo 2}, hdc in the next 12 sts, dc in the next 4 sts {Photo 3}.
[2 dc, ch 3, 2 hdc, 3 sc] in the next ch-4 sp {Photos 4 and 5}. Skip the first st, sc in the next 30 sts {Photo 6}. [4 sc, hdc, ch 3, 2 dc] in the next ch-4 sp {Photos 7 and 8}.
Dc in the next 4 sts {Photo 9}, hdc in the next 12 sts, sc in the next 12 sts. Join to the first sc with a sl st. Fasten off and work away your ends.
Stitch Counts:
- Long Side (counting from ch-3 sp to ch-3 sp): 37 sc and 3 hdc, not including ch-3 sps.
- Per Short Side (counting from ch-2 sp to ch-3 sp): 13 sc, 12 hdc, 6 dc, not including ch sps.
Remember that these triangles are going to be attached to the Heart Houses, so the short sides should be the same as the sides of the heart houses (roughly).
Please Note: If you blocked your Heart Houses way back when you made them, they may have relaxed down a bit and your triangles may look a bit too big to fit them. Please don’t worry about this. It will all work out.
If you are one of those people who are trying to do the maths to see if Small Triangle + Heart House + Small Triangle = the same size as the last round we made on the blanket… DON’T DO IT!!!! Trust the pattern, not the logic. I redid these elements, the corners, and the joining more times than I care to admit, and it works!

This blog post contains affiliate links. I only link to products I personally use or would use. All opinions are my own.


