Welcome to Part 2 of the Maya’s Meadow CAL. This week we will make 24 Back Post Raindrops, which we will turn into four Large Flowers in Week 4. For those interested in making Maya’s Meadow in Whirl or another single colour, you can find Alternative single-colour instructions (without fastening off) at the end of this post.

I have thoroughly enjoyed watching your Part 1 Raindrops take shape this last week. There are so many beautiful colour combinations and interesting photo arrangements. Oooh, just imagine the gorgeous photos we are going to see when we each have a basket full of 72 raindrops! I may have to cook up a competition, don’t you think?
Resources
- Introduction Post
- Abbreviations and Special Stitches
- I’ve done a video tutorial for Part 2. You can find that HERE:
Translations
Part 2: Back Post Raindrops
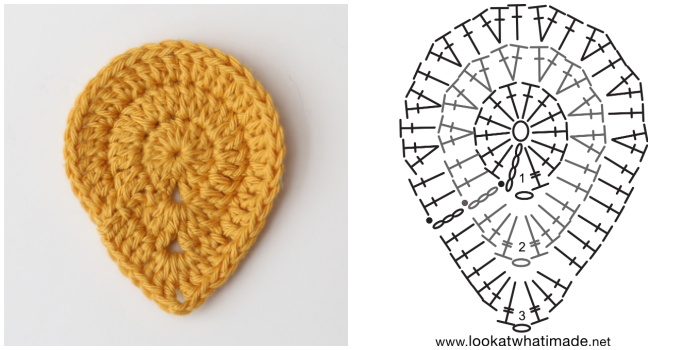
Chart and Abbreviations
Charts by Masako Kawahara from Crochet_hmmm

For help with making back post stitches, see this Back Post Tutorial.
Instructions
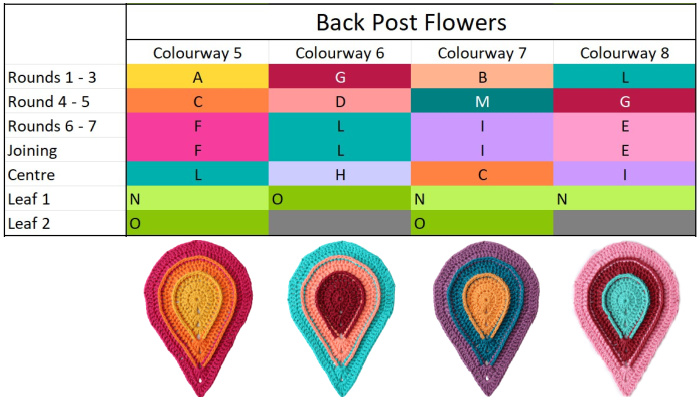
Make 6 Raindrops in each of Colourways 5 – 8.
When making these motifs, it will be a bit fiddly making the Back Post increases. Just take it slow 😊
Round 1: Into a magic ring, ch 5 (counts as tr + ch-1), tr, 12 dc. Join to the fourth ch of the beg ch-5 with a sl st. {12 dc and 2 tr – not including ch-1 sp}
Round 2: Ch 3 (counts as dc throughout). [2 dc, tr, ch 1, tr, 2 dc] in the ch-1 corner sp. Dc in the next 3 sts, the first one of which will be hidden, here and throughout. Make 2 dc in each of the next 8 sts. Dc in the last 2 sts. Join to the top of the beg ch-3 with a sl st. {26 dc and 2 tr – not including ch-1 sp}
Round 3: Ch 3. Dc in the next 3 sts. [2 dc, tr, ch 1, tr, 2 dc] in the ch-1 corner sp. Skip the first (hidden) st. Dc in the next 6 sts. (Make 2 dc in the next st, which will be the second dc of the increase from the previous round. Dc in the next st) 8 times. Dc in the last st. Join to the top of the beg ch-3 with a sl st. Fasten off and work away your ends. {39 dc and 2 tr – not including ch-1 sp}
Round 4: Join your yarn by making a standing dc in the ch-1 corner sp. [Dc, tr, ch 1, tr, 2 dc] in the same ch-1 sp. BPdc in the next 10 sts. (Make 2 BPdc in the next st, which will be the second dc of the increase from the previous round. BPdc in the next 2 sts) 8times. BPdc in the next 7 sts. Join to the first dc with a sl st. {49 BPdc, 4 dc, and 2 tr – not including ch-1 sp}
Round 5: Ch 3. Dc in the next 2 sts. [2 dc, tr, ch 1, tr, 2 dc] in the ch-1 corner sp. Dc in the next 13 sts. (Make 2 dc in the next st, which will be the first dc of the increase from the previous round. Dc in the next 3 sts) 8 times. Dc in the next 7 sts. Join to the top of the beg ch-3 with a sl st. Fasten off and work away your ends. {67 dc and 2 tr – not including ch-1 sp}
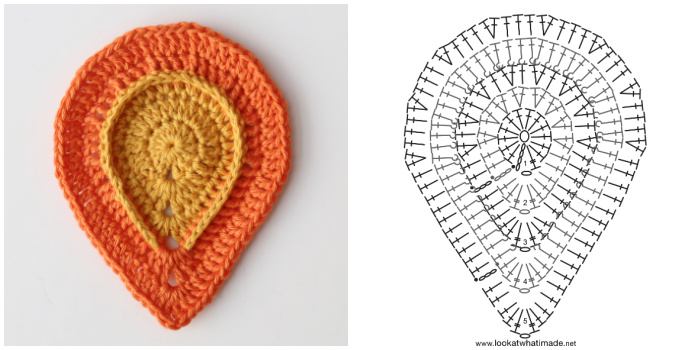
Round 6: Join your yarn by making a standing dc in the ch-1 corner sp. [Dc, tr, ch 1, tr, 2 dc] in the same ch-1 sp. BPdc in the next 17 sts. (Make 2 BPdc in the next st, which will be the second dc of the increase from the previous round. BPdc in the next 4 sts) 8 times. BPdc in the next 12 sts. Join to the first dc with a sl st. {77 BPdc, 4 dc and 2 tr – not including ch-1 sp}
Round 7: Ch 3. Dc in the next 2 sts. [2 dc, tr, ch 1, tr, 2 dc] in the ch-1 corner sp. Dc in the next 20 sts. (Make 2 dc in the next st, which will be the first dc of the increase from the previous round, dc in the next 5 sts) 8 times. Dc in the next 12 sts. Join to the top of the beg ch-3 with a sl st. {95 dc and 2 tr – not including ch-1 sp}


Alternative Single-Colour Instructions
Round 1: Into a magic ring, ch 5 (counts as tr + ch-1), tr, 12 dc. Join to the fourth ch of the beg ch-5 with a sl st. {12 dc and 2 tr – not including ch-1 sp}
Round 2: Sl st into the ch-1 sp. Ch 3 (counts as dc throughout). [Dc, tr, ch 1, tr, 2 dc] in the same ch-1 sp. Dc in the next 3 sts, the first one of which will be hidden. Make 2 dc in each of the next 8 sts. Dc in the last 3 sts. Join to the top of the beg ch-3 with a sl st. {26 dc and 2 tr – not including ch-1 sp}
Round 3: Sl st into the next 2 sts and into the ch-1 sp. [Ch 3, dc, tr, ch 1, tr, 2 dc] in the same ch-1 sp. Skip the first (hidden) st. Dc in the next 6 sts. (Make 2 dc in the next st, which will be the second dc of the increase from the previous round. Dc in the next st) 8 times. Dc in the next 5 sts. Join to the top of the beg ch-3 with a sl st. {39 dc and 2 tr – not including ch-1 sp}
Round 4: Sl st into the next 2 sts and into the ch-1 sp. [Ch 3, dc, tr, ch 1, tr, 2 dc] in the same ch-1 sp. BPdc in the next 10 sts. (Make 2 BPdc in the next st, which will be the second dc of the increase from the previous round. BPdc in the next 2 sts) 8 times. BPdc in the next 7 sts. Join to the top of the beg ch-3 with a sl st. {49 BPdc, 4 dc, and 2 tr – not including ch-1 sp}
Round 5: Sl st into the next 2 sts and into the ch-1 sp. [Ch 3, dc, tr, ch 1, tr, 2 dc] in the same ch-1 sp. Dc in the next 13 sts, the first one of which will be hidden. (Make 2 dc in the next st, which will be the first dc of the increase from the previous round. Dc in the next 3 sts) 8 times. Dc in the next 10 sts. Join to the top of the beg ch-3 with a sl st. {67 dc and 2 tr – not including ch-1 sp}
Round 6: Sl st into the next 2 sts and into the ch-1 sp. [Ch 3, dc, tr, ch 1, tr, 2 dc] in the same ch-1 sp. BPdc in the next 17 sts. (Make 2 BPdc in the next st, which will be the second dc of the increase from the previous round. BPdc in the next 4 sts) 8 times. BPdc in the next 12 sts. Join to the top of the beg ch-3 with a sl st. {77 BPdc, 4 dc and 2 tr – not including ch-1 sp}
Round 7: Sl st into the next 2 sts and into the ch-1 sp. [Ch 3, dc, tr, ch 1, tr, 2 dc] in the same ch-1 sp. Dc in the next 20 sts. (Make 2 dc in the next st, which will be the first dc of the increase from the previous round, dc in the next 5 sts) 8 times. Dc in the next 15 sts. Join to the top of the beg ch-3 with a sl st. {95 dc and 2 tr – not including ch-1 sp}
I hope you have a great week!

This blog post contains affiliate links. I only link to products I personally use or would use. All opinions are my own.


Keke says
Thank you for making and sharing this pattern! If i wanted to make this bigger, how and where would i keep increasing?
Jenny Lowman says
Hi Keke. I would just add more strips of flowers and increase the border accordingly :)
Elda Da Fonseca says
Thanks for ur inspiration !! Love your patterns and designs
Jenny Lowman says
Thank you Elda :)