Welcome to Part 14 of the Maya’s Meadow CAL. In this part, we will add the first two border rounds. Due to the construction of the blanket, the border rounds are very wordy, but that does not mean that they are hard :)
Resources
- Introduction Post
- Abbreviations and Special Stitches
- I’ve done a video tutorial for Part 14. You can find that HERE:
Translations
Part 14: Border Part 1
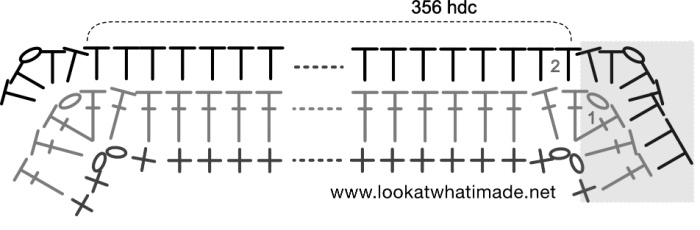
Chart and Abbreviations
Charts by Masako Kawahara from Crochet_hmmm

Instructions
Once you have joined all your columns, we will start creating the border. Border Round 1 is a little bit involved, and you have to do all your counting for Border Round 2. Border Rounds 3 – 7 will be much more fun!
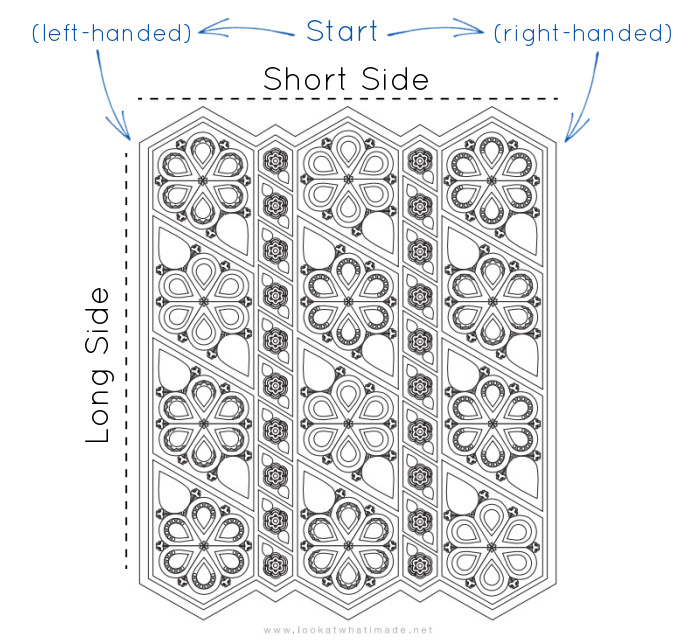
Instructions and stitch counts are provided per ‘Short Side’ (top and bottom) and ‘Long Side’ (sides). Due to the shape of the blanket, there will be a lot of words for the short sides. Sorry!!!
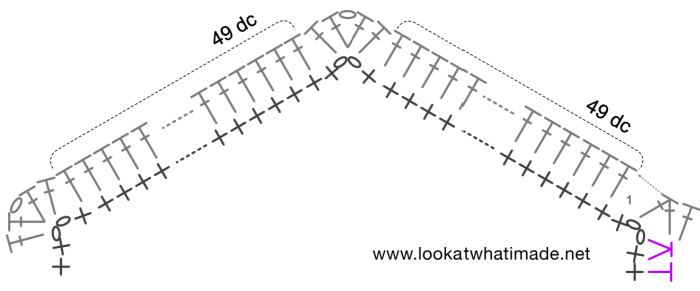
Border Round 1
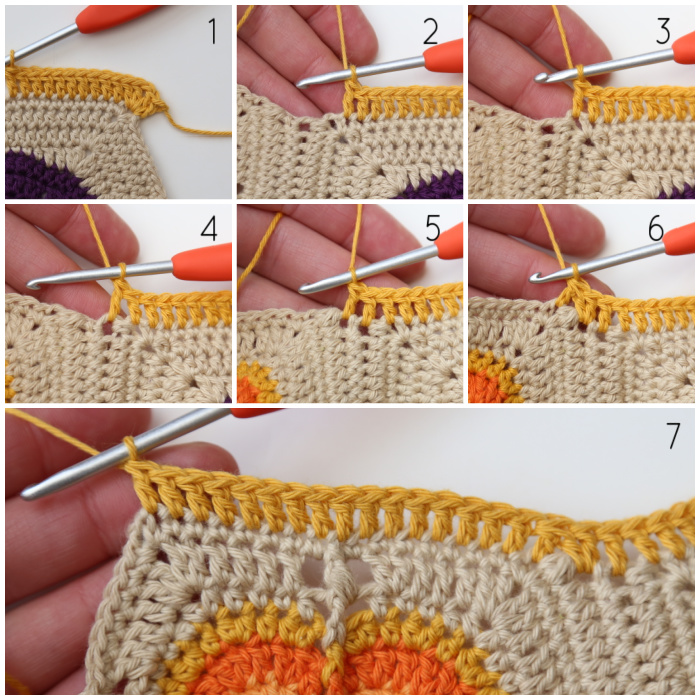
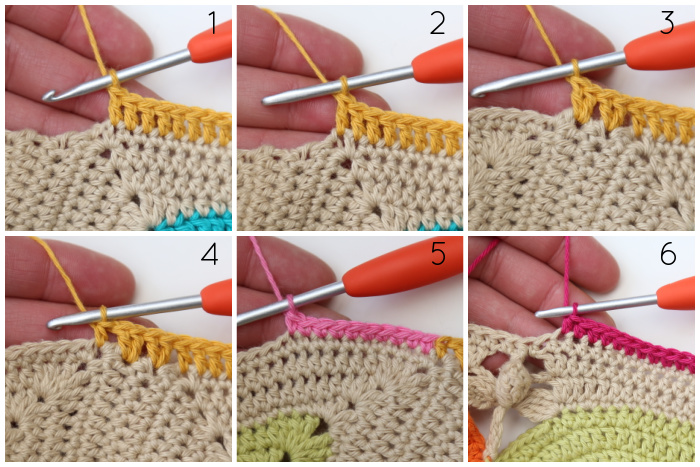
With Colour P (joining colour) and starting in the top right ch-2 corner sp (top left, if you are left-handed) with a standing st: [2 dc, ch 1, 2 dc] in the ch-2 corner sp. This is your first corner made {Photo 1}.
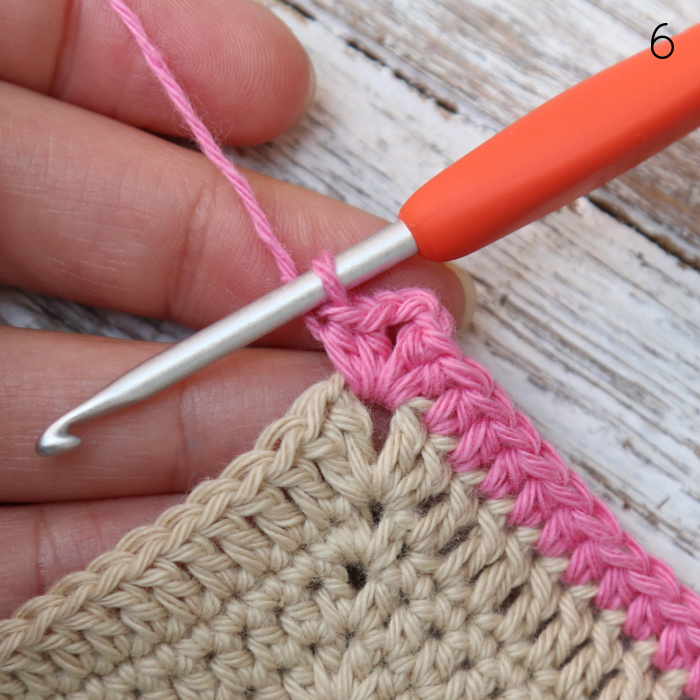
*Short Side: Skip the first (hidden) st. Dc in the next 49 sts. [2 dc, ch 1, 2 dc] in the next ch-2 sp. Skip the first (hidden) st. Dc in the next 49 sts {Photo 2}. Dc in the next ch-2 sp {Photo 3}. Dc in the next hdc of Joining Row 1 (which contains a sc from Joining Row 2) – Photo 4. Dc in the next hdc of Joining Row 1 (which contains the same sc from Joining Row 2) – Photo 5. Dc2tog, working into the same (last) hdc of Joining Row 1 and the next ch-2 sp {Photo 6}.
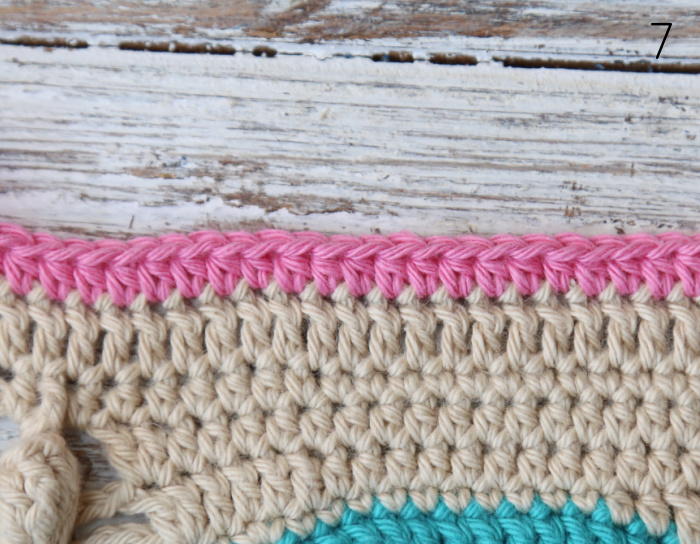
Skip the first (hidden) st. Dc in the next 16 sts {Photo 7}. [2 dc, ch 1, 2 dc] in the next ch-2 sp. Skip the first (hidden) st. Dc in the next 16 sts {Photo 2}. Dc in the next ch-2 sp {Photo 3}. Dc in the next hdc of Joining Row 1 (which contains a sc from Joining Row 2) – Photo 4. Dc in the next hdc of Joining Row 1 (which contains the same sc from Joining Row 2) – Photo 5. Dc2tog, working into the same (last) hdc of Joining Row 1 and the next ch-2 sp {Photo 6}.**
Rep from * to ** once.
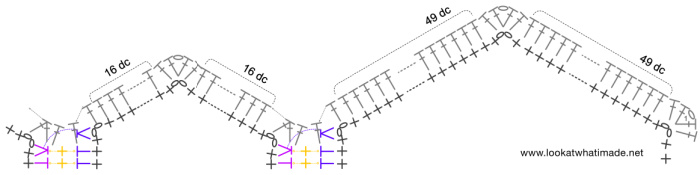
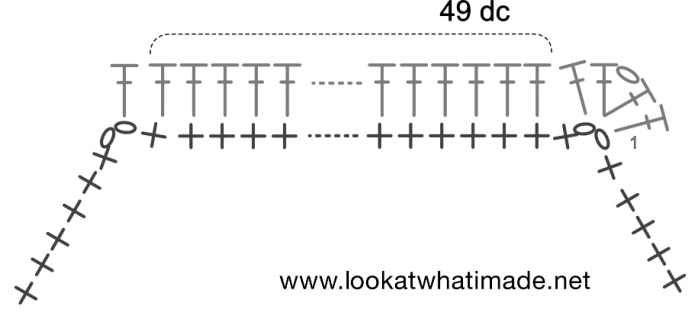
(Skip the first (hidden) st. Dc in the next 49 sts. [2 dc, ch 1, 2 dc] in the next ch-2 sp) twice.
Long Side: Skip the first (hidden) st. Dc in the next 49 sts {Photo 1}. Dc in the next ch-2 sp {Photo 2}.
***Make 2 dc in the second hdc of Joining Row 1 (which contains a sc from Joining Row 2). Make 2 dc in the last hdc of Joining Row 1 (which contains the same sc from Joining Row 2) – Photo 3.
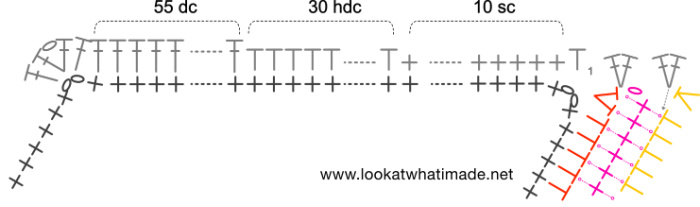
Hdc in the next ch-2 sp {Photo 4}, skip the first (hidden) st, sc in the next 10 sts {Photo 5}. Hdc in the next 30 sts {Photo 6}. Dc in the next 55 sts, the second of which will be a FPdc {Photo 1}. Dc in the next ch-2 sp {Photo 2}.****
Rep from *** to **** once.
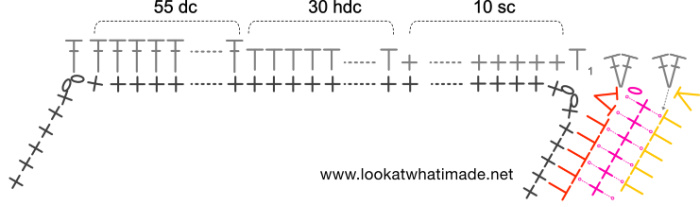
Make 2 dc in the second hdc of Joining Row 1 (which contains a sc from Joining Row 2). Make 2 dc in the last hdc of Joining Row 1 (which contains the same sc from Joining Row 2) – Photo 3.
Hdc in the next ch-2 sp {Photo 4}, skip the first (hidden) st, sc in the next 10 sts {Photo 5}. Hdc in the next 30 sts {Photo 6}. Dc in the next 55 sts, the second of which will be a FPdc {Photo 1}. [2 dc, ch 1, 2 dc] in the ch-2 corner sp.*
Repeat from * to * once, omitting the last corner on the last repeat. Join to the first dc with a sl st.
Stitch Counts (from ch-1 corner sp to ch-1 corner sp, not including the ch-1 corners sps in the four corners of the blanket):
- Short Sides: 398 dc and 5 ch-1 sps
- Long Sides: 356 sts (30 sc, 93 hdc, and 233 dc)
Border Round 2
Please note that the pointy bits at the top and bottom of the blanket are made differently to the 4 main corners.
Sl st in the next st and in the ch-1 corner sp. Ch 2 (counts as hdc). [Hdc, ch 1, 2 hdc] in the same ch-1 sp. This is your first corner made {Photo 1}.

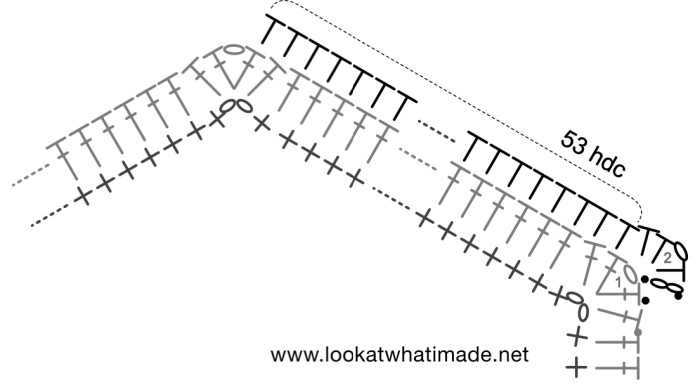
*Short Side: Hdc in the next 53 sts {Photo 2}.
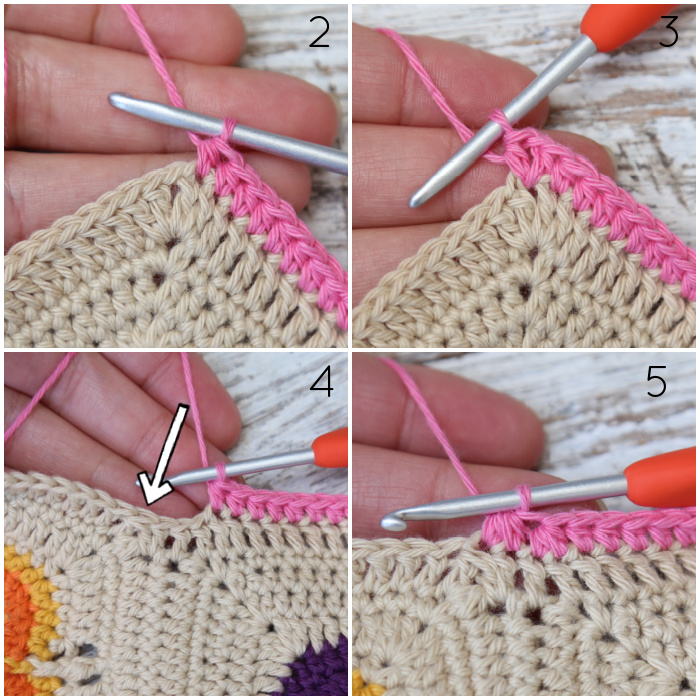
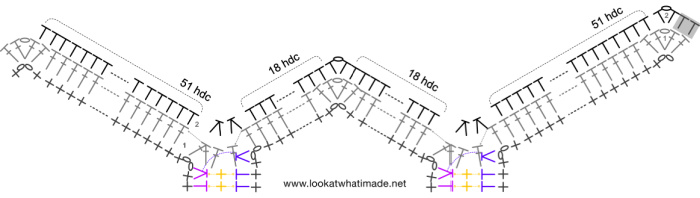
**[Hdc, ch 1, hdc] in the next ch-1 sp {Photo 3}. Hdc in the next 51 sts {Photo 4}. Hdc2tog twice. The last leg of the last hdc2tog should fall in the Dc2tog from the previous round, here and throughout – indicated with an arrow in Photo 4 and illustrated in Photo 5. Hdc in the next 18 sts {Photo 2}. [Hdc, ch 1, hdc] in the next ch-1 sp {Photo 3}. Hdc in the next 18 sts. Hdc2tog twice. Hdc in the next 51 sts.***
Rep from ** to *** once.
[Hdc, ch 1, hdc] in the next ch-1 sp. Hdc in the next 53 sts. [2 hdc, ch 1, 2 hdc] in the next ch-1 corner sp.

Long Side: Hdc in the next 356 sts {Photo 7}. [2 hdc, ch 1, 2 hdc] in the next ch-1 corner sp.****
Rep from * to **** once, omitting the last corner on the last repeat. Join to the top of the beg ch-3 with a sl st. Fasten off and work away your ends.
Stitch Counts (from ch-1 corner sp to ch-1 corner sp, not including the ch-1 corners sps in the four corners of the blanket):
- Short Sides: 404 hdc and 5 ch-1 sps, not including ch-1 corner sps
- Long Sides: 360 hdc, not including ch-1 corner sps
And there we have it. All but the last 5 rounds completed. I can’t believe next week is the last week!!!

This blog post contains affiliate links. I only link to products I personally use or would use. All opinions are my own.


