I designed the Hide and Seek in the Hydrangeas shawl for the November 2018 Issue of Inside Crochet Magazine. With this pattern, I wanted to celebrate my love of wool blends, dappled colour changes, and beads.

Navigate this Post
The Chatty Bit
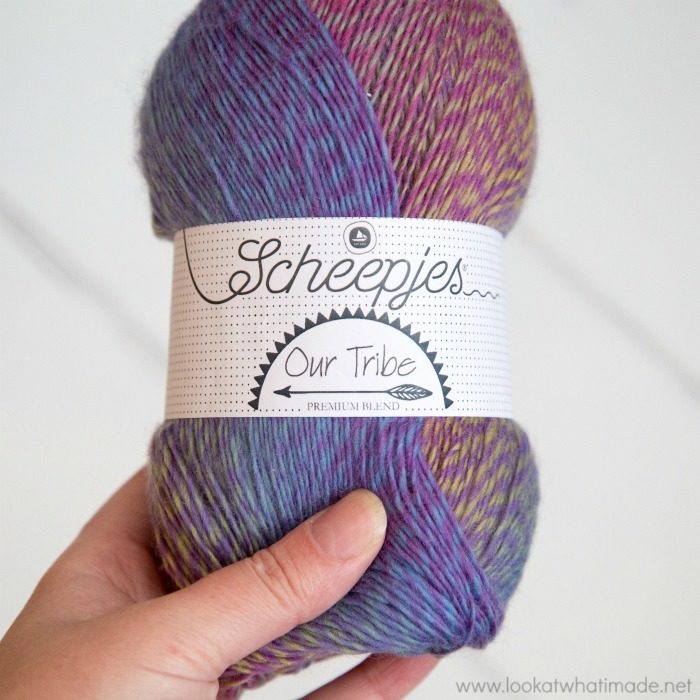
I chose Scheepjes Our Tribe in the Look At What I Made Colourway for this shawl. You may or may not know that I had the great fortune of choosing the colours for this specific colourway, hence the name :) You can read the post I wrote about the colourway (and the inspiration behind it) HERE.
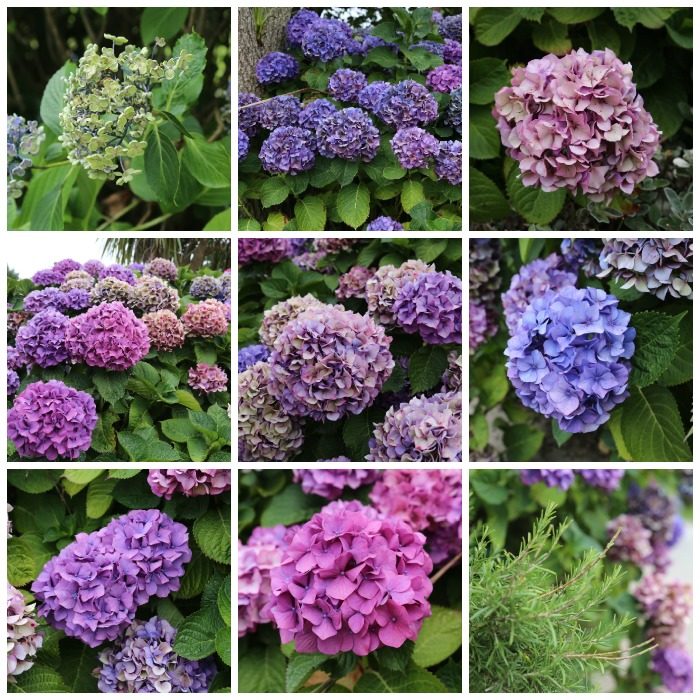
The colourway reminds me of hydrangeas; never more so than when we were camping in Newquay and the boys were playing hide and seek between the gorgeous hydrangea bushes while I sat cross-legged on the grass, finishing this shawl.
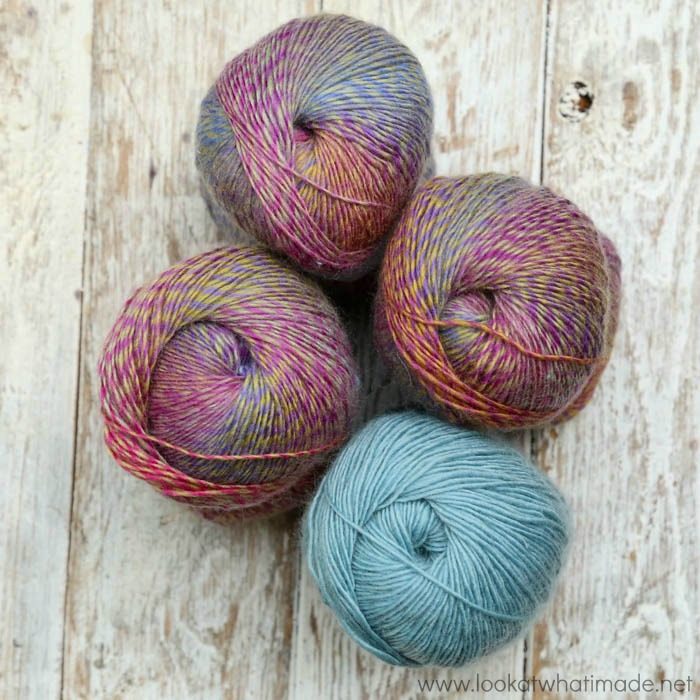
I wanted to use a contrasting colour for the border so that it stood out. For that, I decided to use Blue Flower Haze. It picks up the flecks of blue in the body of the shawl perfectly!
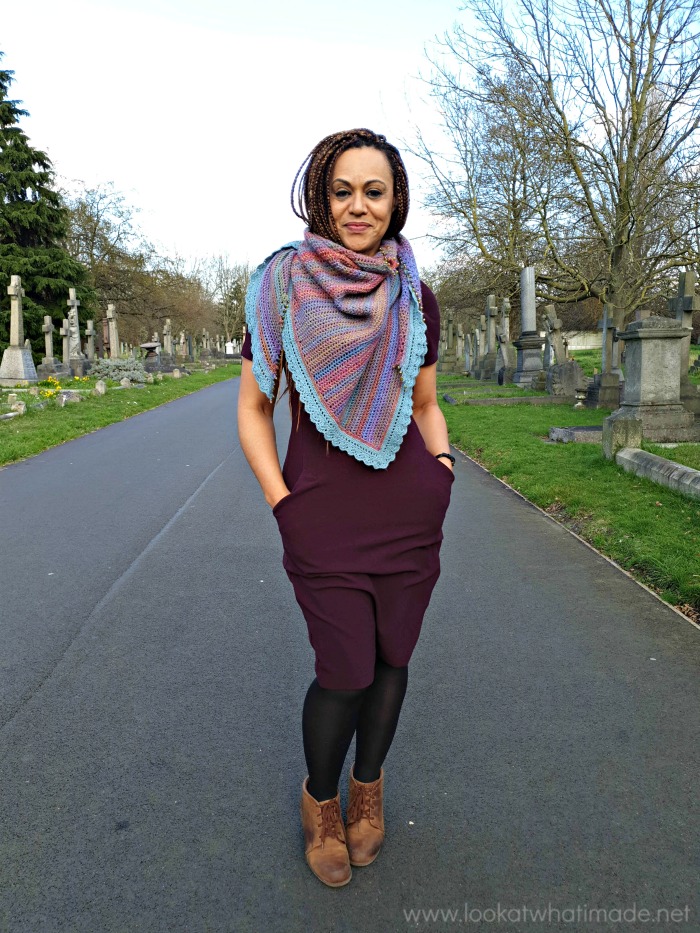
I have worn this shawl A LOT since I made it, but I couldn’t find one single photo of me wearing it that was actually usable as a ‘promotional’ photo.
I thought and thought about who I could ask to model it for me, and then I remembered one of the secretaries at work (Lynda Imo), who is both pretty and a snappy dresser. So I gathered up my courage and asked her if she would PRETTY please model it for me.
She said yes (Yay!), so at lunchtime, we walked over to the cemetery across the road (this was before lockdown) to take some photos.
I wish you could have been there to see how she transformed from endearingly shy in the first few minutes to playful and sassy in the last few. And I really wish you could have heard her daughter’s response to the photos. That half-hour was one of the highlights of my year!
This photo is my favourite. The shawl goes really well with the rest of her outfit, doesn’t it?
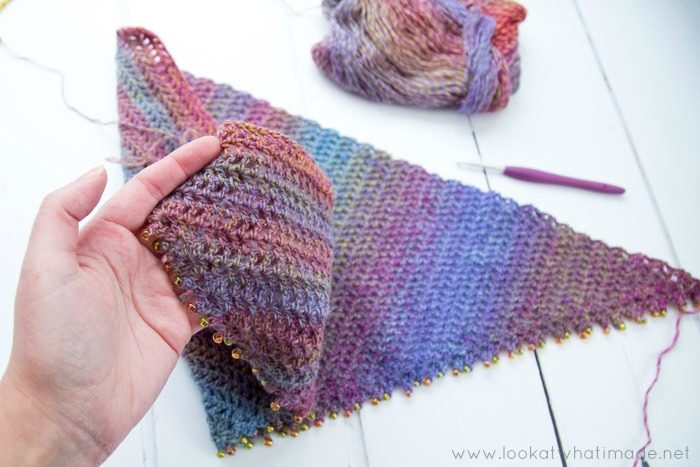
The body of the shawl is an asymmetric triangle, worked in rows from the narrow end.
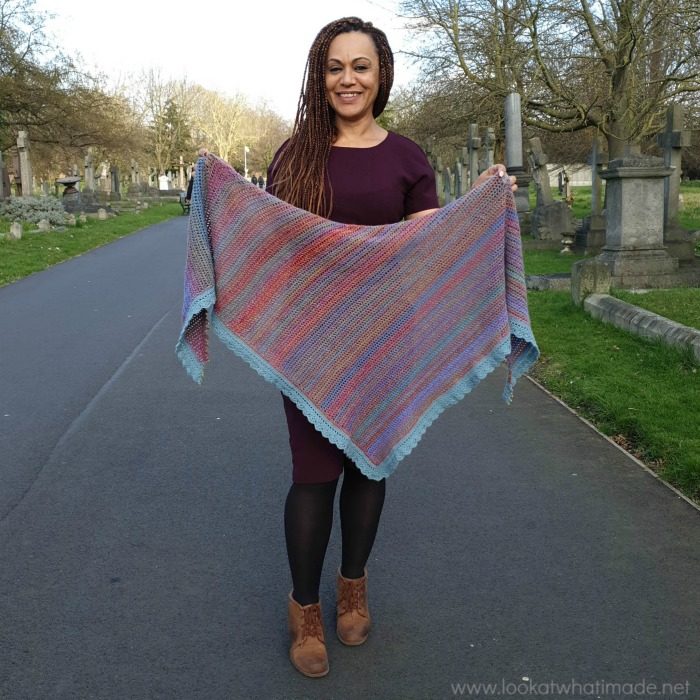
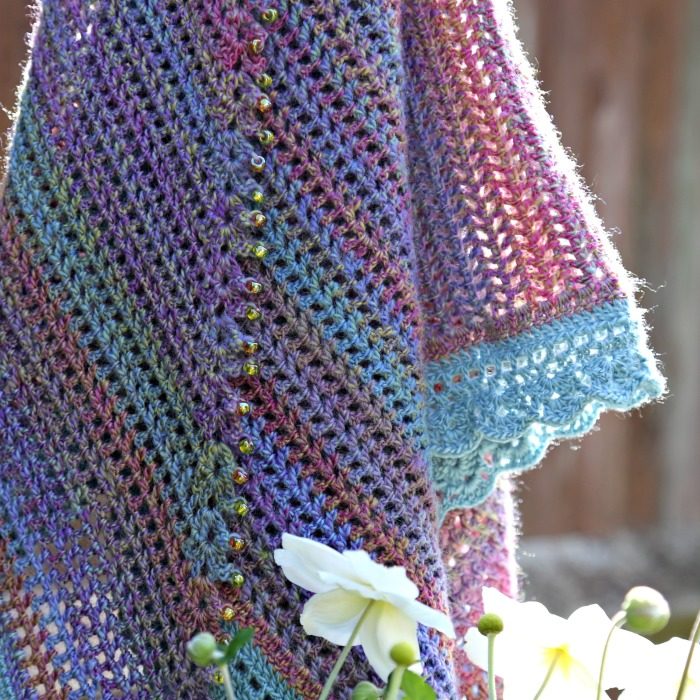
The beads are added on the increase edge as you go. This becomes the top of the shawl, so the beads are visible against your neck.
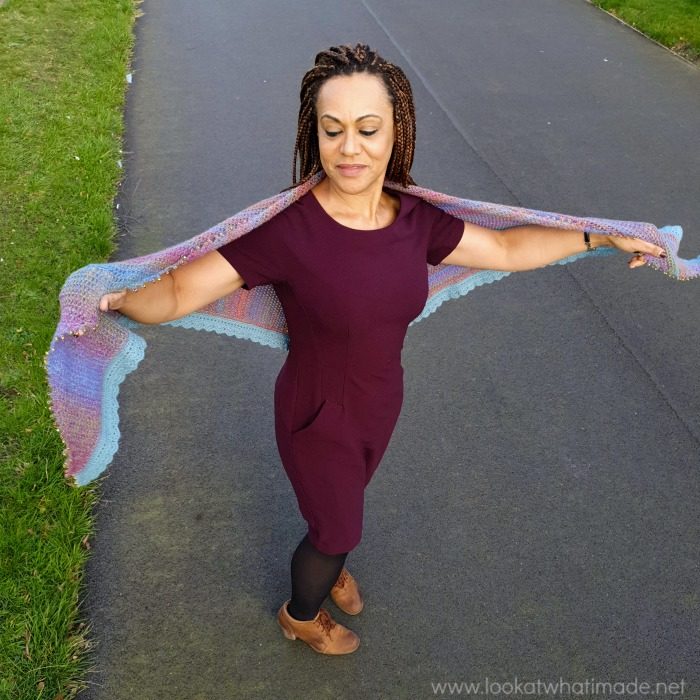
The border is added afterwards by working into the straight side and the last row of the shawl.
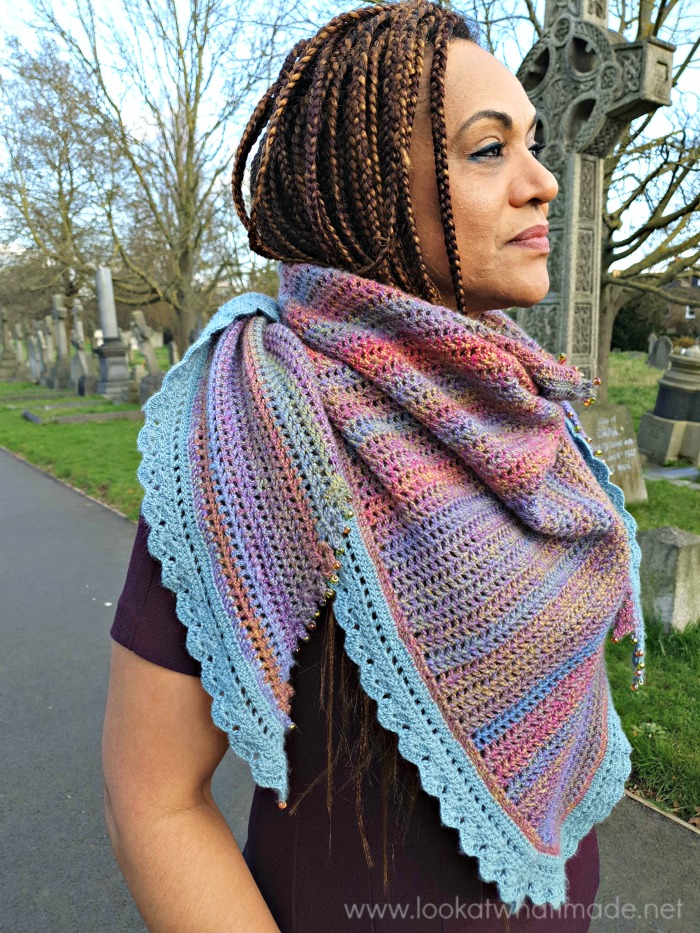
The pattern uses just three stitches (US): ch, hdc, and dc. It is suitable for beginners and those wanting to try their hand at adding beads to a project for the first time.
Hide and Seek in the Hydrangeas Shawl Pattern
© Dedri Uys and Scheepjes 2018. All Rights Reserved.
Resources
- Hashtag: If you share photos, please use #hashydrangeashawl so that we can find your projects and have a gleeful look.
- You can buy Scheepjes Our Tribe from the following retailers:
- Black Sheep Wools (International)
- Deramores (International)
- Caro’s Atelier (Netherlands)
- Knotty House (Canada)
- More Retailers
- Add This Pattern to Your Ravelry Queue
If you prefer a formatted ad-free version of this pattern (Written-only, Photo Tutorial, and Chart), you can buy it HERE in my Ravelry Store.
Materials
- Scheepjes Our Tribe (70% Merino Superwash/30% Polyamide), 100g/420m/460yds
- Yarn A – 972 x 3 balls (I used 250g)
- Yarn B – 882 x 1 ball (I used 50g)
- 4mm crochet hook (US 6/G UK 8)
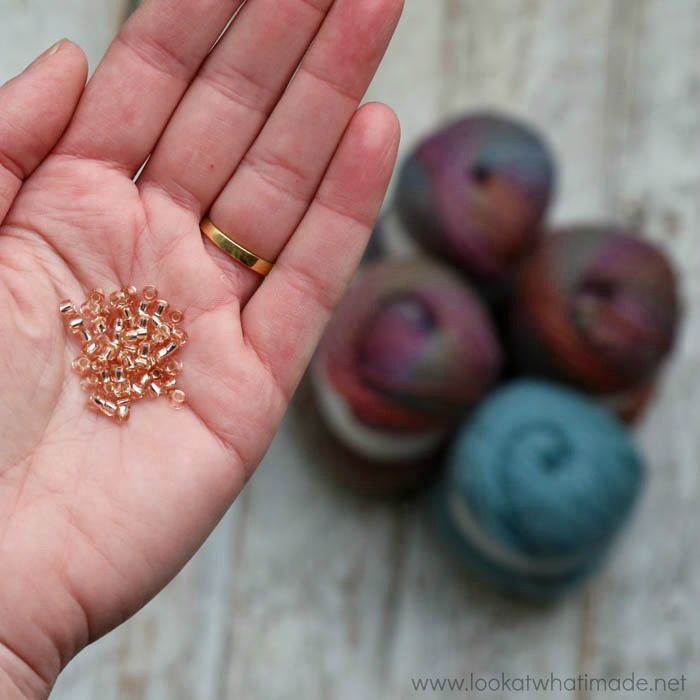
- Toho 3/0 beads*:
- Bead A – Transparent Rainbow Topaz (162C) x 20g (79 beads)
- Bead B – Gold Lined Peridot (991) x 20g (79 beads)
*Since making this shawl, I have grown very fond of Debbie Abrahams beads. If you like the way the two colours of beads look on this shawl, please feel free to use the Toho beads (as mentioned above). If you would like to use just one colour of beads, I highly recommend using Debbie Abrahams Size 6 beads in colour 39 instead, in which case you can disregard the references to Bead A and Bead B in the pattern.
Abbreviations
US Terminology (US/UK Conversion available HERE)
- Ch – Chain
- Dc – Double crochet
- Hdc – Half-double crochet
- Rep – Repeat
- Sl St – Slip stitch
- Sp/sps – Space/spaces
- St/sts – Stitch/stitches

Punctuation
* An asterisk indicates pattern repeats. You will need to repeat all the instructions between asterisks the number of times specified. This is a hard-core repeat and will consist of multiple instructions.
Square Brackets [] indicate repeats. You will need to repeat the instructions between square brackets the number of times specified. This is a lower level repeat.
Parentheses () are used to indicate a group of stitches to be worked into the same stitch/space. Parentheses are also used to indicate a repeat when using square brackets would be too confusing.
Special Stitches
- Shell: (3 dc, ch 2, 3 dc) in the same st/sp. See Border Round 5, Photo 1.
- Scallop: (Dc, ch 1) in the second st of the next Shell. (Dc, ch 1) four times into the next ch-2 sp. Skip the next st and dc in the next st. See Border Round 6, Photo 2.
Gauge
14 rows and 14 (ch-1, dc) repeats per 10cm/4” square (unblocked).
Size
174cm/68.5” along top and 123cm/48.5” along sides.
Notes
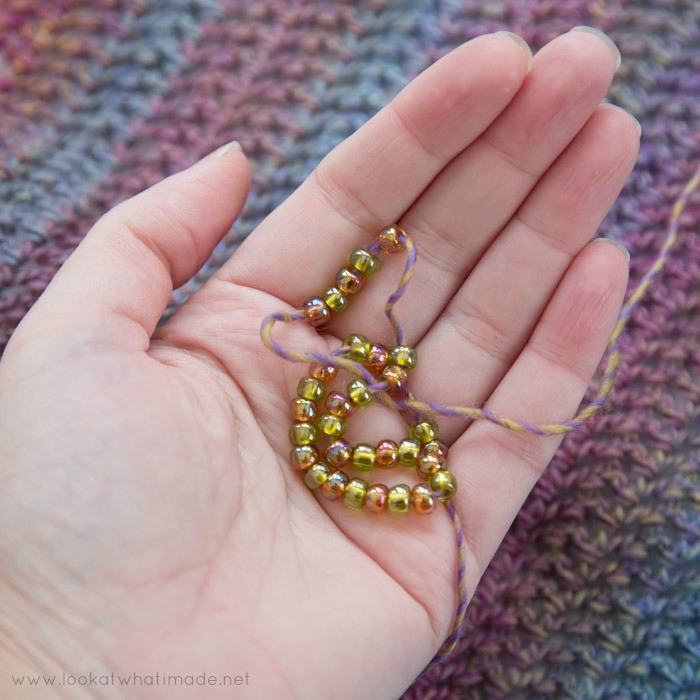
- When threading the beads onto your working yarn, thread them in batches of no more than 30. When you run out of beads, cut your yarn, rethread, and continue. This shawl uses 158 beads in total: one for each row of the Shawl and 12 for the Border. For this tutorial, I will be using only one colour of beads.
- Every even-numbered row ends with a hdc to keep the straight edge from stretching too much.
Instructions
Shawl
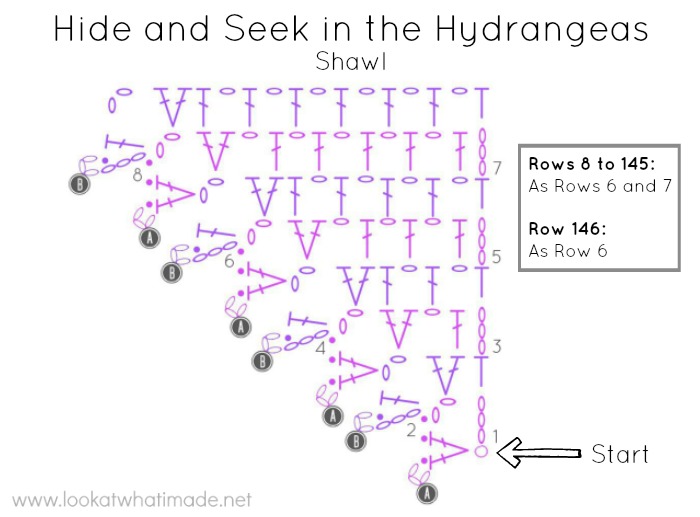
Before you start, thread beads onto Yarn A, alternating Beads B and Beads A and ending with Bead A so that it will be the first one you use.
Row 1
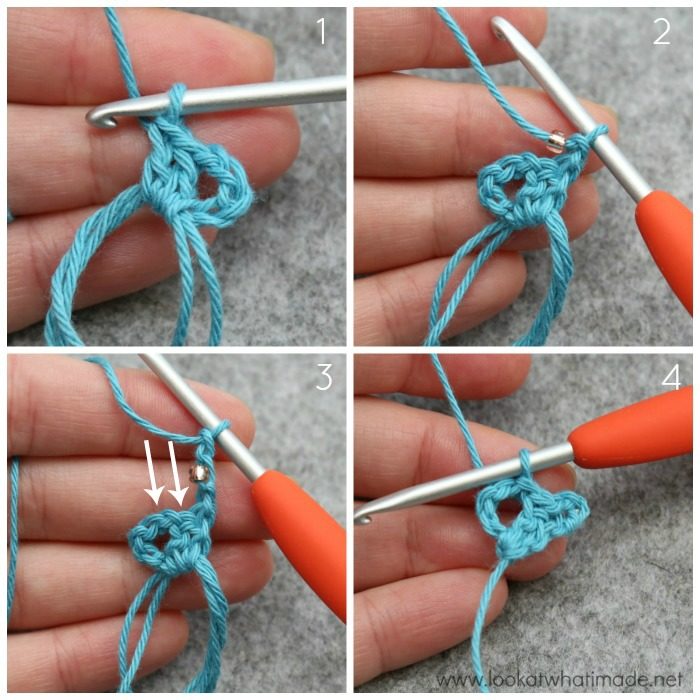
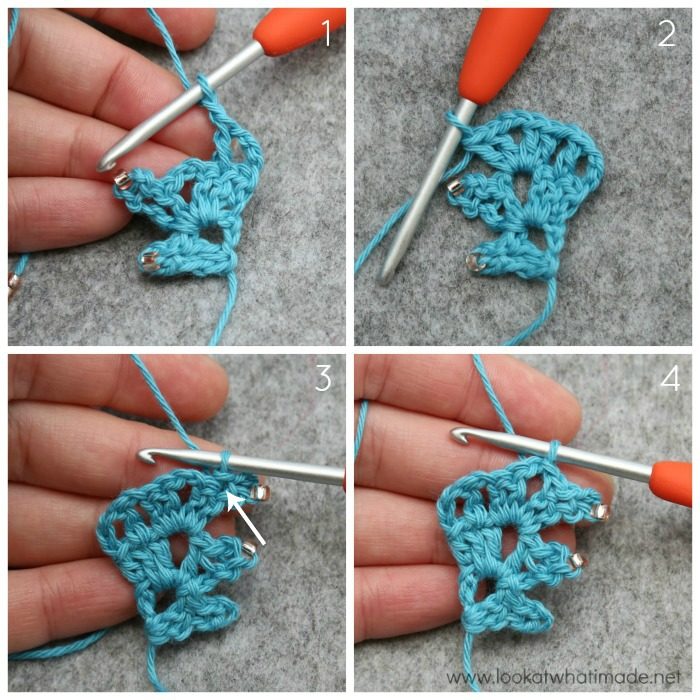
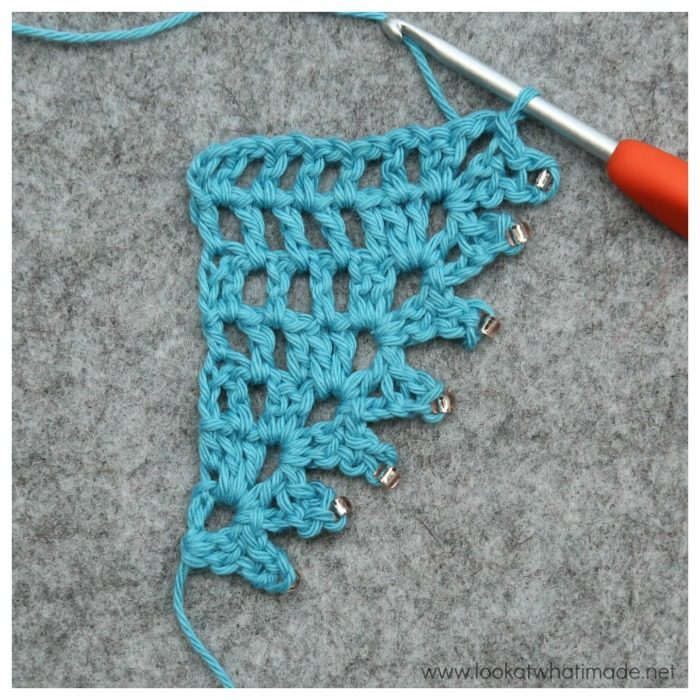
Into a Magic Ring: ch 5 (counts as dc and ch-2 sp), 2 dc {Photo 1}. TURN. Ch 1. Move bead so that it abuts hook {Photo 2}. Ch 2. Sl st in the dc at the base of the ch-3 to form a Picot. Sl st in the next dc and in the ch-2 sp {Indicated with arrows in Photo 3 and illustrated in Photo 4}.
Stitch Count: 3 dc, 1 Picot, and 1 ch-2 corner sp
Row 2
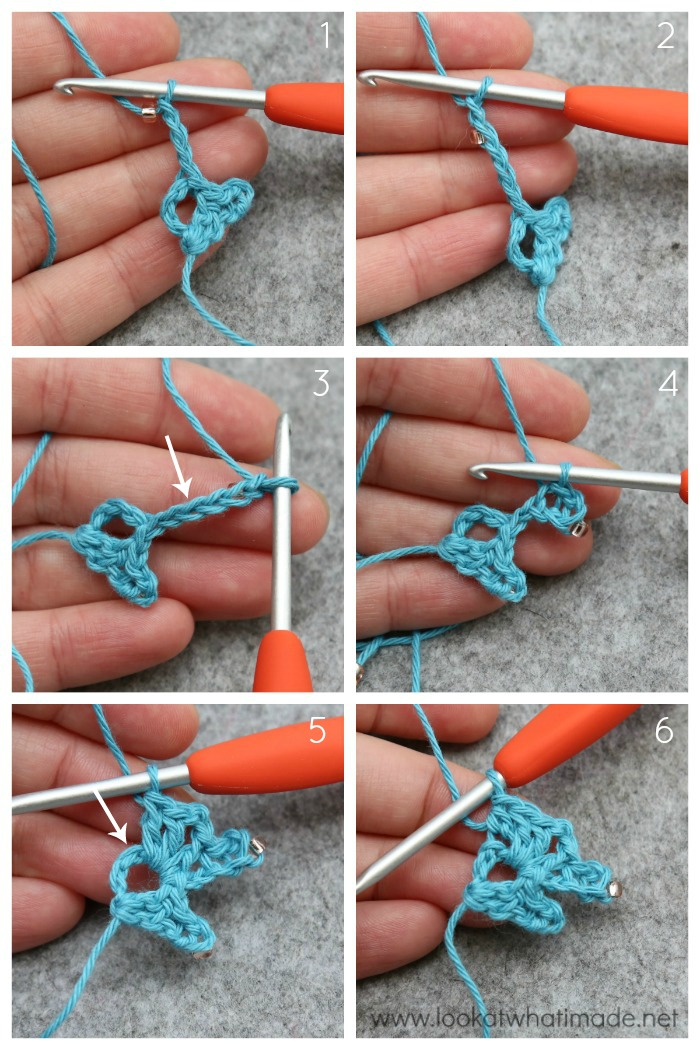
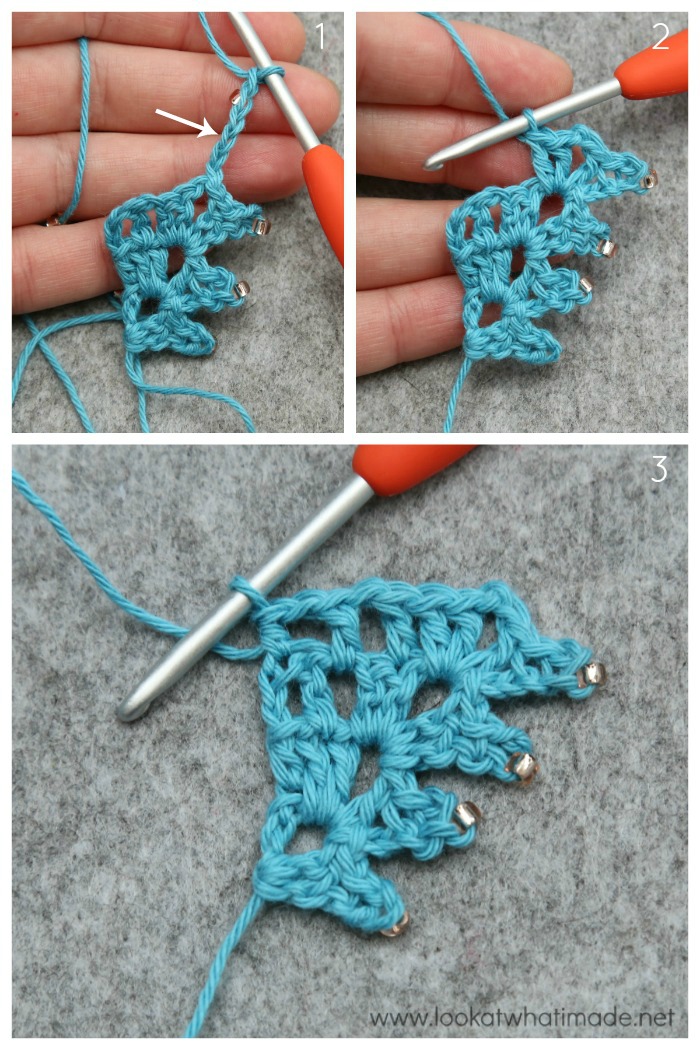
Ch 4 (counts as dc and ch-1 here and throughout), move a bead so that it abuts the hook {Photo 1}. Ch 2 {Photo 2}. Sl st into the fourth ch from the hook to form a Picot {Indicated with an arrow in Photo 3 and illustrated in Photo 4}. (Dc, ch 2, 2 dc) into the same ch-2 sp {Photo 5}. Hdc in the third ch of the beginning ch-5 {Indicated with an arrow in Photo 5 and illustrated in Photo 6}. TURN.
Stitch Count: 1 hdc, 4 dc, 1 Picot, and 1 ch-2 corner sp
Row 3
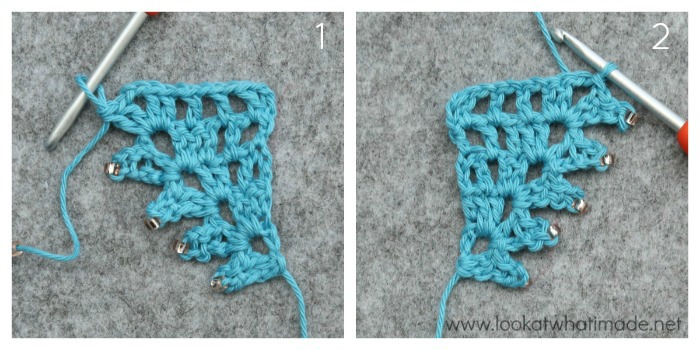
Ch 3 (counts as dc throughout), dc in the next st. Ch 1 and skip the next st {Photo 1}. (2 dc, ch 2, 2 dc) in the next ch-2 sp {Photo 2}. TURN.
Ch 1. Move bead so that it abuts hook, then ch 2. Sl st in the dc at the base of the ch-3 to form a picot {Photo 3}. Sl st in the next dc and in the ch-2 sp {Photo 4}.
Stitch Count: 6 dc, 1 Picot, 1 ch-1 sp, and 1 ch-2 corner sp
Row 4
Ch 4, move a bead so that it abuts the hook. Ch 2. Sl st in the fourth ch from the hook to form a Picot {Indicated with an arrow in Photo 1}. (Dc, ch 2, 2 dc) into the same ch-2 sp {Photo 2}. Dc in the next dc. Ch 1, skip the next dc, dc in the next ch-1 sp. Ch 1, skip the next dc, hdc in the top of the beginning ch-3 {Photo 3}. TURN.
Stitch Count: 1 hdc, 6 dc, 1 Picot, 2 ch-1 sps, and 1 ch-2 corner sp
Row 5
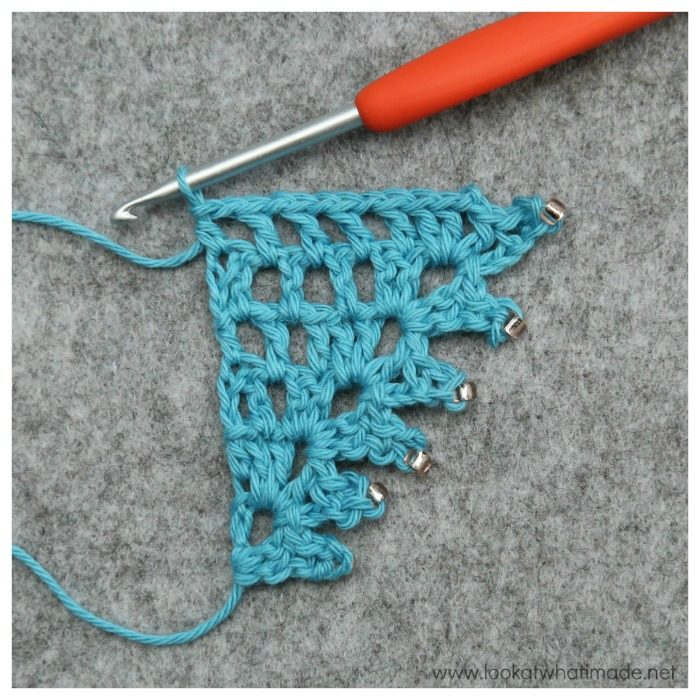
Ch 3, dc in the next ch-1 sp. Ch 1, skip the next dc and dc in the next ch-1 sp. Ch 1, skip the next dc and dc in the next dc. Ch 1 and skip the next dc. (2 dc, ch 2, 2 dc) in the next ch-2 sp {Photo 1}. TURN.
Ch 1. Move bead so that it abuts hook, then ch 2. Sl st in the dc at the base of the ch-3 to form a Picot. Sl st in the next dc and in the ch-2 space {Photo 2}.
Stitch Count: 8 dc, 1 Picot, 3 ch-1 sps, and 1 ch-2 corner sp
Row 6
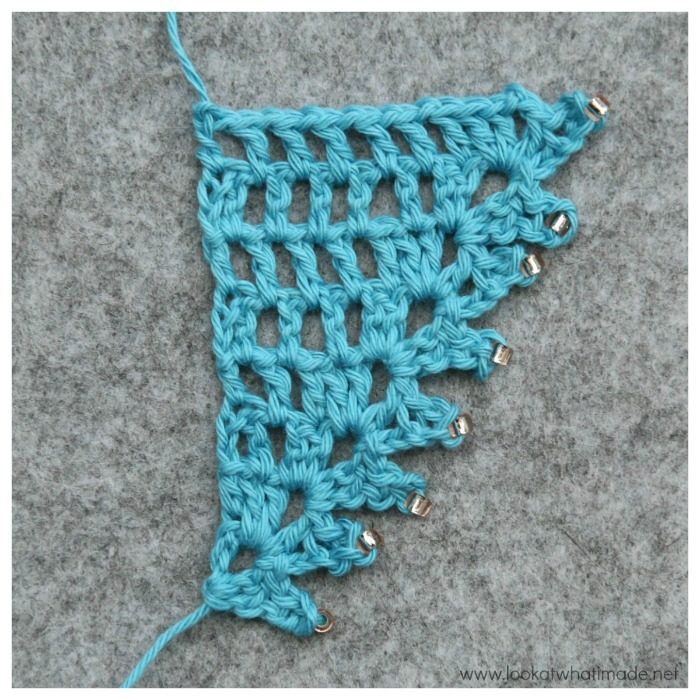
Ch 4, move a bead so that it abuts the hook, ch 2. Sl st in the fourth ch from the hook to form a Picot, (dc, ch 2, 2 dc) into the same ch-2 sp. Dc in the next dc, ch 1, skip the next st. [Dc in the next ch-1 sp, ch 1, skip the next st] until 1 st remains. Hdc in the top of the beginning ch-3. TURN.
Stitch Count: 1 hdc, 8 dc, 1 Picot, 4 ch-1 sps, and 1 ch-2 corner sp
Row 7
Ch 3, dc in the next ch-1 sp. [Ch 1, skip the next st and dc in the next ch-1 sp] until 3 sts remain before the ch-2 corner sp. Ch 1, skip the next dc and dc in the next dc. Ch 1 and skip the next dc. (2 dc, ch 2, 2 dc) in the next ch-2 sp. TURN.
Ch 1. Move bead so that it abuts hook, then ch 2. Sl st in the dc at the base of the ch-3 to form a Picot. Sl st in the next dc and in the ch-2 sp.
Stitch Count: 10 dc, 1 Picot, 5 ch-1 sps, and 1 ch-2 corner sp
Rows 8 to 145
Repeat Rows 6 and 7, remembering that each row will have one more st and one more ch-1 sp than the previous row.
Row 146
Repeat Row 6.
Stitch Count: 149 dc, 1 Picot, 144 ch-1 sps, and 1 ch-2 corner sp
Fasten off but don’t work away ends just yet.
Border
Thread one Bead A and one Bead B onto Yarn A so that Bead B is closest to hook.
Round 1
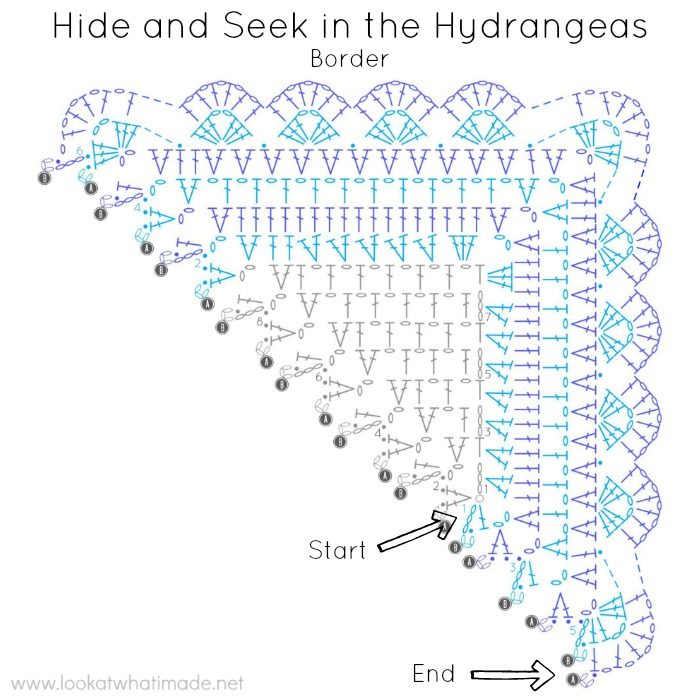
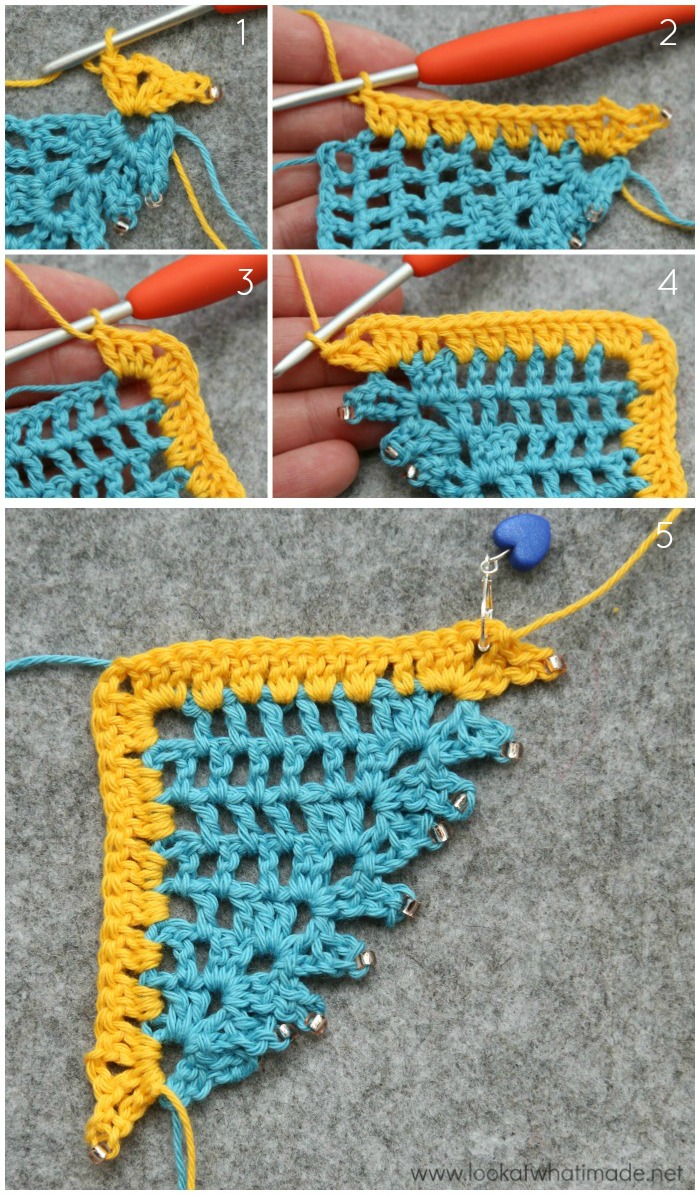
Working along the flat edge and into the sides of each row, join Yarn A by making a sl st in the side of Row 1. Ch 4, move a bead so that it abuts the hook, ch 2. Sl st in the fourth ch from the hook to form a Picot, (dc, ch 2, 2 dc) into the side of the same row {Photo 1}.
Make 2 dc in each row until 1 row remains {Photo 2}. (3 dc, ch 2, 3 dc) in the side of the last row {Photo 3}.
Working into the spaces of the last row, [skip the next st, make 2 dc in the next ch-1 sp] until no ch-1 sps remain {Photo 4}. Skip the next st, dc in the next 2 sts. (2 dc, ch 2, 2 dc) in the next ch-2 sp. TURN.
Ch 1. Move bead so that it abuts hook, then ch 2. Sl st in the dc at the base of the ch-3 to form a Picot. Sl st in the next dc and in the ch-2 space, mark ch-2 sp with SM {Photo 5}. Fasten off.
Stitch Count: 295 dc, 1 ch-2 sp, and 1 Picot per side – not including central ch-2 corner sp
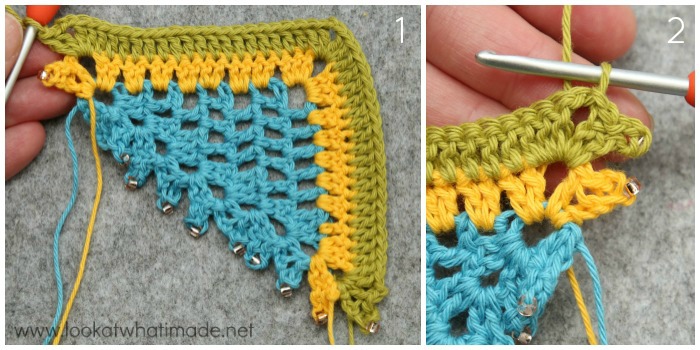
Round 2
Still alternating colours, thread 10 beads onto Yarn B, starting with Bead A so that Bead B is closest to hook.
Join Yarn B by making a sl st in the marked ch-2 sp. Remove SM. Ch 4, move a bead so that it abuts the hook, ch 2. Sl st in the fourth ch from the hook to form a Picot, (dc, ch 2, 2 dc) in the same ch-2 sp.
*Dc in the next 293 sts. (2 dc, ch 2, 2 dc) in the next ch-2 sp.*
Rep from * to * once {Photo 1}. TURN.
Ch 1. Move bead so that it abuts hook, then ch 2. Sl st in the dc at the base of the ch-3 to form a Picot. Sl st in the next dc and in the ch-2 sp {Photo 2}.
Stitch Count: 299 dc, 1 ch-2 sp, and 1 Picot per side – not including central ch-2 corner sp
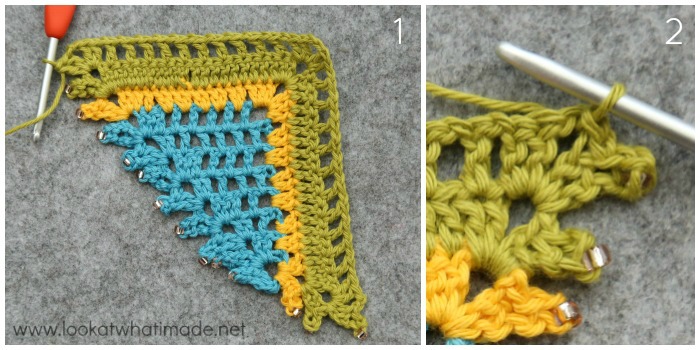
Round 3
Ch 4, move a bead so that it abuts the hook, ch 2. Sl st in the fourth ch from the hook to form a Picot, (dc, ch 2, 2 dc) in the same ch-2 sp.
*[Ch 1, skip the next st, dc in the next st] until 1 st remains. Ch 1, skip the last st. (2 dc, ch 2, 2 dc) in the next ch-2 sp.*
Rep from * to * once {Photo 1}. TURN.
Ch 1. Move bead so that it abuts hook, then ch 2. Sl st in the dc at the base of the ch-3 to form a Picot. Sl st in the next dc and in the ch-2 sp {Photo 2}.
Stitch Count: 154 dc, 149 ch-1 sps, 1 ch-2 sp, and 1 Picot per side – not including central ch-2 corner sp
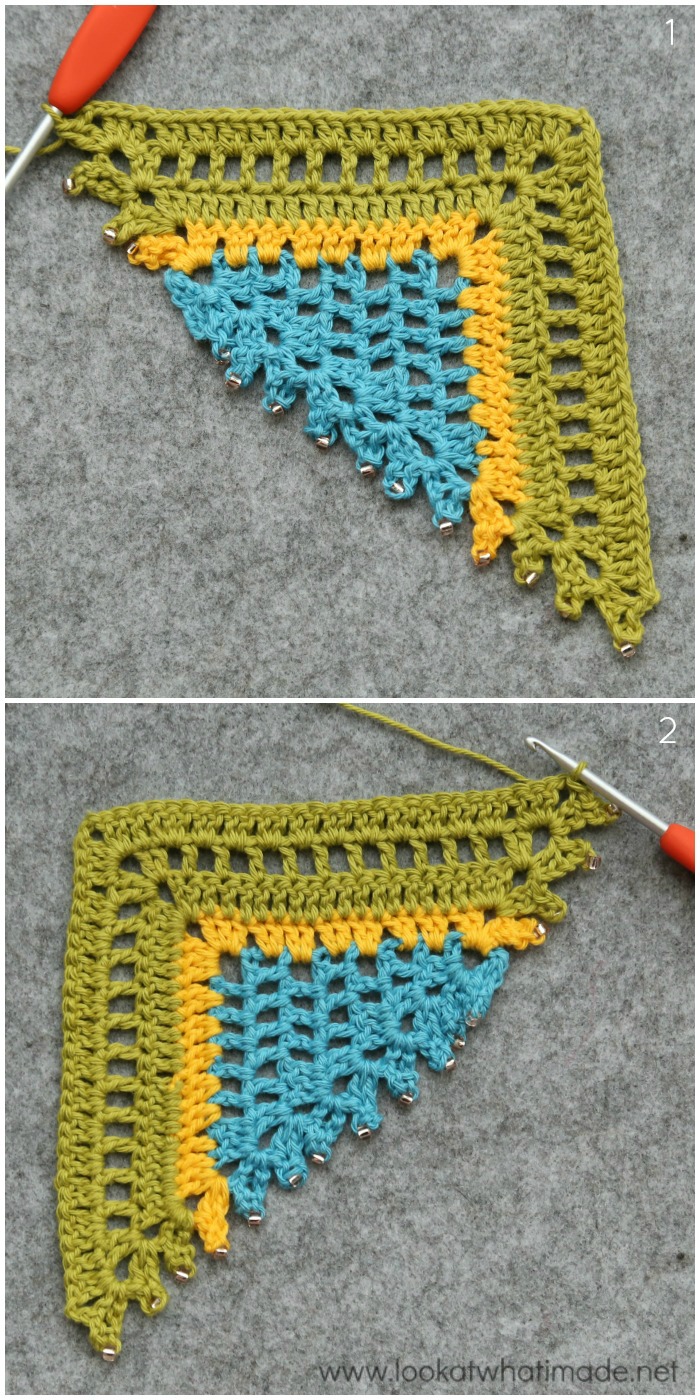
Round 4
Ch 4, move a bead so that it abuts the hook, ch 2. Sl st in the fourth ch from the hook to form a Picot, (dc, ch 2, 2 dc) in the same ch-2 sp.
*Dc in the next 2 sts. Make 2 dc in each ch-1 sp across. Skip the next st, dc in the next st. (2 dc, ch 2, 2 dc) in the next ch-2 sp.*
Rep from * to * once {Photo 1}. TURN.
Ch 1. Move bead so that it abuts hook, then ch 2. Sl st in the dc at the base of the ch-3 to form a Picot. Sl st in the next dc and in the ch-2 sp {Photo 2}.
Stitch Count: 307 dc, 1 ch-2 sp, and 1 Picot per side – not including central ch-2 corner sp
Round 5
Ch 4, move a bead so that it abuts the hook, ch 2. Sl st in the fourth ch from the hook to form a Picot, (2 dc, ch 2, 3 dc) in the same ch-2 sp.
*[Skip the next 2 sts, sl st in the next st, skip the next 2 sts, make a Shell in the next st] until 5 sts remain before the ch-2 corner sp. Skip the next 2 sts, sl st in the next st, skip the next 2 sts. Make a Shell in the ch-2 corner sp.*
Rep from * to * once {Photo 1}. TURN.
Ch 1. Move bead so that it abuts hook, then ch 2. Sl st in the dc at the base of the ch-3 to form a Picot. Sl st in the next dc {Photo 2}.
Stitch Count: 51 shells and 1 Picot per side – not including central corner Shell
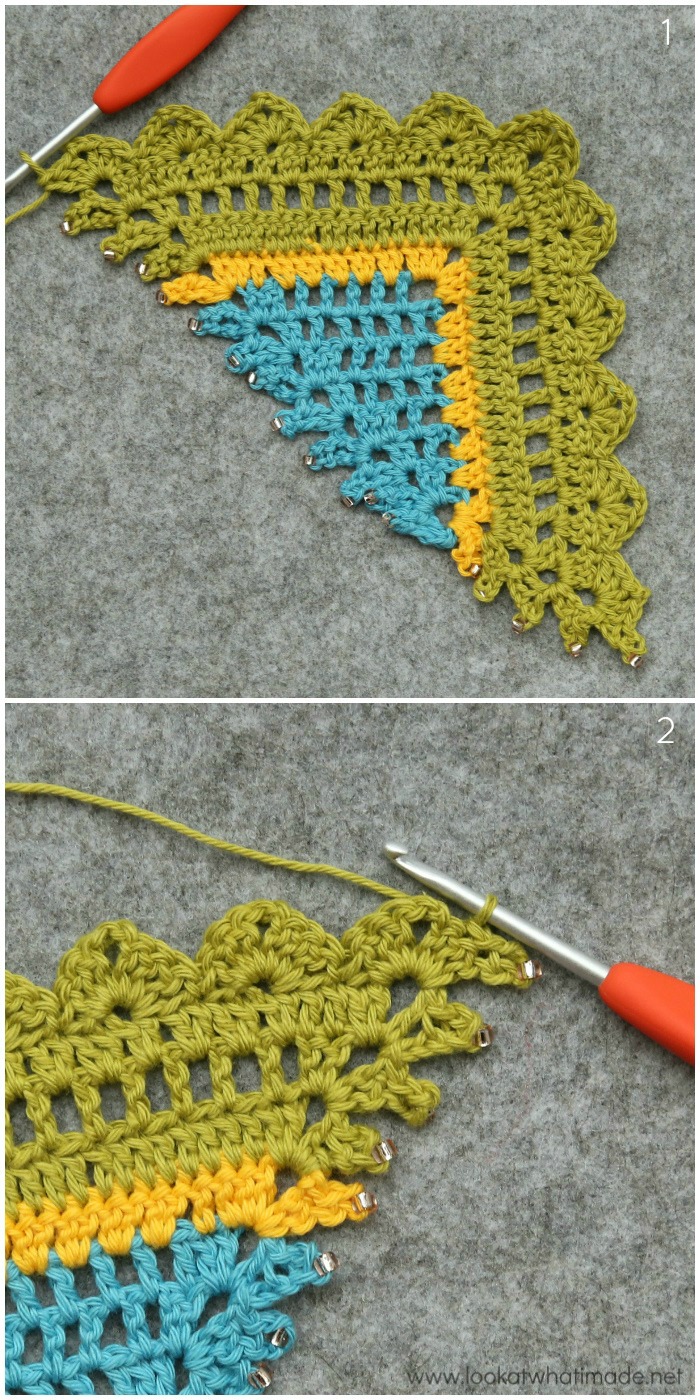
Round 6
Ch 4, move a bead so that it abuts the hook, ch 2. Sl st in the fourth ch from the hook to form a Picot. (Ch 1, dc) four times into the next ch-2 sp. Ch 1, skip the next st, dc in the next st {Photo 1}. Make a Scallop in each remaining Shell {Photos 2 and 3}. TURN.
Ch 1. Move bead so that it abuts the hook, then ch 2. Sl st in the dc at the base of the ch-3 to form a Picot. Fasten off {Photo 4}.
Stitch Count: 103 Scallops and 2 Picots
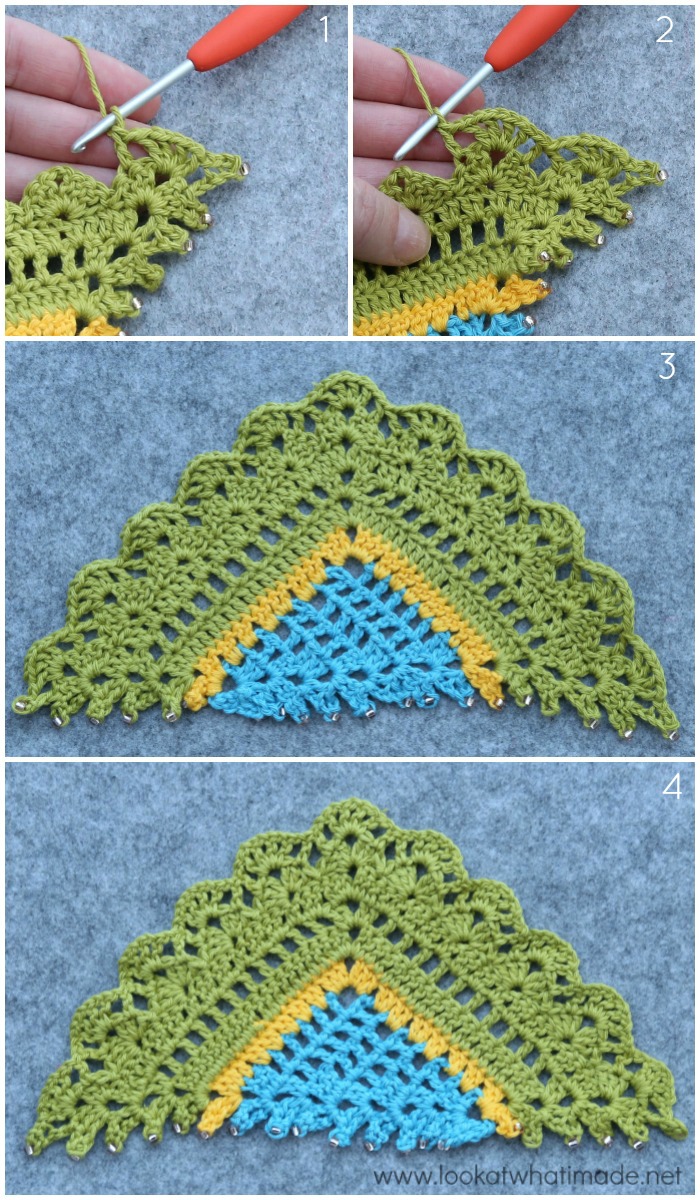
Decide which side of the shawl you like best and then work all your ends away on the reverse side. For best results, I suggest blocking your shawl before wearing it.

This blog post contains affiliate links. I only link to products I personally use or would use. All opinions are my own.


Wilma Groenewald says
Wow Dedto dit is beautiful….Love die idee van die beads….
Dedri Uys says
Dankie Wilma :)