Occasionally you will find yourself wanting to join squares that are the same size, but have different stitch counts. This usually happens when you are using squares from different designers, like we did with the Block a Week CAL 2014, or when receiving squares through a swap.
As long as your squares are the same size it doesn’t really matter if the final-round stitch counts are different. It is easy enough to compensate for a few stitches either way. You might just find that some joining methods lend themselves better to a bit of gentle “fudging”.
In this tutorial I am going to give you some tips on joining squares with different stitch counts.
Step 1:
Decide on your layout.
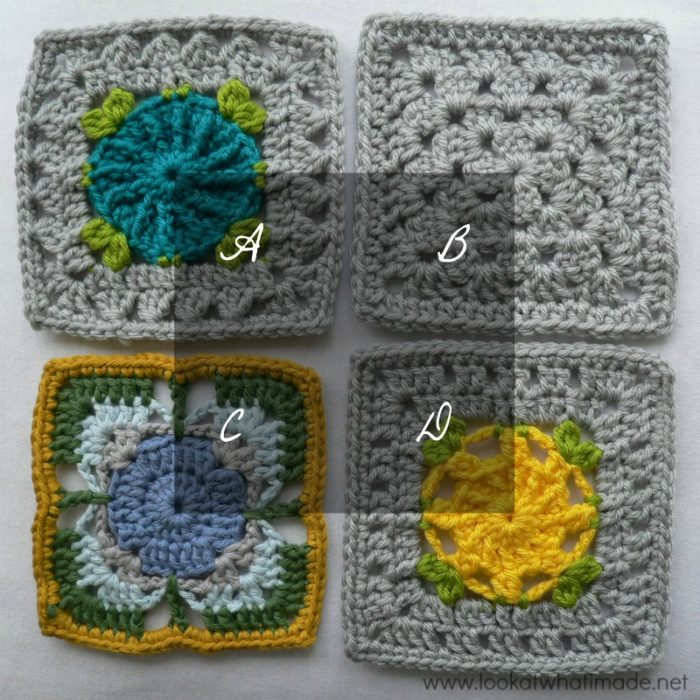
For this example I am using 4 squares:
- A and D are No-Name squares with a final-round stitch count of 20 st’s per side
- B is a standard granny square with a final-round stitch count of 16 st’s per side
- C is Chris Simon’s Butterfly Garden (up to Round 6) with a final-round stitch count of 21 st’s per side
Step 2:
Make sure your squares are all the same size and add a round or two to any squares that need it.
Step 3:
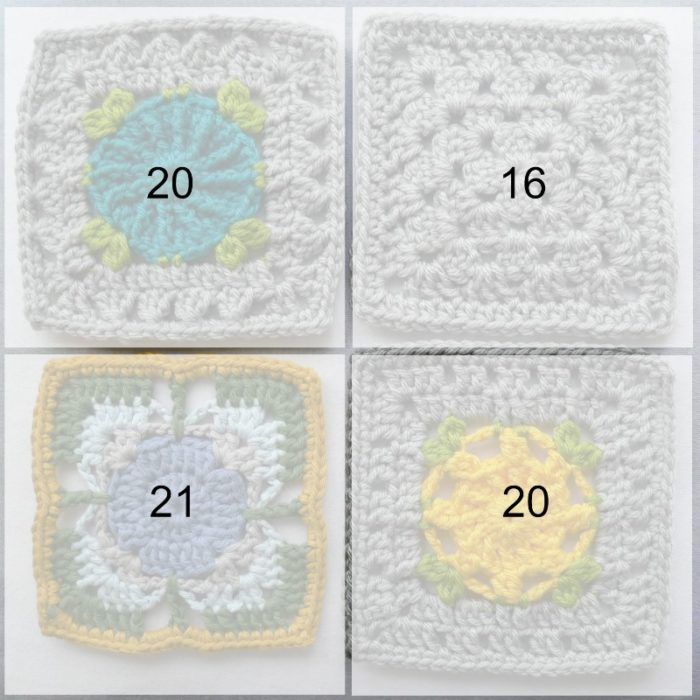
Make a note of how many stitches each square has in its last round. Kimberly (who organized the Block a Week CAL 2014) uses a nifty little diagram to help her keep track of how many stitches each square has per side.
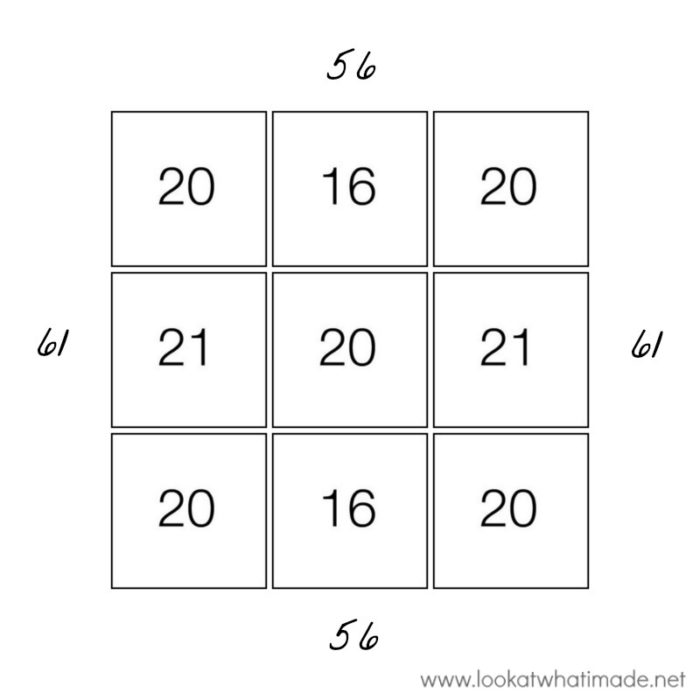
I am using 4 squares, so I would draw a little diagram of 2 x 2 squares. You will need to adjust this to suit your blanket. If you are joining 30 squares in a 5 x 6 grid, draw a 5 x 6 grid and then write down the number of stitches per side for each square.
You can only do this once you have decided on your layout. Make sure that you look at THIS TUTORIAL by Tamara from Moogly. It shows you how to do a “virtual layout” using PicMonkey.
Make sure to make a note of how many stitches your afghan will have per side too. That will come in very handy when you start adding your border.
Step 4:
Decide which joining method you are going to use.
Lacy joining methods are by far the most “forgiving” when it comes to joining squares with different stitch counts.
This Lacy Blanket Join by Cherry Heart is a perfect example of using a lacy join to join crochet squares with different stitch counts. This Joining Squares of Different Sizes with a Lacy Join video tutorial by Craftside is also very thorough and detailed.
You can use solid joins as well, but some people don’t like the way it is “obvious” that you have skipped/added stitches. I personally don’t think this “fudging” is very obvious, especially if you use the same colour as the last round of the squares.
In Part 3 of this 5-part series on joining crochet squares, I shared some of my favourite solid joining methods.
Step 5: Joining
I am going to use the Single Crochet Join (Right Sides Together) to demonstrate how to skip (or add) stitches when joining squares. I will be joining square B (16 st’s) to Squares A and D (20 st’s). There is a 4-stitch difference, so I will either need to “increase” into the 16-st square 4 times (by adding st’s) or “decrease” into the 20-st square 4 times (by skipping st’s).
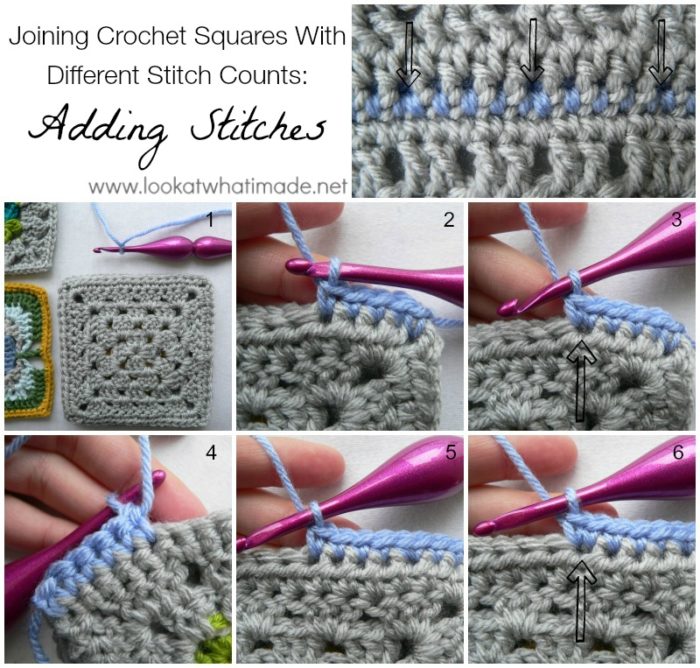
Adding stitches
To figure out how many times you would have to increase, subtract the smaller square’s stitch count from the larger square’s stitch count to find the difference. If the difference is 7, for example, make sure that you spread those 7 increases out evenly along the length of your square’s side. It doesn’t have to be exact, you just don’t want all your increases towards one end or all bunched up in the middle.
I will be joining with 20 st’s (because that is how big the larger square is). This means that I will need to “increase” 4 times when working into the smaller square (Square B – 16 st’s). I want to spread the increases out evenly. In this case it is easy to figure out where to increase, because 16 is divisible by 4, so I will increase once for every 4 st’s of the smaller square.
In this example the 16-st square is in front so that you can see the increases.
Using the Single Crochet Join (Right Sides Together), make a sc into the first 4 st’s of each square (through both layers) – see Photo 2. Working into the same st of the 16 st square and the NEXT st of the 20-st square, make another sc (Photo 3). You have now added a stitch to the front square without adding one to the back square. Photo 4 shows the work from the back.
*Sc in the next 4 st’s (through both layers) – see Photo 5. Sc in the same st of the 16-st square and the NEXT st of the 20-st square, again adding a stitch to the front square without adding one to the back square (Photo 6).*
In this example you will repeat from * to * two more times, at which point you will have done 4 repeats and 4 increases into the smaller square only. You should have 20 joining stitches between corners.
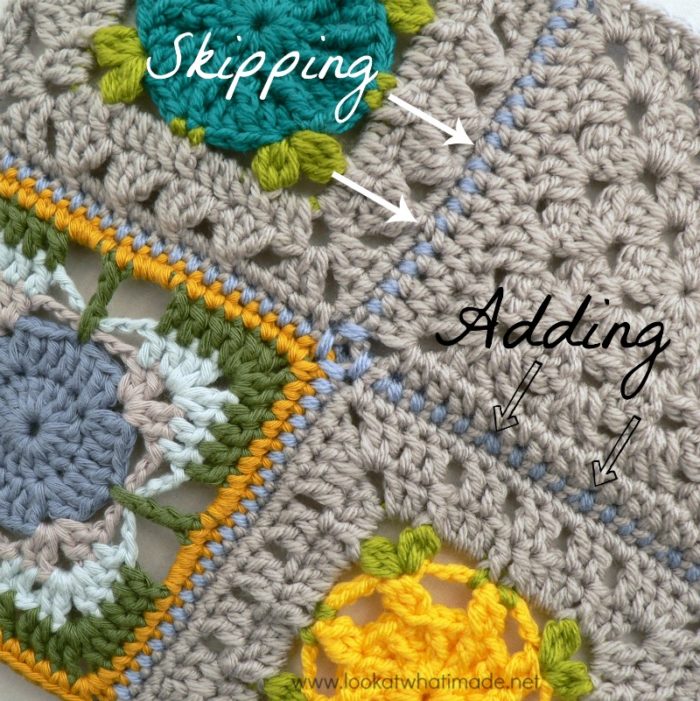
When you open the seam up you will be able to see the increases (indicated with arrows in the photo at the top of the collage). They form little V’s.
Please note that I have used a contrasting colour to illustrate the join. If you use the same colour as for your squares, your join will be a lot less obvious.
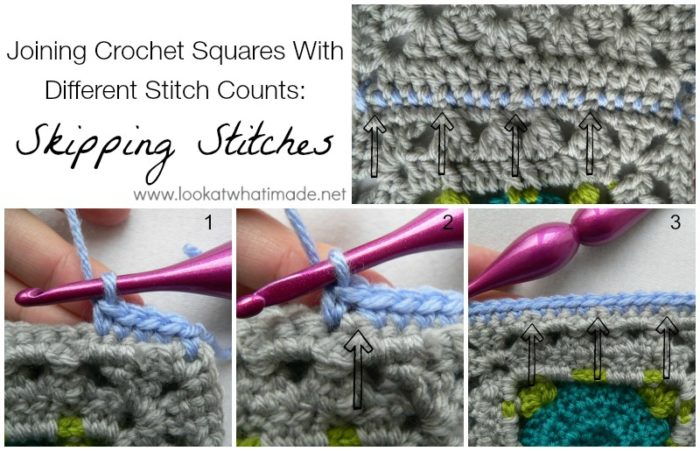
Skipping stitches
To figure out how many stitches you will have to skip, subtract the smaller square’s stitch count from the larger square’s stitch count to find the difference. If the difference is 7, for example, make sure that you spread those 7 skipped stitches out evenly along the length of your square’s side. It doesn’t have to be exact, you just don’t want all your skipped stitches towards one end or all bunched up in the middle.
I will be joining with 16 st’s (because that is how big my smallest square is). This means that I will need to “skip” 4 times when working into the larger square (Square A – 20 st’s). I want to spread the “skips” out evenly. In this case it is easy to figure out where to skip, because 20 is divisible by 4, so I will skip every fifth st of the larger square.
In this example the 20-st square is in front so that you can see the “skips” or decreases.
Using the Single Crochet Join (Right Sides Together), make a sc into the first 4 st’s of each square (through both layers) – see Photo 1.
*Skip the next st of the larger square and insert your hook into the next st. Without skipping a stitch, insert your hook into the next st of the smaller square. Make a sc through both layers (Photo 2). You have now skipped a stitch on the front square without skipping one on the back square.
Sc in the next 3 st’s (through both layers).*
In this example you will repeat from * to * two more times, at which point there will be one stitch of the front square left unworked. Skip this stitch and make a sc into the ch corner space. You have now successfully decreased by 4 st’s and should have 16 joining stitches between corners.
When you open the seam up you will be able to see the skipped stitches (indicated with arrows in the photo at the top of the collage).
Please note that I have used a contrasting colour to illustrate the join. If you use the same colour as for your squares, your join will be a lot less obvious.
Once you understand the principle behind adding/skipping stitches you can apply it to any of the solid join methods around. I hope you have found this tutorial useful. If anything is unclear, or I have left anything out, please contact me so that I can rectify it.
Recommended Book
Connect the Shapes by Edie Eckman is a brilliant resource for creating crochet motifs and learning to join them. I was lucky enough to receive this book as a gift from a dear friend and I absolutely love it!


This blog post contains affiliate links. I only link to products I personally use or would use. All opinions are my own.


Lee Ann Steinmetz says
I finished all of my squares, and I’m a little nervous about joining them. Wish me luck! Your tutorials have helped me tremendously. Thank you so much for all that you do.
Lee Ann
Dedri Uys says
How did it go? Hopefully it went really well :)
Pallie Spadafino says
I was lucky and had a Mom and 2 Grandmoms who taught me to crochet over 50 years ago. They taught me another way to even out squares for joining. On the next to last round take a stitch count, then look at what the stitch count will be for the last round. If it is off from the other squares you can adjust up or down on stitch count in the last round. The blocks are all the same stitch count then when you go to join so the joining goes much faster and easier. Just thought I would put this one out there for any one who wants another way to even out stitch counts for their blocks. Pallie
Dedri Uys says
That’s a great suggestion, Pallie. I like doing it your way too :)
Cassie says
Thank you so much for this tutorial! It’s so simple but I never would have figured it out without you. I just joined my first 2 squares and they look wonderful. Thank you again.
Dedri Uys says
You are very welcome, Cassie. Glad you found it useful.
Susan says
Great post, Dedri! You have put so much time into this and it is fabulously clear and helpful! Thanks!
Dedri Uys says
Thank you, Susan! I didn’t even check to see if you had any tutorials that I can link to, sorry. Do you? Please let me know and I can add them :)
Rhondda Mol says
This is a FANTASTIC post Dedri!! We will definitely be referring to this for our Thursday Squares because they all have different stitch counts!! Thank you for taking the time to write this up – I appreciate it and I am certain many others are going to too!! Rhondda
Dedri Uys says
Thank you, Rhondda. If you have any suggestions about how to make it better, please let me know x