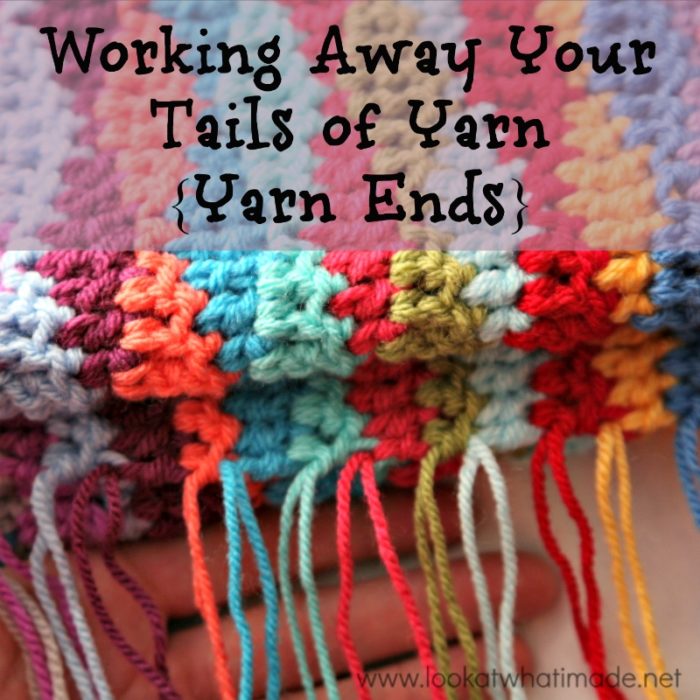
When I wrote the pattern for the Lazy Waves Afghan, I put together some photos and instructions for working away yarn ends when you crochet. I never got around to posting them, so I am posting them today.
There are many (!!!) ways to get rid of yarn ends. Everyone has a favourite, and everyone has a method they HATE.
In this post, I am going to show you how to work away your yarn ends by sewing them away. But, at the bottom of this post you will find a list of links to other methods, so if you don’t like my way, feel free to go forth and explore the boring wonderful world of yarn ends.
You will need a yarn needle to work away your yarn ends. I have recently started using these Susan Bates Finishing Needles. They work brilliantly if you have very short ends that would usually require you to keep threading your needle.
Index
- Important Notes
- Sewing Away Your Yarn Ends: Solid Project
- Sewing Away Your Yarn Ends: Lacy Project
- Other Methods for Eliminating Yarn Ends
Important Notes
After reading some of the comments, I felt the need to clarify a few things.
- When I talk about Working Your Away Your Yarn Ends After the Fact, I do NOT mean leaving them all until you have finished your blanket or project (the Lazy Waves Blanket below being a lazy exception on my part that will never be repeated). What I do mean is that the act of working away your yarn ends comes AFTER a round/row has been completed and involves the use of a needle.
- When I supply links to Eliminating Yarn Ends As You Go, I am referring to methods that use a hook or involve crocheting OVER your ends.
- When working in rows and changing colour on each row (or each second row), consider knotting your ends together first (as I did below).
- When working in rounds and changing colour, consider using the invisible join and working your ends away while you already have the needle in your hand.
Wherever possible, work those ends away as you complete each round, or at the very least when you finish crocheting for the evening. It really is SO MUCH easier, not to mention way more rewarding at the end, when your completed project is virtually finished with the last stitch, instead of being riddled with yarn ends!
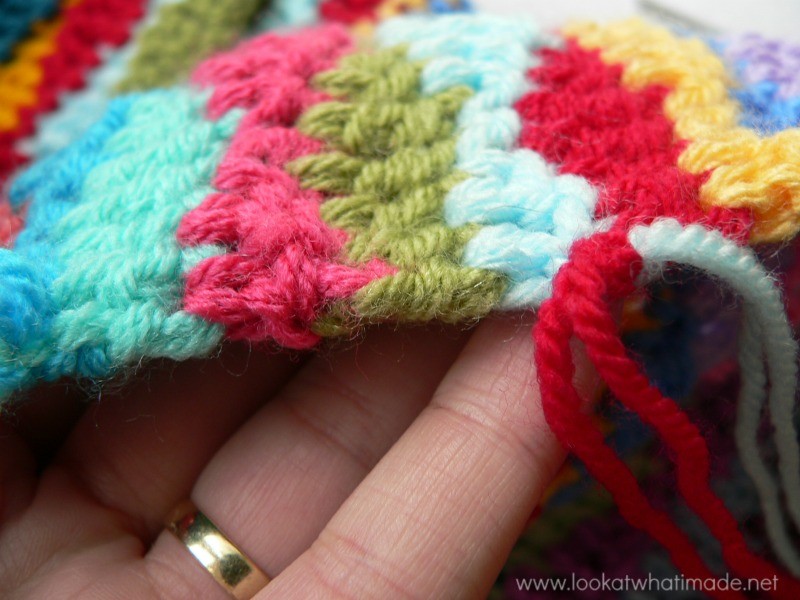
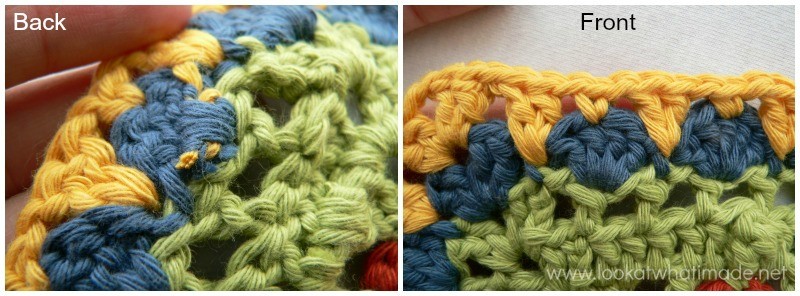
Sewing Away Your Yarn Ends: Solid Project
I am using the Lazy Waves Blanket as an example, so you will notice that my yarn ends have been knotted together in groups of two (4 strands, because I was using 2 strands together). This is an excellent starting point if you are changing colours on every row, because you can halve the amount of work. And as an added bonus, your work won’t unravel if your ends do somehow manage to wiggle free.
Please note that this only works when you have a dense pattern. This will not work for anything lacy. If you need help with a more lacy project, see Sewing Away Your Yarn Ends: Lacy Project below.
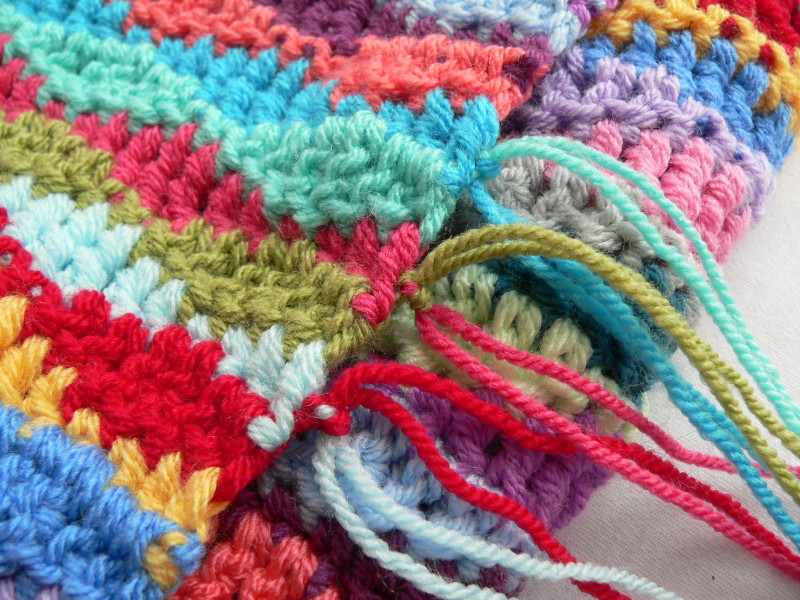
Before you start, LOOK at your blanket/project. Does it have a definite front and back? If it does, and you can identify it, grand! If it doesn’t, you will have to decide which side is going to be the back before you start! You will need to work away your ends on the back of your item, NOT the front.
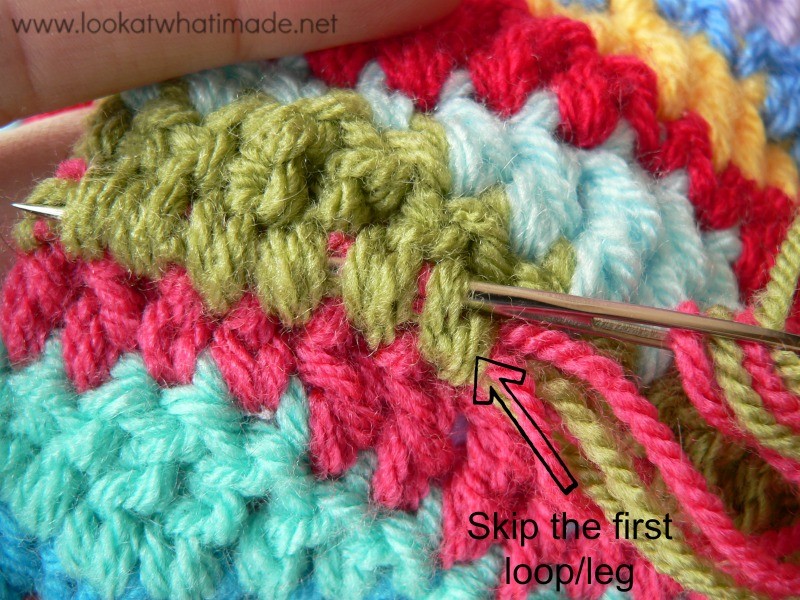
To start, you will need to thread your yarn onto your needle. Then you want to run your needle through the posts of 5 – 8 stitches, making sure that you do so on the BACK of your work.
In this example, I am working from the end of the row inward.
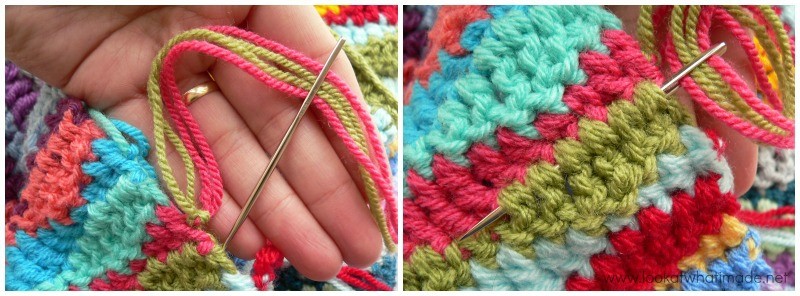
Pull the yarn all the way through, making sure that all your strands are pulled through properly (if using more than one strand). You want to pull hard enough that you don’t end up with a little bobble of yarn where you inserted the needle to begin with. Once you have made sure that your yarn has been pulled all the way through, tug on your work a bit to relax it. The last thing you want is to work away your ends so tightly that they distort your work.
Some people prefer to cut their yarn at this point and call it a day. If you do, your ends will work their way loose bit by bit as your item gets used and stretched. What I suggest is that you work back and forth a few times to ensure that the yarn ends won’t come undone.
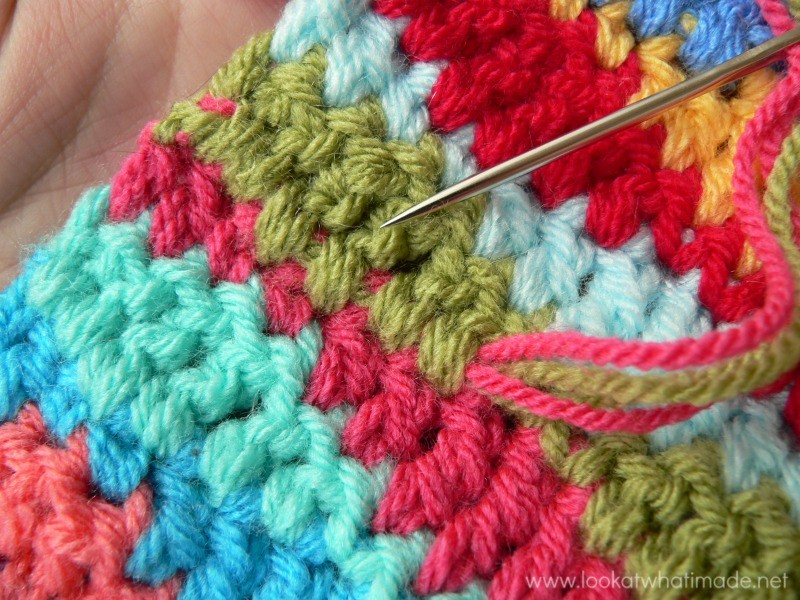
You will notice that the post of each stitch has two loops/’legs’ at the very bottom of the stitch. Working into the same stitches you just worked into, insert your needle into your work in the opposite direction, skipping the first loop/’leg’. If you do not skip that first loop/’leg’, you will unravel the ‘sewing’ you have just done.
In this example, I am now working from the inside of the row toward the outside.
Pull your yarn all the way through, making sure that you don’t end up with a little yarn bobble where the yarn anchors itself around that skipped loop/’leg’. Here you can see the little yarn bobble…
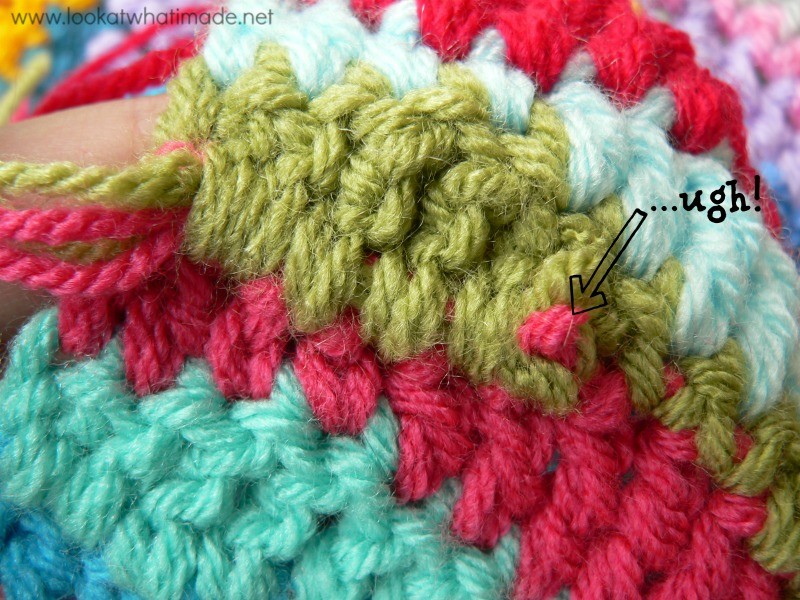
…and here you can see that I have gotten rid of it by tugging gently on my yarn.
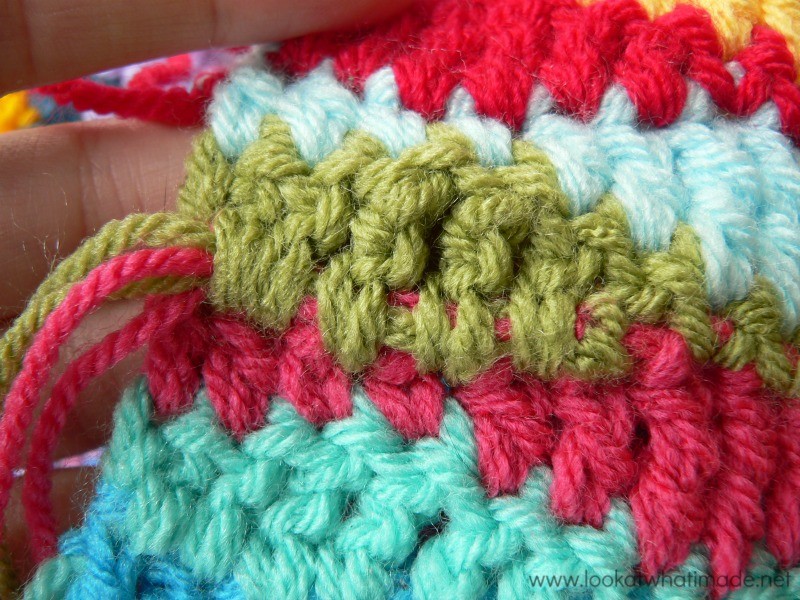
We will go in the opposite direction one more time, working into the same stitches again, and skipping the first loop/’leg’. When you have pulled your yarn through all the way, cut your yarn close to your work, making very sure not to accidentally cut any stitches!
In this example, I am working from the end of the row inward.
Below you can see that the ends are visible on the back of the work (although not on the front). This is largely due to the fact that I worked both colours away together. If I had only worked away the pink yarn (working into the bottoms of the green stitches), you would not have been able to see my ends.
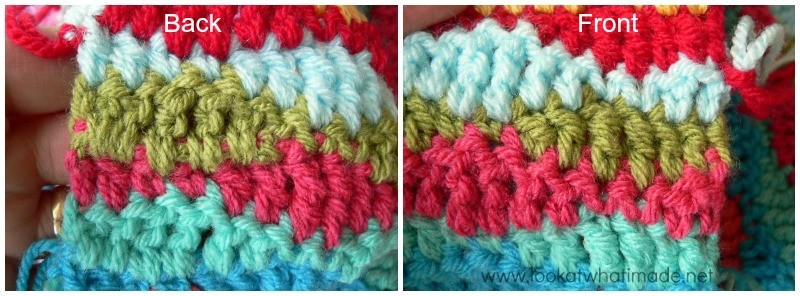
This method makes for a particularly neat edge as well. In fact, I didn’t crochet an edge around this blanket, because the edges were already very neat and I like the simplicity.
You can find a video tutorial for this method HERE.
Sewing Away Your Yarn Ends: Lacy Project
Lacy Projects like afghan squares are a bit more fiddly. Sometimes you don’t have very many stitches to work your ends away into.
As before, identify the back of your work. You will notice that the posts of longer stitches (like dc and tr) are ‘knotty’, whereas the fonts will look neatly twisted.
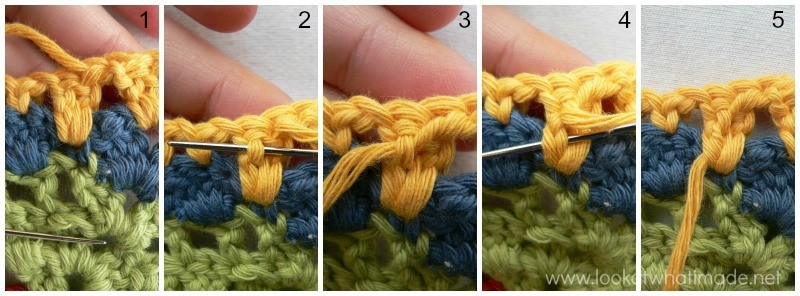
In the example below there are only 2 yellow stitches to work the ends away into, so you will need to ‘lead’ your yarn down to a round that has a bit more substance (Photo 1). In this case we are aiming for the bottom of the blue shells in the previous round.
To do that, insert your needle (threaded with your yarn end) into the back of the next available stitch (Photo 2) and pull your yarn all the way through (Photo 3). Insert your hook through both ‘legs’ at the bottom of the stitch (Photo 4) and pull all the way through (Photo 5).
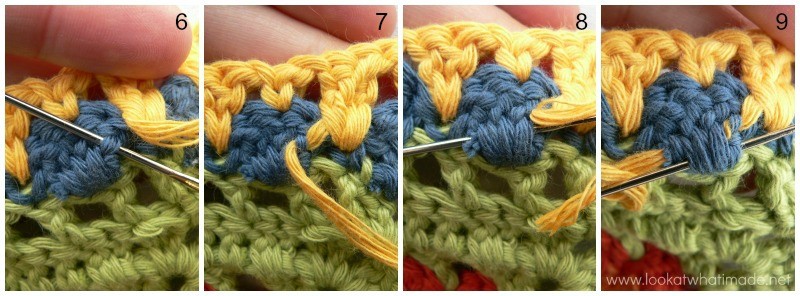
Insert your needle into any loop on the back of the next available stitch in the previous round (Photo 6) and pull through (Photo 7). Insert your needle through the bottoms of all the available stitches (Photo 8) and pull your yarn through. In this case, there are only 4 stitches. Ideally, you would want to have 5, but 4 will work. If you only have one or two stitches available, see Other Methods for Eliminating Yarn Ends below. Insert your needle into the same stitches again, going in the opposite direction and skipping the first stitch (Photo 9).
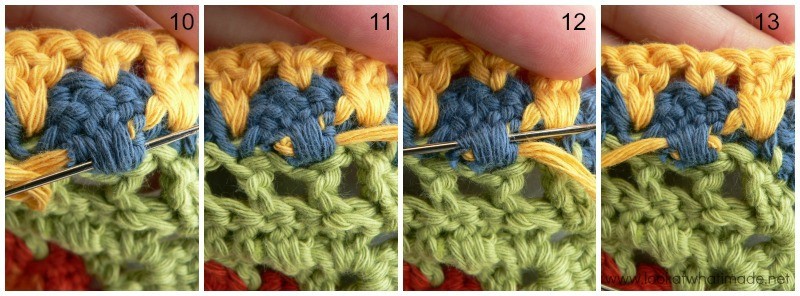
Insert your needle into the same stitches again, going in the opposite direction and skipping the first stitch (Photo 10). Pull your yarn all the way through (Photo 11). Insert your needle into the same stitches one last time, going in the opposite direction and skipping the first stitch (Photo 12). Pull your yarn all the way through (Photo 13). Cut your yarn close to your work, making very sure not to accidentally cut any stitches!
Your ends will be slightly visible on the back of your work but in a neat, controlled way. If done correctly, you shouldn’t be able to see them on the front of your work at all.
Other Methods for Eliminating Yarn Ends
Working Away Your Yarn Ends After the Fact
- Working Away Through 1 Stitch – Stephie’s Corner
Eliminating Your Yarn Ends As You Go
- No Needles Needed Method – Mama Jo’s Inspired by Love
- Working Over and Weaving Away – My Poppet Makes
- Weaving in Ends As You Go – Cherry Heart (This method is Advanced, but brilliant!)
What is your favourite method for working away yarn ends? And (more importantly) what is your least favourite method?

This blog post contains affiliate links. I only link to products I personally use or would use. All opinions are my own.


Emma F says
Brilliant article. My very first crochet project from years ago recently came undone in many, many places which destroyed my confidence in weaving in ends. This makes all the difference, thanks so much.
Vivianne says
That was most helpful – as was the link to the finishing needles: thank you :)
Jenny says
I couldn’t believe how much easier this made my life too, Vivianne! :)
Donna says
I use this method on all of my peojects. It works out well.
Jenny says
It certainly is a great time saver :)
Hilda says
Wish we could pin this … don’t see it on this page.
sandra says
hover over the picture and pin comes up
Maggie Lewin says
I meant Susan Bates…….!!!!! Stupid predictive text! Love those needles so much thank you
Maggie Lewin says
Dedri thank you for the info about the Susan Hayes finishing needles. Just got mine and I love them.
Dedri Uys says
I’m so pleased to hear that, Maggie. I find that their pointy ends make them go through the strands of the yarn more often than a blunt needle, but I like it, because it makes my tails all the more secure.
Phyllis Stuart says
Thanks, Dedri! Usually I sew over my tails as I crochet but I’m always looking for a better method. Something neater and more secure. My tails always seem to wiggle out & show the ends. I’m going to try this method from now on. I also need to master invisible join.
Dedri Uys says
Phyllis, if you prefer crocheting over your tails, continue to do so for a couple of stitches, and then work the tails back and forth once to secure them. I don’t bother crocheting over them, because the hassle of keeping the tails in position to work over them takes all the joy out of the crocheting for me. It is just a personal preference.
Margreeth Vermeulen says
Hi Dedri, I use your method most of the time and, like you, never leave them all to be done at the end of a project. With this post I have learned again something new, because I had never seen the Cherry Hearts method before and that is indeed brilliant! Going to try that for sure! Thanks for the tip!
Dedri Uys says
Margreeth, Cherry Hearts’ method is ‘indeed brilliant!’ :)
Maggie Lewin says
Hi Dedri – your method is more or less the same as I use – except I sew as a I go – I use the invisible join and sew that in and any other recent joins. I cant face the task of doing the lot in one go! I find I loose total control over my work if I try to crochet the ends in when joining a new colour.
Sharon Wiggins says
Hi Dedri,
I usually use the same method that you do. I hate weaving in as I go. It is so much easier for me to do it afterwards.
Linda says
Great timing of this post. I am just beginning a stripey blanket and this perfect As always, Dedri, precise, concise and user-friendly. Thanks so much.
Sarah says
I am glad to see your methods are actually the same as mine. Bring self taught, I have always been unsure if I was doing it correctly. Thanks for sharing!
Joy M says
I use the Cherry Heart method most all the time, especially with a lot of color changes in a project….it hasn’t failed me yet!
Dedri Uys says
Hi Joy :) Thank you for your feedback.