In this post, I will take you through the special stitches and techniques that you will be using during the Universe in Bloom CAL 2025. The photo tutorials below will help familiarise you with the skills needed to complete the crochet-along.
Please note that it is not essential for you to read through the photo tutorials below. Every step of the pattern will be explained thoroughly as Michael and I walk you through the weekly video tutorials.
I would suggest bookmarking or saving this post to PDF (print-friendly button below this post) so that you can refer to it later if you need to. Alternatively, you can access the written-only instructions in the Tips and Tricks PDFs listed below.
Resources
- Universe in Bloom Information Post
- Universe in Bloom on Ravelry
- Tips and Tricks PDF (English)
- Tips and Tricks PDF (Dutch)
Index
Abbreviations
US Terminology (US/UK Conversion Chart HERE)
- Beg – Beginning
- BLO – Back loop only
- BP – Back post
- Ch – Chain
- Dc – Double crochet
- Dtr – Double treble crochet
- Edc – Extended double crochet
- FLO – Front loop only
- FP – Front post
- Hdc – Half-double crochet
- Rem – Remaining/remains
- Rep – Repeat
- RS – Right side
- Sc – Single crochet
- Sl st – Slip stitch
- SM – Stitch marker
- Sp/sps – Space/spaces
- St/sts – Stitch/stitches
- Tr – Treble crochet
- WS – Wrong side
- [] – Stitches to be worked into the same st/sp
- () – Repeat instructions between parentheses the number of times specified
- * – Repeat instructions between asterisks the number of times specified
- *(blue) – Used to indicate a footnote (rare)
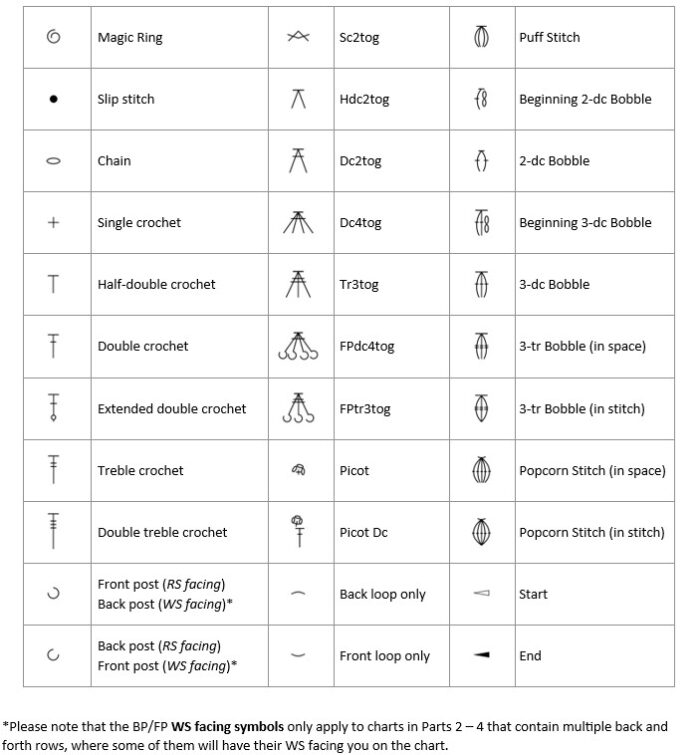
Chart Legend
Charts by Masako Kawahara
Special Stitches
2-dc Bobble
Yarn over and insert your hook into the indicated st/sp. Yarn over and draw up a loop, yarn over and pull through 2 loops. Yarn over and insert your hook into the same st/sp. Yarn over and draw up a loop, yarn over and pull through 2 loops. Yarn over and pull through all 3 loops on your hook.
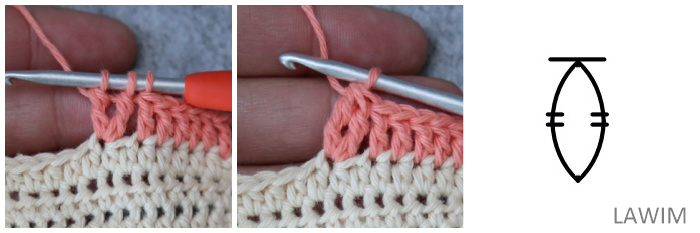
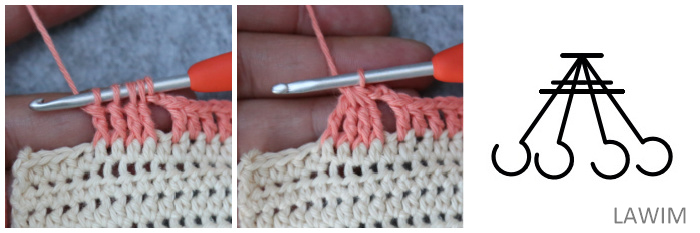
2-tr Bobble
Yarn over twice and insert your hook into the indicated st/sp. Yarn over and pull up a loop. (Yarn over and pull through 2 loops) twice. Yarn over twice and insert your hook into the same st/sp. Yarn over and pull up a loop. (Yarn over and pull through 2 loops) twice. Yarn over and pull through all 3 loops on your hook.
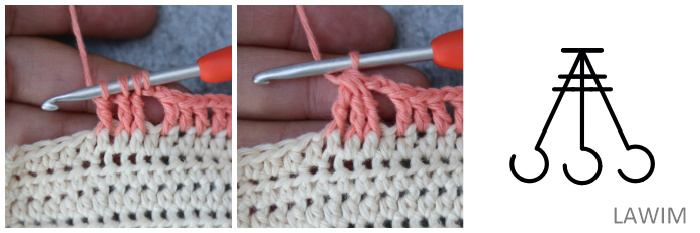
3-dc Bobble
Yarn over and insert your hook into the indicated st/sp. Yarn over and pull up a loop, yarn over and pull through 2 loops. (Yarn over and insert your hook into the same st/sp. Yarn over and pull up a loop, yarn over and pull through 2 loops) twice. Yarn over and pull through all 4 loops on your hook.
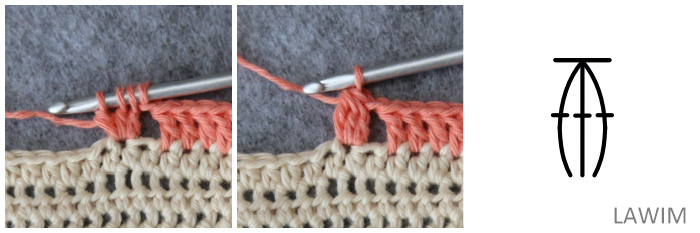
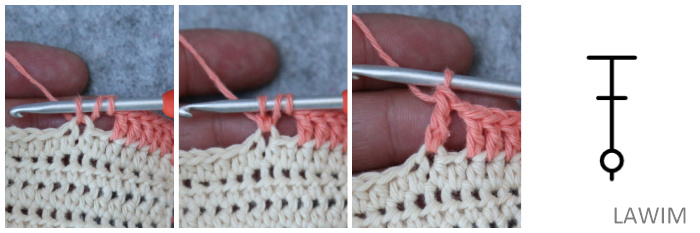
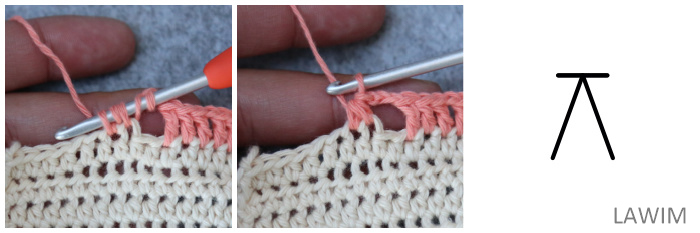
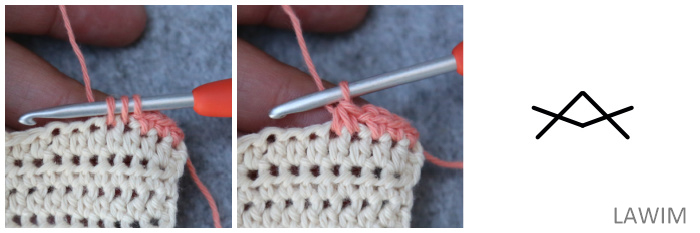
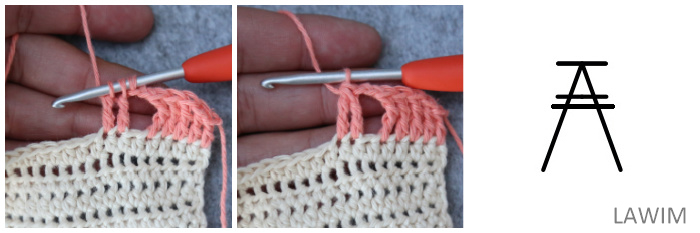
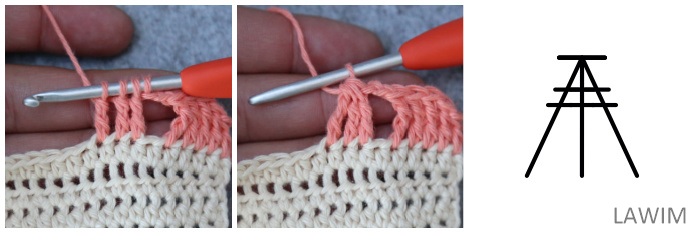
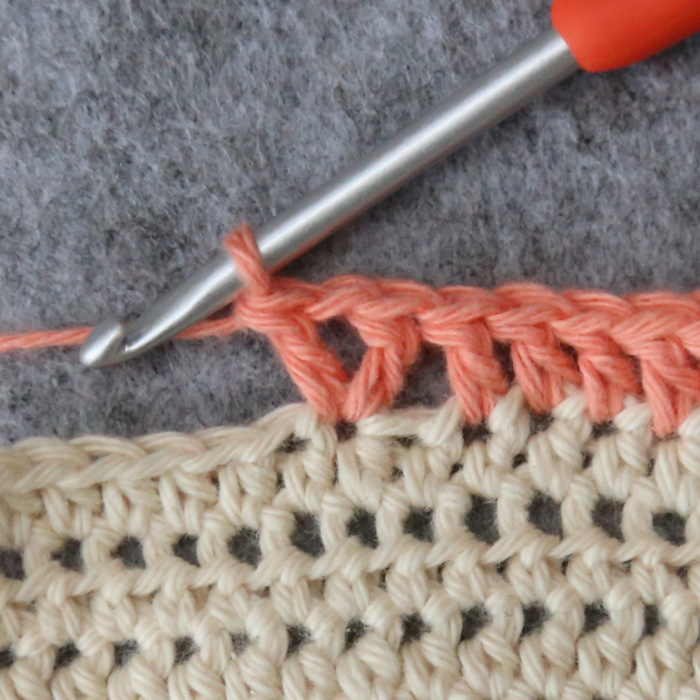
3-tr Bobble
Yarn over twice and insert your hook into the indicated st/sp. Yarn over and pull up a loop. (Yarn over and pull through 2 loops) twice.
*Yarn over twice and insert your hook into the same st/sp. Yarn over and pull up a loop. (Yarn over and pull through 2 loops) twice.* Rep from * to * once. Yarn over and pull through all 4 loops on your hook.
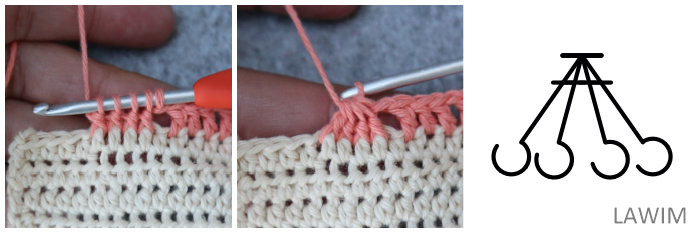
5-dc Bobble
Yarn over and insert your hook into the indicated st/sp. Yarn over and pull up a loop, yarn over and pull through 2 loops. (Yarn over and insert your hook into the same st/sp. Yarn over and pull up a loop, yarn over and pull through 2 loops) 4 times. Yarn over and pull through all 6 loops on your hook.
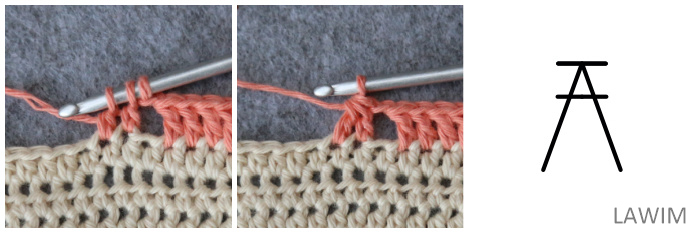
Dc2tog
Yarn over and insert your hook into the indicated st/sp. Yarn over and pull up a loop, yarn over and pull through 2 loops. Yarn over and insert your hook into the next st/sp. Yarn over and pull up a loop, yarn over and pull through 2 loops. Yarn over and pull through all 3 loops on your hook.
Edc
Yarn over, insert your hook into the indicated st, yarn over and pull up a loop. Yarn over and pull through ONE loop. (Yarn over and pull through two loops) twice.
FPdc2tog
Yarn over and insert your hook from front to back to front around the post of the indicated st. Yarn over and pull up a loop, yarn over and pull through 2 loops. Yarn over and insert your hook from front to back to front around the post of the next st. Yarn over and pull up a loop, yarn over and pull through 2 loops. Yarn over and pull through all 3 loops on your hook.

FPdc4tog
Yarn over and insert your hook from front to back to front around the post of the indicated st. Yarn over and pull up a loop, yarn over and pull through 2 loops. (Yarn over and insert your hook from front to back to front around the post of the next st. Yarn over and pull up a loop, yarn over and pull through 2 loops) 3 times. Yarn over and pull through all 5 loops on your hook.
FPtr3tog
Yarn over twice and insert your hook from front to back to front around the post of the indicated st. Yarn over and pull up a loop. (Yarn over and pull through 2 loops) twice.
*Yarn over twice and insert your hook from front to back to front around the post of the next st. Yarn over and pull up a loop. (Yarn over and pull through 2 loops) twice.* Rep from * to * once. Yarn over and pull through all 4 loops on your hook.
FPtr4tog
Yarn over twice and insert your hook from front to back to front around the post of the indicated st. Yarn over and pull up a loop. (Yarn over and pull through 2 loops) twice.
*Yarn over twice and insert your hook from front to back to front around the post of the next st. Yarn over and pull up a loop. (Yarn over and pull through 2 loops) twice.* Rep from * to * twice. Yarn over and pull through all 5 loops on your hook.
Hdc2tog
Yarn over and insert your hook into the indicated st/sp. Yarn over and pull up a loop. Yarn over and insert your hook into the next indicated st/sp. Yarn over and pull up a loop. Yarn over and pull through all 5 loops.
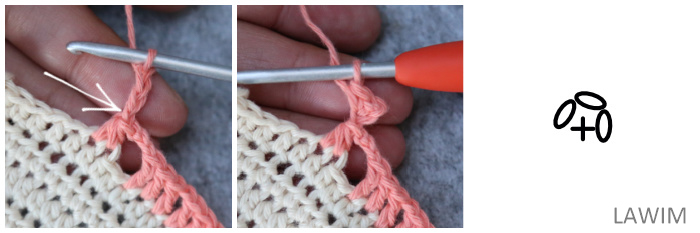
Picot
Ch 3, sc in the third ch from the hook.
Picot Dc
Make a dc. Ch 3, complete the Picot by making a sc in the top of the dc just made. To do this, insert your hook into both loops of the dc from the side and complete a sc.

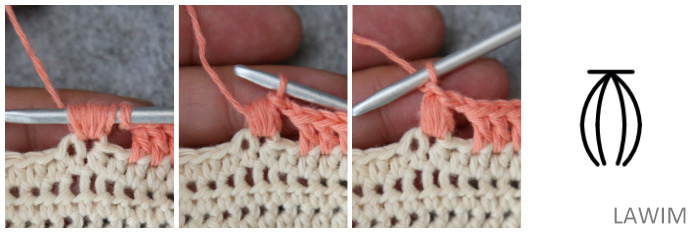
Popcorn Stitch
Make 5 dc in the indicated st/sp. Remove your hook from the last dc and insert it into the first dc of the 5-dc group. Grab the last st with your hook and pull it through the first st to complete the Popcorn.
When working into the Popcorn in subsequent rounds, it is important to note that the top of the Popcorn will be the first dc of the 5-dc group that forms the Popcorn.
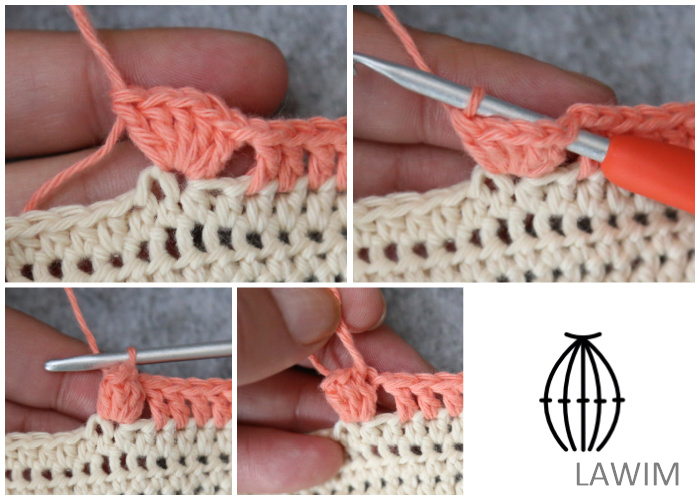
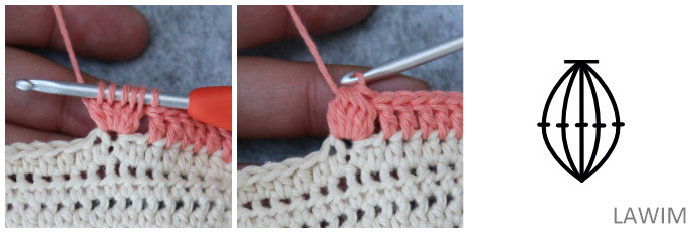
Puff Stitch
Yarn over and insert your hook into the indicated st/sp. Yarn over and pull up a long loop. (Yarn over and insert your hook into the same st/sp, yarn over and pull up a long loop) 3 times. Yarn over and pull through all 9 loops on your hook. Ch 1 to close the Puff Stitch.
Sc2tog
Insert your hook into the indicated st/sp. Yarn over and pull up a loop. Insert your hook into the next st/sp. Yarn over and pull up a loop. Yarn over and pull through all 3 loops.
Tr2tog
Yarn over twice and insert your hook into the indicated st/sp. Yarn over and pull up a loop. (Yarn over and pull through 2 loops) twice. Yarn over twice and insert your hook into the next st/sp. Yarn over and pull up a loop. (Yarn over and pull through 2 loops) twice. Yarn over and pull through all 3 loops on your hook.
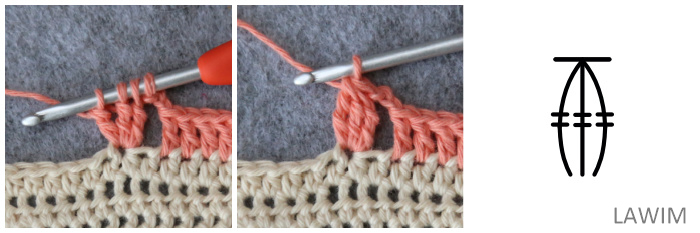
Tr3tog
Yarn over twice and insert your hook into the indicated st/sp. Yarn over and pull up a loop. (Yarn over and pull through 2 loops) twice.
*Yarn over twice and insert your hook into the next st/sp. Yarn over and pull up a loop. (Yarn over and pull through 2 loops) twice.*
Rep from * to * once. Yarn over and pull through all 4 loops on your hook.
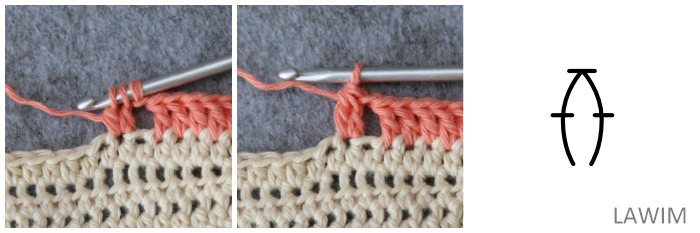
V-stitch
[Dc, ch 1, dc] in the indicated st/sp.
Techniques
Gauge
Please see the ‘Heart House’ pattern/gauge motif.
Magic Ring
Magic rings are great because they do not leave a hole in the middle of your project. When using this method, it is extremely important that you work your initial yarn end away very well. If it comes undone, your whole project might unravel (see Working Away Yarn Ends below).
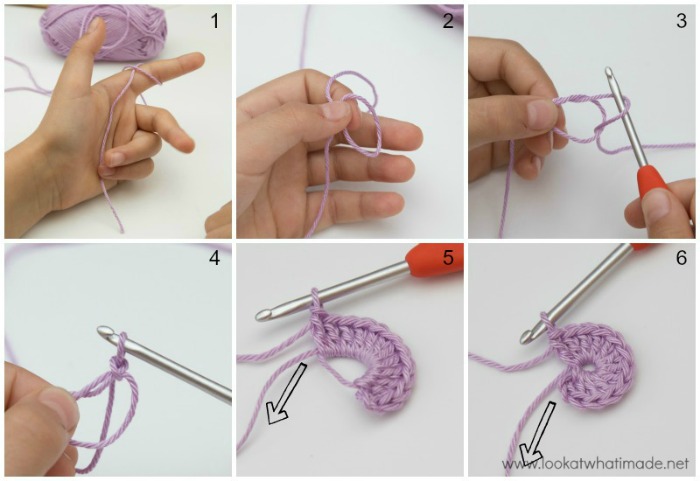
- Place the end of the yarn in your left palm (right if you are left-handed) and hold it in place with your pinkie and ring finger. Wrap the yarn clockwise around your forefinger so that the working yarn crosses over the yarn end and forms a loop.
- Remove the loop from your finger and hold it by pinching the point where the two strands of yarn overlap.
- Insert your hook into the loop, catch the working yarn end with your hook, and pull it through the loop.
- Yarn over and make a chain stitch. This chain secures your working yarn.
- Following the pattern, work the remainder of the round into the magic ring, remembering to work over the initial yarn end as well.
- When the round is complete, close the hole by pulling on the initial yarn end. Remember to work your yarn end away very well!
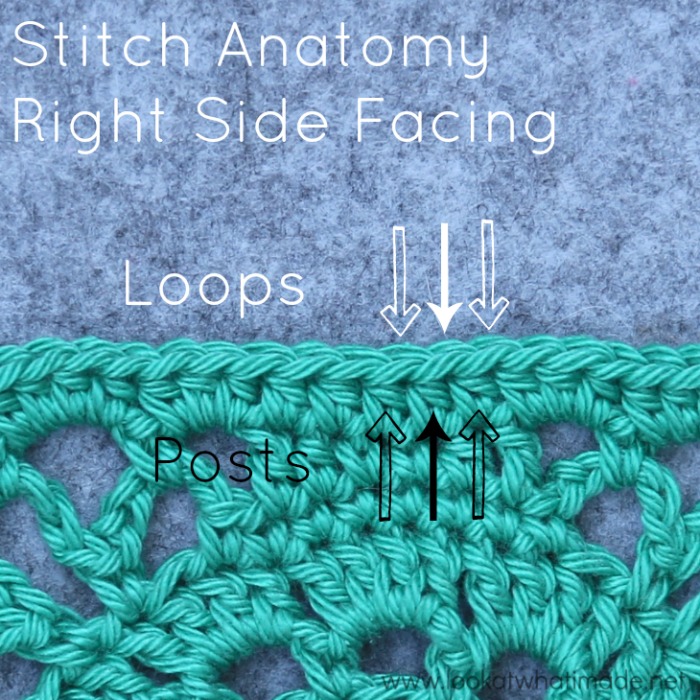
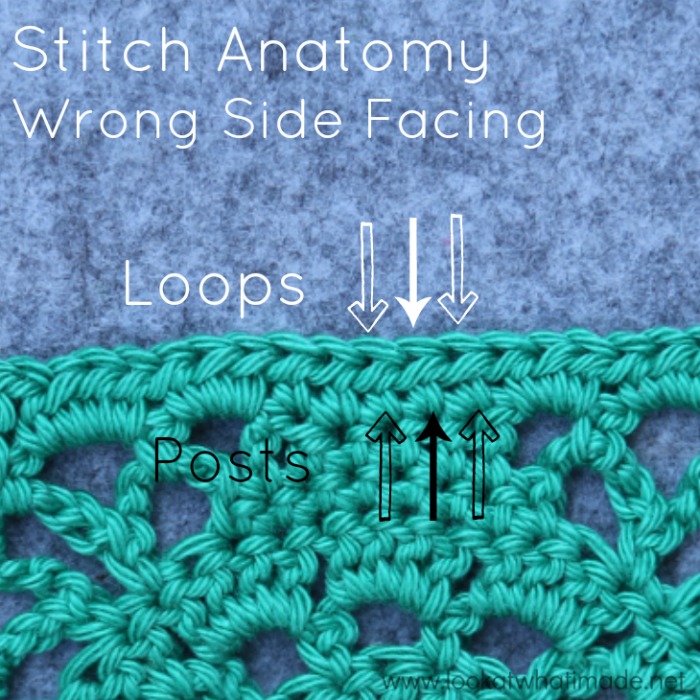
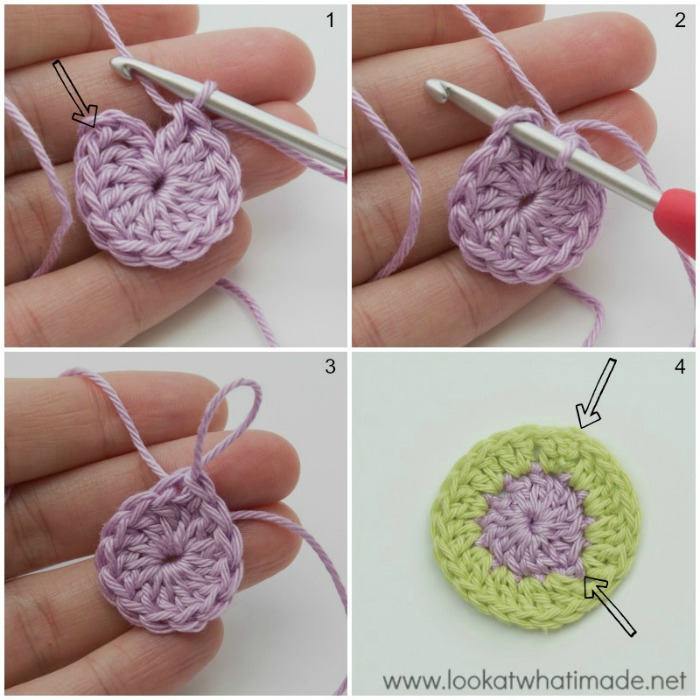
Stitch Anatomy
Stitches consist of posts (the bits that go into the stitches of the previous round) and loops (the horizontal ‘V’s formed by the tops of the stitches). Before you start with this pattern, it is vitally important that you know which ‘loops’ belong to which stitch or ‘post’, and vice versa.
When working with the right side (RS) of the last round facing you, the loops for each stitch can be found to the right of the post for that stitch (left if you are left-handed).
When working with the wrong side (WS) of the last round facing you, the loops for each stitch can be found to the left of the post for that stitch (right if you are left-handed).
Corners and the Elusive Hidden Stitch
When working in the round, your corners will be formed by working a number of stitches into the corner stitch/space of the previous round. When you’ve made more than one stitch into that corner space (or any other chain space), the loops for the first stitch after the corner (or chain space) can sometimes be hidden.
If you miss this first stitch, your stitch count will be out every single time, no matter how many times you frog and re-do. Sometimes the first stitch after a chain space is NOT hidden, but clearly visible. Even so, I will refer to it as a ‘hidden stitch’, just to remind you to pause and check that you are not accidentally skipping it.
Sometimes you will need to push the stitches out of the way to get into that first stitch. It is worth noting that an hdc directly after any chain space is the most tricky stitch to get into. It is ALSO worth noting that the hidden stitch won’t be nearly as hidden if the WS is facing you.

Using Stitch Markers
Occasionally, I will tell you to mark specific stitches with a SM. This will either be to help you count (in which case you can remove the marker after you have counted your stitches), or to help you identify a stitch in later rounds (in which case you should leave the SM until it has served its purpose). To mark a stitch, insert your SM through both loops of the indicated stitch (or into the indicated space). If you need help identifying which loops belong to which stitch, see Stitch Anatomy above.
If you do not have stitch markers (or you don’t have enough), you can use a piece of scrap yarn to mark your work. I often do!

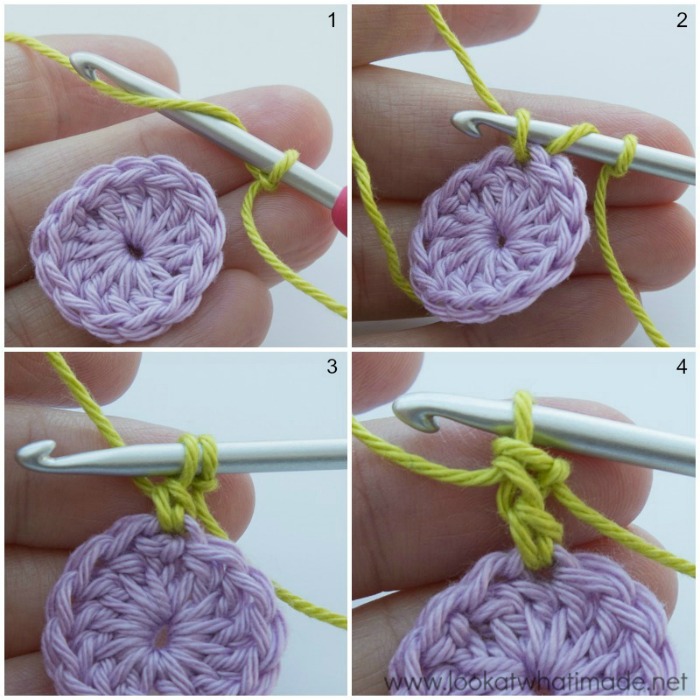
Standing Stitches
Standing stitches are used to start the round when using a new colour (or starting in a different place from where you finished the previous round). They are exactly the same as regular stitches, except that they are made ‘in air’, without being attached to a previous stitch. With a sl knot already on your hook, and holding the knot in place with your index finger, make your stitch as normal.
As an example, I will show you how to do a standing double crochet.
- With a sl knot already on your hook, yarn over.
- Insert your hook into the indicated st/sp. Press the slip knot against your hook with your right index finger (left, if you are left-handed) to prevent it from spinning around your hook when you yarn over. Yarn over again and pull up a loop {3 loops on hook}.
- Yarn over and pull through 2 loops {2 loops on hook}.
- Yarn over and pull through both remaining loops.
Post Stitches
Front Post Stitches
- Identify the post of the stitch you want to work around. Insert your hook from the front to the back and then from the back to the front around the post of the stitch so that the post lies on top of your hook.
- Complete your stitch as normal.
Back Post Stitches
Back post stitches are a bit trickier than front post stitches, but once you get the hang of them you will love them!
- Identify the post of the stitch you want to work around. Insert your hook from the back to the front and then from the front to the back around the post of the stitch so that the post lies behind your hook.
- Complete your stitch as normal.
You might find it easier to twist your work forward so that you can see what you are doing.

Omitting
At the end of some rounds, you will see an instruction telling you to omit the last corner/stitch(es) of the last repeat. This means that your last repeat should stop before the indicated corner/stitch(es) because you will already have made that corner/stitch(es) before the repeat started.
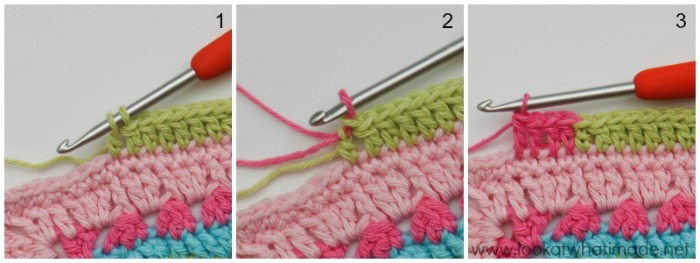
Changing Colours
You can use this method to join a new colour (or a new ball of yarn) in the middle of a round. If you want to make certain elements of the pattern in a different colour, for example, this is how you would switch between colours in a round.
- You will need to change your colour on the last yarn-over of the last stitch before the colour change. In other words, stop when you have 2 loops left on your hook.
- Let go of the old colour/yarn and pick up the new colour/yarn. Draw the new colour/yarn through both loops to complete the stitch.
- Continue as normal.
Joining at the End of a Round/Row
- To join your round with a sl st, identify the st you need to join to.
- Insert your hook into the indicated st/sp…
- …and make a sl st. If you are instructed to join to the top of the beg chain, make sure that you don’t accidentally insert your hook into the top of the first st after the beg chain.
Alternatively, you can use the Invisible Join. You can ONLY use the invisible join if you are fastening off at the end of a round/swapping colours for the next round.
Fastening Off
If you are using a sl st join, cut your yarn about 10cm/4” away from your work (after completing the sl st) and pull the yarn all the way through the st. Work away your yarn ends (see Working Away Yarn Ends below).
Tip: Often, I will make a cheeky ch-1 before fastening off, pulling this ch-1 tight to form a little knot.
Working Away Yarn Ends
Unfortunately, your project is never complete until you have gotten rid of all the “loose ends”. A pattern will usually tell you to work away your yarn ends when you are done, but I suggest working your ends away as you go. To do that you will need a blunt tapestry needle and a pair of scissors.
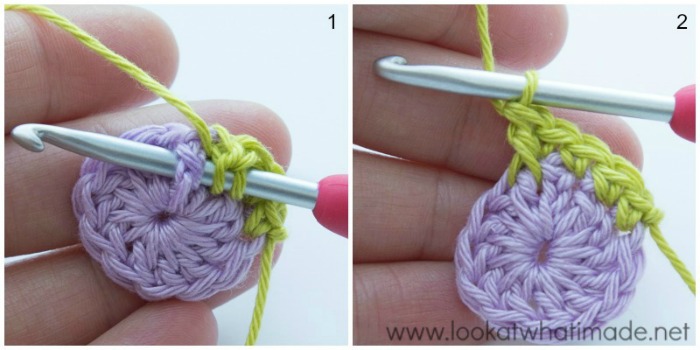
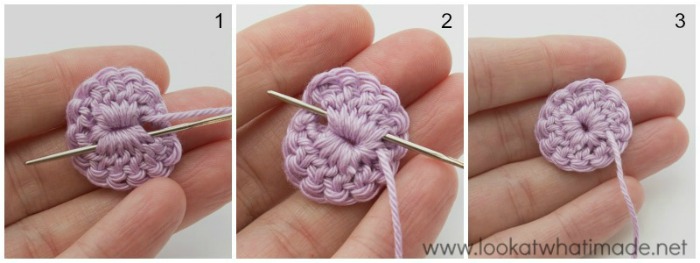
Thread the tapestry needle with the yarn end. Working on the wrong side of the fabric, thread your needle through at least 2.5cm/1” of stitches. Please note that the wrong side of your project is not necessarily the wrong side of the last row/round made! If you are working away your initial yarn end, thread it through at least half of the stitches made into the magic ring {Photo 1}.
Pull the yarn through all the way. Working in the opposite direction and skipping the first stitch, insert your needle back into the same stitches again. Skipping the first stitch is essential because it gives the yarn something to grip on to {Photo 2}. Pull the yarn through again. You can repeat this one more time if you want to make absolutely sure that your yarn ends won’t work themselves loose {Photo 3}.
Cut the yarn close to your work, being careful not to accidentally cut one of your stitches. If you have done this neatly, your tails won’t be visible on the front of your work.
Blocking
You don’t HAVE to block your motifs and/or blanket if you don’t want to, but I always find that a good blocking makes for a great presentation. This pattern contains a mix of solid and lace parts, so blocking it will help those parts ‘open up’ and Bloom, if you will allow me the pun.
I prefer to block my motifs before joining, so that I can gauge whether or not my join is too tight. This pattern allows for that by suggesting that you use a larger hook for your joining, so if you don’t want to block, don’t block.
If you ARE going to block, immerse your motifs/blanket in water for a couple of minutes. Gently wring out most of the excess water. Place your work between two large towels and roll up like a big cigar so that the towels absorb more of the water. Unroll again and place your work on your blocking surface. Applying gentle pressure, stretch your work out and use pins to pin it to your blocking surface. Try to avoid creating ‘pointy bits’ when you pin it down. I use a pin every inch or so.
Alternatively, you can use a steamer and gently stretch the blanket into shape as you go.
I hope that this post has answered some of the questions you might have and that you will thoroughly enjoy joining us on this journey.

This blog post contains affiliate links. I only link to products I personally use or would use. All opinions are my own.


Nish-Muthoni says
Dear Dedri,
With everything happening in the UK and around the world, it feels like this CAL will offer a true place of refuge.
I’m also trying something new — working on two blankets simultaneously! I have the Bouquet Kit, whose colours remind me of beautiful African flowers, and the Earth Kit, which I absolutely adore for its tones and that charming vintage feel you mentioned.
Thank you so much for sharing these patterns freely and for everything you do for the community. Your creativity and generosity are truly inspiring—more power to you!
Jenny Lowman says
I couldn’t agree with your sentiments more! :)
Natalie says
Thank you.
Patricia Kressig says
Popcorn stich: Question
In the Sophies universe/dream pattern the popcorn stich is closed with a chain stich. Is the chain stich in this pattern not needed?
Dedri Uys says
Hi Patricia,
No, it isn’t. I stopped using a ch to close Popcorn after Sophie because it caused a lot of unnecessary confusion.
Natalie says
What a thorough explanation of the tips and tricks. It might take me some time to read through it . Here at my home the time always goes by slowly
I did not get a kit for this CAL. I wanted the Galaxy kit but now they are sold out in the US. I wish there was a way to purchase the yarns separately but I would not know how many skeins of each color to buy.
Dedri Uys says
Hi Natalie,
Thank you! In the Reveal Post, it tells you how many balls of each colour to get for each colourway ;)