In Part 4, we will complete the meadow we started in Part 3, planting some more flowers along the way. This part is a repeat of the leafy pattern we started creating in Part 3, so it should be smooth sailing (she says, jinxing this part for sure!). Be mindful of the beginning and ends of rows, though.
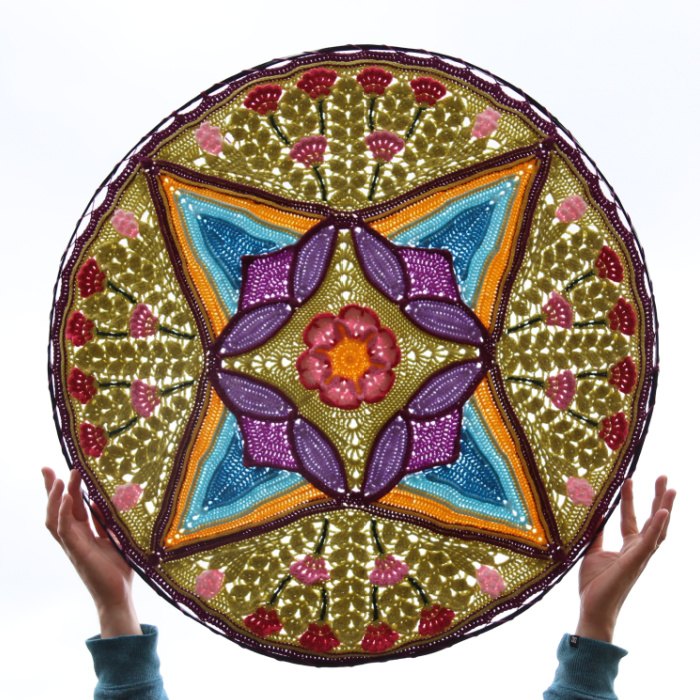
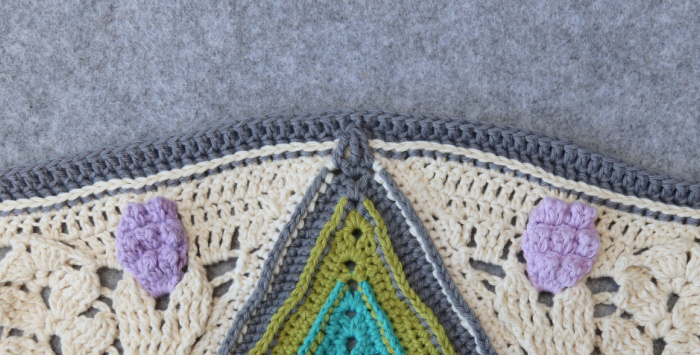
At the end of this part, you will have a giant mandala. This is what it would look like if you chose to make it only up to this point and fit it into a hoop. You will be super pleased to know that, from next week onwards, we will be working in rounds ALL the way around this mandala. You can give your stitch markers a little holiday!!
Resources
>>Universe in Bloom Information Post<<
- Universe in Bloom on Ravelry
- PDFs – these contain a condensed version of the pattern below, and can be found on the Scheepjes Website:
- English PDFs (US and UK Terms)
- Dutch PDF
Video Playlists
- English US Terminology
- Dutch
Abbreviations, Special Stitches, Chart Legend
The photo tutorial below uses US Terminology. Please see the Special Stitches and Techniques Post HERE for Photo Tutorials and Chart Legend.
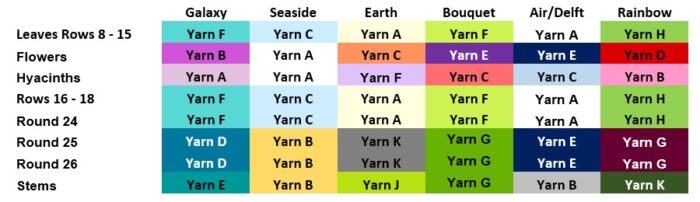
Colours Per Round
Instructions
Leaves Part 2
Housekeeping: This part is not hard, but you may accidentally find yourself skipping (or not skipping) a ch-1 sp you didn’t mean to. At the end of each row, you will creep one ch-1 sp forward, ready to start the next row. There will, therefore, be a difference between the number of ch-1 sps left on one side (where you started your row) and the other side (where you ended the row). So, as a safety net, I will tell you how many unworked ch-1 sps from Round 23 need to be left AT THE END OF each Row. This will be to the left of your work (right, if you are left-handed).
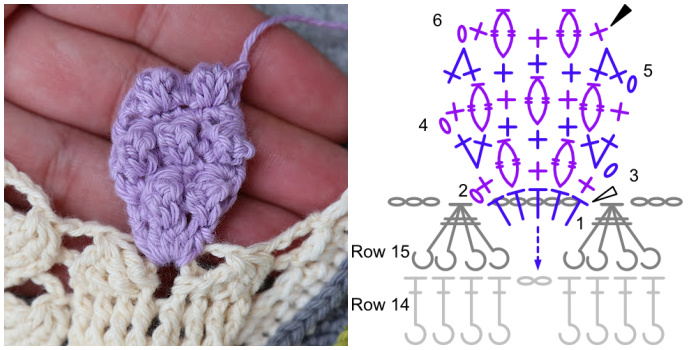
Row 8
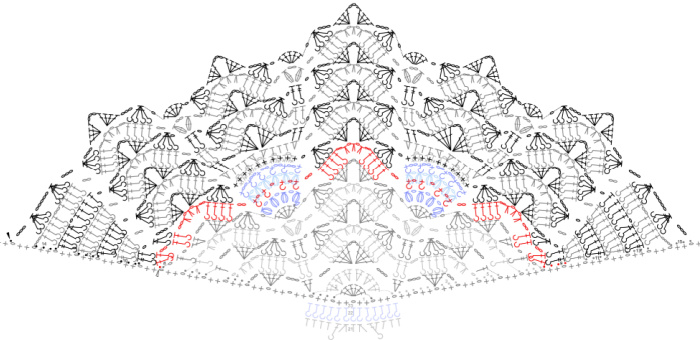
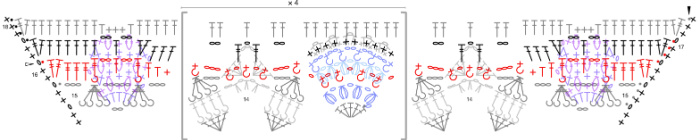
The chart for Rows 8 – 15 is at the bottom of Row 15.
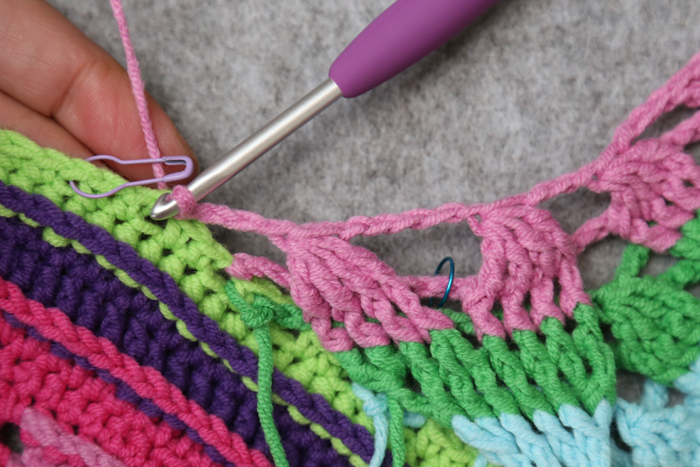
With WS facing (this is important!) and a slip knot already on your hook, join your yarn by making a sl st in the marked ch-1 sp of Round 23, which will already contain the last sl st of Row 7. Remove the SM.
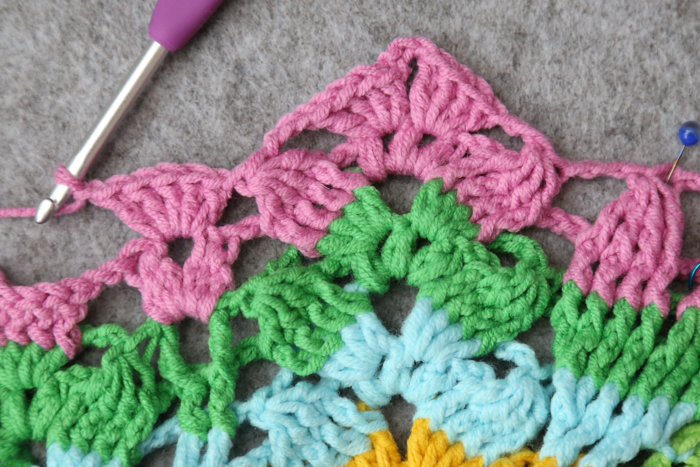
Make 2 BPdc around the FPtr from Row 7. Ch 2, BPdc around each of the next 2 dc.
*Ch 2, [hdc2tog, ch 1, hdc2tog, ch 1, hdc2tog] in the next ch-3 sp. Ch 2, BPdc around each of the next 4 dc. Ch 2, make a FPsc around the first Puff st of Flower Row 1. (Ch 1, make a FPsc around the next Puff st of Flower Row 1) 3 times. Ch 2, skip the next FPdc4tog, BPdc around each of the next 4 dc.*
Rep from * to * once.
Ch 2, [hdc2tog, ch 1, hdc2tog, ch 1, hdc2tog] in the next ch-3 sp. Ch 2, BPdc around each of the next 2 dc. Ch 2, make 2 BPdc around the FPtr.
Sl st in the marked ch-1 sp from Round 23 that already contains the last sl st of Row 6 (at the start of Row 7). Remove the SM.
Sl st in the next 2 sts, sl st in the next ch-1 sp. There should now be 8 ch-1 sps left unworked before the corner. TURN.
Stitch Count: 8 FPsc, 9 hdc2tog, 24 BPdc, 12 ch-1 sps, and 11 ch-2 sps
Row 9
With RS facing, FPtr around the first BPdc, FPdc around the second BPdc, ch 1, make a FPdc2tog over the next 2 BPdc, ch 3.
*Skip the next ch-2 sp, (make 4 dc in the next ch-1 sp, ch 3) twice. Make a FPdc4tog over the next 4 BPdc, ch 1. Working into the ch-2 sps from Flower Row 4 (behind your work), make 2 sc in each of the 5 ch-2 sps. Ch 1, FPdc4tog over the next 4 BPdc. Ch 3.*
Rep from * to * once. Skip the next ch-2 sp, (make 4 dc in the next ch-1 sp, ch 3) twice. FPdc2tog over the next 2 BPdc, ch 1, FPdc around the next BPdc, FPtr around the last BPdc. Skip the next 2 sts of Round 23, sl st in the next ch-1 sp.
Sl st in the next 2 sts, sl st in the next ch-1 sp. There should now be 7 ch-1 sps left unworked before the corner. TURN.
Stitch Count: 20 sc, 24 dc, 2 FPdc, 2 FPdc2tog, 4 FPdc4tog, 2 FPtr, 6 ch-1 sps, and 9 ch-3 sps
Row 10
With WS facing, [BPtr, BPdc] around the first FPtr. Make 2 BPdc around the next FPdc. Ch 2, skip the next FPdc2tog.
*BPdc around each of the next 4 dc. Ch 2, [hdc2tog, ch 1, hdc2tog, ch 1, hdc2tog] in the next ch-3 sp. Ch 2, BPdc around each of the next 4 dc, ch 2.** Skip the next FPdc4tog, (make 2 hdc in the next sc, hdc in the next 3 sc, make 2 hdc in the next sc) twice. Ch 2, skip the next FPdc4tog.*
Rep from * to * once, then from * to ** once. Skip the next FPdc2tog. Make 2 BPdc around the next FPdc, [BPdc, BPtr] around the last FPtr. Skip the next 2 sts of Round 23, sl st in the next ch-1 sp.
Sl st in the next 2 sts, sl st in the next ch-1 sp. There should now be 6 ch-1 sps left unworked before the corner. TURN.
Stitch Count: 28 hdc, 9 hdc2tog, 30 BPdc, 2 BPtr, 6 ch-1 sps, and 12 ch-2 sps
By now, it should have become apparent that we ALWAYS skip the FPdc4tog sts. Going forward, I will stop telling you to skip them.
Row 11
Remember your stitch anatomy. The top of the first hdc to work into will be AFTER the post.
With RS facing, [FPtr, FPdc] around the first BPtr. FPdc around each of the next 2 BPdc, make 2 FPdc around the last BPdc.
*Ch 1, make a FPdc4tog over the next 4 BPdc, ch 3. Skip the next ch-2 sp, (make 4 dc in the next ch-1 sp, ch 3) twice. Make a FPdc4tog over the next 4 BPdc, ch 1.** Dc in the next 2 hdc, ch 3, skip the next 4 hdc. [4 dc, ch 3, 4 dc] in the next st. Ch 3, skip the next 4 hdc, dc in the next 2 hdc. Skip the last hdc, which will be tricky to get into anyway.*
Rep from * to * once, then from * to ** once.
Make 2 FPdc around the next BPdc, FPdc around each of the next 2 BPdc. [FPdc, FPtr] around the last BPtr. Skip the next 2 sts of Round 23, sl st in the next ch-1 sp.
Sl st in the next 2 sts, sl st in the next ch-1 sp. There should now be 5 ch-1 sps left unworked before the corner. TURN.
Stitch Count: 48 dc, 10 FPdc, 6 FPdc4tog, 2 FPtr, 6 ch-1 sps, and 15 ch-3 sps
Row 12
With WS facing, [BPtr, BPdc] around the first FPtr. BPdc around each of the next 4 FPdc, make 2 BPdc around the last FPdc. Ch 2.

*BPdc around each of the next 4 dc. Ch 2, [hdc2tog, ch 1, hdc2tog, ch 1, hdc2tog] in the next ch-3 sp. Ch 2, BPdc around each of the next 4 dc, ch 2.** BPdc around the next 2 dc, ch 2.*
Rep from * to * 3 more times, then from * to ** once.
Make 2 BPdc around the next FPdc, BPdc around each of the next 4 FPdc, [BPdc, BPtr] around the last FPtr. Skip the next 2 sts of Round 23, sl st in the next ch-1 sp.
Sl st in the next 2 sts, sl st in the next ch-1 sp. There should now be 4 ch-1 sps left unworked before the corner. TURN.
Stitch Count: 15 hdc2tog, 62 BPdc, 2 BPtr, 10 ch-1 sps, and 20 ch-2 sps
Row 13
With RS facing, [FPtr, FPdc] around the first BPtr. FPdc around the next BPdc, FPdc2tog over the next 2 BPdc. Ch 1, FPdc around each of the next 4 BPdc.
*Ch 1, make a FPdc4tog over the next 4 BPdc, ch 3. Skip the next ch-2 sp, (make 4 dc in the next ch-1 sp, ch 3) twice. Make a FPdc4tog over the next 4 BPdc, ch 1.** FPtr around each of the next 2 BPdc.*
Rep from * to * 3 more times, then from * to ** once.
FPdc around each of the next 4 BPdc. Ch 1, FPdc2tog over the next 2 BPdc. FPdc around the next BPdc, [FPdc, FPtr] around the last BPtr. Skip the next 2 sts of Round 23, sl st in the next ch-1 sp.
Sl st in the next 2 sts, sl st in the next ch-1 sp. There should now be 3 ch-1 sps left unworked before the corner. TURN.
Stitch Count: 40 dc, 12 FPdc, 2 FPdc2tog, 10 FPdc4tog, 10 FPtr, 12 ch-1 sps, and 15 ch-3 sps
Row 14
With WS facing, ch 3, BPdc around the next 4 sts (the last of which will be a FPdc2tog), ch 2 (marking this ch-2 with a SM), BPdc around the next 4 sts.
*Ch 2, BPdc around each of the next 4 dc. Ch 2, [hdc2tog, ch 1, hdc2tog, ch 1, hdc2tog] in the next ch-3 sp. Ch 2, BPdc around each of the next 4 dc, ch 2.** [3-dc Bobble, ch 2, 3-dc Bobble] between the two FPtr.*
Rep from * to * 3 more times, then from * to ** once.
BPdc around the next 4 FPdc, ch 2 (marking this ch-2 with a SM), BPdc around the last 4 sts (the first of which will be a FPdc2tog). Ch 3, skip the next 2 sts of Round 23, sl st in the next ch-1 sp.
Sl st in the next 2 sts, sl st in the next ch-1 sp. There should now be 2 ch-1 sps left unworked before the corner. TURN.
Stitch Count: 15 hdc2tog, 8 3-dc Bobbles, 56 BPdc, 10 ch-1 sps, 26 ch-2 sps, and 2 ch-3 sps
Row 15
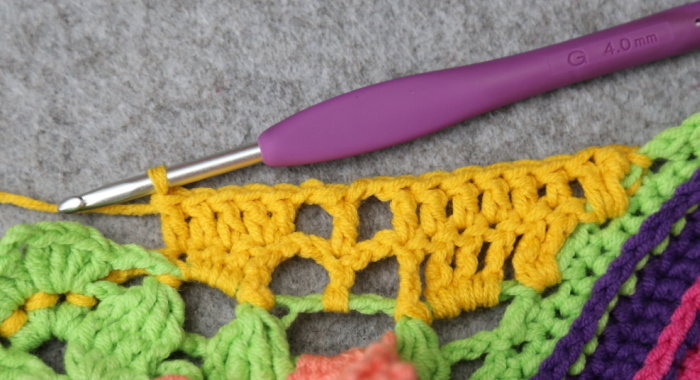
With RS facing, ch 3, FPtr4tog over the next 4 BP sts, ch 5, FPtr4tog over the next 4 BP sts, ch 3.
*Make a FPdc4tog over the next 4 BPdc, ch 3. Skip the next ch-2 sp, (make 4 dc in the next ch-1 sp, ch 3) twice. Make a FPdc4tog over the next 4 BPdc.** Ch 1, skip the next ch-2 sp, make 5 dc in the next ch-2 sp, ch 1.*
Rep from * to * 3 more times, then from * to ** once.
Ch 3, FPtr4tog over the next 4 BP sts, ch 5, FPtr4tog over the next 4 BP sts, ch 3. Skip the next 2 sts of Round 23, sl st in the next ch-1 sp. There should now be 2 ch-1 sps left unworked before the corner. Mark the NEXT ch-1 sp with a SM so that you can find it easily in Row 16. Fasten off – optional (preferably with a cheeky ch-1 knot before cutting your yarn).
I prefer to fasten off here while I make the Flowers. If you do not want to cut your yarn while you are making the Flowers, sl st in the next 2 sts, sl st in the next ch-1 sp (which should contain the SM you just inserted). Pull up a long loop and put a SM in it to stop it from unravelling.
Stitch Count: 40 dc, 10 FPdc4tog, 4 FPtr4tog, 8 ch-1 sps, 19 ch-3 sps, and 2 ch-5 sps
Flowers
You will need to make four of these Flowers before continuing with Row 16, one in each of the 5-dc groups from Row 15. Please see the charts and photo tutorials in Part 3 if you need help with this.
Flower Row 1
With RS facing and a slip knot already on your hook, join your yarn by making a sl st between the first and second dc of one of the four 5-dc groups in Row 15. Ch 1 (doesn’t count as a st). Make a Puff st between the first and second dc, remembering that the Puff st is closed with a ch. Ch 1. (Make a Puff st between the next 2 dc, ch 1) 3 times. TURN.
Stitch Count: 4 Puff stitches and 3 ch-1 sps, not counting the last turning ch-1.
Flower Row 2
With WS facing, ([Puff st, ch 1, Puff st, ch 1] into the next ch-1 sp) 3 times, placing the last leg of the last Puff st in the side of the first Puff st frm Row 1 for neatness. TURN.
Stitch Count: 6 Puff stitches and 5 ch-1 sps, not counting the last turning ch-1.
Flower Row 3
With RS facing, [sc, hdc, ch 1, hdc, sc] in each of the 5 ch-1 sps. I’m going to call these Small Scallops. Ch 1 and TURN.
Stitch Count: 5 Small Scallops, not counting the last turning ch-1.
Flower Row 4
With WS facing, FPsc around the first Puff st of Flower Row 2. (Ch 2, FPsc around the next Puff st of Flower Row 2) 5 times. Fasten off.
Stitch Count: 6 FPsc and 5 ch-2 sps
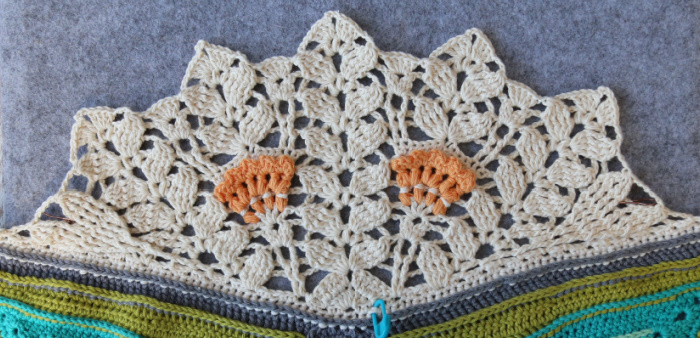
Hyacinths
You will need to make two of these Flowers before continuing with Row 16, one in each of marked ch-2 sps from Row 14. You can find the chart and a photo at the bottom of Row 6.
Hyacinth Row 1
With RS facing and a slip knot already on your hook, join your yarn by making a standing hdc in a marked ch-2 sps from Row 14, working in front of the ch-5 sp from Row 15. Make 4 hdc in the same ch-2 sp. Remove the SM. TURN.
Stitch Count: 5 hdc
Hyacinth Row 2
With WS facing, ch 1, sc in the first st. (2-tr Bobble in the next st, sc in the next st) twice. TURN.
Stitch Count: 3 sc and 2 2-tr Bobbles
Hyacinth Row 3
With RS facing, ch 1, make 2 sc in the first st, sc in the next 3 sts, make 2 sc in the last st. TURN.
Stitch Count: 7 sc
Hyacinth Row 4
With WS facing, ch 1, sc in the first st. (2-tr Bobble in the next st, sc in the next st) 3 times. TURN.
Stitch Count: 4 sc and 3 2-tr Bobbles
Hyacinth Row 5
With RS facing, ch 1, sc2tog over the first 2 sts, sc in the next 3 sts, sc2tog over the last 2 sts. TURN.
Stitch Count: 5 sc
Hyacinth Row 6
With WS facing, ch 1, sc in the first st. (2-tr Bobble in the next st, sc in the next st) twice. Fasten off.
Do not work away your ends yet! You will use them to secure the hyacinths when you’ve made Row 18.
Stitch Count: 3 sc and 2 2-tr Bobbles
Leaves Part 3
When you have made all the Flowers, make sure that the WS of your work is facing you before you continue.
Row 16
To Start This Round:
- If you have fastened off at the end of Row 15: With WS facing and a slip knot already on your hook, join your yarn by making a sl st in the marked ch-1 sp of Round 23. Remove the SM.
- If you did not fasten off at the end of Row 15: With WS facing, pick up the loop at the end of Row 15, remove both SM, and pull on your yarn so that the loop is tight on your hook.
Make 2 tr in the next ch-1 sp of Round 23, which will contain the last sl st of Row 15. Make 3 tr in the next ch-3 sp. BPtr around the next FPtr4tog. Working in front of the Hyacinth, ch 2, dc in the next ch-5 sp, ch 2. BPtr around the next FPtr4tog. [Dc, hdc, sc] in the next ch-3 sp.
*FPsc around the next FPdc4tog. Ch 3, FPsc around the next hdc2tog from Row 14. (Ch 1, FPsc around the next hdc2tog from Row 14) twice. Ch 3, FPsc around the next FPdc4tog.** (Ch 1, FPsc around the next Puff stitch of Flower Row 1) 4 times. Ch 1.*
Rep from * to * 3 more times, then from * to ** once.
[Sc, hdc, dc] in the next ch-3 sp. BPtr around the next FPtr4tog. Working in front of the Hyacinth, ch 2, dc in the next ch-5 sp, ch 2. BPtr around the next FPtr4tog. Make 3 tr in the next ch-3 sp. Make 2 tr in the ch-1 sp of Round 23 that contains the first sl st of Row 15.
Skip the next 2 sts of Round 23, sl st in the next ch-1 sp. Sl st in the next 2 sts, sl st in the next ch-1 sp. TURN.
Stitch Count: 2 sc, 41 FPsc, 2 hdc, 4 dc, 10 tr, 4 BPtr, 30 ch-1 sps, 4 ch-2 sp, and 10 ch-3 sps
Row 17
With RS facing, [tr, dc] in the next ch-1 sp of Round 23, which will already contain a sl st from Row 16. Dc in the next 6 sts. Ch 2, dc in the next dc, ch 2. Make 2 dc in the next st, dc in the next 3 st. Skip the next FPsc, which will be hidden anyway.
*Ch 2, skip the next ch-3 sp. Tr in the next ch-1 sp, ch 1, tr in the next ch-1 sp, ch 2. You may find it helpful to fold Row 15 over so that you can see the ch sps of Row 16 better. Working into the ch-2 sps from Flower Row 4 (behind your work), make 2 sc in each of the 5 ch-2 sps.*
Rep from * to * 3 more times.
Ch 2, skip the next ch-3 sp. Tr in the next ch-1 sp, ch 1, tr in the next ch-1 sp. Ch 2, skip the next ch-3 sp and the next FPsc. Dc in the next 3 sts, make 2 dc in the next st. Ch 2, dc in the next dc, ch 2. Dc in the next 6 sts, [dc, tr] in the ch-1 sp from Round 23 that contains the first sl st of Row 16.
Skip the next 2 sts of Round 23, sl st in the next ch-1 sp. Sl st in the next 3 sts. TURN.
Stitch Count: 40 sc, 26 dc, 12 tr, 5 ch-1 sps, and 14 ch-2 sps
Row 18
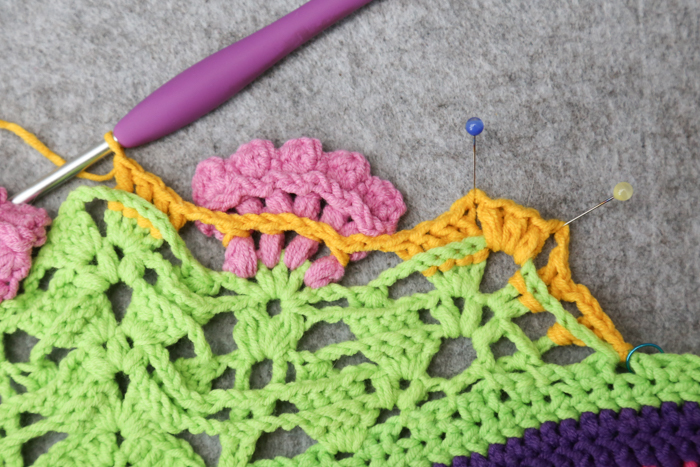
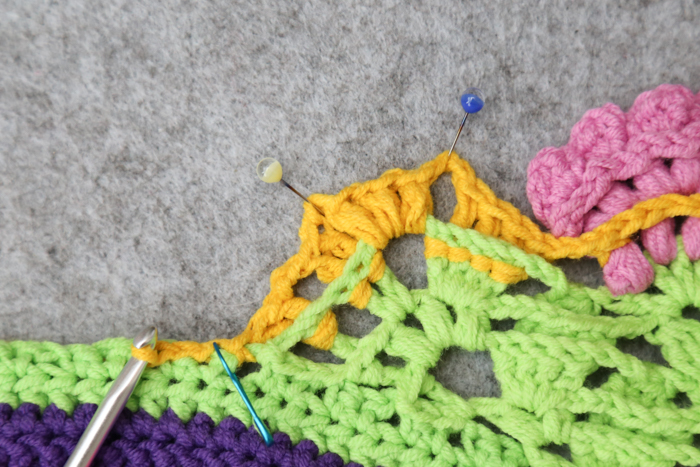
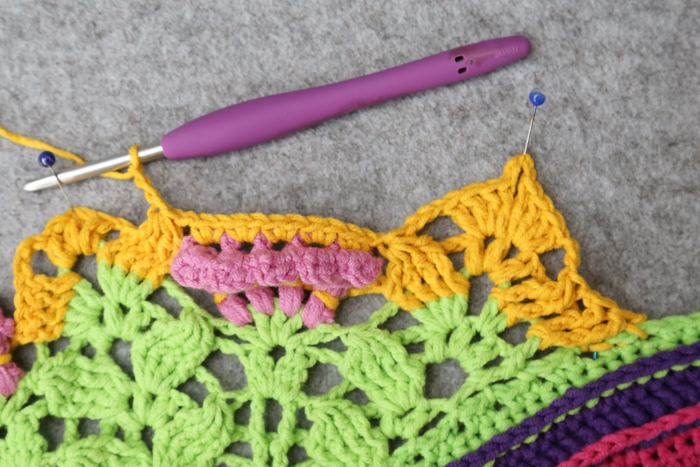
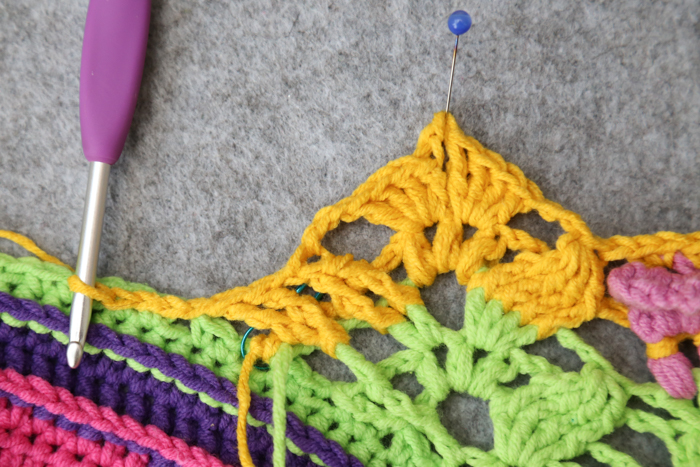
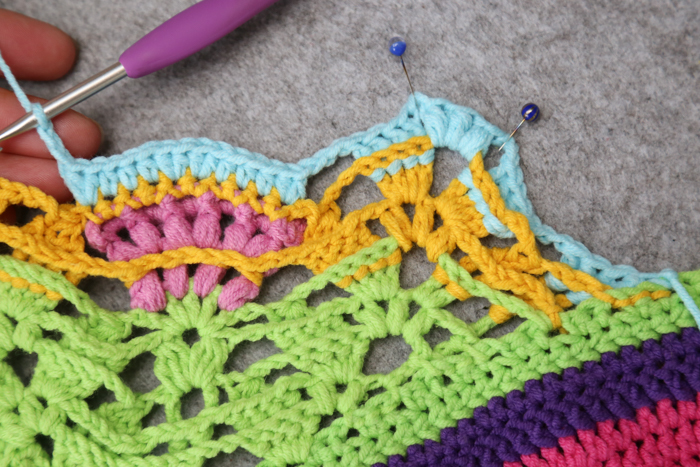
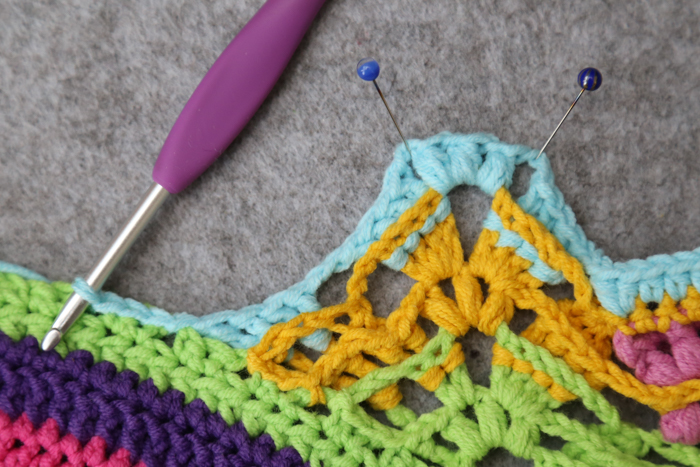
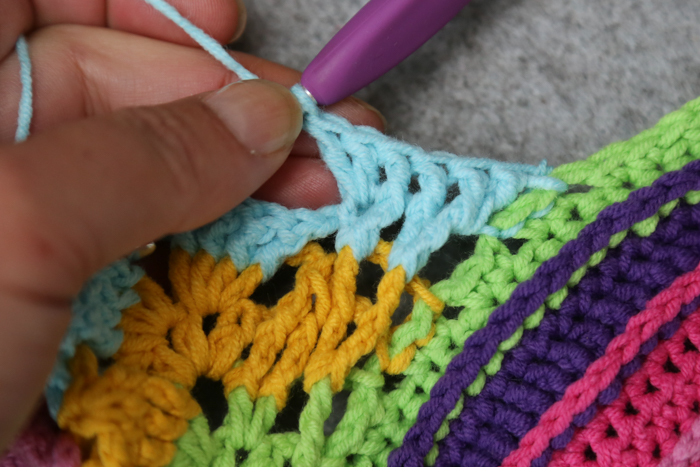
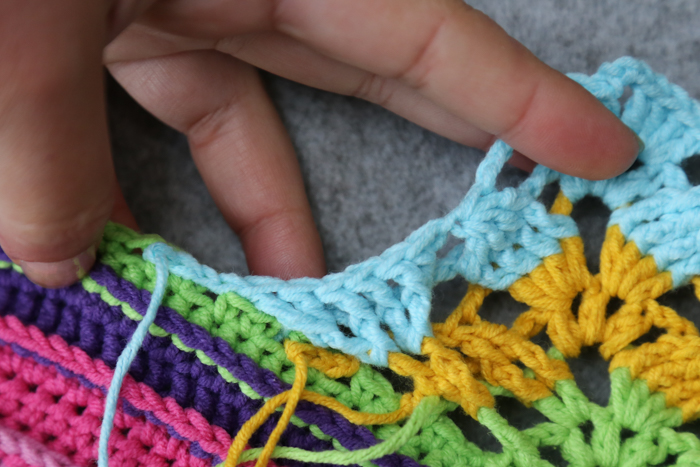
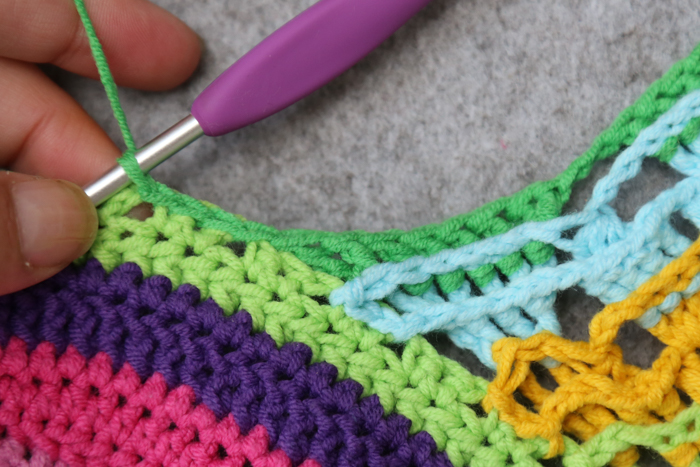
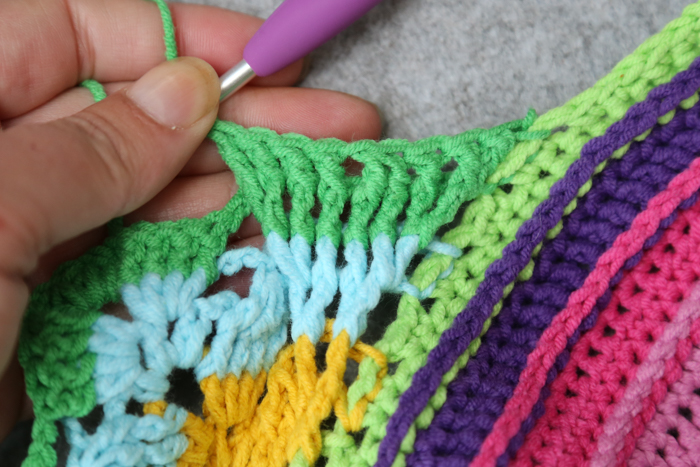
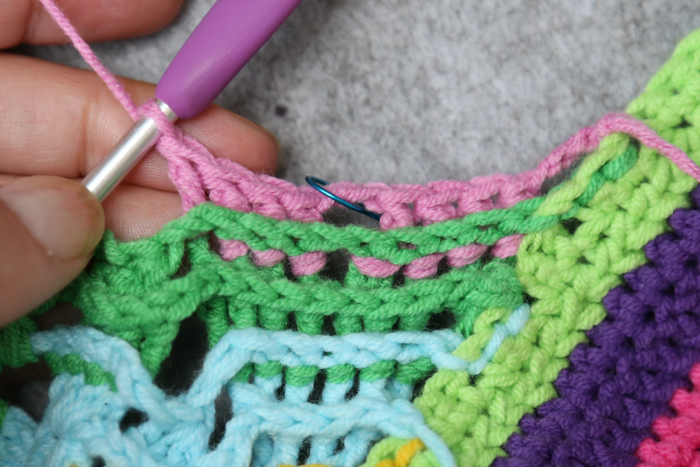
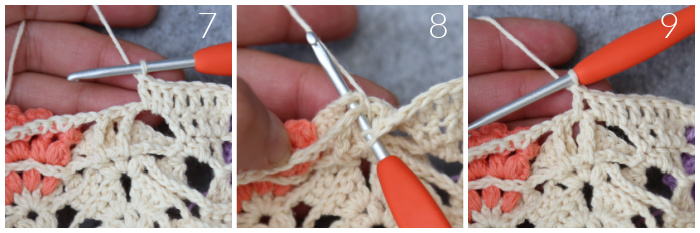
With WS facing, [tr, dc] in the next ch-1 sp of Round 23, which will already contain a sl st from Row 17. Dc in the next 8 sts. [Hdc, sc] in the next ch-2 sp {Photo 1}. Catch the Hyacinth by making a sc into the next dc AND the third st of Hyacinth Row 6 (between the two 2-tr Bobbles) – Photos 2 and 3. [Sc, hdc] in the next ch-2 sp {Photos 4 – 6}. Dc in the next 5 sts.
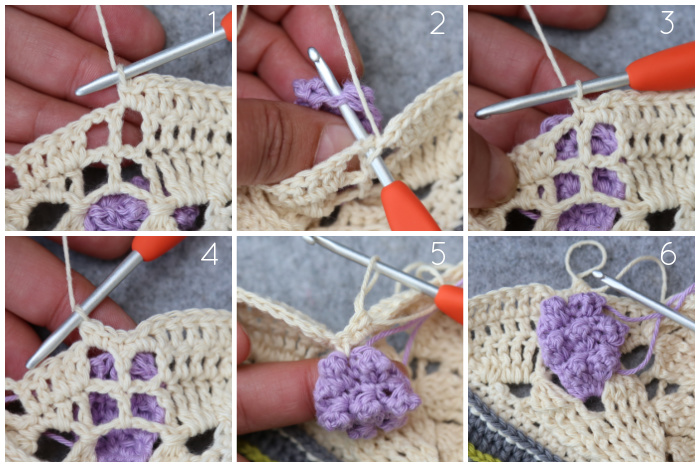
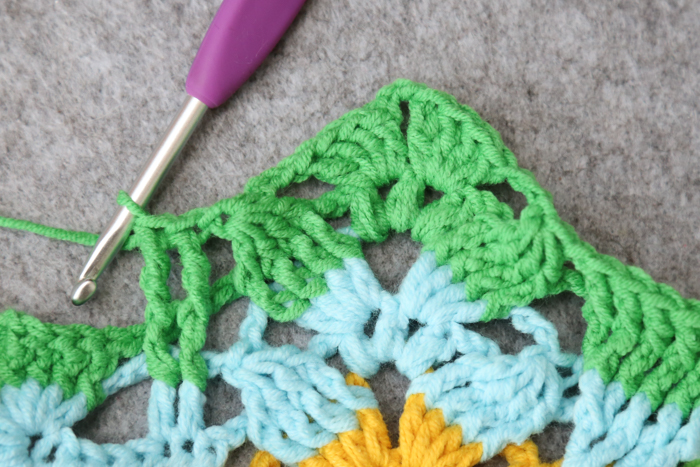
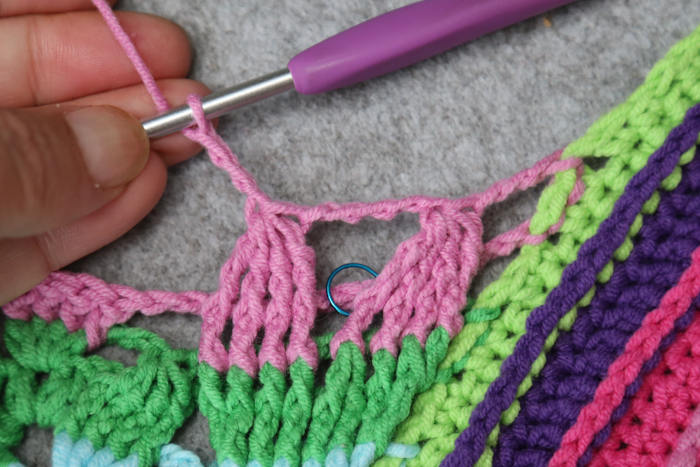
*Make 2 dc in the next ch-2 sp {Photo 7}, dc in the next ch-1 sp of Row 17 AND the ch-3 sp of Row 15 (behind your work) – Photos 8 and 9, make 2 dc in the next ch-2 sp.** Dc in the next 10 sc.*
Rep from * to * 3 more times, then from * to ** once.
Dc in the next 5 sts. [Hdc, sc] in the next ch-2 sp. Catch the Hyacinth by making a sc into the next dc AND the third st of Hyacinth Row 6 (between the two 2-tr Bobbles). [Sc, hdc] in the next ch-2 sp. Dc in the next 8 sts. [Dc, tr] in the ch-1 sp from Round 23 that contains the first sl st of Row 17.
Skip the next 2 sts of Round 23, sl st in the next st. Fasten off and work away your ends.
Stitch Count: 6 sc, 4 hdc, 93 dc, and 2 tr

Before you continue, work away your ends.
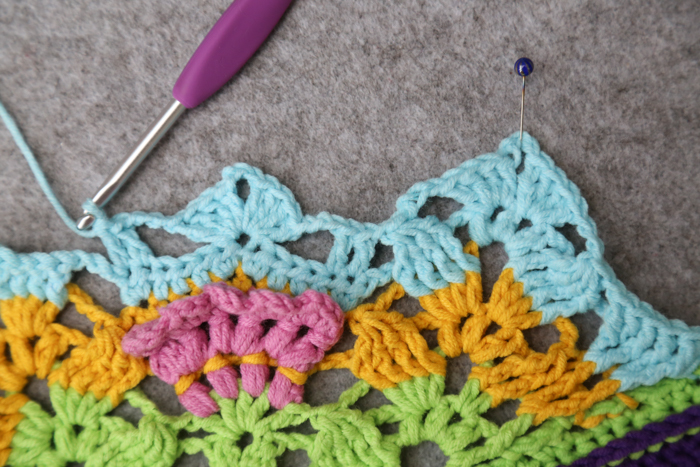
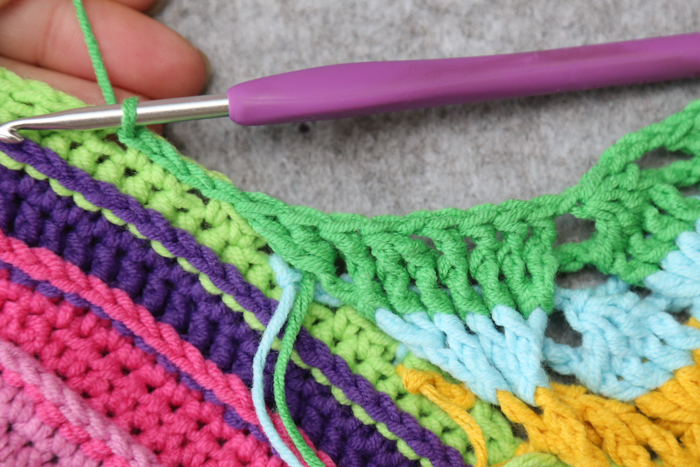
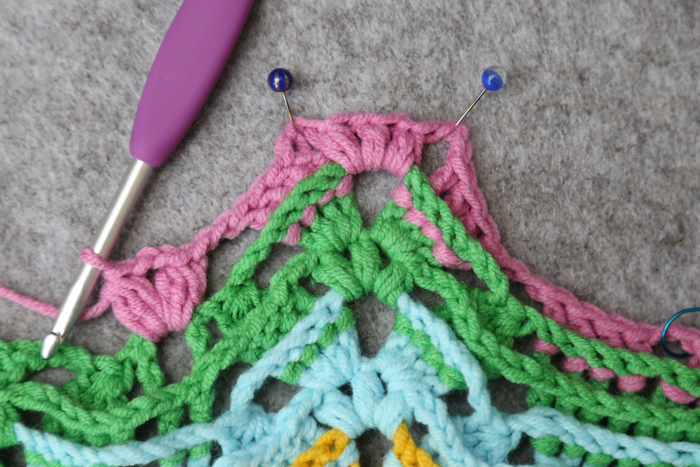
For the hyacinths, work your ends away through the 5 sts of Row 18 above the hyacinth {Photo 1}. Catch the last st of the hyacinth by inserting your needle from back to front into that st {Photo 2} and then inserting it from front to back between the hdc and dc from Row 18. Pull your yarn tight {Photo 3}. Turn your work around and work the ends away at the back of your work {Photos 4 and 5}. Photo 6 shows how this attaches the hyacinth to Row 18.

Repeat these instructions for each of the four sides before continuing.
Edging
Round 24
There have been some questions about jumping from Row 18 to Round 24. Remember all those dreaded ch-1 spaces? They were in Round 23 of the pattern. We then went off piste to do 18 rows of lacework on each side. Now we are back to doing rounds, starting with Round 24.
Before you start this round, take a moment to identify the ch-4 sp of Round 22 on any side.
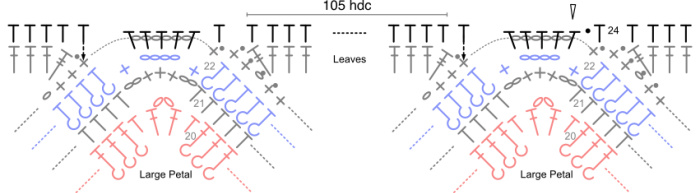
Tip: count in 20’s when making the 105 sts. I do it in batches of 4 to 20 so I don’t get confused.
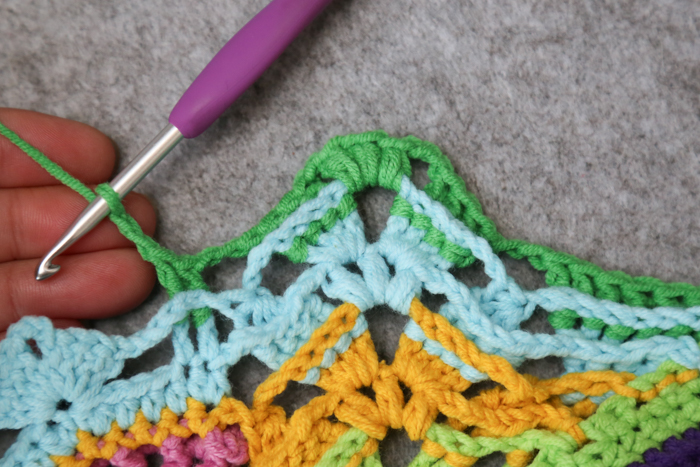
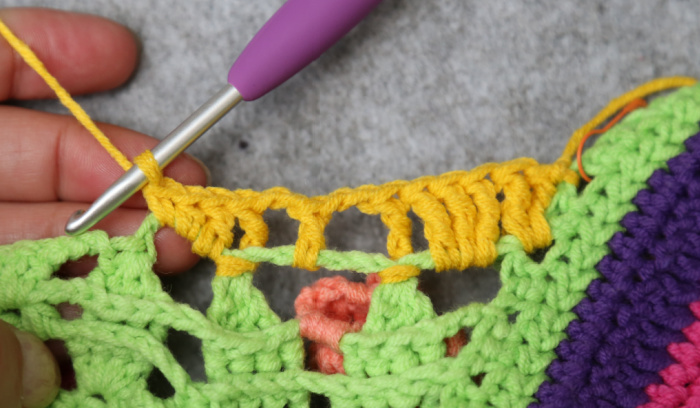
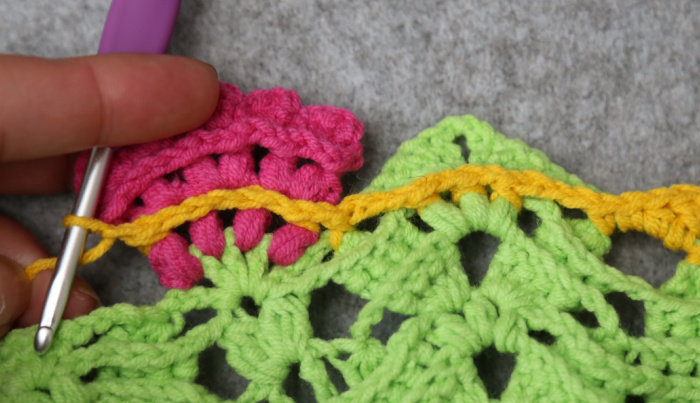
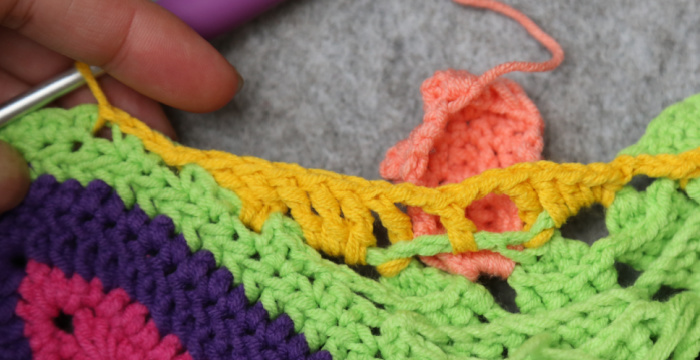
With the RS facing, a slip knot already on your hook, and starting with a standing st, *make 5 hdc in the ch-4 sp of Round 22, working in front of the ch-6 sp from Round 23. Hdc in the first sc after the ch-6 sp from Round 23, which will already contain the last sl st of Row 18. Hdc in the next 105 sts of Row 18. Hdc in the next sc of Round 23, which will contain a sl st from Row 18.*
Rep from * to * 3 more times. Join to the first hdc with a sl st. Mark this first hdc with a SM. Fasten off and work away your ends.
Stitch Count: 448 hdc
Round 25
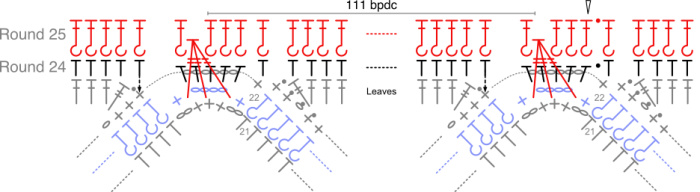
Join your yarn by making a standing BPdc around the first (marked) hdc from the previous round. Remove the SM. BPdc around the next 2 sts.
*Working in front of Rounds 22 and 23, make a tr3tog, working into the first ch-2 sp from Round 21, the second sc of Round 21, and the last ch-2 sp of Round 21. Skip the next hdc, BPdc in the next 111 sts, the first of which will be the fifth hdc made into the ch-4 sp.*
Rep from * to * 3 more times, omitting the last 3 BPdc on the last repeat. Join to the first BPdc with a sl st.
Stitch Count: 444 BPdc and 4 tr3tog
Round 26
Ch 3, dc in the next 2 sts. (FPdc around the next tr3tog, dc in the next 111 sts, the first of which may be hidden) 3 times. FPdc around the next tr3tog, dc in the next 108 sts.
Join to the top of the beg ch-3 with a sl st. Fasten off and work away your ends.
Stitch Count: 444 dc and 4 FPdc

Stems {Optional}
You do not have to add these stems if you don’t want to. If you do decide to add them, you may wish to go up a hook size when making the Stems.
Bottom 2 Flowers
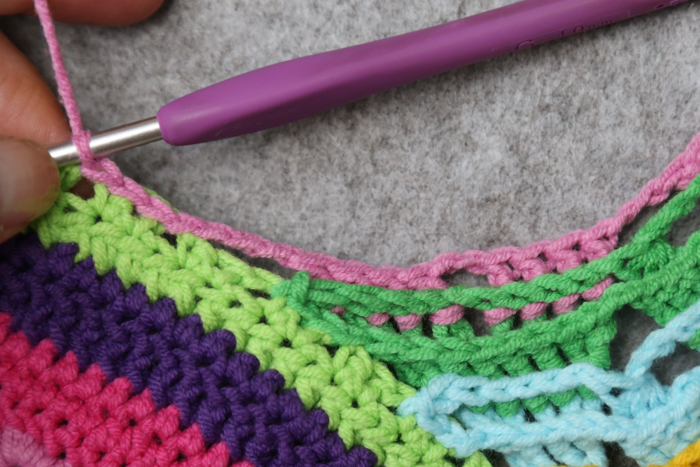
With a sl knot already on your hook, join your yarn by making a sl st in one of the ch-1 sps of Round 23 that contains the 2 dc from Row 3, working BETWEEN the 2 dc {Photos 1 – 3}.
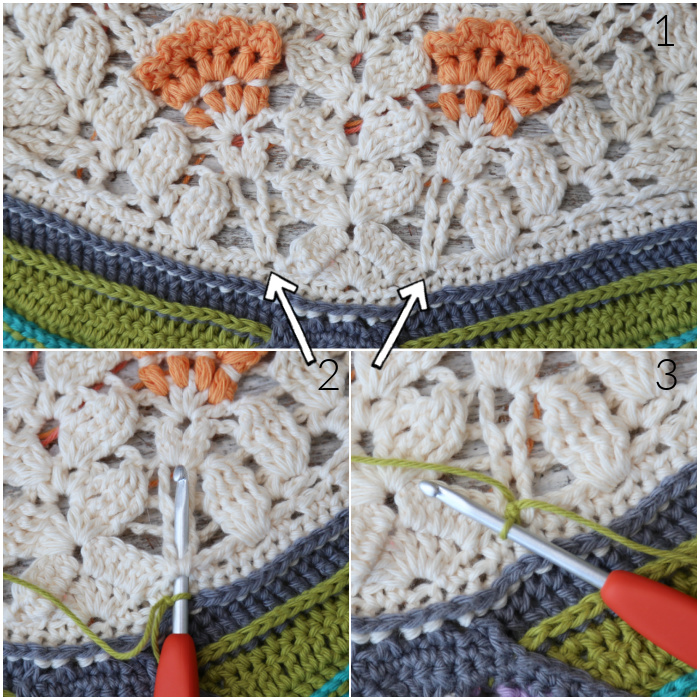
Ch 2 {Photo 4}, sl st between the top of the 2 dc from Row 3 {Photo 5}. Ch 1, sl st between the top of the 2 BPdc from Row 4 {Photo 6}. Ch 2, sl st between the top of the 2 FPtr from Row 5, also working between the 2 3-dc Bobbles from Row 6 {Photo 7}.
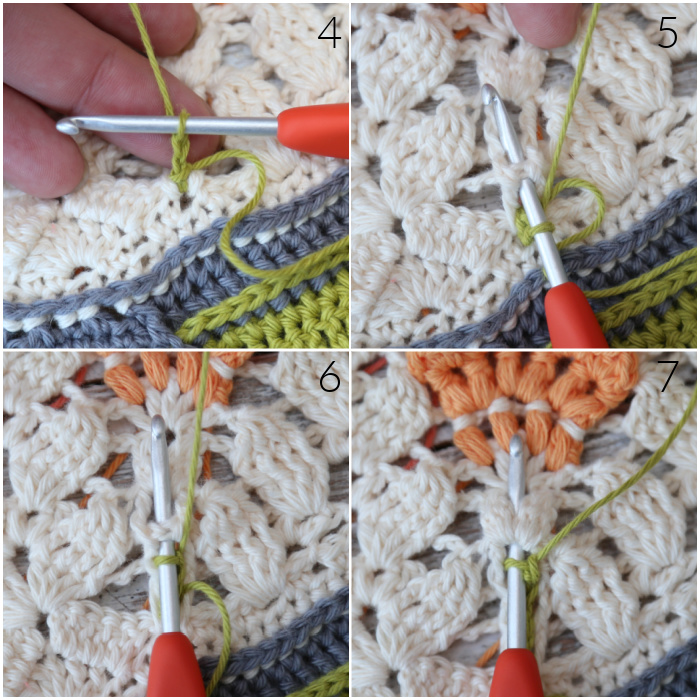
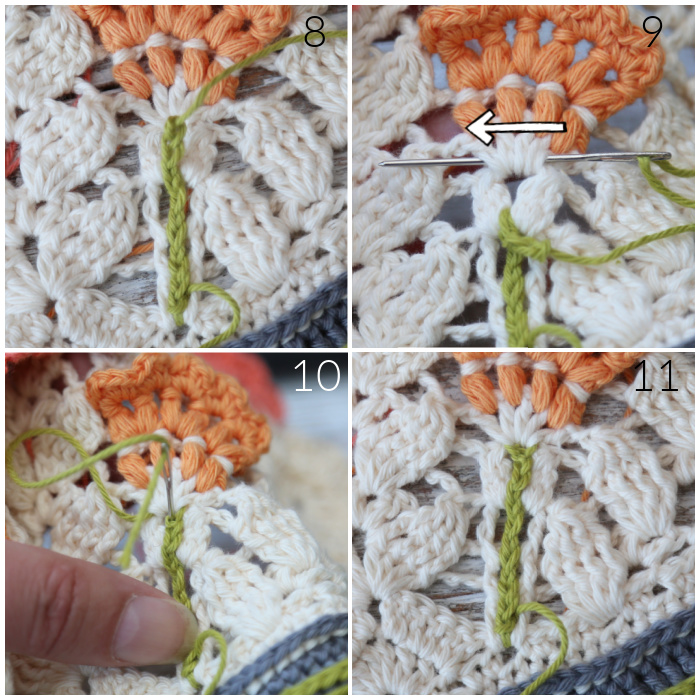
Ch 3, cut your yarn, and gently pull the end all the way through {Photo 8}. Thread a yarn needle with this end. Working from right to left (left to right, if you are left-handed), work your end away through the 5 dc of Row 7 {Photo 9}. Insert your needle from front to back into the last ch of the Stem {Photo 10} and then to the back of your work. Pull tight so that the ch is neat {Photo 11}.
Work your end away to the back of your work, working through the bottom of the 5 dc from Row 7.
Top 4 Flowers
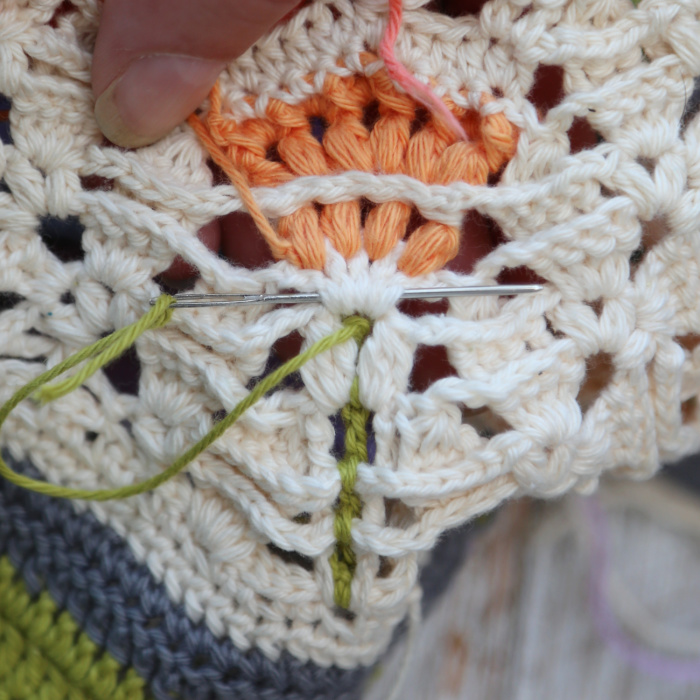
Before you start, take a moment to look at the spaces where the stems need to be added for the top 4 Flowers. You will find them above the First 2 Flowers. Locate the two dc from Row 11 at the bottom of each stem. I suggest that you start in the hdc from Row 10 that contains the second of these 2 dc. That will be the dc to the left, if you are right-handed. It will be the dc to the right, if you are left-handed.
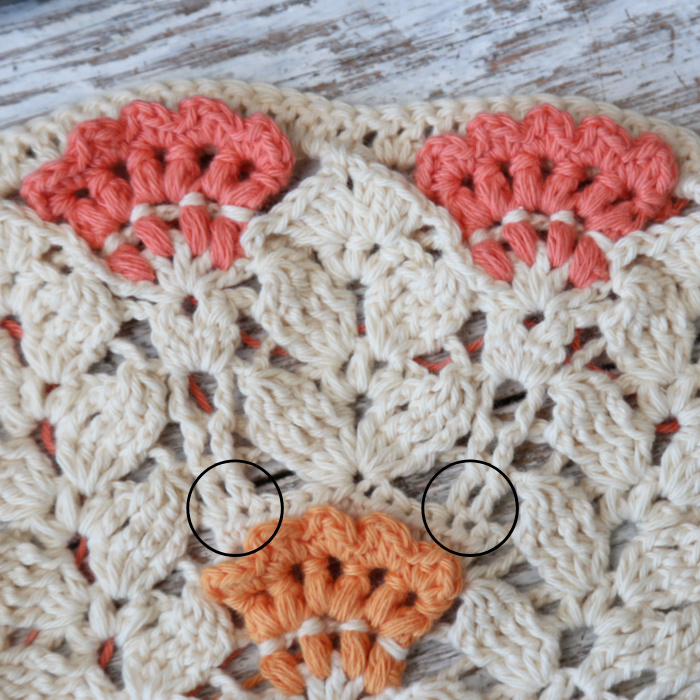
Once you have located that hdc from Row 10, join your yarn by making a sl st in that hdc, working BETWEEN the 2 dc.
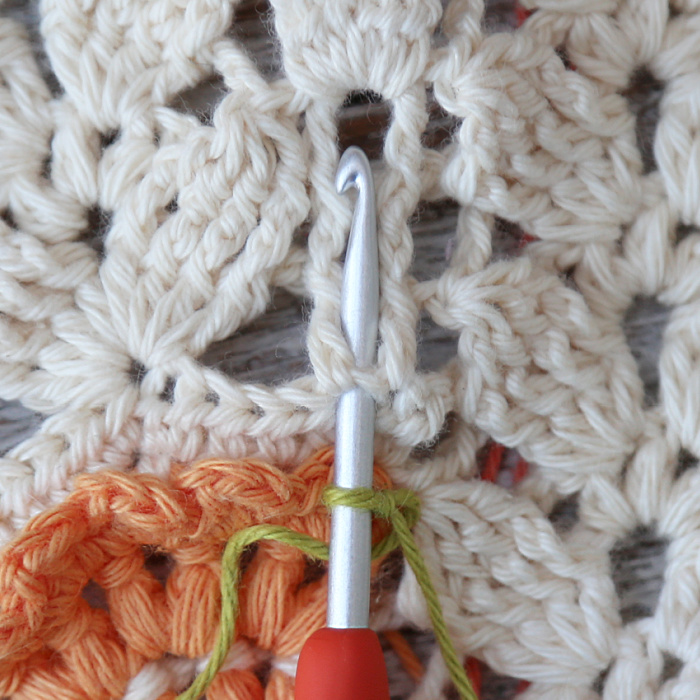
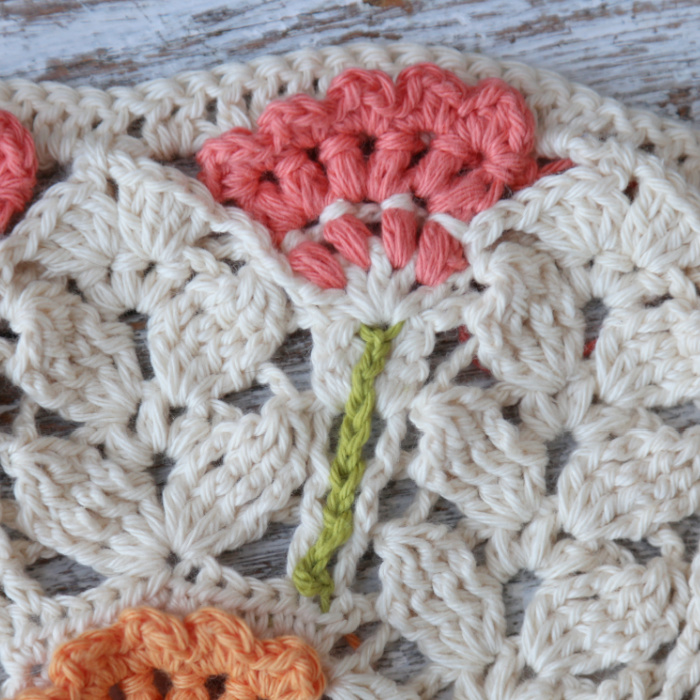
Ch 2, sl st between the top of the 2 dc from Row 11. Ch 1, sl st between the top of the 2 BPdc from Row 12. Ch 2, sl st between the 2 FPtr from Row 13, also working between the 2 3-dc Bobbles from Row 14.
Ch 3, cut your yarn, and gently pull the end all the way through. Thread a yarn needle with this end. Working from right to left (left to right, if you are left-handed), work your end away through the 5 dc of Row 15. Insert your needle from front to back into the last ch and then to the back of your work. Pull tight so that the ch is neat. Work your end away to the back of your work, working through the bottom of the 5 dc from Row 15.
Thank you so much to everyone who has been sharing photos of their work. Please keep doing so. I LOVE seeing your progress (and your furry helpers)!

This blog post contains affiliate links. I only link to products I personally use or would use. All opinions are my own.


