Hi and welcome to Part 12 of the Universe in Bloom Crochet-along. And so we come to the end of this crochet adventure. As always when we get to the end of a big project, I feel quite emotional about it. I also feel excited to see what comes next!
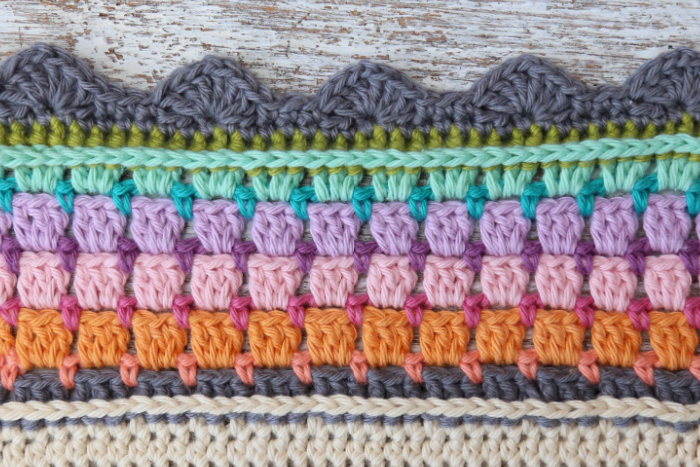
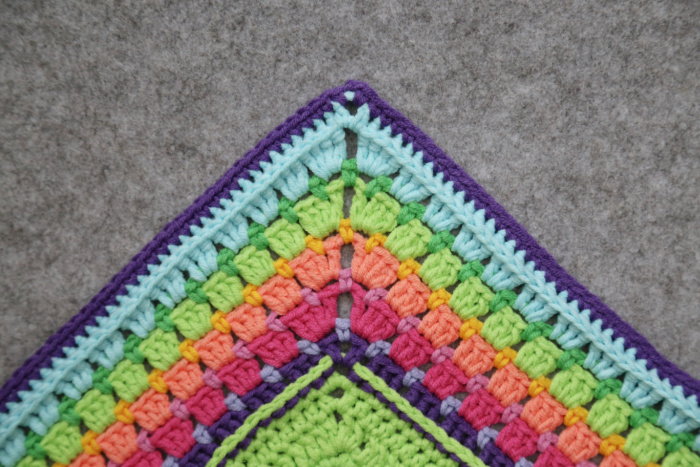
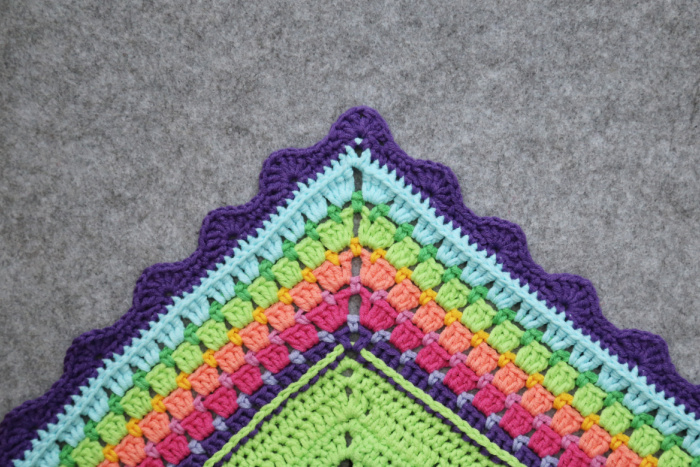
In this part, we will create a simple Brick Stitch Border, finished with a Scalloped edge. I think this frames our Universe in Bloom beautifully, and makes me think about the yellow brick road from The Wonderful Wizard of Oz. I hope you have made some great friends along the way, much like Dorothy did in the book.
My hope is that you will find this part a relaxing and fitting end to this journey, with plenty of time to reflect and wind down.
Resources
>>Universe in Bloom Information Post<<
- Universe in Bloom on Ravelry
- PDFs – these contain a condensed version of the pattern below, and can be found on the Scheepjes Website:
- English PDFs (US and UK Terms)
- Dutch PDF
Video Playlists
- English US Terminology
- Dutch
Abbreviations, Special Stitches, Chart Legend
The photo tutorial below uses US Terminology. Please see the Special Stitches and Techniques Post HERE for Photo Tutorials and Chart Legend.
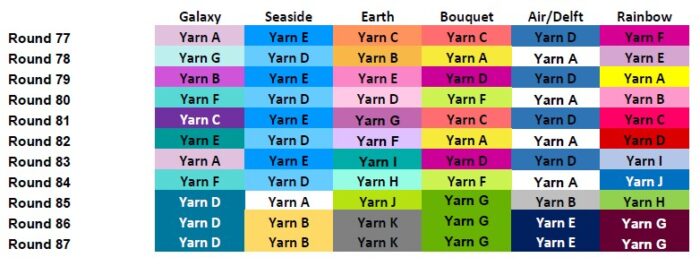
Colours Per Round
Instructions
Note
You can use a bigger hook for the single crochet rounds ONLY if you prefer. Be mindful of the fact that you DO want these rounds to pull in slightly because the double crochet rounds will straighten them out again. If these rounds do not pull in, you run the risk of having a wobbly border.
Brick Stitch Border
- If you want to add this Brick Stitch Border (without the final Scallop Round) to an existing project, you will need a multiple of 3 + 2 stitches, not including ch-2 corner sps.
- If you want to add the Brick Stitch Border and the final Scallop Round to an existing project, you will need a multiple of 24 – 4 stitches, not including ch-2 corner sps.
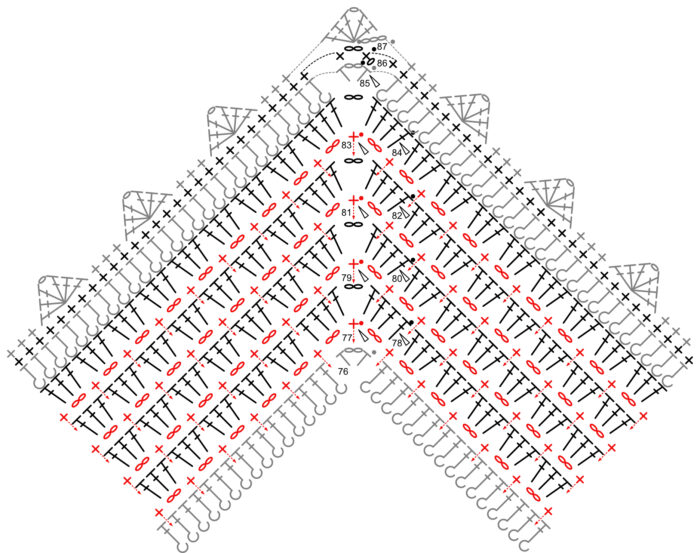
You can find the chart for Rounds 77 to 87 at the end of this post.
Round 77
In this round, you will be working between stitches, not into them.
HINT: When counting the stitches to skip, I found it easiest to count the posts, making sure that there were 3 skipped posts between each sc.
If you know that you make your ch sts tighter than your other sts, you may wish to do this round (and the remaining similar rounds) with a slightly bigger hook.
Join your yarn by making a standing sc in any ch-2 corner sp around.
*Ch 2, skip the first hdc and make a sc between the first hdc and the first BPdc. (Ch 2, skip the next 3 BPdc, make a sc between the third and fourth BPdc) until 1 st rem before the corner sp (94 times). Ch 2, skip the last hdc, sc in the ch-2 corner sp. Feel free to mark this corner sc if you are going to have trouble identifying it in the next round.*
Rep from * to * 3 more times, omitting the last sc on the last repeat. Join to the first sc with a sl st. Fasten off and work away your ends.
Stitch Count Per Side: 95 sc and 96 ch-2 sps, not including corner sc.
Suggestion from TESTERS/MAKERS: For the remainder of the blanket, mark the corner sps/sts with a SM to remind you that you have reached a corner and need to do something different. The remaining rounds are pretty no-brainer, so it is easy to just keep going and forget to make a corner
Round 78
In this round, you will only be working into the ch-2 sps from the previous round.
If you went up a hook size for the previous round, remember to go back to your original hook size for this round.
Join your yarn by making a standing dc in the last ch-2 sp of any side. Make 3 dc in the same sp.
*Ch 2, make 4 dc in the first ch-2 sp of the next side, removing the SM if you used one. (Make 3 dc in the next ch-2 sp) until 1 ch-2 sp rem before the corner sc (94 times). Make 4 dc in the last ch-2 sp.*
Rep from * to * 3 more times, omitting the last 4 dc on the last repeat. Join to the first dc with a sl st. Fasten off and work away your ends.
Stitch Count Per Side: 290 dc, not including ch-2 corner sps.

Round 79
In this round, you will be working between 3-dc groups (except when otherwise specified).
Remember to go up a hook size for this round if you know that you make your ch sts too tight.
Join your yarn by making a standing sc in any ch-2 corner sp around.
*Ch 2, skip the first dc and make a sc between the first dc and the second dc. Ch 2, skip the next 3 dc and make a sc between the fourth dc of the round and the first 3-dc group. (Ch 2, skip the next 3 dc and make a sc between the 3-dc groups) until 4 sts rem. Ch 2, skip the next 3 dc, sc between the last 2 dc. Ch 2, sc in the ch-2 corner sp.*
Rep from * to * 3 more times, omitting the last sc on the last repeat. Join to the first sc with a sl st. Fasten off and work away your ends.
Stitch Count Per Side: 97 sc and 98 ch-2 sps, not including corner sc.
Round 80
In this round, you will only be working into the ch-2 sps from the previous round.
If you went up a hook size for the previous round, remember to go back to your original hook size for this round.
Join your yarn by making a standing dc in the last ch-2 sp of any side. Make 3 dc in the same sp.
*Ch 2, make 4 dc in the first ch-2 sp of the next side. (Make 3 dc in the next ch-2 sp) until 1 ch-2 sp rem before the corner sc. Make 4 dc in the last ch-2 sp.*
Rep from * to * 3 more times, omitting the last 4 dc on the last repeat. Join to the first dc with a sl st. Fasten off and work away your ends.
Stitch Count Per Side: 296 dc, not including ch-2 corner sps.
Round 81
As Round 79
Stitch Count Per Side: 99 sc and 100 ch-2 sps, not including corner sc.
Round 82
As Round 80
Stitch Count Per Side: 302 dc, not including ch-2 corner sps.
Round 83
As Round 79
Stitch Count Per Side: 101 sc and 102 ch-2 sps, not including corner sc.
Round 84
As Round 80
Stitch Count Per Side: 308 dc, not including ch-2 corner sps.
Round 85
Join your yarn by making a standing hdc in any ch-2 corner sp. [Ch 2, hdc] in the same ch-2 sp. BPhdc in the next 308 sts. ([Hdc, ch 2, hdc] in the next ch-2 sp. BPhdc in the next 308 sts) 3 times. Join to the first hdc with a sl st.
Fasten off and work away your ends if you are going to change colours for the next round, otherwise sl st into the next ch-2 corner sp.
Stitch Count Per Side: 310 sts {2 hdc and 308 BPhdc}, not including ch-2 corner sps.
Round 86
- If you are using the same colour: [Ch 1, sc, ch 2, sc] in the ch-2 corner sp.
- If you are using a new colour: Join your yarn by making a standing sc in any ch-2 corner sp. [Ch 2, sc] in the same ch-2 sp. This is your first corner made.
*Skip the first (hidden) st. Sc in the next 309 sts. [Sc, ch 2, sc] in the next ch-2 sp.*
Rep from * to * 3 more times, omitting the last corner on the last repeat. Join to the first sc with a sl st.
Stitch Count Per Side: 311 sc, not including ch-2 corner sps.
Round 87
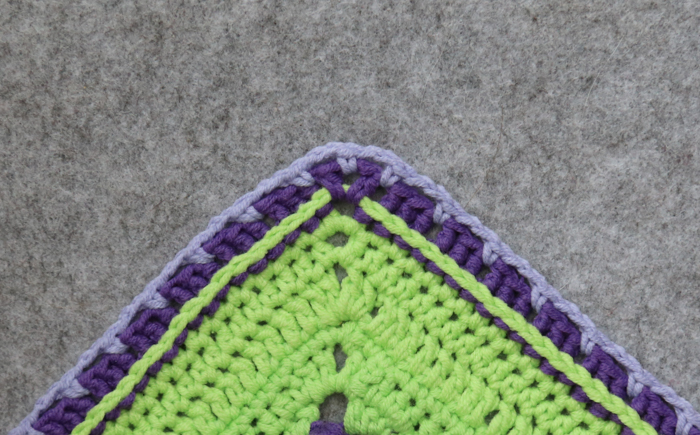
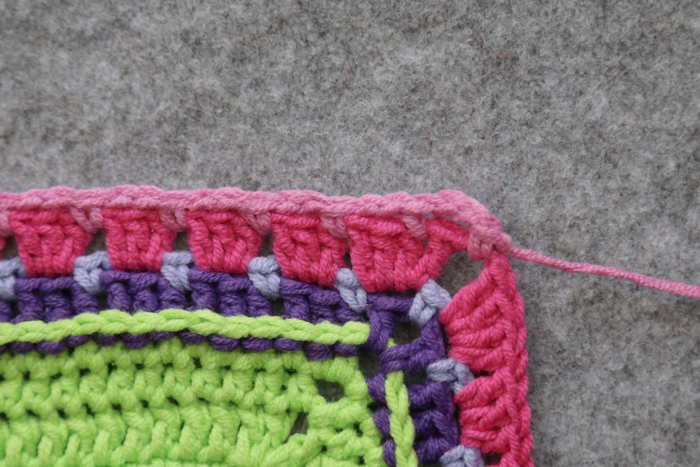
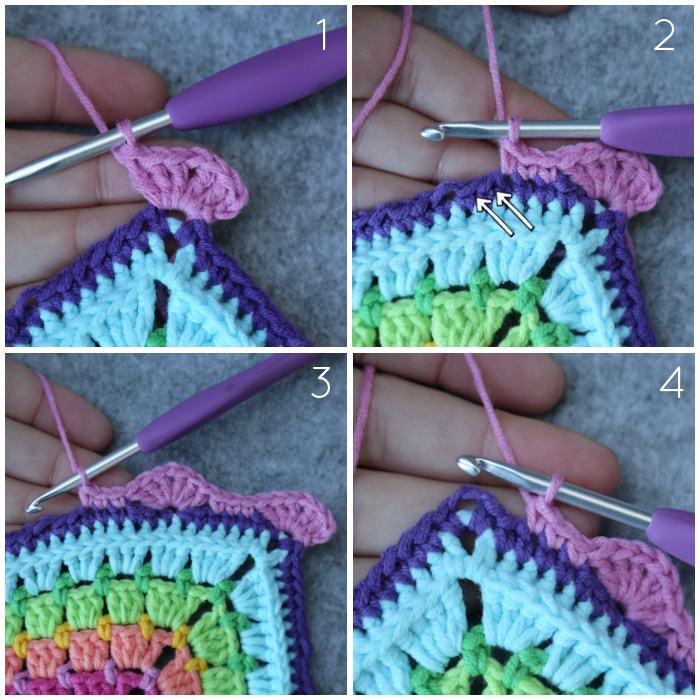
Sl st in the next ch-2 corner sp. [Ch 3, 2 dc, ch 1, 3 dc] in the ch-2 corner sp. This is your first corner Scallop made {Photo 1}.
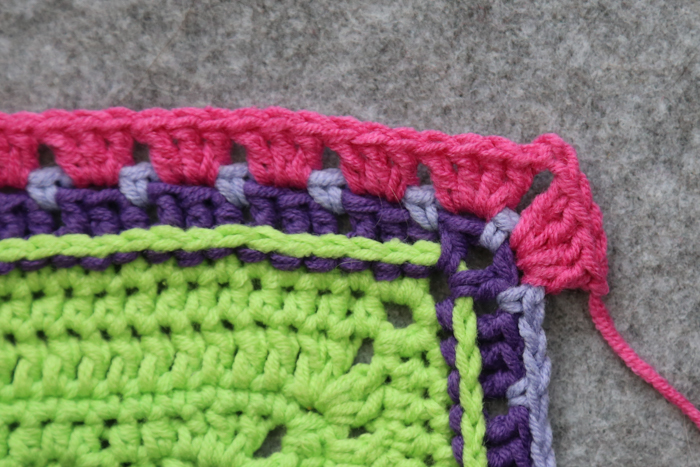
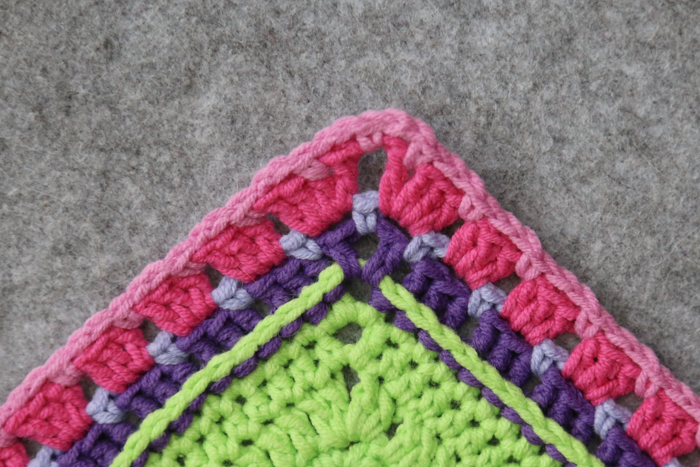
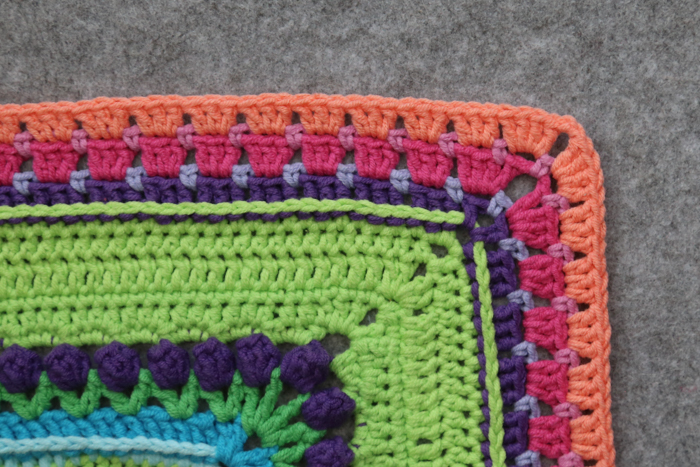
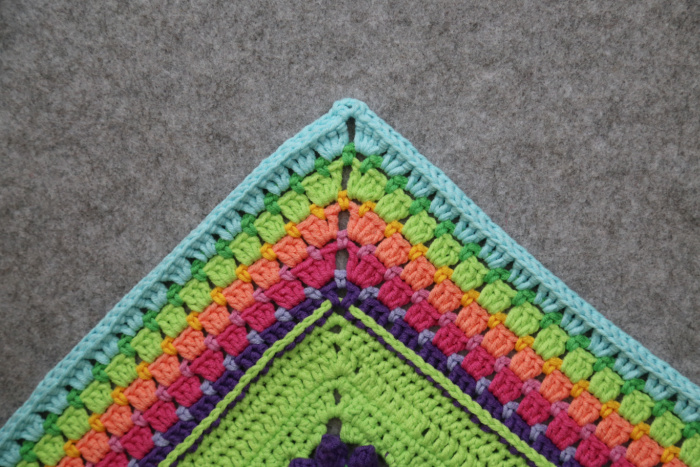
*Skip the next 2 sts, the first of which will be hidden. Sc in the next 3 sts {Photo 2}, skip the next 2 sts {Indicated with arrows in Photo 2}. ([3 dc, ch 1, 3 dc in the next st, skip the next 2 sts, sc in the next 3 sts {Photo 3}, skip the next 2 sts) until you get to the next ch-2 corner sp {Photo 4}. [3 dc, ch 1, 3 dc] in the ch-2 corner sp.*
Rep from * to * 3 more times, omitting the last corner Scallop on the last repeat. Join to the top of the beg ch-3 with a sl st. Fasten off and work away your ends. ALL your ends. Yes, I know you haven’t been working them away as you went!!!
Stitch Count Per Side: 117 sc and 38 Scallops, not including Corner Scallop.
The End!
Now all that remains is a gentle blocking and for you to give yourself a mighty big pat on the back for being AWESOME at crochet.
I hope you have enjoyed going on this adventure as much as I have! I appreciate each and every comment you made, photo you shared, helping-hand extended, and question asked.
Once again I would like to thank Scheepjes for giving me this opportunity, Michael for the Dutch translations and videos, Masako for the gorgeous charts, all my testers and makers for your meticulous notes and sound advice, and the moderators of the Facebook group for being absolute super stars!!!

This blog post contains affiliate links. I only link to products I personally use or would use. All opinions are my own.


ELIZABETH KURATA says
Hi Dedri, I just finished today! Dec 13. I started Oct 13, exactly 2 months! I will lay it out tmro & block it & post a pic on FB. I have absolutely LOVED making this beautiful pattern & plan to do another in different colors! Thank you so much for all the work you put into this amazing design & pattern! By the way, it fits atop a Queen size bed! Wow! I didn’t know it would be so big!
Jenny Lowman says
We are so pleased you enjoyed the journey!