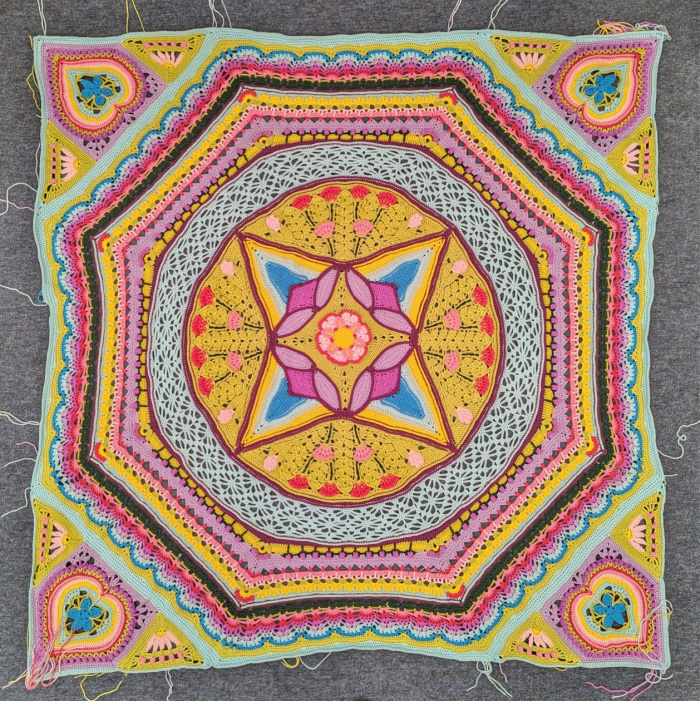
Hello and welcome to Part 11 of the Universe in Bloom CAL 2025. In this part, we will create four Giant Triangles by joining our Triangles (Part 10) and Heart Houses (Gauge Motif). Once we have added a border round to these Giant Triangles, we will add them to the Octagon created in Parts 1 to 9 to create a square. Once we have done THAT, we will add a few rounds, ready to start the border for the blanket in Part 12.
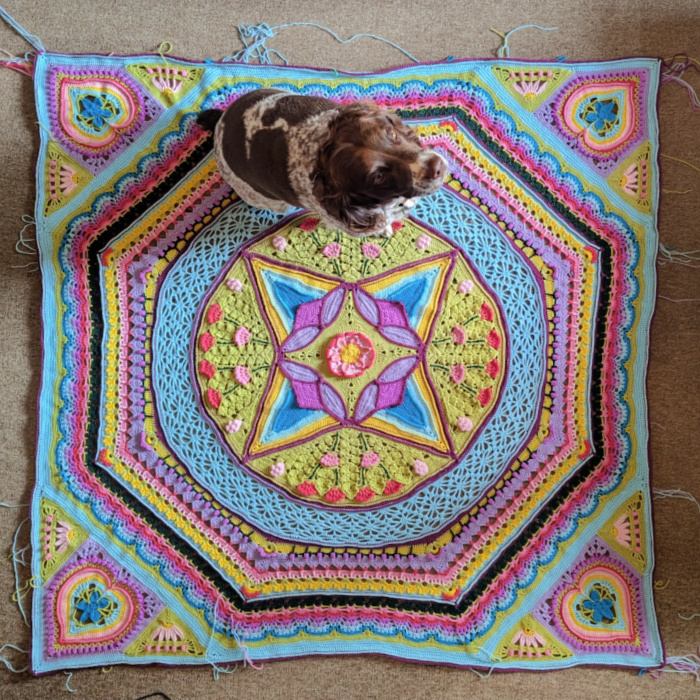
Before I say anything more, I have to caveat the photo above. Do NOT let all the ends I left encourage you to ignore all your ends until the last minute! Usually, I work my ends away as I go, BUT designing is a merciless beast sometimes!
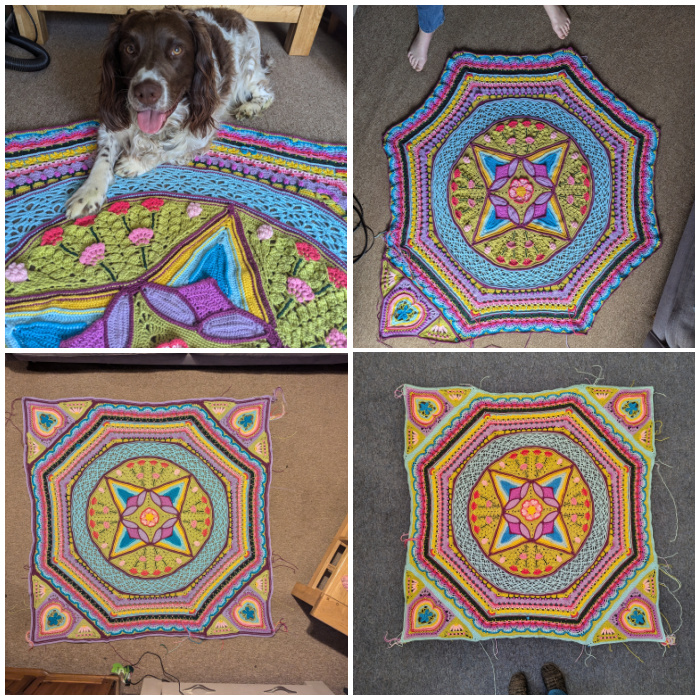
I cannot tell you how many hours I spent getting to this point and frogging back to Part 9. Here are just four of the many failed attempts over a two-month period back in June – August 2024. You’ll notice that each photo has progressively more ends as I realised (I’m not always a fast learner) that this part was NOT a part I could design with the cocky assurance that it would work. In the end, I did not dare work an end away until I was VERY sure that I wouldn’t have to frog the entire part again!
And there were many MANY scribbled notes like this (some of you will appreciate the accidental purple theme):
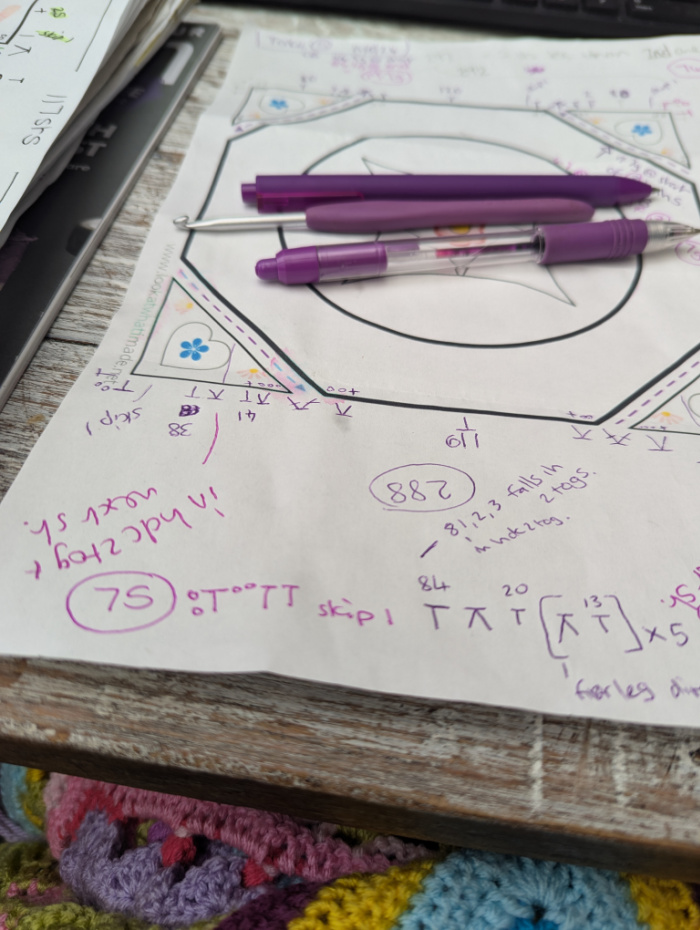
The maths just did not want to math. Finally, I let go of the notion that the maths HAD to math, and went with what my gut said would work. And it did! This is the moment adding all four corners FINALLY worked out. Lunchtime. At work. 16 August 2024.
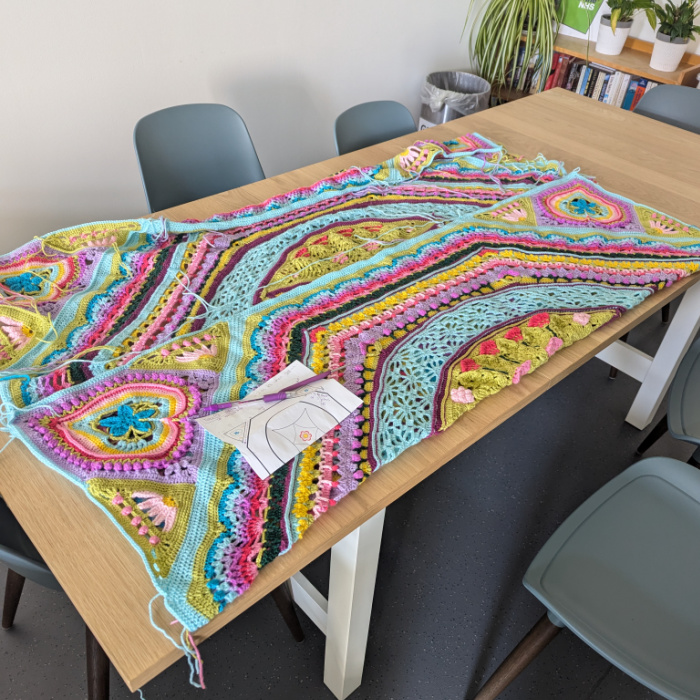
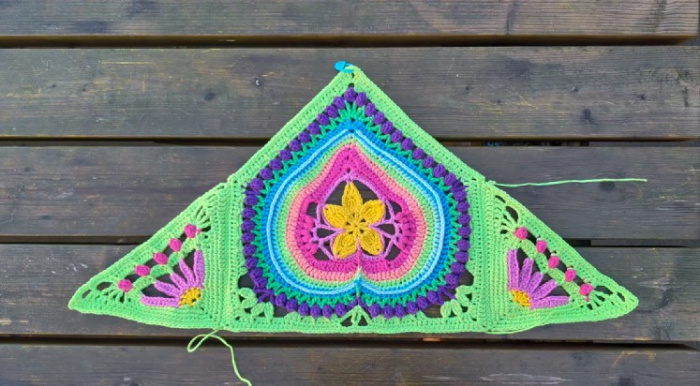
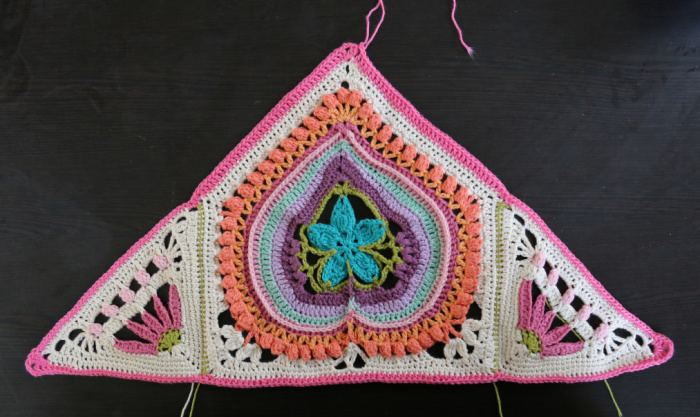
So once I got back to the office, I laid it out on the floor to get a not-so-great-but-totally-YES-I-DID-IT photo…
Man, I loved this challenge SO MUCH!!!
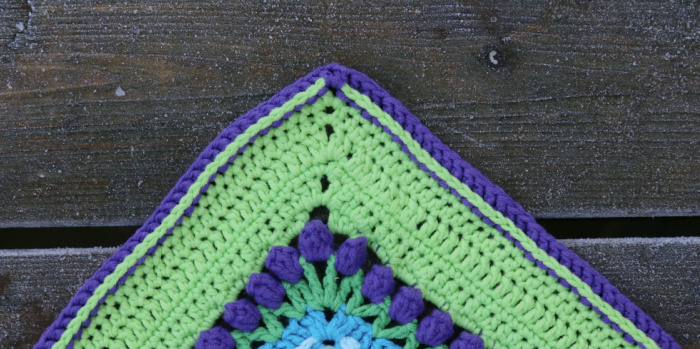
Please note that I have used contrasting colours in the photos below to show the joining and the Border Rounds.
Resources
>>Universe in Bloom Information Post<<
- Universe in Bloom on Ravelry
- PDFs – these contain a condensed version of the pattern below, and can be found on the Scheepjes Website:
- English PDFs (US and UK Terms)
- Dutch PDF
Video Playlists
- English US Terminology
- Dutch
Abbreviations, Special Stitches, Chart Legend
The photo tutorial below uses US Terminology. Please see the Special Stitches and Techniques Post HERE for Photo Tutorials and Chart Legend.
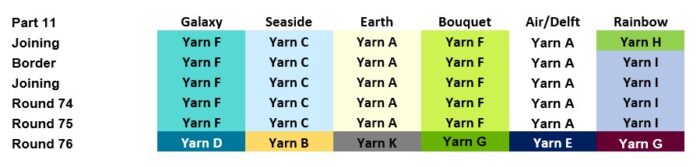
Colours Per Round
Instructions
Joining the Heart Houses and Triangles
You will need to attach a Triangle to each side of each Heart House so that they form Giant Triangles. You can use the same hook for the joining as you have used for the rest of the blanket, but I always find it better to go up a hook size when joining. I prefer my joins to have a little bit of ‘give’/elasticity. The choice is yours.
*Whispers* But I’d go up a hook size, both for this join and when joining the Giant Triangles to the Octagon!

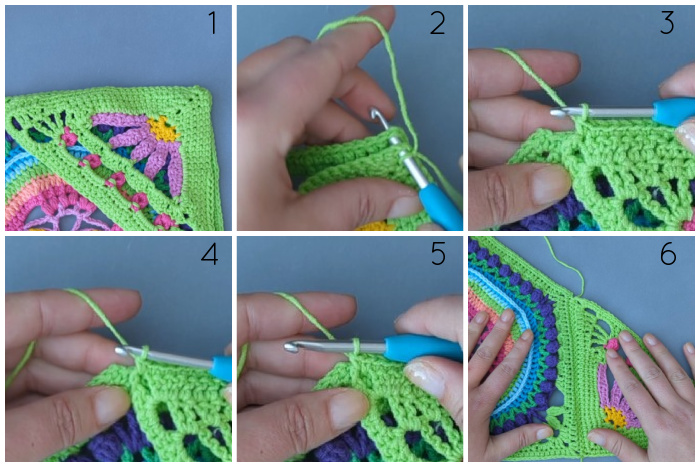
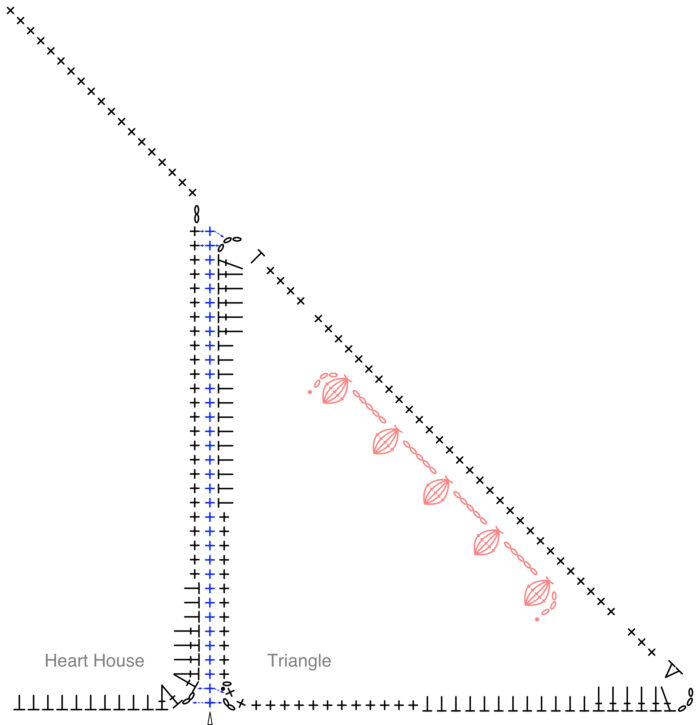
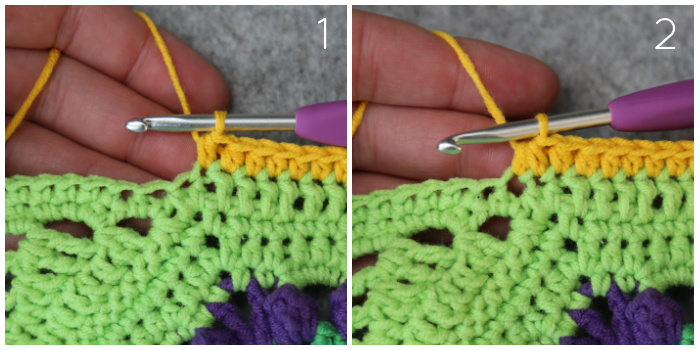
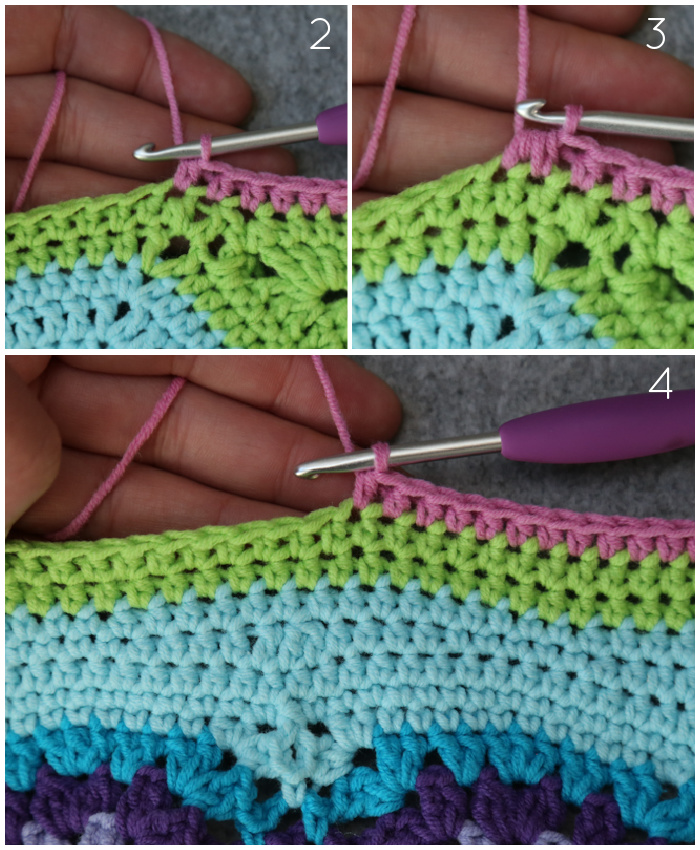
With RS facing each other, line up the right-angle corners of a Triangle and one of the Heart Houses {Photo 1}. Starting in the bottom ch-2 corners, join your yarn by making a standing sc in the ch-2 corner sps (through both layers – Photo 2). Working through both layers, sc in the next 31 sts {Photo 3}.
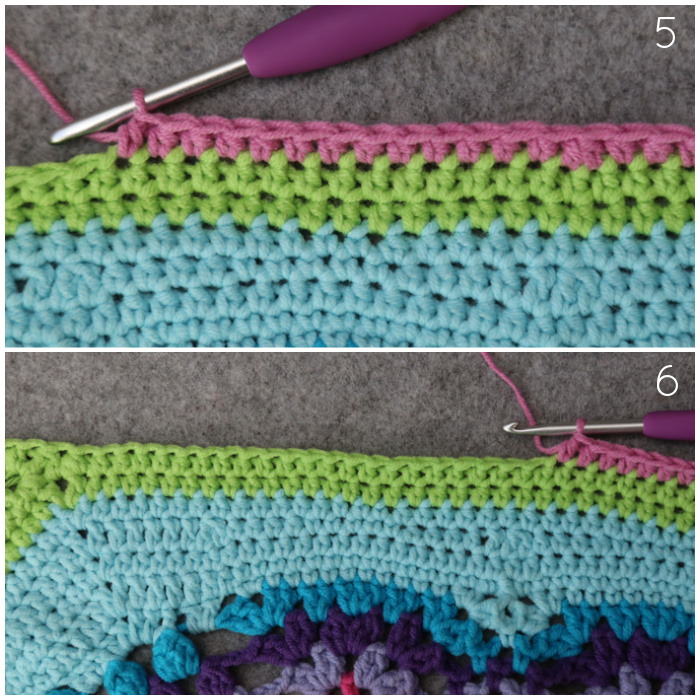
Sc in the ch-3 sp of the Triangle and the next st of the Heart House {Photo 4}. Sc in the same ch-3 sp of the Triangle and the NEXT st of the Heart House {Photo 5}. Fasten off {Photo 6}. {34 sc}
When you have joined one triangle to the heart house, join another triangle to the opposite side in the same way as above.
Tester’s Tip: The Triangle will be on top of the Heart House when joining the one side, and the Heart House will be on top of the Triangle when joining the other side.
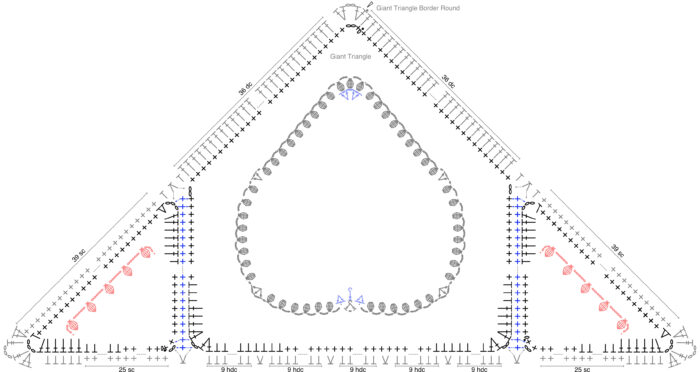
Giant Triangle Border Round
The Giant Triangle will look a tiny bit wonky, especially over the corners of the Triangles. Don’t worry about it. Remember to go back to your regular hook size for the Border Round!!
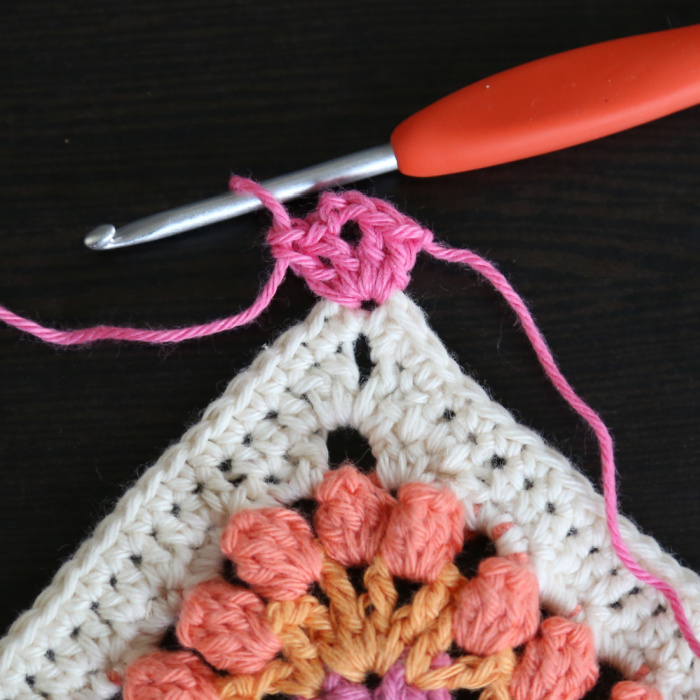
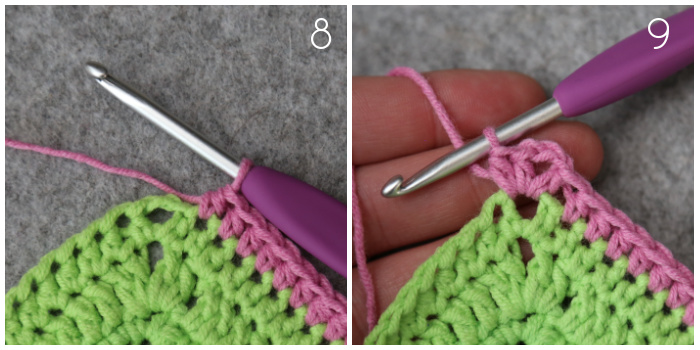
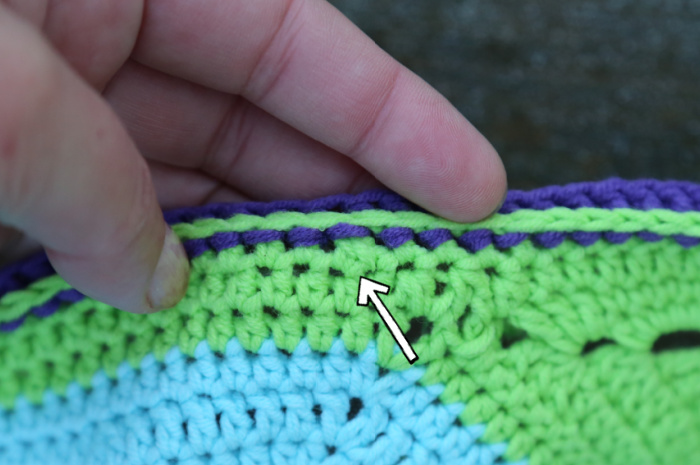
First Corner: Join your yarn by making a standing dc in the marked ch-2 sp of Heart House Round 16. [Dc, ch 2, 2 dc] in the same ch-2 sp.
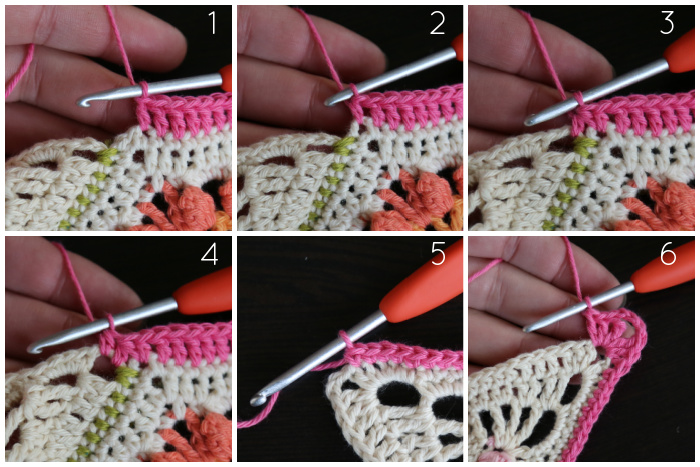
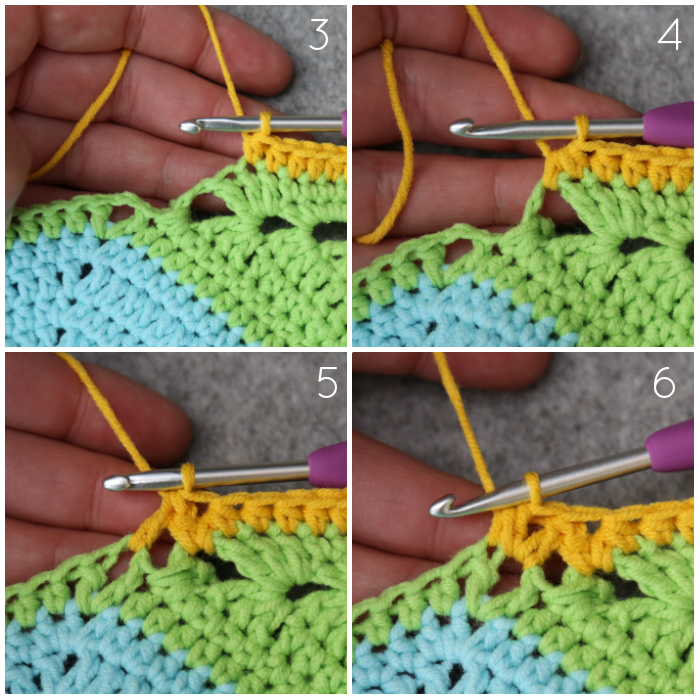
First Side: Skip the first (hidden) st, dc in the next 36 sts {Photo 1}. Hdc in the next ch-2 corner sp {Photo 2}. Hdc2tog in the same ch-2 corner sp and the next ch-3 corner sp {Photo 3}. Hdc in the same ch-3 sp {Photo 4}. Skip the next (hidden) st, sc in the next 39 sts {Photo 5}.
Second Corner: [2 dc, tr, ch 3, tr, 2 dc] in the next ch-3 sp {Photo 6}.
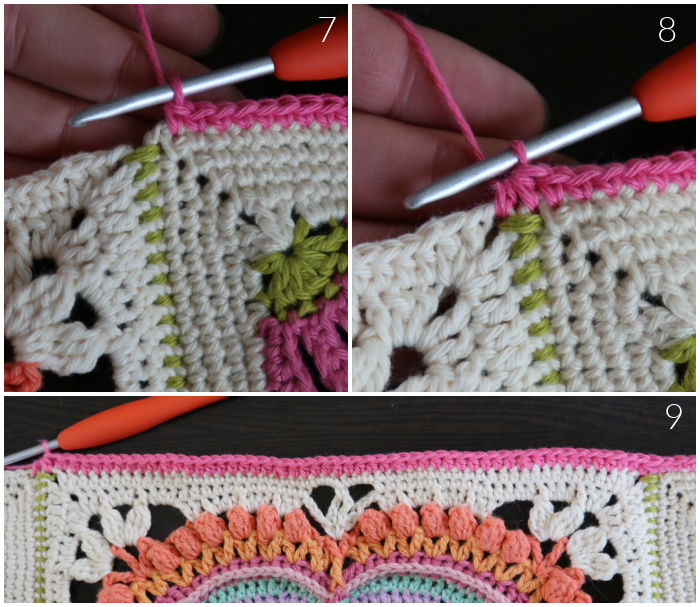
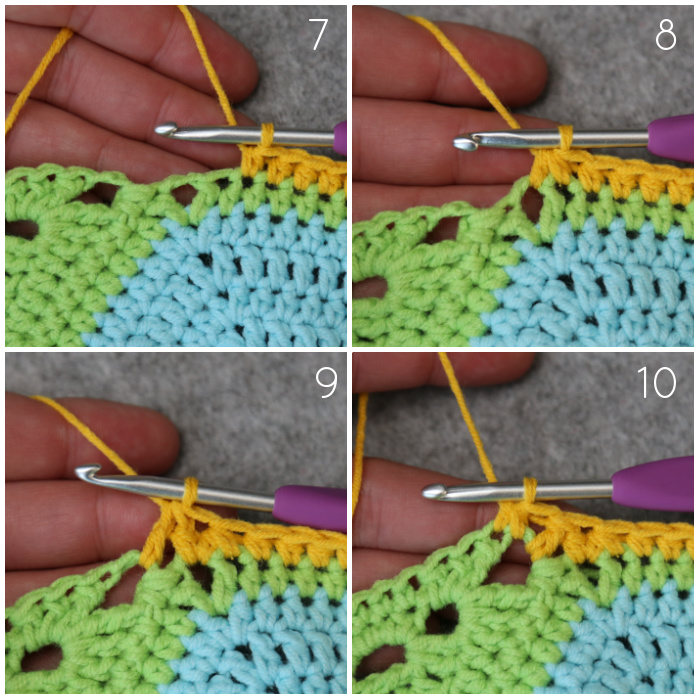
Second Side: Skip the first st, hdc in the next 5 sts, sc in the next 25 sts {Photo 7}. Hdc2tog in the next 2 ch-2 corner sps {Photo 8}. Skip the next st, hdc in the next 9 sts. (Hdc2tog, hdc in the next 9 sts) 4 times. Hdc2tog in the next 2 ch-2 corner sps {Photo 9}. Skip the first st, sc in the next 25 sts, hdc in the last 5 sts.
Third Corner: [2 dc, tr, ch 3, tr, 2 dc] in the next ch-3 sp.
Third Side: Skip the first (hidden) st. Sc in the next 39 sts, hdc in the next ch-3 sp. Hdc2tog in the same ch-3 sp and the next ch-2 sp. Hdc in the same ch-2 sp. Skip the next st, dc in the 36 sts. Join to the first dc with a sl st. Fasten off and work away your ends.
Stitch Counts (counting from corner sp to corner sp, not including corner sps):
- Per Short Side: 83 sts {39 sc, 2 hdc, 1 hdc2tog, 40 dc, and 1 tr}
- Long Side: 117 sts {50 sc, 55 hdc, 6 hdc2tog, 4 dc, and 2 tr}
Joining the Giant Triangles to the Octagon
You will be joining the Giant Triangles to the four sides of the Octagon that fall over a Large (pointy) Petal. Visually, I prefer it this way, but you are, of course, welcome to join them to the other four sides if you prefer.
When joining the Giant Triangles to the Octagon, it will look like they are too small compared to the sides of the Octagon. Do not worry about this.
Once you have joined them, give them a good tug to get rid of the puckering between the Giant Triangles and the sides.
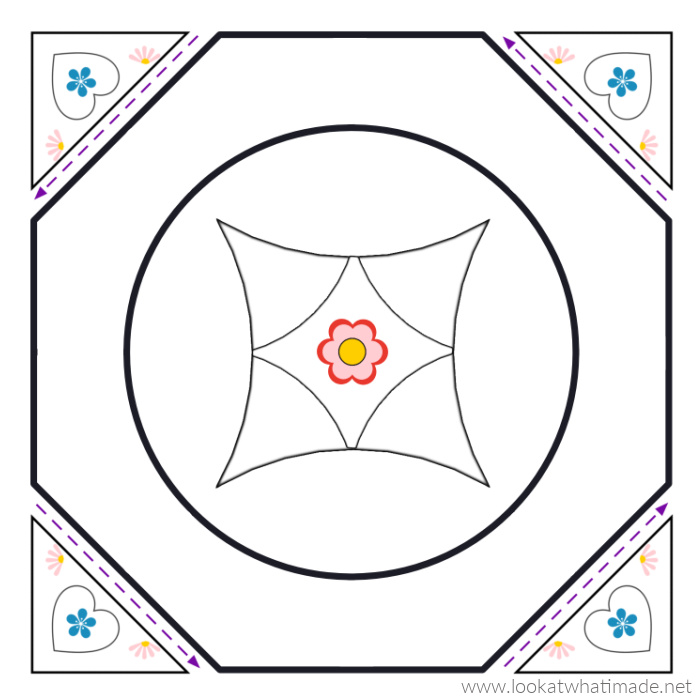
With RS facing each other, line the long side of a Giant Triangle up with one of the indicated sides of the Octagon.

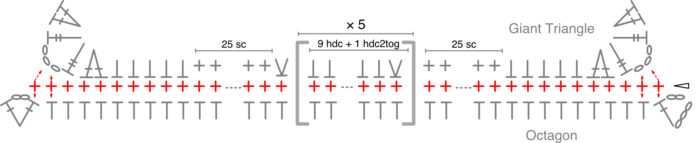
Join your yarn by making a standing sc in the ch-3 corner sp of the Giant Triangle and the first st after the corner ch-2 sp of the Octagon {Photos 1 and 2}. Make a sc into the same ch-3 sp of the Giant Triangle and the next st of the Octagon {Photo 3}. Sc in the next 117 sts {Photo 4}. Sc in the next ch-3 sp of the Giant Triangle and the next st of the Octagon {Photo 5}. Sc in the same ch-3 sp of the Giant Triangle and the last st of the Octagon {Photo 6}. Fasten off and work away your ends.
Photo 8 shows what the start of the join looks like on the Right Side so that you can see where the first stitches fall. Photo 7 shows what the end of the join looks like on the Right Side so that you can see where the last stitches fall.
![]()
Stitch Count: 121 sc
Repeat this for all four corners so that you end up with a square again.
Border
Round 74
Join your yarn by making a standing hdc in any ch-2 corner sp around. Ch 2, hdc in the same ch-2 corner sp. This is your first corner made.
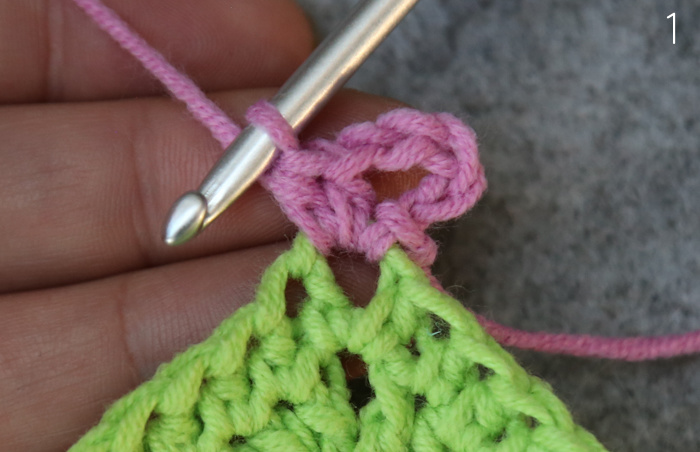
*Skip the first (hidden) st. Hdc in the next 38 sts {Photo 1}. Hdc2tog over the next 2 sts, which will be the hdc2tog from the previous round and the next st {Photo 2}.
Hdc in the next 41 sts {Photo 3}. Hdc2tog over the next st and the next ch-3 corner sp {Photo 4}. Dc2tog in the same ch-3 corner sp and the next ch-2 corner sp {Photo 5}. Hdc2tog in the same ch-2 corner sp and the next st {Photo 6}.
Hdc in the next 119 sts {Photo 7}. Hdc2tog over the next st and the next ch-2 corner sp {Photo 8}. Dc2tog in the same ch-2 corner sp and the next ch-3 corner sp {Photo 9}. Hdc2tog in the same ch-3 corner sp and the next st {Photo 10}.
Hdc in the next 42 sts {Photo 11}. Hdc2tog over the next 2 sts, which will be the hdc2tog from the previous round and the next st {Photo 12}. Hdc in the last 38 sts {Photo 13}. [Hdc, ch 2, hdc] in the next ch-2 corner sp {Photo 14}.*

Repeat from * to * 3 more times, omitting the last corner on the last repeat. Join to the first hdc with a sl st.
Stitch Count Per Side: 288 sts {280 hdc, 6 hdc2tog, and 2 dc2tog}, not including ch-2 corner sps.

Round 75
The corners on this round are asymmetric.
Sl st in the next ch-2 corner sp. Ch 4 (counts as hdc + ch-2 sp). Make 2 hdc in the same ch-2 sp. This is your first corner made {Photo 1}.
*Skip the first (hidden) st. Hdc in the next 84 sts {Photo 2}. Hdc2tog {Photo 3}, hdc in the next 20 sts {Photo 4}.
(Hdc2tog, hdc in the next 13 sts {Photo 5}) 5 times {Photo 6}.
Hdc2tog, hdc in the next 18 sts {Photo 7}.

Hdc2tog, hdc in the last 84 sts {Photo 8}. [Hdc, ch 2, 2 hdc] in the next ch-2 corner sp {Photo 9}.*
Repeat from * to * 3 more times, omitting the last corner on the last repeat. Join to the second ch of the beg ch-4 with a sl st. Fasten off and work away your ends.
Stitch Count Per Side: 282 sts {274 hdc and 8 hdc2tog}, not including ch-2 corner sps.

Round 76
When doing this round, take special care when working around hdc2tog sts so that you don’t accidentally work around them twice.
Join your yarn by making a standing hdc in any ch-2 corner sp. [Ch 2, hdc] in the same ch-2 corner sp. BPdc around the next 282 sts. ([Hdc, ch 2, hdc] in the next ch-2 corner sp. BPdc around the next 282 sts) 3 times. Join to the top of the first hdc with a sl st. Fasten off and work away your ends.
Stitch Count Per Side: 2 hdc and 282 BPdc, not including ch-2 corner sps.

Yay! We are so close to having a completed blanket! I took her out for a photo this morning. I figured you’d like to share our frost if you are living in warmer parts of the world :)
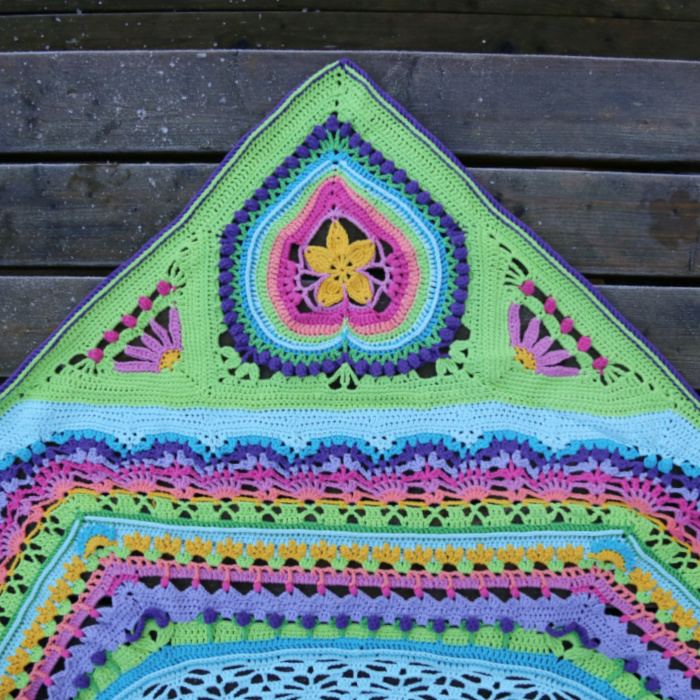
I can’t wait to see you next week for Part 12!

This blog post contains affiliate links. I only link to products I personally use or would use. All opinions are my own.


Rosemary Platt says
Dear Dedri,
There is a shortage of colour 1822 here in the UK.
No suppliers have stock of this shade. Amazon have intimated that this colour is being discontinued.
Some of our group members on Ravelry are worried about this.
Is this true, or just rumour?
Please could you clarify the situation.
Thank you,
Rosy Platt
Jenny Lowman says
Hi Rosy, I think you are better off contacting Scheepjes directly, as the will be the best people to answer this query.