Every time I go Lyme Regis, I come home with a bunch of treasures from the beach. The fool’s gold I picked up at my very first Devon Sun Yarns Retreat two years ago is still so shiny that I am beginning to wonder if it isn’t real gold. This crochet hook roll is my nod to the beautiful ammonites and sparkly iron pyrite that grace the shores of the Jurassic Coast.
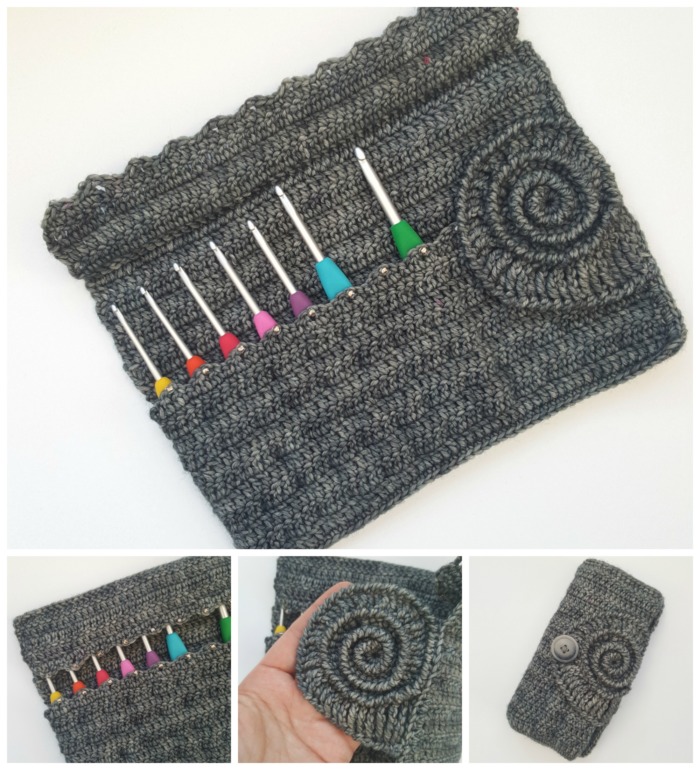
I know that there are already loads of patterns out there for crochet hook rolls, but I wanted to find a way to make a roll by shaping the ‘pockets’ horizontally instead of vertically (if that makes sense). I am so pleased with how it turned out.
Ammonite Crochet Hook Roll Pattern
© Dedri Uys 2017. All Rights Reserved.
This pattern was designed for the October 2017 Yarn Retreat with Devon Sun Yarns.
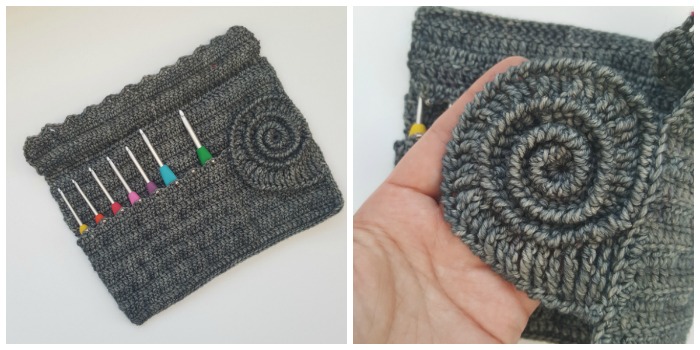
The pattern is designed to fit the majority of the hooks I featured in my hook review HERE. You can always add more initial repeats or rows to make your hook roll bigger.
Resources
- Video Tutorial by Esther Dijkstra from It’s All in a Nutshell
- Add This Pattern to Your Ravelry Queue
- German Translation by Mona Llau, Nathalie Llau, and Astrid Seidel
- Hashtag: #amonitecrochethookroll
Materials
- 4 mm crochet hook (I use Clover Amour, available on Amazon.com and Amazon.co.uk)
- Devon Sun Yarns Sprightly DK – 65g
- 6/0 beads (24) – I used Toho Gold-lined Crystal beads, available from Amazon.co.uk. If you are in the US, you can find similar beads HERE on Amazon.com.
- Beading needle (I use Shappy beading needles, available on Amazon.com and Amazon.co.uk)
- Button (roughly 2 cm or just under an inch)
Even though I used a simple grey yarn for my hook roll, I think these hook rolls look wonderful in any kind of yarn – variegated, stonewashed, ombre, speckled. Don’t be afraid to experiment!
Here are just some of the rolls made at the last Devon Sun Yarns Retreat.

Abbreviations
US Terminology
- Ch – Chain
- Dc – Double crochet (yarn over once)
- Dtr – Double treble crochet (yarn over 3 times)
- Hdc – Half-double crochet
- Quadtr – Quadruple treble crochet (yarn over 5 times)
- Quintr – Quintuple treble crochet (yarn over 6 times)
- Sexttr – Sextuple treble crochet (yarn over 7 times)
- Sc – Single crochet
- Sl st – Slip stitch
- SM – Stitch marker
- Sp/sps – Space/spaces
- St/sts – Stitch/stitches
- Tr – Treble crochet (Yarn over twice)
- Ttr – Triple treble crochet (yarn over 4 times)
- () – Repeat the instructions between parentheses the number of times specified.
Special Stitches
- BP (Back Post) – Identify the post of the stitch you want to work around. Insert your hook from the back to the front and then from the front to the back around the post of the stitch so that the post lies behind your hook. Complete your stitch as normal. You might find it easier to twist your work forward so that you can see what you are doing.
- FP (Front Post) – Identify the post of the stitch you want to work around. Insert your hook from the front to the back and then from the back to the front around the post of the stitch so that the post lies on top of your hook. Complete your stitch as normal.
- Standing stitches – Standing stitches are the same as regular stitches, except that they are made ‘in air’, without being attached to a previous stitch. Start with a slip knot already on your hook and complete the stitch as normal.
- Crab Stitch – Start with a Standing Single Crochet. To make the next stitch, swing your hook under your hand, by twisting your wrist, and insert it into both loops of the stitch BEFORE the stitch you just worked into. Yarn over and pull up a loop. Yarn over and pull through both loops on your hook. Continue making your stitches in this way, inserting your hook into both loops of the stitch before the stitch you just worked into each time.
Gauge
21 sts and 12 rows in a 10 cm (4”) square using dc.
I crochet quite tightly, so if you absolutely refuse to do a gauge swatch, and you know you crochet loosely, you will have to go down a hook size.
Size
24 cm (9.5”) x 16 cm (6.3”)
Notes
This hook roll has 12 ‘pockets’.
- If you would like to make more ‘pockets’, you will need to add 8 ch sts to the starting ch for each extra pocket.
- If you would like to make fewer ‘pockets’, you will need to subract 8 ch sts from the starting ch for each pocket you wish to remove.
If you do change the number of pockets, please keep in mind that you will need to alter the SM reference in Row 1. To do this, divide your initial ch sts by 2 and place the st marker in that st.
Instructions
For this photo tutorial, I have used Scheepjes Stonewashed (Smokey Quartz and Lemon Quartz) and a 4 mm hook, which will produce the same size hook roll as the materials listed. I have changed colours on Rows 2 and 3 to make it easier to see what goes where.
Bottom of Hook Roll
Row 1
You will mark the 51st ch with a Stitch Marker (SM). Keep this Stitch Marker in until you are instructed to remove it.
Ch 102, marking the 51st ch with a SM. Dc in the 4th ch from the hook and each ch across. Turn. {100 dc – including beg ch-3}
Row 2
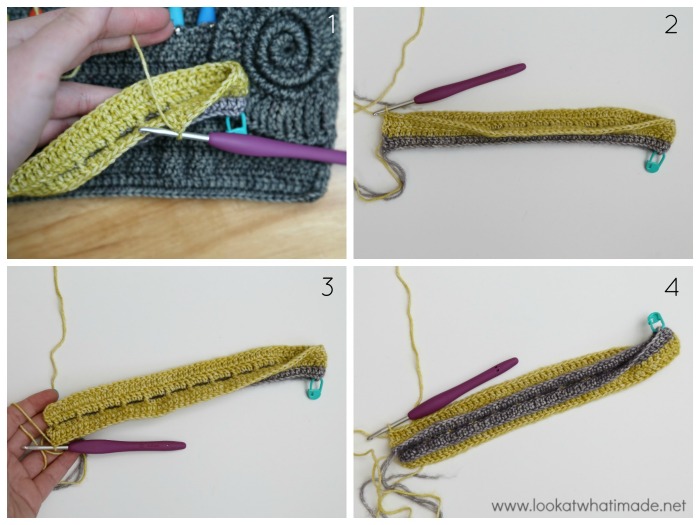
In this row, we will start forming the ‘pockets’ that will hold the crochet hooks. This round has LOADS of photos, but that is only because the technique used to form the pockets is quite tricky to explain in words. Once you have done this round, the rest will be much more straightforward.
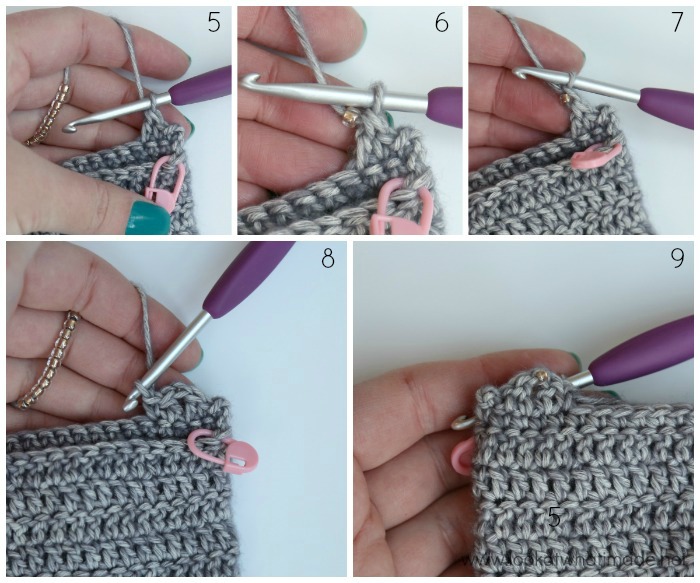
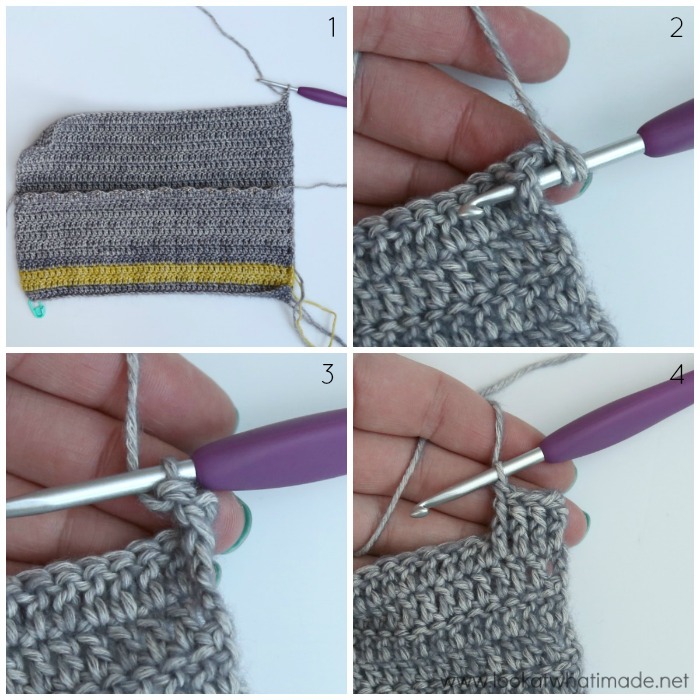
Ch 3 (counts as first dc throughout). Fold the first row in half, with the end farthest away from the hook in front of the end closest to the hook {Photo 1}. Skip the beg ch-3 of Row 1, yarn over and insert your hook into the next dc {indicated with a white arrow in Photo 2 and illustrated in Photo 3}. Then insert your hook into the second-to-last dc of Row 1 directly behind it {indicated with a black arrow in Photo 2 and illustrated in Photo 4}. Make a dc through both layers. I’m going to call this a ‘catching dc’ in subsequent rows. Photo 5 shows the ‘catching dc’ from the front. Photo 6 shows the ‘catching dc’ from the top.
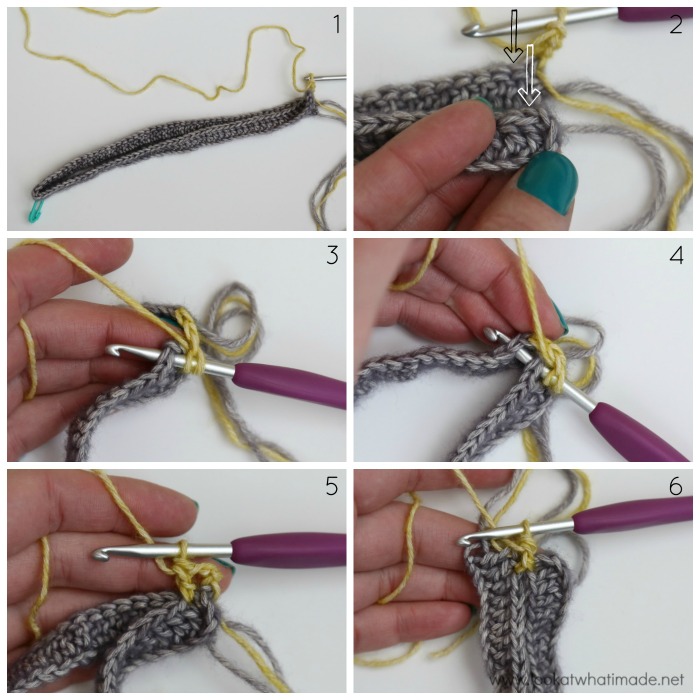
Dc in the next 3 sts of the back layer {Photo 7}. Skip the next 3 sts of the front layer and make a dc through the next st of both layers {Photos 8 – 10}. You will notice that this forms a pocket that your crochet hook should be able to fit into {Photo 11}. (Dc in the next 3 sts of the back layer. Skip the next 3 sts of the front layer and make a dc through the next st of both layers) 10 more times {Photo 12}.
If you look at your work, there should be 8 sts left unworked to the left of the last ‘catching dc’ (right, if you are left-handed) – see Photo 13. If you have any problems with this part, please see the video tutorial and skip to 11:10.
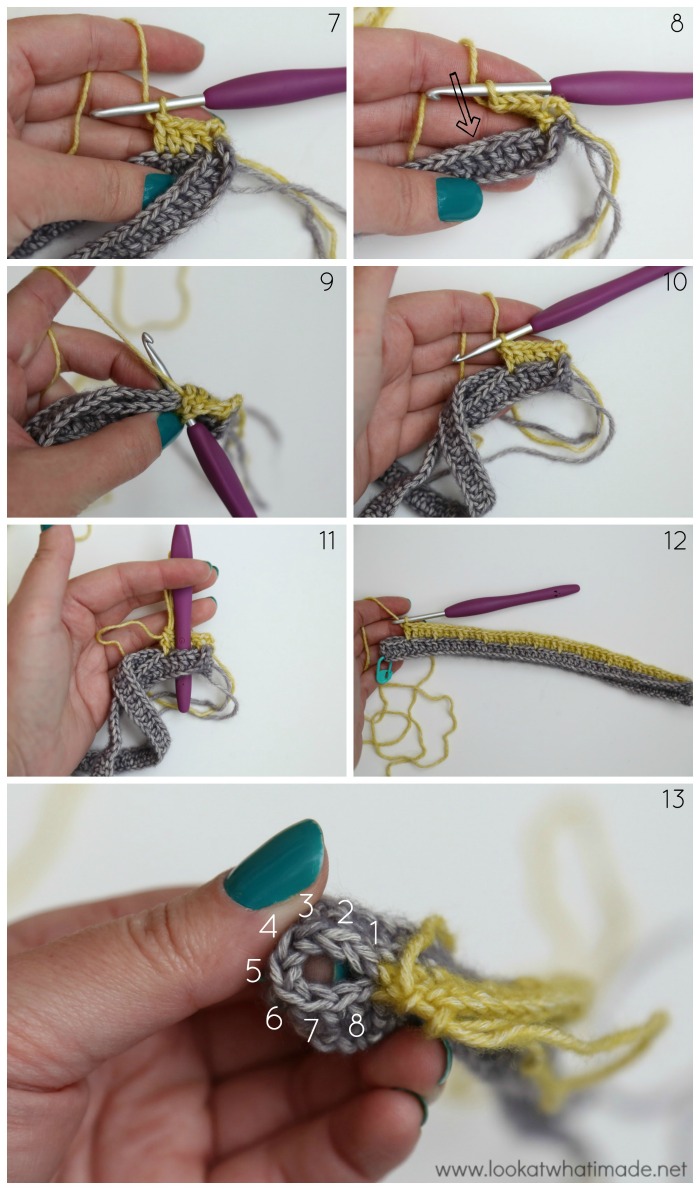
Dc in the next 4 sts of the back layer. This will bring you to the fold {Photo 14}. Dc in the next 4 sts {Photo 15}. Dc in the next st, which should already contain a catching dc {Photos 16 and 18}. (Dc in the next 3 sts {visible in Photo 19}, dc in the next st, which already contains a catching dc) 11 times {Photo 20}. Dc in the last st, which will be the top of the beg ch-3 from the previous round – indicated with an arrow in Photo 20 and illustrated in Photo 21}. Turn. {100 dc}
Row 3
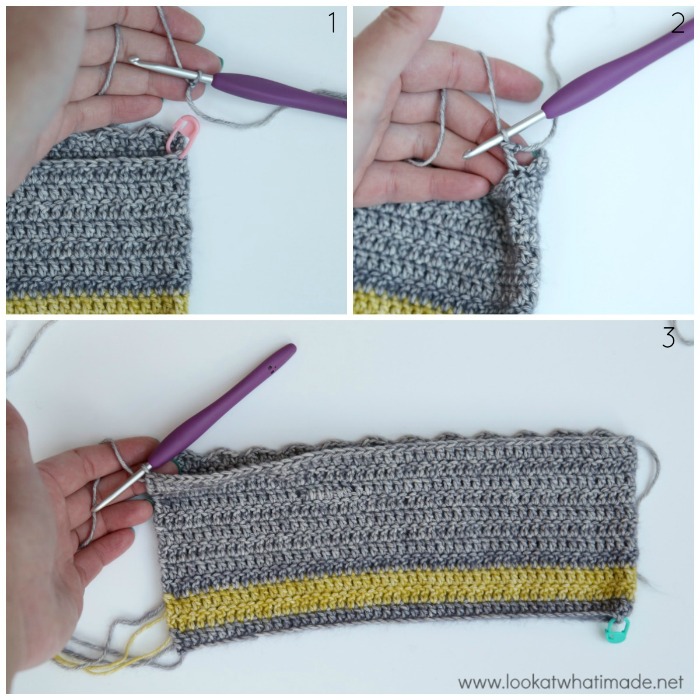
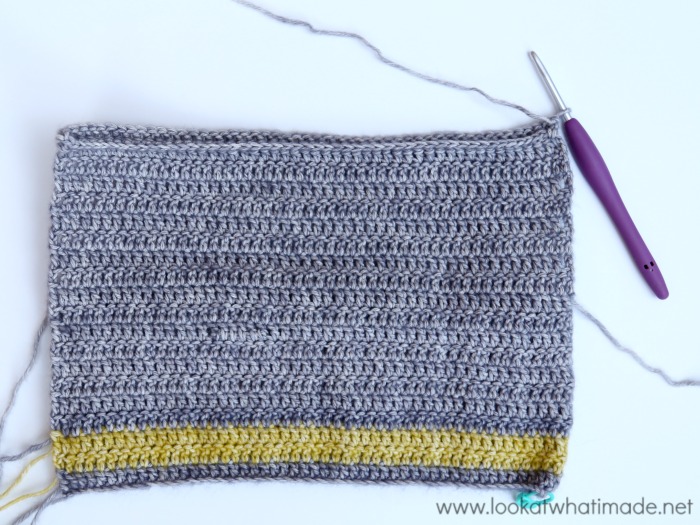
Ch 3, dc in each st {Photos 1 and 2}. Turn. {100 dc}
Photos 3 and 4 show what your work should look like at the end of this round (from the top and the bottom).
Row 4
This row is similar to Row 2.
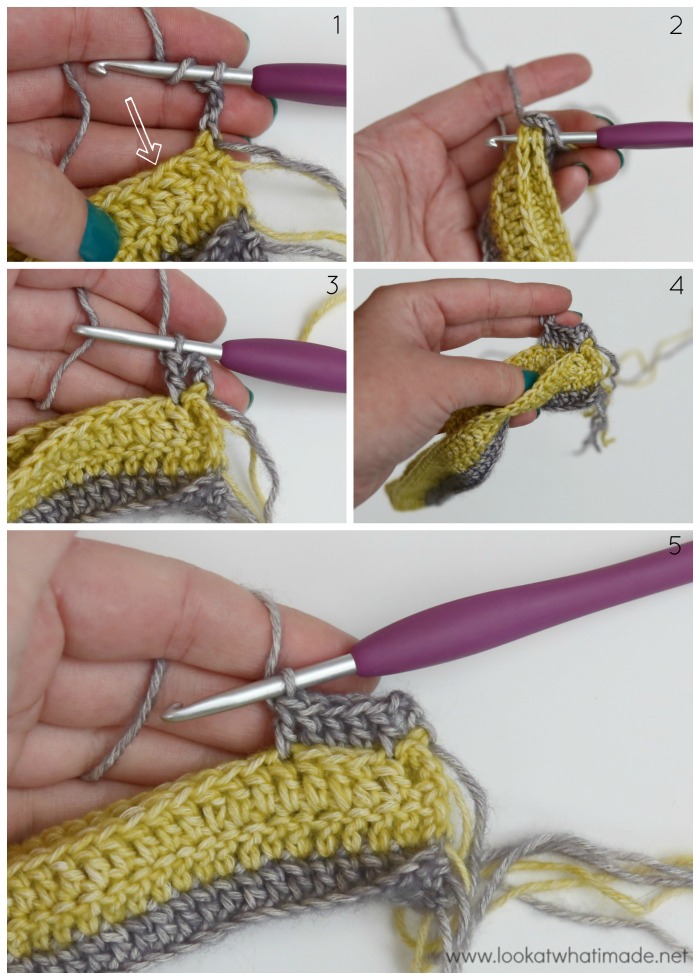
Ch 3. Skip the beg ch-3 of the previous row and make a catching dc in the next dc and the second-to-last dc directly behind it {indicated with an arrow in Photo 1 and illustrated in Photos 2 and 3}. (Dc in the next 3 sts of the back layer {Photo 4}. Skip the next 3 sts of the front layer and make a catching dc through the next st of both layers {Photo 5}) 11 times.
Dc in the next 4 sts of the back layer. This will bring you to the fold. Continue around, making a dc in each remaining st, including the ones that already contain a catching dc. Remember to make your last dc in the beg ch-3 of the previous row. Turn. {100 dc}
Rows 5 – 10
Repeat Rows 3 and 4.
Row 11a
In this row, you will only be working into the first 50 sts.
Ch 1, sc in the first 50 sts.
Mark the next st of the previous row with a SM. Turn. {50 sc}
Row 12a
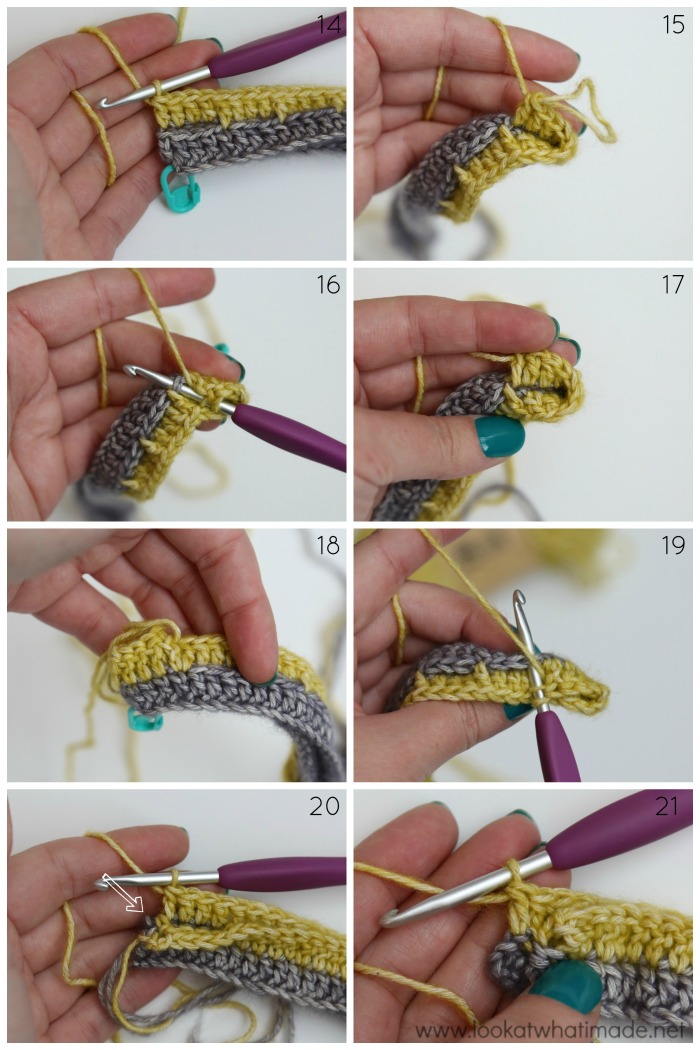
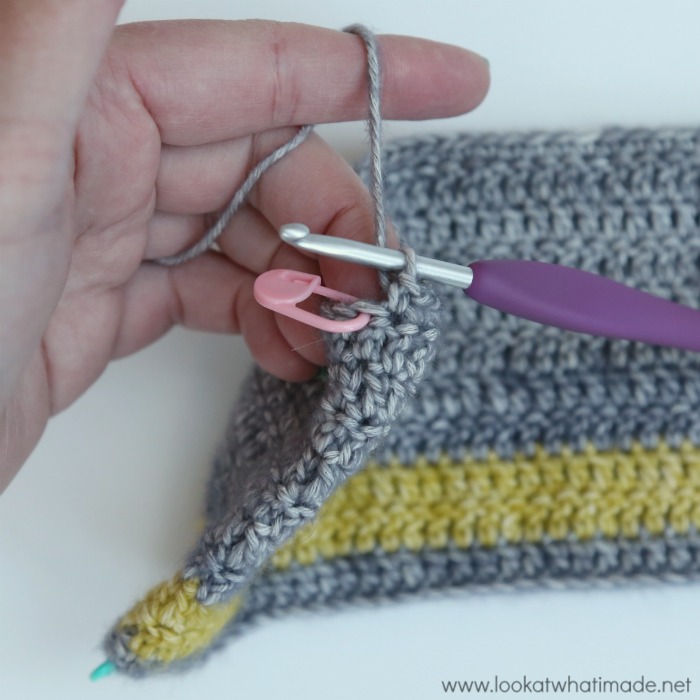
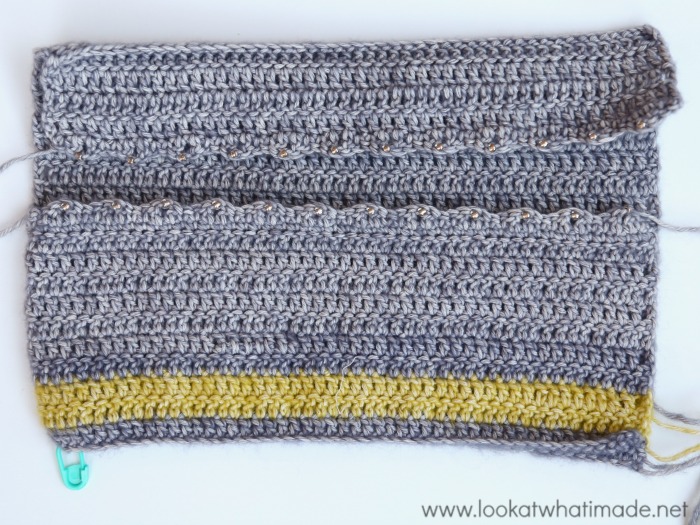
Before you start, cut your yarn, leaving a 4m end {Photo 1}. Thread 12 beads onto this end and push them along the yarn until they are about 20 cm away from your hook {Photos 2 – 4}.
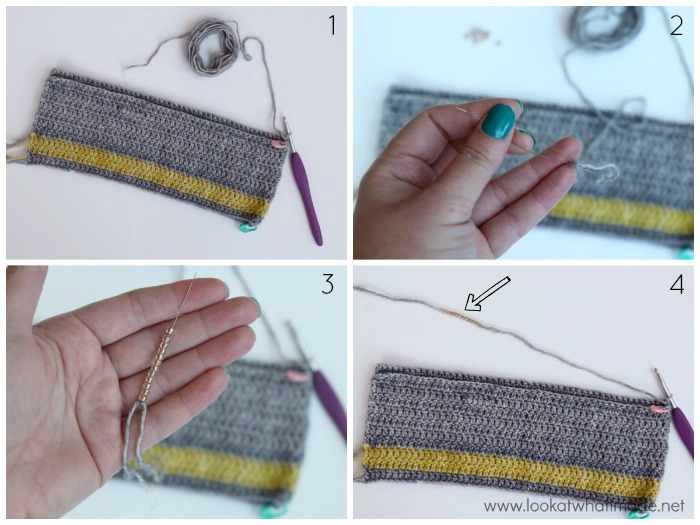
Ch 1, sl st in the first st. (Sc in the next st, dc in the next st {Photo 5}. Move one of the beads until it abuts your hook {Photo 6}. Ch 1, enclosing the bead in the ch {Photo 7}. Dc in the next st, sc in the next st {Photo 8}) 12 times. Sl st in the last st. Fasten off and work away your ends. {12 ‘Petals’, each containing 2 sc, 2 dc, and 1 ch-1 sp with a bead in it}
The beads will pop to the back of your work (which will be the inside of the hook roll). Photo 9 shows the bead from the back.
Top of Hook Roll
Hint: On even-numbered rows, the inside of the hook case (the side with the beaded edge) should be facing you.
Row 11b
Join your yarn by making a standing dc in the next (marked) st of Row 10 {Photos 1 and 2}. Dc in the remaining 49 sts {Photo 3}. Turn. {50 dc}
Row 12b
Ch 3, dc in the remaining 49 sts. Turn. {50 dc}
Rows 13 – 19
As Row 12b.
Top Flap
Row 20
With the Inside of the hook case facing you, ch 2 (doesn’t count as a st) – Photo 1. Make a FPdc around each of the 50 sts across {Photos 2 – 5}. Turn. {50 FPdc}
This is Row 20 completed and turned for the start of Row 21.
Rows 21 – 23
As Row 12b.
Row 24
As Row 12 a, with the inside of the hook case facing you.
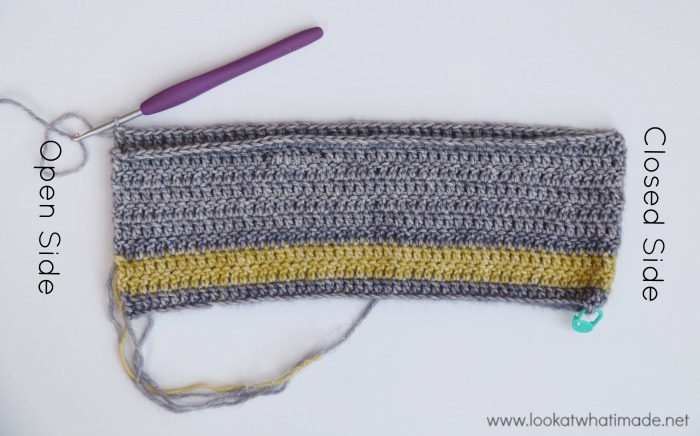
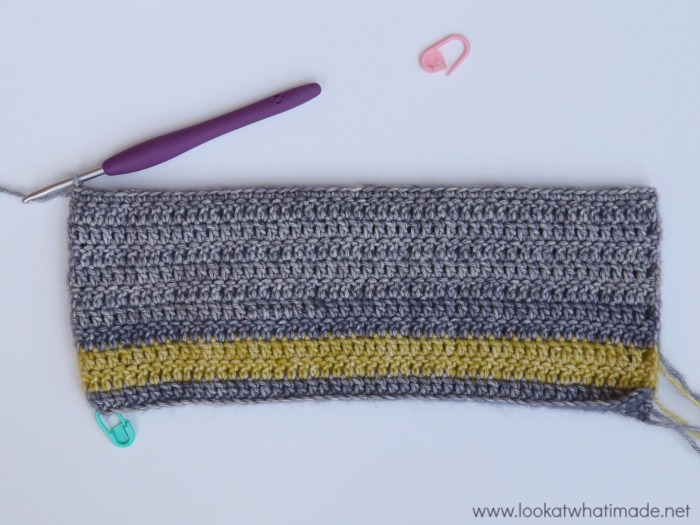
Seam and Closure
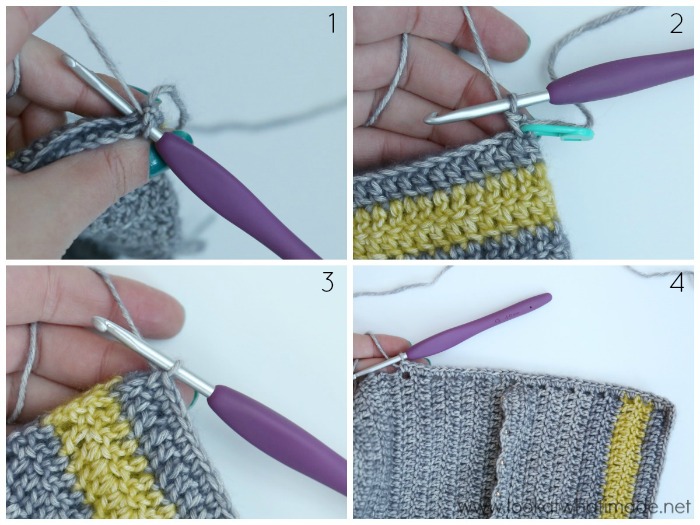
Turn your hook case so that the beaded side (inside) is facing you and the foundation chain is at the top. You will be working into the remaining loops (and through both layers) of the foundation chain to close the bottom and the open side of the hook roll.
Bottom
You can remove the SM once you have worked into that stitch.
Join your yarn by making a standing sc in the marked st of the foundation row (working through both layers) – Photos 1 and 2. Still working through both layers, sc in the remaining 49 chains. The last sc will fall in the bottom of the beg ch-3. {50 sc}
Side
When closing the side, you will be working between the first and second dc’s of each row. Please remember that the beg ch-3 of each row counts as a dc.
Ch 2, sc in the same st as the last sc from the Bottom. Working through both layers, make 2 sc in each of the first 10 rows. Working only into the back layer, make 2 sc in each of the next 9 rows {Photos 3 and 4}. Fasten off and work away your ends. {39 sc}
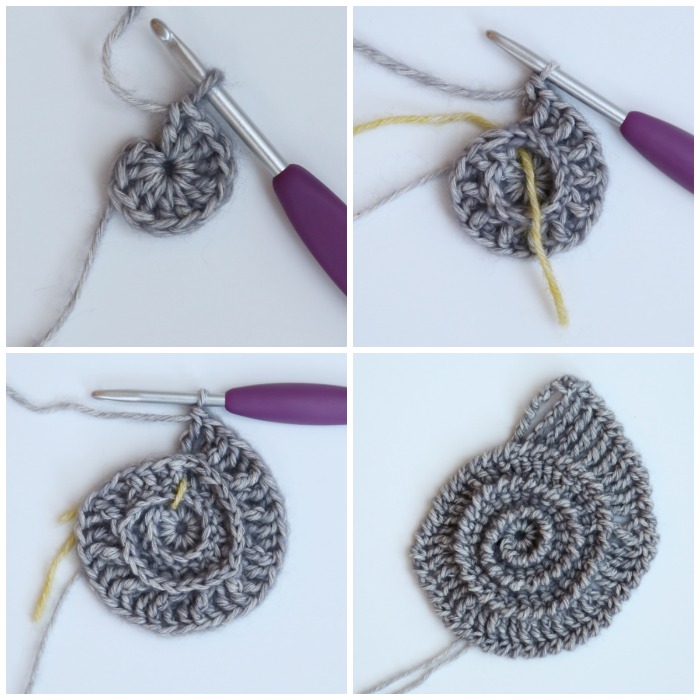
Ammonite Closure
Worked in a spiral. Round 4 can get a bit hairy with all the yarn-overs! I suggest writing the number of yarn-overs above the stitch instructions to make it easier.
Round 1
Into a magic ring, ch 1 (doesn’t count as a st), hdc, 11 dc. {12 sts – 1 hdc, 11 dc}
Round 2
Make 2 dc in the next st. Make 2 BPdc around each of the remaining 11 sts. {24 sts – 2 dc, 22 BPdc}
Round 3
(Make 2 BPdc around the next st, BPdc around the next st) twice. (Make 2 BPtr around the next st. BPtr around the next st) 10 times. {36 sts – 6 BPdc and 30 BPtr}
Round 4
(Make 2 BPdtr around the next st. BPdtr around the next st) 7 times. (Make 2 BPttr around the next st. BPttr around the next st) 3 times. BPQuadtr around the next 3 sts. BPQuintr around the next 3 sts. BPSexttr around the next st. There should now be 8 sts of Round 3 left unworked. {37 sts – 21 BPdtr, 9 BPttr, 3 BPQuadtr, 3 BPQuintr, and 1 BPSexttr}
Finishing Off
Ch 1, make a Crab Stitch in the top of each st right back to the start. {109 Crab Stitches}
Assembly
Place the hook roll down with the inside facing you and the top flap farthest away from you. Place the ammonite on top of the hook roll so that the ‘flat side’ aligns with the right side (left if you are left-handed) of the hook roll and the front is facing you.
Sew the ammonite to the side of the hook roll, working into the first Crab Stitch, into the back bumps all the way down the last Sexttr, and into the next 9 Crab Stitches. Fasten off and work away your ends.
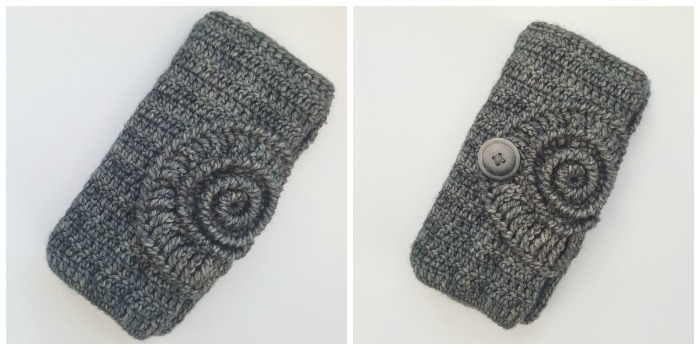
Attach Button
Fold your hook roll in thirds, folding towards the ammonite. Fold the ammonite onto the hook roll to close it. Using a pin, mark the spot where you should place your button. Sew the button on.
I think this hook roll would make an excellent present for a yarny friend. I hope you will enjoy making this project!
If you share photos of your hook roll, please use #amonitecrochethookroll so that I can see them.

This blog post contains affiliate links. I only link to products I personally use or would use. All opinions are my own.


Damien Silverfang says
Somehow, the hook part is too long, but I love it so much I can’t care one bit! It is so cute, and so awesome!! Thanks for the really cool pattern
Shelley says
I’ve made 3 of these! Easy to adapt to odd-sized hooks, too, and different multiples of pockets. Great gift for a fellow crafter! Thank you!
Jenny Lowman says
We love this pattern too! So glad you enjoy making the hook roll :)